2006 BMW MOTORRAD K 1200 R Rider's Manual (in English)
-
 1
1 -
 2
2 -
 3
3 -
 4
4 -
 5
5 -
 6
6 -
 7
7 -
 8
8 -
 9
9 -
 10
10 -
 11
11 -
 12
12 -
 13
13 -
 14
14 -
 15
15 -
 16
16 -
 17
17 -
 18
18 -
 19
19 -
 20
20 -
 21
21 -
 22
22 -
 23
23 -
 24
24 -
 25
25 -
 26
26 -
 27
27 -
 28
28 -
 29
29 -
 30
30 -
 31
31 -
 32
32 -
 33
33 -
 34
34 -
 35
35 -
 36
36 -
 37
37 -
 38
38 -
 39
39 -
 40
40 -
 41
41 -
 42
42 -
 43
43 -
 44
44 -
 45
45 -
 46
46 -
 47
47 -
 48
48 -
 49
49 -
 50
50 -
 51
51 -
 52
52 -
 53
53 -
 54
54 -
 55
55 -
 56
56 -
 57
57 -
 58
58 -
 59
59 -
 60
60 -
 61
61 -
 62
62 -
 63
63 -
 64
64 -
 65
65 -
 66
66 -
 67
67 -
 68
68 -
 69
69 -
 70
70 -
 71
71 -
 72
72 -
 73
73 -
 74
74 -
 75
75 -
 76
76 -
 77
77 -
 78
78 -
 79
79 -
 80
80 -
 81
81 -
 82
82 -
 83
83 -
 84
84 -
 85
85 -
 86
86 -
 87
87 -
 88
88 -
 89
89 -
 90
90 -
 91
91 -
 92
92 -
 93
93 -
 94
94 -
 95
95 -
 96
96 -
 97
97 -
 98
98 -
 99
99 -
 100
100 -
 101
101 -
 102
102 -
 103
103 -
 104
104 -
 105
105 -
 106
106 -
 107
107 -
 108
108 -
 109
109 -
 110
110 -
 111
111 -
 112
112 -
 113
113 -
 114
114 -
 115
115 -
 116
116 -
 117
117 -
 118
118 -
 119
119 -
 120
120 -
 121
121 -
 122
122 -
 123
123 -
 124
124 -
 125
125 -
 126
126 -
 127
127 -
 128
128 -
 129
129 -
 130
130 -
 131
131 -
 132
132 -
 133
133 -
 134
134 -
 135
135 -
 136
136 -
 137
137 -
 138
138 -
 139
139 -
 140
140 -
 141
141 -
 142
142 -
 143
143 -
 144
144 -
 145
145 -
 146
146 -
 147
147 -
 148
148 -
 149
149 -
 150
150 -
 151
151 -
 152
152 -
 153
153 -
 154
154 -
 155
155 -
 156
156 -
 157
157 -
 158
158 -
 159
159
 Align clamp3on the end
silencer with mark A(arrow)
on oxygen sensor B.
Tighten clamp 3on the end
silencer to the specified
tightening torque.
Silencer to manifold
35 Nm If the gap between the
rear whe")
 Front-wheel standFront-wheel standA front wheel stand for
simple, safe changing of
the front wheel is available
from BMW Motorrad. The
BMW special tool number is
36 3 971 and the front-wheel
stand is")
 Push both mounting pins2
through the triangles of the
brake caliper anchorages
just far enough to allow
the front wheel to be rolled
between them.
There is a risk of dam-
aging the ABS sensor
ring of")
 Fit the rear-wheel standUse screws1to set the
rear-wheel stand to the de-
sired height.
Remove retaining disc 2.To
do so, press release but-
ton 3. Push the rear wheel stand
from the left into the rea")
 Press the lever down to the
ground.BulbsGeneral instructionsThe 'bulb defect' symbol ap-
pears in the display if a bulb
is defective. If the brake or
rear light fails, the symbol is
accompanie")
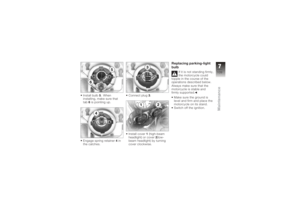
 Make sure the ground is
level and firm and place the
motorcycle on its stand.
Switch off the ignition.
Remove cover1(high-beam
headlight) or cover 2(low-
beam headlight) by turning
cover counter-clock")
 Install bulb5. When
installing, make sure that
tab 6is pointing up.
Engage spring retainer 4in
the catches. Connect plug
3.
Install cover 1(high-beam
headlight) or cover 2(low-
beam headlight) by turn")
 Remove securing screws1
from both sides of the bulb
housing.
Pull the bulb housing for-
ward to remove it and tilt it
slightly down. Remove bulb holder
2from
the headlight housing by
turning it counte")