Page 97 of 160

ably an authorised BMW
Motorrad dealer.The clutch system is
filled with a special hy-
draulic fluid that does not
have to be changed.TyresCheck the tyre tread
depth
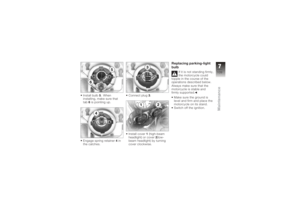
Your motorcycle's hand-
ling and grip can be im-
paired even before the tyres
wear to the minimum tyre
tread depth permitted by law.
Have the tyres changed in
good time before they wear
to the minimum permissible
tread depth.
Make sure the ground is
level and firm and place the
motorcycle on its stand. Measure the tyre tread
depth in the main tread
grooves with wear marks.
Tyres have wear indic-
ators integrated into the
main tread grooves. The tyre
is worn out when the tyre
tread has worn down to the
level of the marks. The loca-
tions of the marks are indic-
ated on the edge of the tyre,
e.g. by the letters TI, TWI or
by an arrow.
If the tyre tread is worn to
minimum:
Replace tyre or tyres, as ap-
plicable.
RimsChecking rimsMake sure the ground is
level and firm and place the
motorcycle on its stand. Visually inspect the rims for
defects.
Have damaged rims
checked and, if necessary,
replaced by a specialist
workshop, preferably an
authorised BMW Motorrad
dealer.
WheelsApproved wheels and
tyresFor each size of tyre BMW
Motorrad tests certain makes,
and approves those that it
certifies as roadworthy. If
BMW Motorrad has not ap-
proved the wheels and tyres,
it cannot assess their suitab-
ility or provide any guarantee
of road safety.
Use only wheels and tyres ap-
proved by BMW Motorrad for
your type of motorcycle.
795zMaintenance
Page 98 of 160

You can obtain detailed in-
formation from your author-
ised BMW Motorrad dealer or
on the Internet at www.bmw-
motorrad.com.RDC label
OE
Incorrect tyre-removal
procedures can result in
damage to the RDC sensors.
Be sure to notify the author-
ised BMW Motorrad dealer or
specialist workshop that the
wheel is fitted with an RDC
sensor. If the motorcycle is equipped
with RDC, each wheel rim
bears an adhesive label indic-
ating the position of the RDC
sensor. When changing the
tyre, take care not to damage
the RDC sensor. Be sure to
draw the attention of the au-
thorised BMW Motorrad deal-
er or specialist workshop to
the fact that the wheel is fitted
with an RDC sensor.
Remove the front wheelPlace the motorcycle on an
auxiliary stand; BMW Motor-
rad recommends the BMW
Motorrad rear-wheel stand.
Fit the rear-wheel stand
( 106)
with OA Centre stand:
Make sure the ground is
level and firm and place
the motorcycle on its centre
stand. Remove screws
1on left
and right.
Remove covers 2on left
and right.
796zMaintenance
Page 99 of 160

Once the calipers have
been removed, there is
a risk of the brake pads be-
ing pressed together to the
extent that they cannot be
slipped back over the brake
disc on reassembly.
Do not operate the handbrake
lever when the brake calipers
have been removed.
Remove securing screws 3
of the brake calipers on left
and right. Force the brake pads
slightly apart by rocking
brake calipers
4back
and forth Aagainst brake
discs 5.
Mask off the parts of the
wheel rim that could be
scratched in the process of
removing the brake calipers.
Carefully pull the brake cal-
ipers back and out until
clear of the brake discs.
with OE BMW Motorrad
Integral ABS: When removing the left
brake caliper, take care not to damage the ABS sensor
cable.
Raise the front of the mo-
torcycle until the front wheel
can rotate freely. BMW Mo-
torrad recommends the
BMW Motorrad front wheel
stand for lifting the motor-
cycle.
Fitting the front wheel stand
( 104)
Remove right-hand axle
clamping screw
6.
797zMaintenance
Page 100 of 160

with OE BMW Motorrad
Integral ABS:The left axle clamping
screw locates the
threaded bush in the front
suspension. If the threaded
bush is not correctly aligned
the gap between the ABS
sensor ring and the ABS
sensor will not be correct and
this can cause the ABS to
malfunction or allow the ABS
sensor to be damaged.
In order to ensure that the
threaded bush remains cor-
rectly aligned, do not slacken
or remove the left axle camp-
ing screw.
Remove right-hand axle
clamping screw 6.
Remove quick-release
axle 7, holding the wheel as
you do so. Lower the front wheel to the
ground between the front
forks.
Roll the front wheel forward
to remove.
with OE BMW Motorrad
Integral ABS:
Take care not to damage
the ABS sensor when
rolling out the front wheel.
Note the ABS sensor when
rolling out the front wheel.
Roll the front wheel forward
to remove.
Installing front wheel
ABS malfunctions on ac-
count of incorrect speed
signal.
Segmentation differs between
individual types of sensor
ring; it is very important to en-
sure that the correct sensor
ring is installed. Install only
the sensor ring that matches the motorcycle's construction
status.
Threaded fasteners not
tightened to the spe-
cified torque can work loose
or their threads can suffer
damage.
Always have the security of
the fasteners checked by a
specialist workshop, prefer-
ably an authorised BMW Mo-
torrad dealer.
The front wheel must be
installed right way round
to rotate in the correct direc-
tion.
Note the direction-of-rotation
arrows on the tyre or the
wheel rim.
Roll the front wheel into
position between the front
forks.
798zMaintenance
Page 101 of 160

with OE BMW Motorrad
Integral ABS:There is a risk of dam-
aging parts of the front
brake, particularly the BMW
Motorrad Integral ABS, in the
course of the procedure de-
scribed below.
Take care not to damage the
brake system, in particular the
ABS sensor with cable and
the ABS sensor ring.
Take care not to damage
the ABS sensor when
rolling in the front wheel.
Note the ABS sensor when
rolling in the front wheel.
Roll the front wheel into
position between the front
forks. Raise the front wheel, insert
quick-release axle
7and
tighten to specified torque.
Quick-release axle in
threaded bush
50 Nm
Tighten right axle clamp-
ing screw 6to the specified
tightening torque.
Clamping screw for
quick-release axle in
wheel carrier
19 Nm Remove the front wheel
stand.
Ease the brake calipers on
to the brake discs.
with OE BMW Motorrad
Integral ABS:
The cable of the ABS
sensor could chafe
through if it comes into
contact with the brake disc.
Make sure that the ABS
sensor cable is routed
correctly.
Carefully route the ABS
cable. Make sure that the
799zMaintenance
Page 102 of 160
ABS sensor cable is clipped
into holders8.
Install securing screws 3.
Front brake caliper to
wheel carrier
30 Nm
Remove the adhesive tape
from the wheel rim. Position covers
2on left and
right.
Install screws 1on left and
right.
Firmly pull the handbrake
lever until the pressure point
is perceptible, and repeat
this operation several times.
Removing rear wheelPlace the motorcycle on an
auxiliary stand; BMW Motor-
rad recommends the BMW
Motorrad rear-wheel stand.
Fit the rear-wheel stand
( 106) with OA Centre stand:
Make sure the ground is
level and firm and place
the motorcycle on its centre
stand.
Remove screw 1from silen-
cer cover 2.
Pull the cover to the rear to
remove.
7100zMaintenance
Page 103 of 160
Remove clamp3from the
silencer.
Do not remove the sealing
grease from the clamp. Remove screw
4for the
bracket of the end silencer
from the rear footrest.
Turn the end silencer out.
Engage first gear. Remove studs
5from the
rear wheel, holding the
wheel as you do so.
If you are using the BMW
Motorrad rear-wheel stand:
remove the retaining disc.
Lower the rear wheel to the
ground.
Roll the rear wheel out to-
ward the rear.
If you are using the BMW
Motorrad rear-wheel stand:
reinstall the retaining disc.
7101zMaintenance
Page 104 of 160
Installing rear wheel
Threaded fasteners not
tightened to the spe-
cified torque can work loose
or their threads can suffer
damage.
Always have the security of
the fasteners checked by a
specialist workshop, prefer-
ably an authorised BMW Mo-
torrad dealer.
If you are using the BMW
Motorrad rear-wheel stand:
remove the retaining disc.
Roll the rear wheel into po-
sition at the rear-wheel ad-
apter.
Seat the rear wheel on the
rear-wheel adapter.
If you are using the BMW
Motorrad rear-wheel stand:
reinstall the retaining disc. Install wheel studs
5and
tighten to the specified
torque in diagonally
opposite sequence.
Rear wheel to wheel
flange
Tightening sequence:
Tighten in diagonally op-
posite sequence
60 Nm
Turn the end silencer to its
initial position. Install screw
4for the
bracket of the end silencer
in the rear footrest, but do
not tighten it at this point.
7102zMaintenance