Page 97 of 127
5. Disconnect the battery negative (ground)
6. Release the clamp holding the battery.
7. Disconnect the positive cable and lift out the battery.
Install the new battery in the reverse order.WARNING!
Never expose the battery to open flame or electric spark.
Do not smoke near the battery.
Battery fluid contains sulfuric acid. Do not allow battery fluid to contact eyes, skin, fabrics or painted surfaces. If
contact occurs, flush the affected area immediately with water. Obtain medical help immediately if eyes are affected.
Contents | Top of Page
ProCarManuals.com
Page 98 of 127
")
2 0 0 5
VOLVO S40
Chapter 11 - Audio
pg. 167 Audio
Audio system - introduction168
Audio system overview169
Audio functions171
Radio functions174
CD player177
CD changer (certain audio systems only)179
Audio menu settings and selections181
pg. 168 Audio system - introduction
The audio system in your car is operated with the buttons and keys in the front, center control panel. Certain functions,
such as adjusting the volume, changing radio stations or tracks on a CD, etc, can also be controlled with the optional
steering wheel-mounted keypad.
The audio system is available in three
1 versions:
Performance
Features: AM/FM radio, single-disc CD player, 4x25W output, 4 full-range speakers and two treble speakers.
High-performance
Features: AM/FM radio, CD player, 4x40W output, eight speakers (bass and treble speakers in each door).
Premium sound
Features: AM/FM radio, integrated CD changer (6 discs), 4x70W output plus 25W Dolby Pro Logic II, twelve
speakers (bass, mid-range and treble speakers in the front doors, bass and treble speakers in the rear doors, and bass
and treble in the dashboard's center speaker).
A subwoofer mounted under the floor in the trunk is available as an accessory. Consult your Volvo retailer.
1. All three audio systems may not be available in all markets.
pg. 169 Audio system overview
ProCarManuals.com
Page 99 of 127

5. AM/FM - switch between AM, FM1, and FM2
6. M")
Center control panel
1. POWER - audio system on/off
2. Not in use
3. VOLUME
4. CD - switch to the CD player or CD changer (certain audio systems only)
5. AM/FM - switch between AM, FM1, and FM2
6. MENU - press to access the audio and car settings menu
7. ENTER - press to make or confirm a menu selection
8. EXIT - press to go back in a menu, or to cancel a menu selection
9. MENU NAVIGATION CONTROL - press the up or down arrow keys to scroll in a menu, or the keys on the
left/right sides of the control to search for or change radio stations/CD tracks
10. TUNING - search for or change a radio station/CD track
11. SOUND - press to set the levels of bass, treble, fader, balance, etc
12. SCAN - automatic station search
13. AUTO - search for and store the strongest radio stations in the area in which you are driving
14. DISPLAY
15. CD slot
16. CD eject
17. Station preset buttons/switch between CDs (1-6) in the CD changer (certain audio systems only)
pg. 170 Audio system overview
ProCarManuals.com
Page 100 of 127

The four buttons on the steering wheel keypad can be used to control the audio system. The steering wheel keypad can
be used to adjust volume, shift between preset s")
Steering wheel keypad (option)
The four buttons on the steering wheel keypad can be used to control the audio system. The steering wheel keypad can
be used to adjust volume, shift between preset stations and change CD tracks. Press one of the two left-hand buttons
briefly to change to the next/previous preset radio station, or to go to the next/previous track on a CD. Press and hold
down these buttons to search within a track on a CD.
Display
The display shows the function in use, such as menu selections, messages, or settings.
This display is also used for the climate control system.
Daytime/twilight display
In daylight the information is displayed against a light background. In darkness it is displayed against a dark
background.
Clean the display with a soft, dry cloth. Do not use cleaning agents.
Using the audio system menus
Press MENU to access the main audio system menu. The settings for the audio system source (radio or CD) are
selected from the main menu. Audio settings cannot be made if the audio system is not switched on.
Using the menu:
Use the MENU NAVIGATION control to scroll up and down in the menu.
Press the EXIT button for more than approximately one second to leave the menu.
A brief press on EXIT allows you to clear, cancel or decline an alternative or to go back one step in the menu
structure.
Press ENTER to confirm, select or scroll from one submenu to the next one.
pg. 171 Audio functions
Display in the center control panel
ProCarManuals.com
Page 101 of 127

Audio system On/Off
With the ignition key in position I or higher, press the POWER button to switch the audio system on or off.
If the audio system is active when the ignition is switched off, it will reactivate automatically when the car is restarted.
Selecting a sound source
Use the CD and AM/FM buttons to select the sound source of your choice.
Press the AM/FM button repeatedly to switch between FM1, FM2 and AM.
The selected sound source is shown in the display.
Volume control
Turn the volume knob clockwise or counterclockwise to increase or lower the volume. The volume can also be
increased (+) or lowered (-) using the optional steering wheel keypad.
Pause mode
When the volume is turned all the way down, the CD player switches to pause mode. Reactivate the player by turning
up the volume.
Volume control - ALARM
If a CD is playing when the radio receives an alarm bulletin (available in certain areas only), the CD player enters
pause mode. The bulletin is broadcast at the volume selected for this type of message.
After the bulletin has been completed, the audio system reverts to the originally selected sound source (radio or CD),
which is played at the volume that was selected for that source.
If the bulletin volume is adjusted while the bulletin is being broadcast, this new volume is saved and used for
subsequent bulletins.
Sound settings
1. Press SOUND.
2. Press the SOUND button repeatedly until you come to the setting that you wish to change. Choose BASS, TREBLE,
FADER, BALANCE, SUBWOOFER (option), CENTER or SURROUND
1.
3. Use the TUNING knob to adjust the level. The display will show a scale from the min. to max. settings. The center
of this scale is the default setting.
Display text Sound setting
BASS Bass
TREBLE Treble
BALANCE Balance between the speakers on the left and right sides of the car
FADER Balance between the front and rear speakers
SUBWOOFER Level for the optional subwoofer (bass speaker)
CENTER Setting for the center speaker (Premium sound system only)
SURROUND Setting for surround sound (Premium sound system only)
1. The Center and Surround functions are only available on the Premium sound system.
pg. 172 Audio functions
NOTE:
The settings for the center speaker can only be adjusted if Dolby Pro Logic II (DPL II) or 3-channel stereo (3CH) is
selected in the menu.
The level for the subwoofer can only be set if SUBWOOFER is activated in the menu.
3-channel mode is recommended for AM/FM radio broadcasts.
ProCarManuals.com
Page 102 of 127

Dolby Surround Pro Logic II
Dolby Surround Pro Logic II together with a center speaker in the dashboard offers you a sound experience very close
to a live performance. The normal left-right stereo channels are divided to left-center -right. In addition, surround
sound is produced by the rear speakers. This surround sound mirrors the ambience of a concert hall. Dolby Surround
Pro Logic II functions in CD, AM, and FM modes.
NOTE:
Dolby Surround Pro Logic II is only available on the Premium Sound system.
Weak and/or distorted radio signals can cause static in Dolby Surround Pro Logic II mode. 3-channel mode is
recommended in such cases.
To select Dolby Surround Pro Logic II:
1. Press MENU.
2. Select the menu for relevant sound source and press ENTER.
3. Select AUDIO SETTINGS from the menu and press ENTER.
4. Select SURROUND AM/FM or SURROUND CD and press ENTER.
5. Select PRO LOGIC II, 3 CHANNEL or OFF and press ENTER The symbol Dolby PL II is shown in the display if
Pro Logic II has been selected. 3 CH is shown in the display if 3 CHANNEL has been selected. OFF means the audio
system is in normal stereo mode.
Dolby Surround Pro Logic II and the Dolby icon are trademarks of Dolby Laboratories Licensing
Corporation. Dolby Pro Logic II Surround System is manufactured under license from Dolby Laboratories Licensing
Corporation.
Bass speaker - SUBWOOFER
(accessory)
The subwoofer helps the system provide fuller sound and deeper bass.
To switch the subwoofer on or off:
1. Press MENU.
2. Select the menu for relevant sound source and press ENTER.
3. Select SUBWOOFER and press ENTER. A check in the box in the display indicates that SUBWOOFER is
activated.
Equalizer Front/Rear
This function is used to fine-tune the sound from the front and rear speakers.
NOTE: This function is only available on certain sound systems.
To adjust the equalizer settings:
1. Press MENU.
2. Select the menu for the current sound source and press ENTER.
3. Select Audio settings in the menu and press ENTER.
4. Select Equalizer front/rear and press ENTER.
5. Use the MENU NAVIGATION control or the TUNING knob to set the level.
6. Use the MENU NAVIGATION control to select the new frequency. Five frequencies can be selected.
7. Press ENTER to save any changes made and to exit the menu.
pg. 173 Audio functions
ProCarManuals.com
Page 103 of 127

8. Press EXIT to leave the menu without saving any changes.
ASC - speed compensated volume
The audio system's volume is adjusted automatically according to the speed of the vehicle. There are three settings
available (see e.g. menu point 4.6), which determine the level of volume compensation:
Low
Medium*
High
* Default setting.
pg. 174 Radio functions
Station search
Select radio mode AM/FM1/FM2 using the AM/FM button.
Briefly press the left or right arrow on the MENU NAVIGATION control to search for the next strong station.
Press one of the arrows again to start a new search.
Manual station search
There are two ways to manually tune a radio station:
Turn the TUNING knob to obtain the desired frequency.
Press the left or right arrow key on the MENU NAVIGATION control and hold it down. The radio scans slowly in
the selected direction and will increase the scanning speed after a few seconds. Release the button when the desired
frequency appears in the display. The frequency can be fine-tuned by short presses on the left/right arrow keys.
Storing stations
To store a selected station under one of the station setting buttons 0-9:
1. Tune to the desired station.
2. Press the button under which the station is to be stored and keep it depressed. The audio system sound will be
interrupted for a few seconds and STATION STORED will appear in the display. The station is now stored.
A total of 30 stations can be stored; 10 stations each in AM, FM1 and FM2.
Storing stations automatically - AUTOSTORE
This function automatically searches for and stores up to ten strong AM or FM stations in a separate memory. If more
than ten stations are found, the ten strongest ones are stored. This function is especially useful in areas in which you
are not familiar with radio stations or their frequencies.
To use the AUTO function:
1. Select radio mode using the AM/FM button.
2. Start the search by pressing AUTO for more than 2 seconds.
3. AUTO STORING appears in the display and a number of stations with strong signals (max. 10) from the selected
frequency band will be stored in the auto-store memory. If there are no stations with sufficient signal strength, NO
AST FOUND is displayed.
ProCarManuals.com
Page 104 of 127

The stored stations can be found using the buttons 0-9.
When the radio is in auto-store mode, AUTO is shown in the display. AUTO disappears when you return to the
normal radio mode. Return to the normal radio mode by pressing the AM/FM button, EXIT, or by briefly pressing the
AUTO button (for less than approx. 0.5 seconds).
To return to the Auto-store mode, press the AUTO button briefly and select a stored station by pressing one of the
number keys (0-9)
Scanning - SCAN
This function automatically searches for the next strong AM or FM station signal. When the radio finds a station,
scanning is interrupted for approximately 8 seconds, after which it will continue scanning.
pg. 175 Radio functions
1. Select radio mode using the AM/FM button.
2. Press SCAN (SCAN is shown in the display).
3. Press the SCAN or EXIT button to stop the scan function and listen to the selected station.
To start a new station scanning, repeat steps 1-3.
Radio Broadcast Data System - RBDS
This feature, which may not be available in your area, functions only with FM broadcasts. The radio in your car is
equipped with an advanced system allowing information from broadcasters to be transmitted visually, as text, together
with the audio signal. This information is then decoded by the radio and made available for several new and unique
features.
The RBDS or Radio Broadcast Data System operates in the FM band only, and the information transmitted is
supplied exclusively by participating broadcasters. Volvo has no control over the accuracy of the data or
information.
Coverage by local broadcasters may be limited at this time, but as the technology and benefits grow, you will find the
radio in your car is equipped to take advantage of this system.
PI (Program Information) seek
When an FM station has been stored as a preset, the radio also stores RBDS program information if it is available.
When the preset is selected at a later time, the radio tries to access updated program information. In weak signal areas,
there may be a delay before the station becomes audible. During this delay, there will be no sound.
PI seek can be interrupted by pressing EXIT.
Radio text
Certain RBDS stations broadcast program information, which can be shown in the display.
To start this function:
1. Select FM1 or FM2 and press the MENU button.
2. Press ENTER.
3. Select RADIOTEXT in the menu and press ENTER.
To deactivate this function, select RADIOTEXT again and press ENTER.
Alarm
Alarms bulletins are transmitted automatically by certain RBDS stations. The function cannot be deactivated.
"Alarm!" is shown in the radio display when an alarm message is sent. The function is used to warn motorists of
serious accidents, etc.
Program type/station format - PTY
The PTY function allows you to find stations whose programs suit your taste. Use the PTY function to select among
the different station formats shown in the list.
To show the format of the current station:
1. Select FM1 or FM2 and press the MENU button.
ProCarManuals.com
 1
1 2
2 3
3 4
4 5
5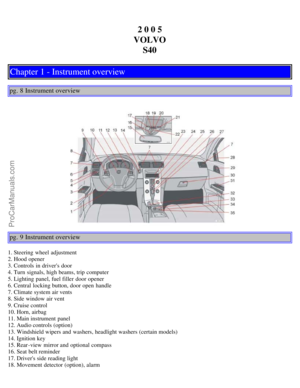 6
6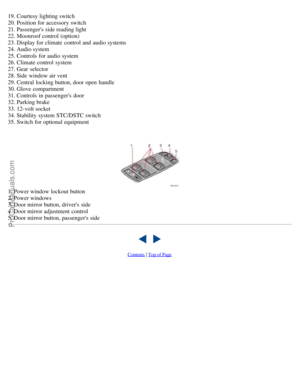 7
7 8
8 9
9 10
10 11
11 12
12 13
13 14
14 15
15 16
16 17
17 18
18 19
19 20
20 21
21 22
22 23
23 24
24 25
25 26
26 27
27 28
28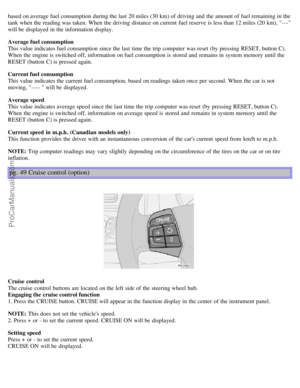 29
29 30
30 31
31 32
32 33
33 34
34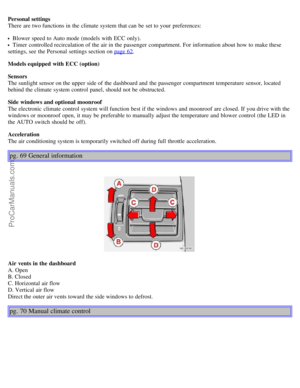 35
35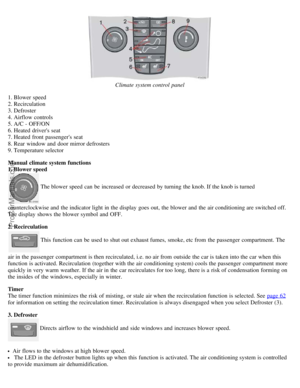 36
36 37
37 38
38 39
39 40
40 41
41 42
42 43
43 44
44 45
45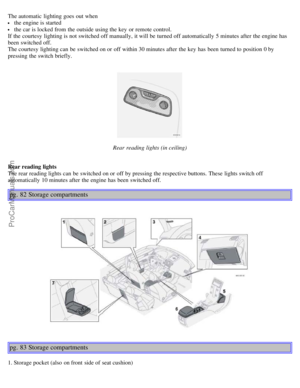 46
46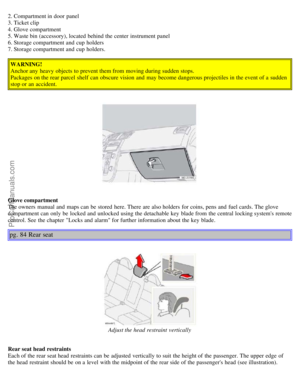 47
47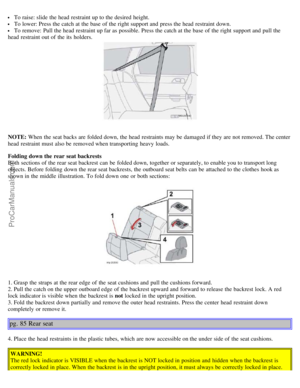 48
48 49
49 50
50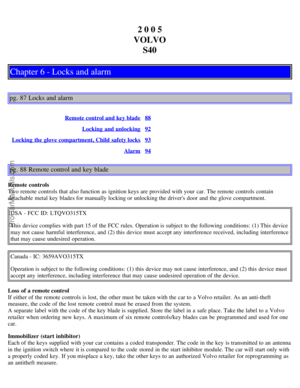 51
51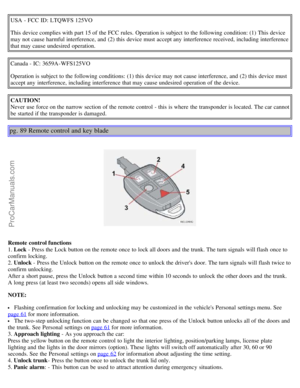 52
52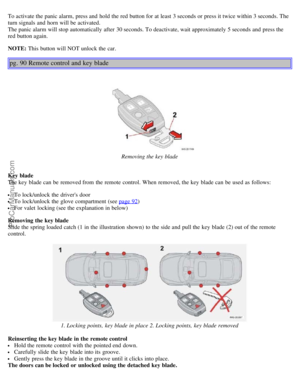 53
53 54
54 55
55 56
56 57
57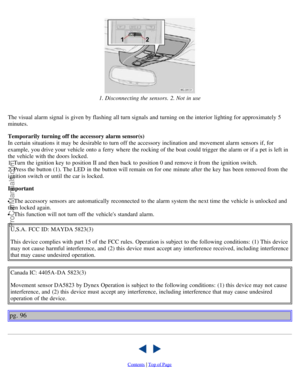 58
58 59
59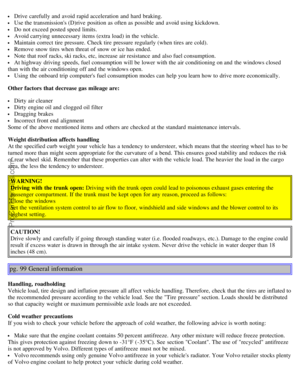 60
60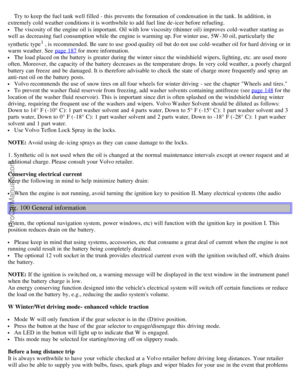 61
61 62
62 63
63 64
64 65
65 66
66 67
67 68
68 69
69 70
70 71
71 72
72 73
73 74
74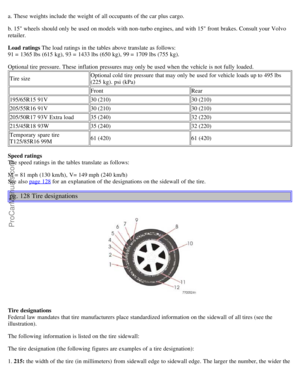 75
75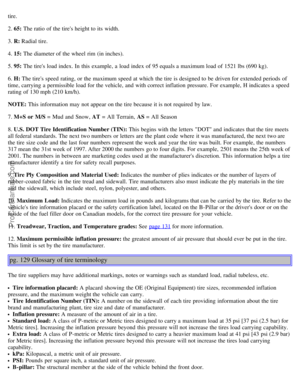 76
76 77
77 78
78 79
79 80
80 81
81 82
82 83
83 84
84 85
85 86
86 87
87 88
88 89
89 90
90 91
91 92
92 93
93 94
94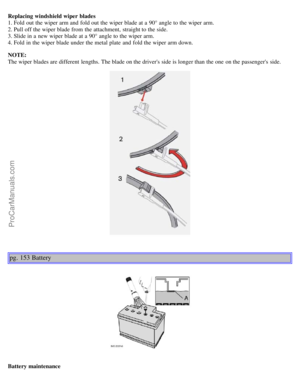 95
95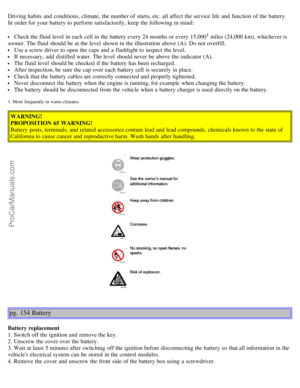 96
96 97
97 98
98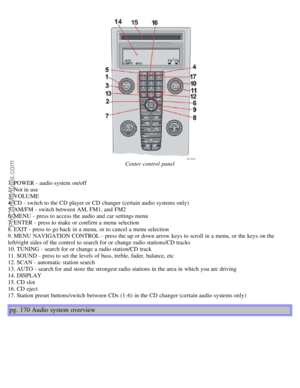 99
99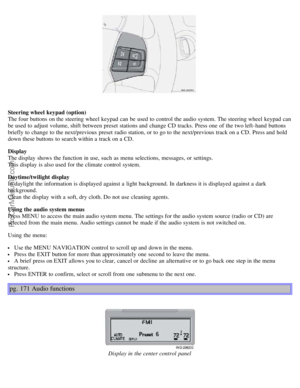 100
100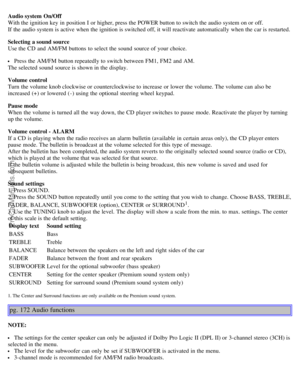 101
101 102
102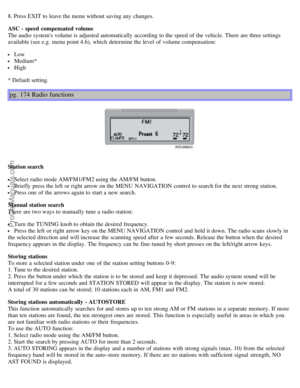 103
103 104
104 105
105 106
106 107
107 108
108 109
109 110
110 111
111 112
112 113
113 114
114 115
115 116
116 117
117 118
118 119
119 120
120 121
121 122
122 123
123 124
124 125
125 126
126
6. Release the clamp holding the battery.
7. Disconnect the positive cable and lift out the battery.
Install the new battery in the reverse order.WARNING")