Page 89 of 127

positively affect your vehicle's emissions, should be performed as indicated. It is recommended that receipts for
vehicle emission maintenance be retained in case questions arise concerning maintenance. Inspection and maintenance
should also be performed anytime a malfunction is observed or suspected.
Applicable warranties - U.S/Canada
In accordance with applicable U.S. and Canadian regulations, the following list of warranties is provided.
New Vehicle Limited Warranty
Parts and Accessories Limited Warranty
Corrosion Protection Limited Warranty
Seat Belt and Supplemental Restraint Systems Limited Warranty
Emission Design and Defect Warranty
Emission Performance Warranty
These are the federal warranties; other warranties are provided as required by state/provincial law. Refer to your
separate Warranty and Service Records Information booklet for detailed information concerning each of the warranties.
Periodic maintenance helps minimize emissions
Periodic maintenance will help keep your vehicle running well. Your Warranty and Service Records Information
booklet provides a comprehensive periodic maintenance schedule up to 150,000 miles (240,000 km) of vehicle
maintenance. The schedule includes components that affect vehicle emissions. This page describes some of the
emission-related components.
Vehicle Event Data
Your vehicle's driving and safety systems employ computers that monitor, and share with each other, information
about your vehicle's operation. One or more of these computers may store what they monitor, either during normal
vehicle operation or in a crash or near-crash event. Stored information may be read and used by:
Volvo Car Corporation
service and repair facilities
law enforcement or government agencies
others who may assert a legal right to know, or who obtain your consent to know such information.
pg. 147 Maintaining your car
Owner maintenance
Periodic maintenance requirements and intervals are described in your vehicle's Warranty and Service Records
Information booklet.
The following points can be carried out between the normally scheduled maintenance services.
Each time the car is refueled:
Check the engine oil level
Clean the windshield, windshield wipers, headlights, and tail lights
Monthly:
Check cold tire pressure in all tires. Inspect the tires for wear.
Check that engine coolant and other fluid levels are between the indicated "min" and "max" markings.
Clean interior glass surfaces with a glass cleaner and soft paper towels.
Wipe driver information displays with a soft cloth.
Visually inspect battery terminals for corrosion. Corrosion may indicate a loose terminal connector, or a battery near
the end of its useful service life. Consult your Volvo retailer for additional information.
As needed:
ProCarManuals.com
Page 90 of 127

Wash the car, including the undercarriage, to reduce wear that can be caused by a buildup of dirt, and corrosion that
can be caused by salt residues.
Clean leaves and twigs from air intake vents at the base of the windshield, and from other places where they may
collect.
NOTE:
Complete service information for qualified technicians is available online for purchase or subscription at
www.volvotechinfo.com
.
pg. 148 Hood and engine compartment
Hood and engine compartment
Opening the hood
To open the hood:
Pull the lever located under the left side of the dash to release the hood lock.
Lift the hood slightly.
Press up the release control located under the front edge of the hood (at the center) up to the right, and lift the hood.
WARNING!
Check that the hood locks engage properly when closed.
Engine compartment
1. Cooling system expansion tank
2. Power steering fluid reservoir
3. Dipstick - engine oil
4. Radiator
5. Cooling fan
6. Washer fluid reservoir
7. Engine oil filler cap
8. Brake/clutch fluid reservoir
9. Battery
10. Relay/fuse box
11. Air cleaner
ProCarManuals.com
Page 91 of 127
 after the engine has been switched off.
pg. 149 Oils and fluids
Changing engine oil and oil filter
Refer to the Warra")
WARNING!
The cooling fan may start or continue to operate (for up to 6 minutes) after the engine has been switched off.
pg. 149 Oils and fluids
Changing engine oil and oil filter
Refer to the Warranty and Service Records Information booklet for information on the oil change intervals. See page
187 for oil specifications.
Volvo does not recommend the use of oil additives.
Synthetic oil is not used when the oil is changed at the normal maintenance intervals except at owner request and at
additional charge. Please consult your Volvo retailer.
Checking and adding oil
The oil level should be checked every time the vehicle is refueled. This is especially important during the period up to
the first scheduled maintenance service.
CAUTION!
Not checking the oil level regularly can result in serious engine damage if the oil level becomes too low.
Always add oil of the same type and viscosity as already used.
The car should be parked on a level surface when the oil is checked.
Location of dipstick and oil filler cap
If the engine is warm , wait for at least 10-15 minutes after the engine has been switched off before checking the oil.
ProCarManuals.com
Page 92 of 127
Checking the oil
1. Pull out the dipstick and wipe it with a lint-free rag.
2. Reinsert the dipstick, pull it out, and check the oil level.
3. Add oil if necessary. If the level is close to the MIN mark, add approximately 1 US quart (1 liter) of oil.
4. Run the engine until it reaches normal operating temperature.
5. Switch off the engine and wait for at least 10-15 minutes and recheck the oil level. If necessary, add oil until the
level is near the Max mark.CAUTION!
Never fill oil above the MAX mark. This could cause an increase in oil consumption.
WARNING!
Do not allow oil to spill onto or come into contact with hot exhaust pipe surfaces.
pg. 150 Oils and fluids
Washer fluid reservoir
Washer fluid
The washer fluid reservoir is located in the engine compartment and holds approximately 6.8 US qts (6.5 liters).
During cold weather, the reservoir should be filled with windshield washer solvent containing antifreeze.
ProCarManuals.com
Page 93 of 127

Coolant reservoir
Coolant
Normally, the coolant does not need to be changed. If the system must be drained, consult your Volvo retailer.
NOTE: Do not top off with water only. This reduces the rust-protective and antifreeze qualities of the coolant and has
a lower boiling point. It can also cause damage to the cooling system if it should freeze. Top off with Volvo Genuine
Coolant/Antifreeze only (a 50/50 mix of water and antifreeze). CAUTION!
The cooling system must always be kept filled to the correct level, and the level must be between the MIN and
MAX marks. If it is not kept filled, there can be high local temperatures in the engine which could result in damage.
Different types of antifreeze/coolant may not be mixed. Check coolant regularly!
WARNING!
Never remove the radiator cap while the engine is warm. Wait until the vehicle cools.
If it is necessary to top off the coolant when the engine is warm, unscrew the expansion tank cap slowly so that the
over-pressure dissipates.
pg. 151 Oils and fluids
Brake fluid reservoir
Brake fluid
The brake fluid should always be between the MIN and MAX marks on the side of the reservoir. Check, without
ProCarManuals.com
Page 94 of 127
, P/N 9437433
Replace: The fluid should be replaced according to the intervals")
removing the cap, that there is sufficient fluid in the reservoir.
Fluid type: DOT 4+ boiling point >536°F (280°C), P/N 9437433
Replace: The fluid should be replaced according to the intervals specified in the Warranty and Service Records
Information booklet. When driving under extremely hard conditions (mountain driving, etc), it may be necessary to
replace the fluid more often. Consult your Volvo retailer. Always entrust brake fluid changing to an authorized Volvo
retailer.
Power steering fluid reservoir
Power steering fluid
The fluid level should always be between the MIN and MAX marks.
Fluid type: Volvo power steering fluid or equivalent.
Replace: No fluid change required WARNING!
If a problem should occur in the power steering system or if the vehicle has no electrical current and must be towed,
it is still possible to steer the vehicle.
However, keep in mind that greater effort will be required to turn the steering wheel.
pg. 152 Wiper blades
Wiper blades
ProCarManuals.com
Page 95 of 127
Replacing windshield wiper blades
1. Fold out the wiper arm and fold out the wiper blade at a 90° angle to the wiper arm.
2. Pull off the wiper blade from the attachment, straight to the side.
3. Slide in a new wiper blade at a 90° angle to the wiper arm.
4. Fold in the wiper blade under the metal plate and fold the wiper arm down.
NOTE:
The wiper blades are different lengths. The blade on the driver's side is longer than the one on the passenger's side.
pg. 153 Battery
Battery maintenance
ProCarManuals.com
Page 96 of 127

Driving habits and conditions, climate, the number of starts, etc. all affect the service life and function of the battery.
In order for your battery to perform satisfactorily, keep the following in mind:
Check the fluid level in each cell in the battery every 24 months or every 15,0001 miles (24,000 km), whichever is
sooner. The fluid should be at the level shown in the illustration above (A). Do not overfill.
Use a screw driver to open the caps and a flashlight to inspect the level.
If necessary, add distilled water. The level should never be above the indicator (A).
The fluid level should be checked if the battery has been recharged.
After inspection, be sure the cap over each battery cell is securely in place.
Check that the battery cables are correctly connected and properly tightened.
Never disconnect the battery when the engine is running, for example when changing the battery.
The battery should be disconnected from the vehicle when a battery charger is used directly on the battery.
1. More frequently in warm climates.
WARNING!
PROPOSITION 65 WARNING!
Battery posts, terminals, and related accessories contain lead and lead compounds, chemicals known to the state of
California to cause cancer and reproductive harm. Wash hands after handling.
pg. 154 Battery
Battery replacement
1. Switch off the ignition and remove the key.
2. Unscrew the cover over the battery.
3. Wait at least 5 minutes after switching off the ignition before disconnecting the battery so that all information in the
vehicle's electrical system can be stored in the control modules.
4. Remove the cover and unscrew the front side of the battery box using a screwdriver.
ProCarManuals.com
 1
1 2
2 3
3 4
4 5
5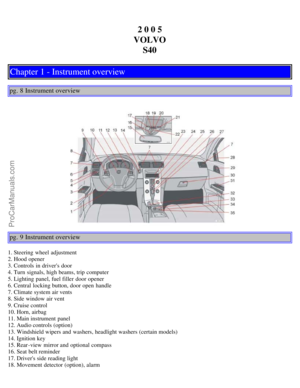 6
6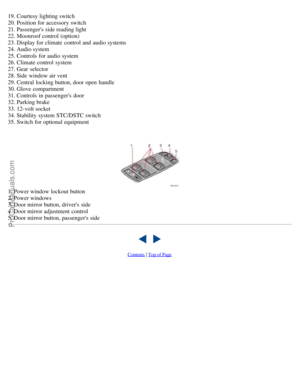 7
7 8
8 9
9 10
10 11
11 12
12 13
13 14
14 15
15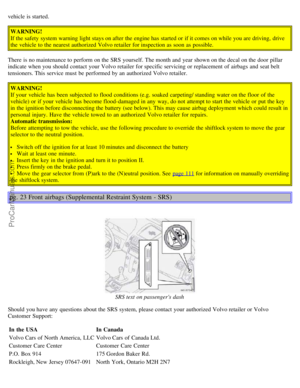 16
16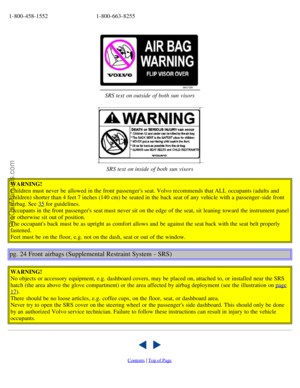 17
17 18
18 19
19 20
20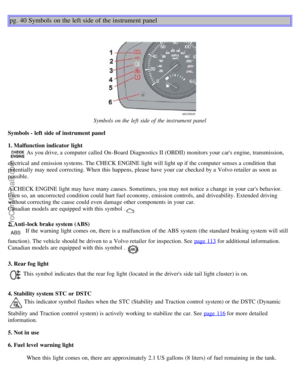 21
21 22
22 23
23 24
24 25
25 26
26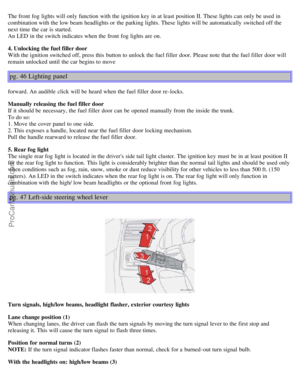 27
27 28
28 29
29 30
30 31
31 32
32 33
33 34
34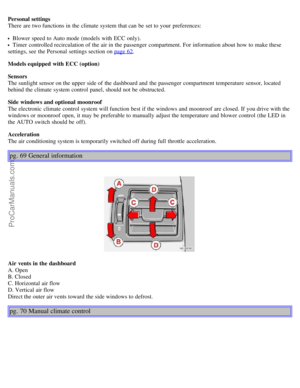 35
35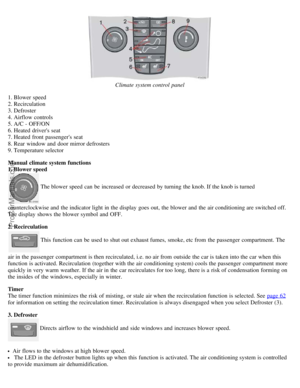 36
36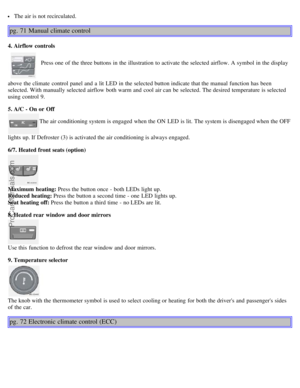 37
37 38
38 39
39 40
40 41
41 42
42 43
43 44
44 45
45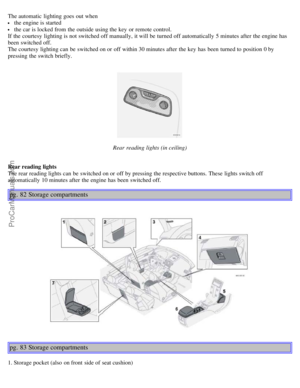 46
46 47
47 48
48 49
49 50
50 51
51 52
52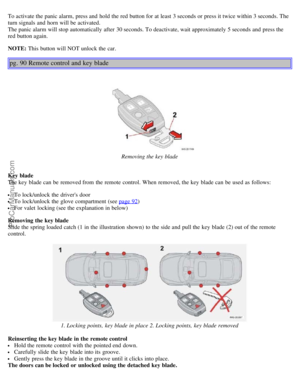 53
53 54
54 55
55 56
56 57
57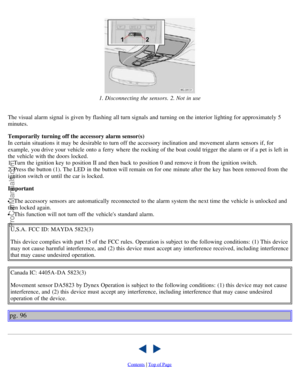 58
58 59
59 60
60 61
61 62
62 63
63 64
64 65
65 66
66 67
67 68
68 69
69 70
70 71
71 72
72 73
73 74
74 75
75 76
76 77
77 78
78 79
79 80
80 81
81 82
82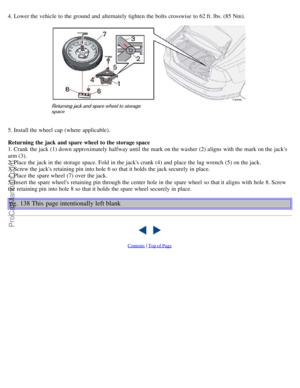 83
83 84
84 85
85 86
86 87
87 88
88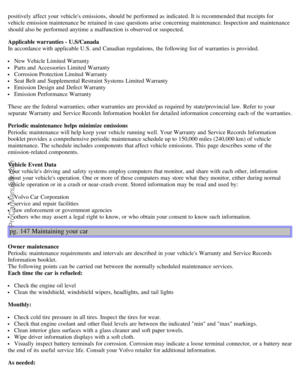 89
89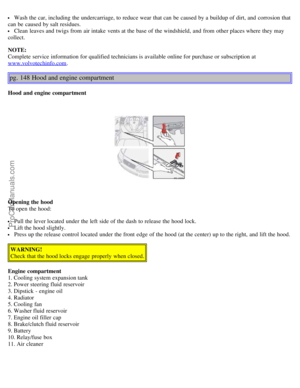 90
90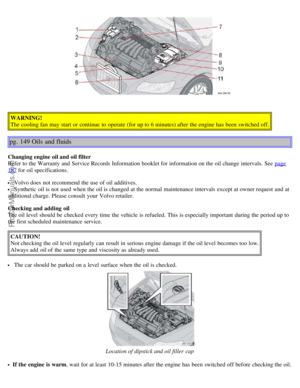 91
91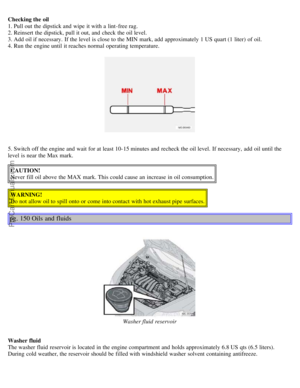 92
92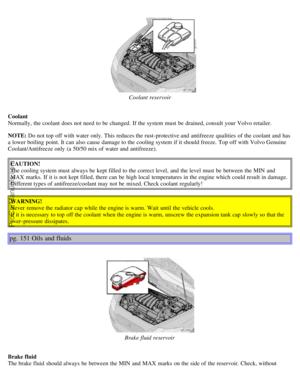 93
93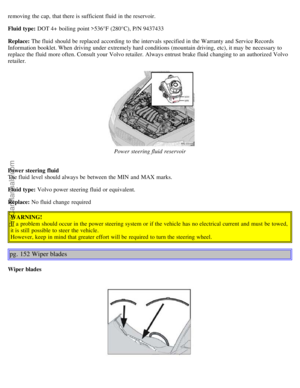 94
94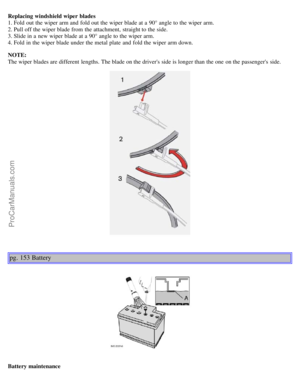 95
95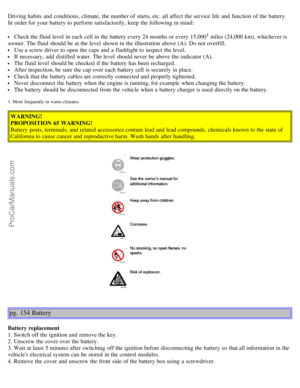 96
96 97
97 98
98 99
99 100
100 101
101 102
102 103
103 104
104 105
105 106
106 107
107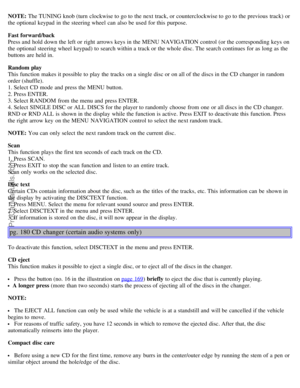 108
108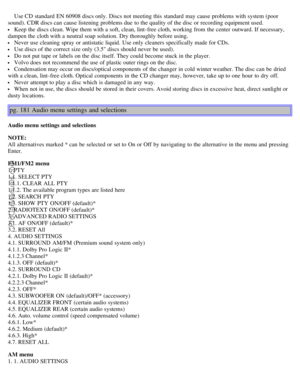 109
109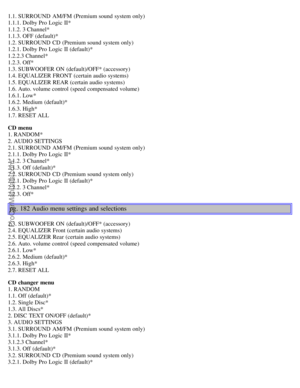 110
110 111
111 112
112 113
113 114
114 115
115 116
116 117
117 118
118 119
119 120
120 121
121 122
122 123
123 124
124 125
125 126
126
