Page 3776 of 5135
A01455
A62789
Plastigage
A01454
A01453
±
ENGINE MECHANICAL CYLINDER HEAD ASSY (1ZZ±FE/3ZZ±FE)
14±33
1ZZ±FE,3ZZ±FE ENGINE REPAIR MANUAL
(RM923E)
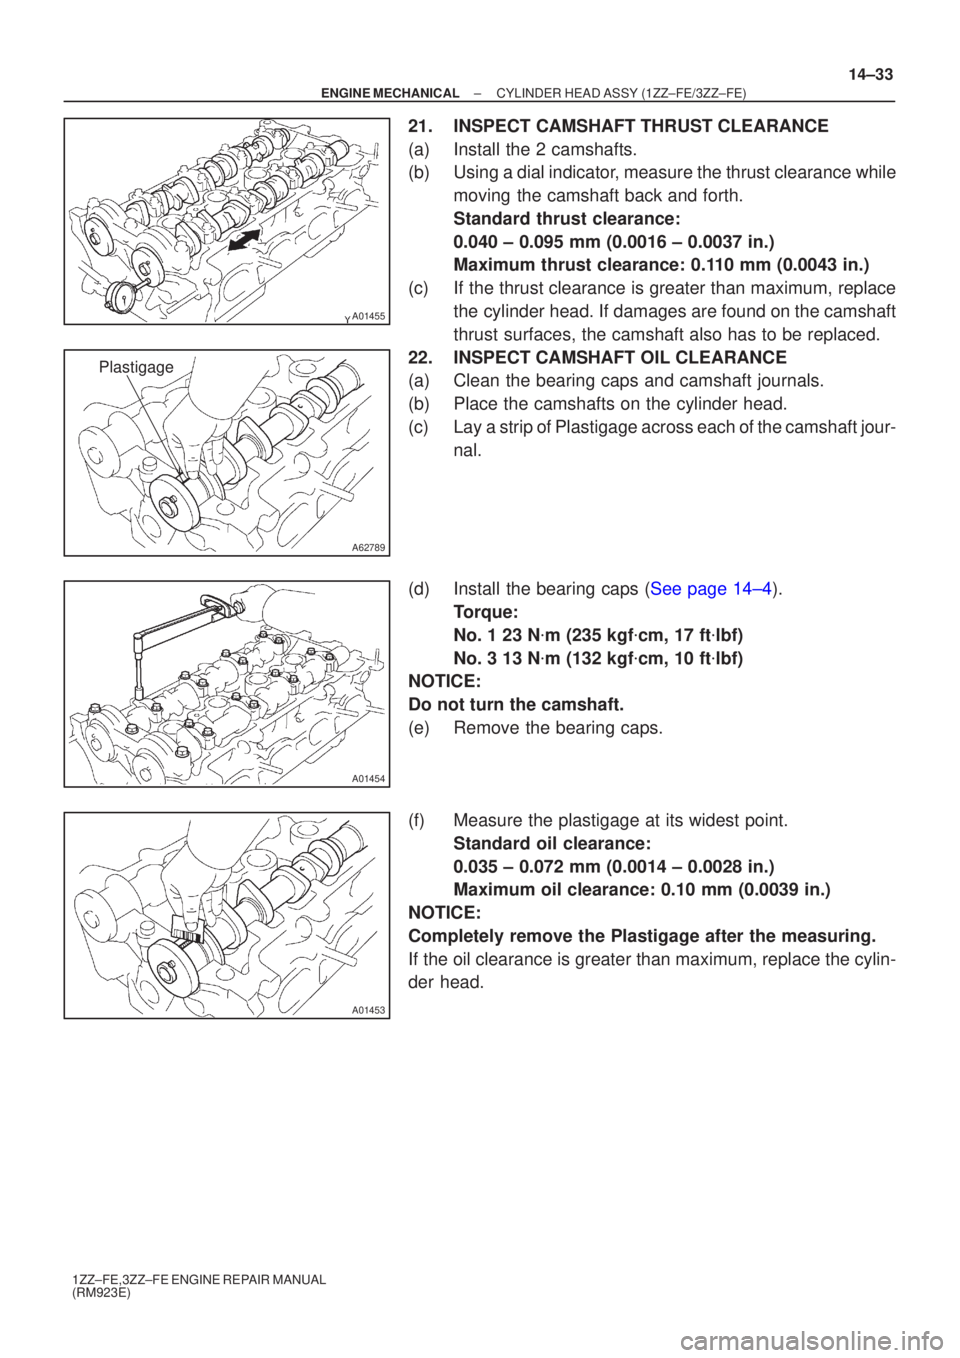
21. INSPECT CAMSHAFT THRUST CLEARANCE
(a) Install the 2 camshafts.
(b) Using a dial indicator, measure the thrust clearance while
moving the camshaft back and forth.
Standard thrust clearance:
0.040 ± 0.095 mm (0.0016 ± 0.0037 in.)
Maximum thrust clearance: 0.110 mm (0.0043 in.)
(c) If the thrust clearance is greater than maximum, replace the cylinder head. If damages are found on the camshaft
thrust surfaces, the camshaft also has to be replaced.
22. INSPECT CAMSHAFT OIL CLEARANCE
(a) Clean the bearing caps and camshaft journals.
(b) Place the camshafts on the cylinder head.
(c) Lay a strip of Plastigage across each of the camshaft jour- nal.
(d)Install the bearing caps (See page 14±4). Torque:
No. 1 23 N �m (235 kgf �cm, 17 ft �lbf)
No. 3 13 N �m (132 kgf �cm, 10 ft �lbf)
NOTICE:
Do not turn the camshaft.
(e) Remove the bearing caps.
(f) Measure the plastigage at its widest point.
Standard oil clearance:
0.035 ± 0.072 mm (0.0014 ± 0.0028 in.)
Maximum oil clearance: 0.10 mm (0.0039 in.)
NOTICE:
Completely remove the Plastigage after the measuring.
If the oil clearance is greater than maximum, replace the cylin-
der head.
Page 3779 of 5135
A62795
Exhaust IntakeMark
ºNOKº
Black Surface
Gray Surface
A62796
SST
A01065
A62780
SST
A07307
14±36
± ENGINE MECHANICALCYLINDER HEAD ASSY (1ZZ±FE/3ZZ±FE)
1ZZ±FE,3ZZ±FE ENGINE REPAIR MANUAL
(RM923E)
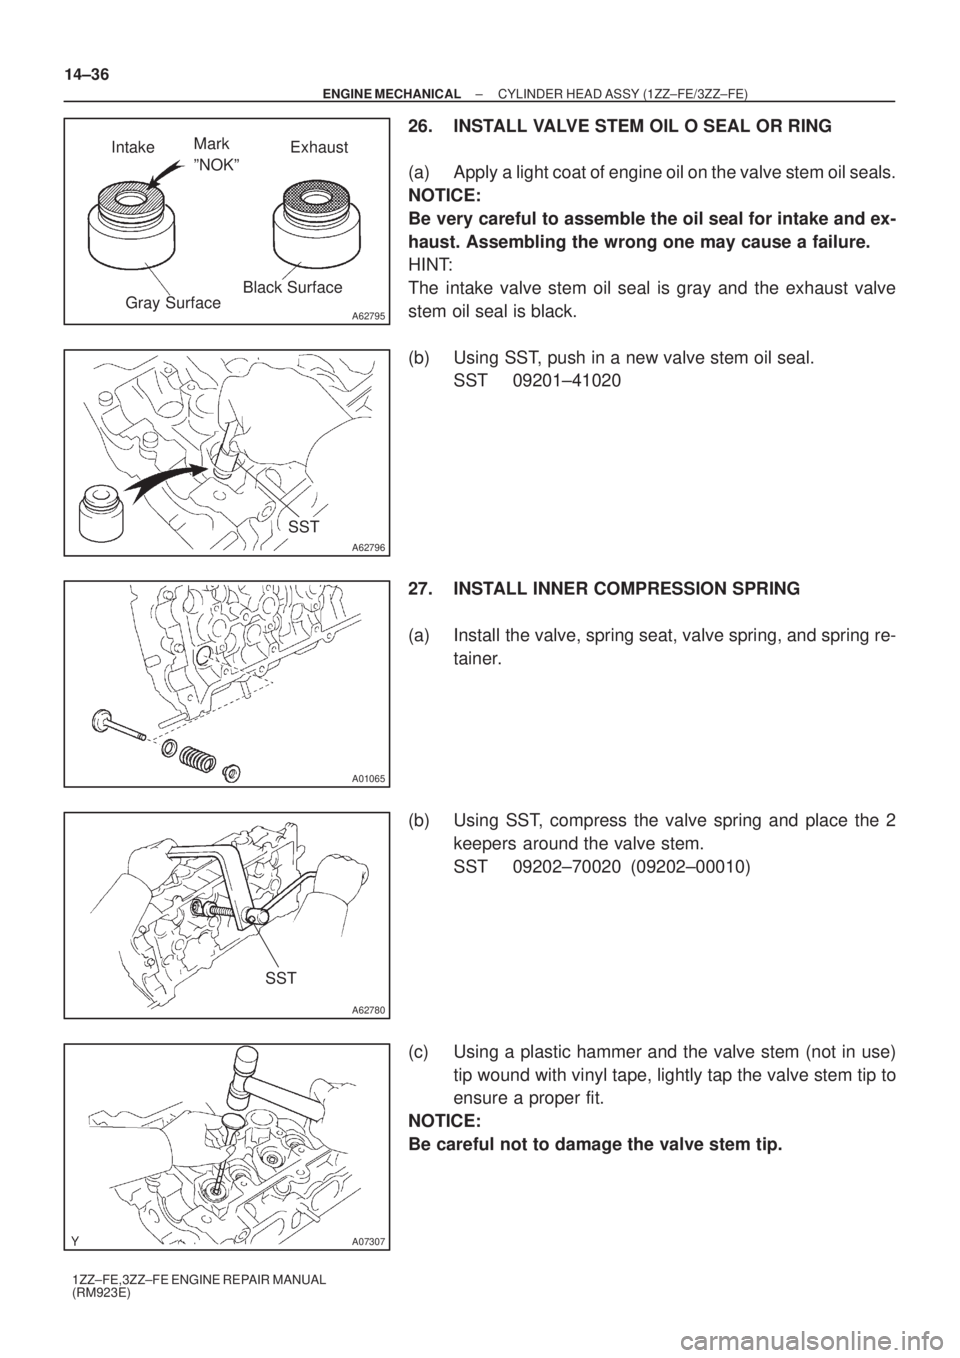
26. INSTALL VALVE STEM OIL O SEAL OR RING
(a) Apply a light coat of engine oil on the valve stem oil seals.
NOTICE:
Be very careful to assemble the oil seal for intake and ex-
haust. Assembling the wrong one may cause a failure.
HINT:
The intake valve stem oil seal is gray and the exhaust valve
stem oil seal is black.
(b) Using SST, push in a new valve stem oil seal.
SST 09201±41020
27. INSTALL INNER COMPRESSION SPRING
(a) Install the valve, spring seat, valve spring, and spring re-
tainer.
(b) Using SST, compress the valve spring and place the 2
keepers around the valve stem.
SST 09202±70020 (09202±00010)
(c) Using a plastic hammer and the valve stem (not in use)
tip wound with vinyl tape, lightly tap the valve stem tip to
ensure a proper fit.
NOTICE:
Be careful not to damage the valve stem tip.
Page 3781 of 5135
140KL±01
A62179
A62185
Mark
Mark
Mark
Timing Chain
Cover Surface
Groove
14±4
± ENGINE MECHANICALPARTIAL ENGINE ASSY (1ZZ±FE/3ZZ±FE)
1ZZ±FE,3ZZ±FE ENGINE REPAIR MANUAL
(RM923E)
OVERHAUL
1. REMOVE OIL FILLER CAP SUB±ASSY
(a) Remove the oil filler cap from the cylinder head cover.
2. REMOVE OIL FILLER CAP GASKET
(a) Remove the gasket from the oil filler cap.
3. REMOVE VENTILATION VALVE SUB±ASSY
(a) Remove the ventilation valve from the cylinder head cover.
4. REMOVE SPARK PLUG
(a) Using a spark plug wrench, remove the 4 spark plugs.
5. REMOVE CYLINDER HEAD COVER SUB±ASSY
(a) Remove the 9 bolts, 2 seal washer, 2 nuts and cylinder head cover.
6. REMOVE CYLINDER HEAD COVER GASKET
(a) Remove the gasket from the cylinder head cover.
7. REMOVE WATER PUMP ASSY
(a) Remove the 6 bolts, water pump and O±ring.
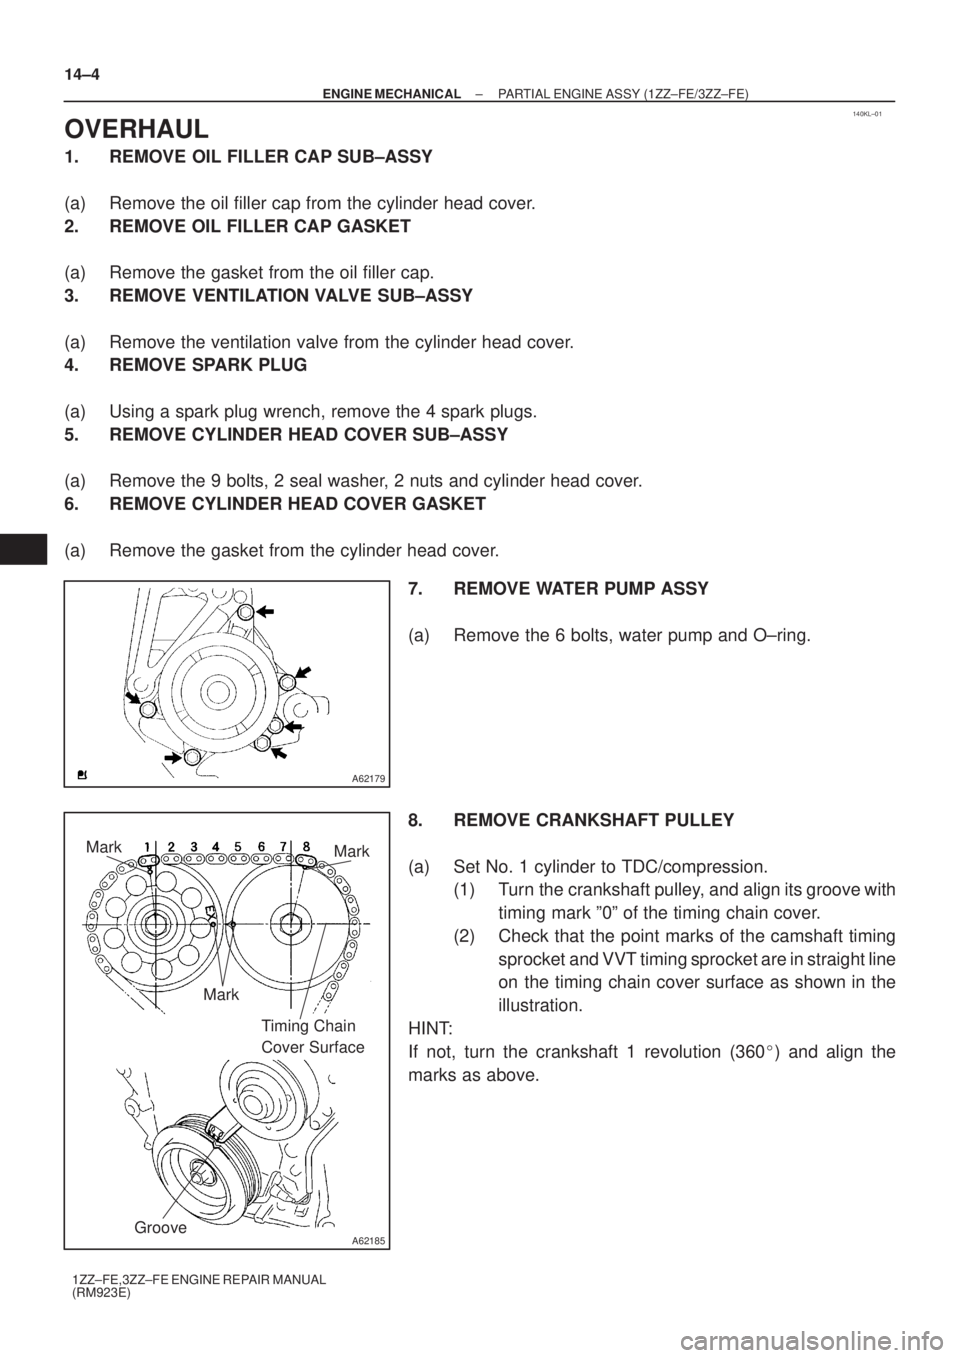
8. REMOVE CRANKSHAFT PULLEY
(a) Set No. 1 cylinder to TDC/compression.
(1) Turn the crankshaft pulley, and align its groove with
timing mark º0º of the timing chain cover.
(2) Check that the point marks of the camshaft timing
sprocket and VVT timing sprocket are in straight line
on the timing chain cover surface as shown in the
illustration.
HINT:
If not, turn the crankshaft 1 revolution (360�) and align the
marks as above.
Page 3782 of 5135
A62837SST
A10076
A30848
± ENGINE MECHANICALPARTIAL ENGINE ASSY (1ZZ±FE/3ZZ±FE)
14±5
1ZZ±FE,3ZZ±FE ENGINE REPAIR MANUAL
(RM923E)
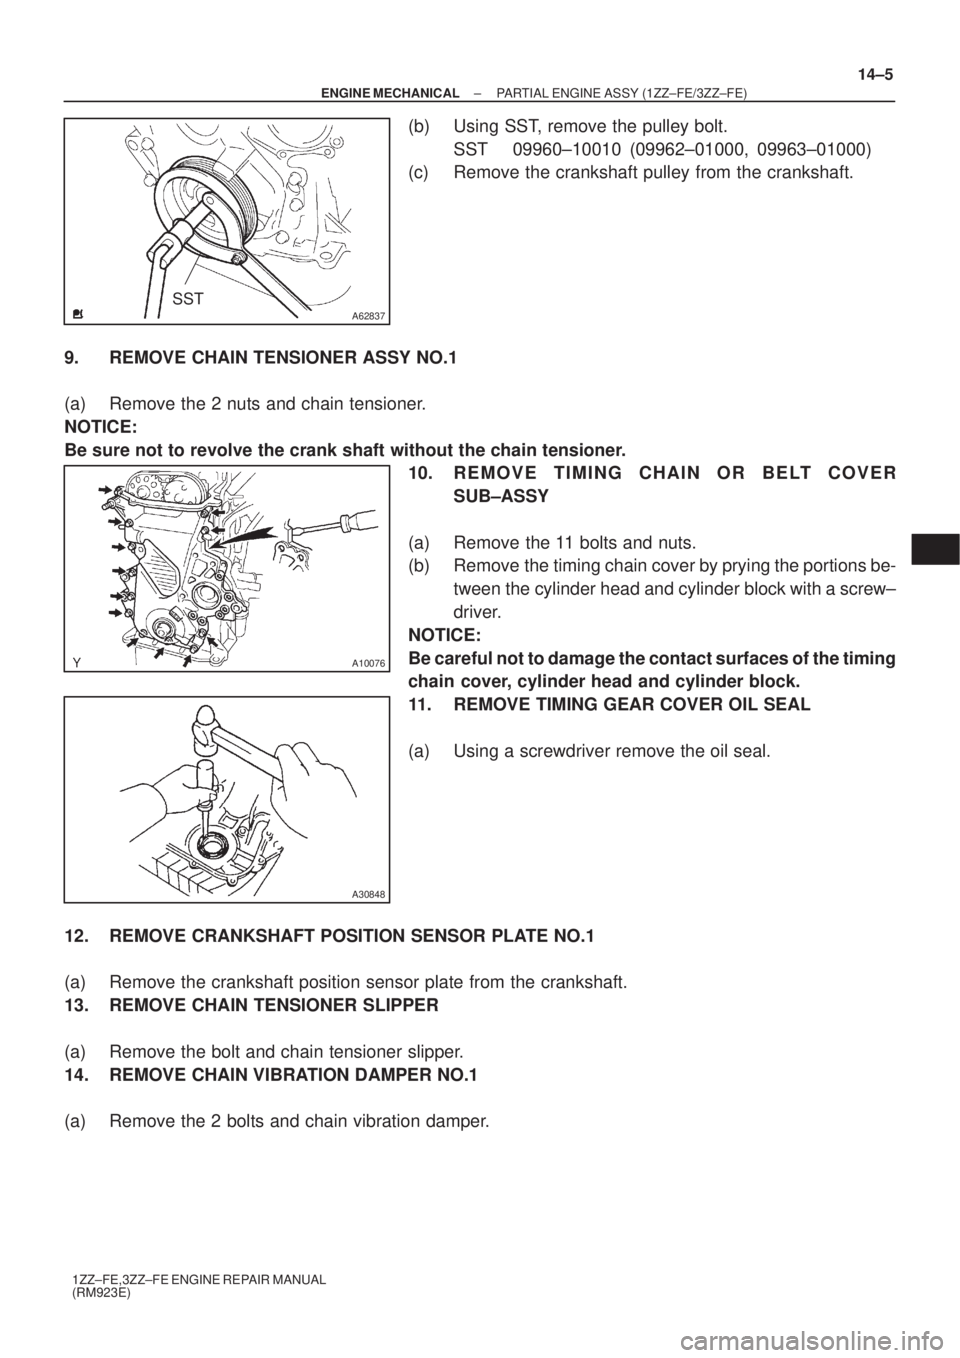
(b) Using SST, remove the pulley bolt.
SST 09960±10010 (09962±01000, 09963±01000)
(c) Remove the crankshaft pulley from the crankshaft.
9. REMOVE CHAIN TENSIONER ASSY NO.1
(a) Remove the 2 nuts and chain tensioner.
NOTICE:
Be sure not to revolve the crank shaft without the chain tensioner.
10. REMOVE TIMING CHAIN OR BELT COVER
SUB±ASSY
(a) Remove the 11 bolts and nuts.
(b) Remove the timing chain cover by prying the portions be-
tween the cylinder head and cylinder block with a screw±
driver.
NOTICE:
Be careful not to damage the contact surfaces of the timing
chain cover, cylinder head and cylinder block.
11. REMOVE TIMING GEAR COVER OIL SEAL
(a) Using a screwdriver remove the oil seal.
12. REMOVE CRANKSHAFT POSITION SENSOR PLATE NO.1
(a) Remove the crankshaft position sensor plate from the crankshaft.
13. REMOVE CHAIN TENSIONER SLIPPER
(a) Remove the bolt and chain tensioner slipper.
14. REMOVE CHAIN VIBRATION DAMPER NO.1
(a) Remove the 2 bolts and chain vibration damper.
Page 3783 of 5135
A30857
A62814
4 2531
A32167
A62190
Advance
Side Path Retard Side
Path
Open
Close
Rubber Vinyl Tape Open Close
14±6
± ENGINE MECHANICALPARTIAL ENGINE ASSY (1ZZ±FE/3ZZ±FE)
1ZZ±FE,3ZZ±FE ENGINE REPAIR MANUAL
(RM923E)
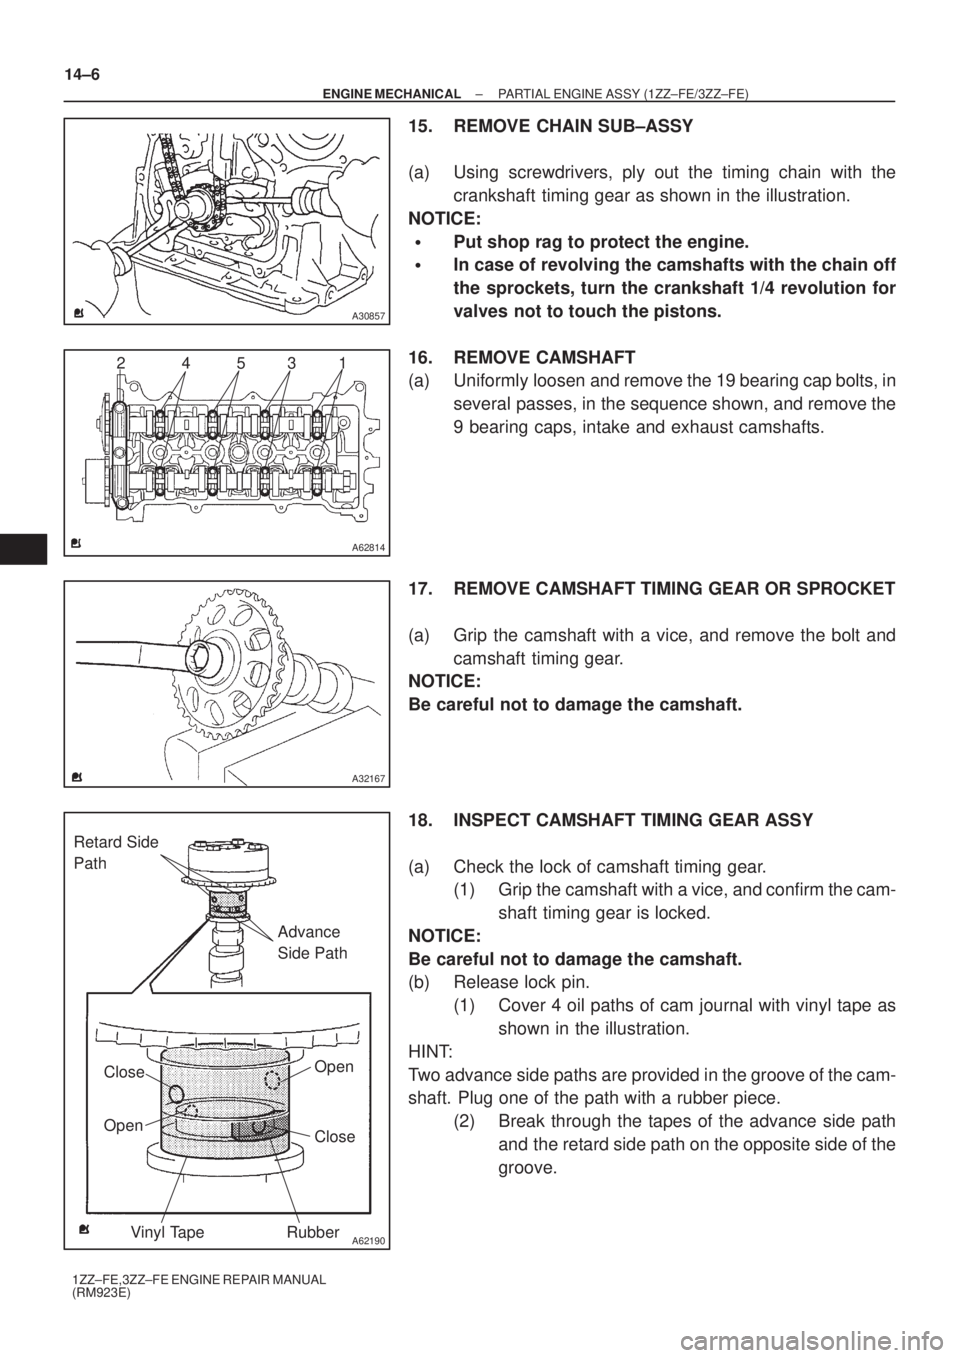
15. REMOVE CHAIN SUB±ASSY
(a) Using screwdrivers, ply out the timing chain with the
crankshaft timing gear as shown in the illustration.
NOTICE:
�Put shop rag to protect the engine.
�In case of revolving the camshafts with the chain off
the sprockets, turn the crankshaft 1/4 revolution for
valves not to touch the pistons.
16. REMOVE CAMSHAFT
(a) Uniformly loosen and remove the 19 bearing cap bolts, in
several passes, in the sequence shown, and remove the
9 bearing caps, intake and exhaust camshafts.
17. REMOVE CAMSHAFT TIMING GEAR OR SPROCKET
(a) Grip the camshaft with a vice, and remove the bolt and
camshaft timing gear.
NOTICE:
Be careful not to damage the camshaft.
18. INSPECT CAMSHAFT TIMING GEAR ASSY
(a) Check the lock of camshaft timing gear.
(1) Grip the camshaft with a vice, and confirm the cam-
shaft timing gear is locked.
NOTICE:
Be careful not to damage the camshaft.
(b) Release lock pin.
(1) Cover 4 oil paths of cam journal with vinyl tape as
shown in the illustration.
HINT:
Two advance side paths are provided in the groove of the cam-
shaft. Plug one of the path with a rubber piece.
(2) Break through the tapes of the advance side path
and the retard side path on the opposite side of the
groove.
Page 3784 of 5135
A62191
Advanced
Side Path Retard
Side Path
A62192
Hold Pressure
DecompressAdvanced
Side Path Retard
Side Path
± ENGINE MECHANICALPARTIAL ENGINE ASSY (1ZZ±FE/3ZZ±FE)
14±7
1ZZ±FE,3ZZ±FE ENGINE REPAIR MANUAL
(RM923E)
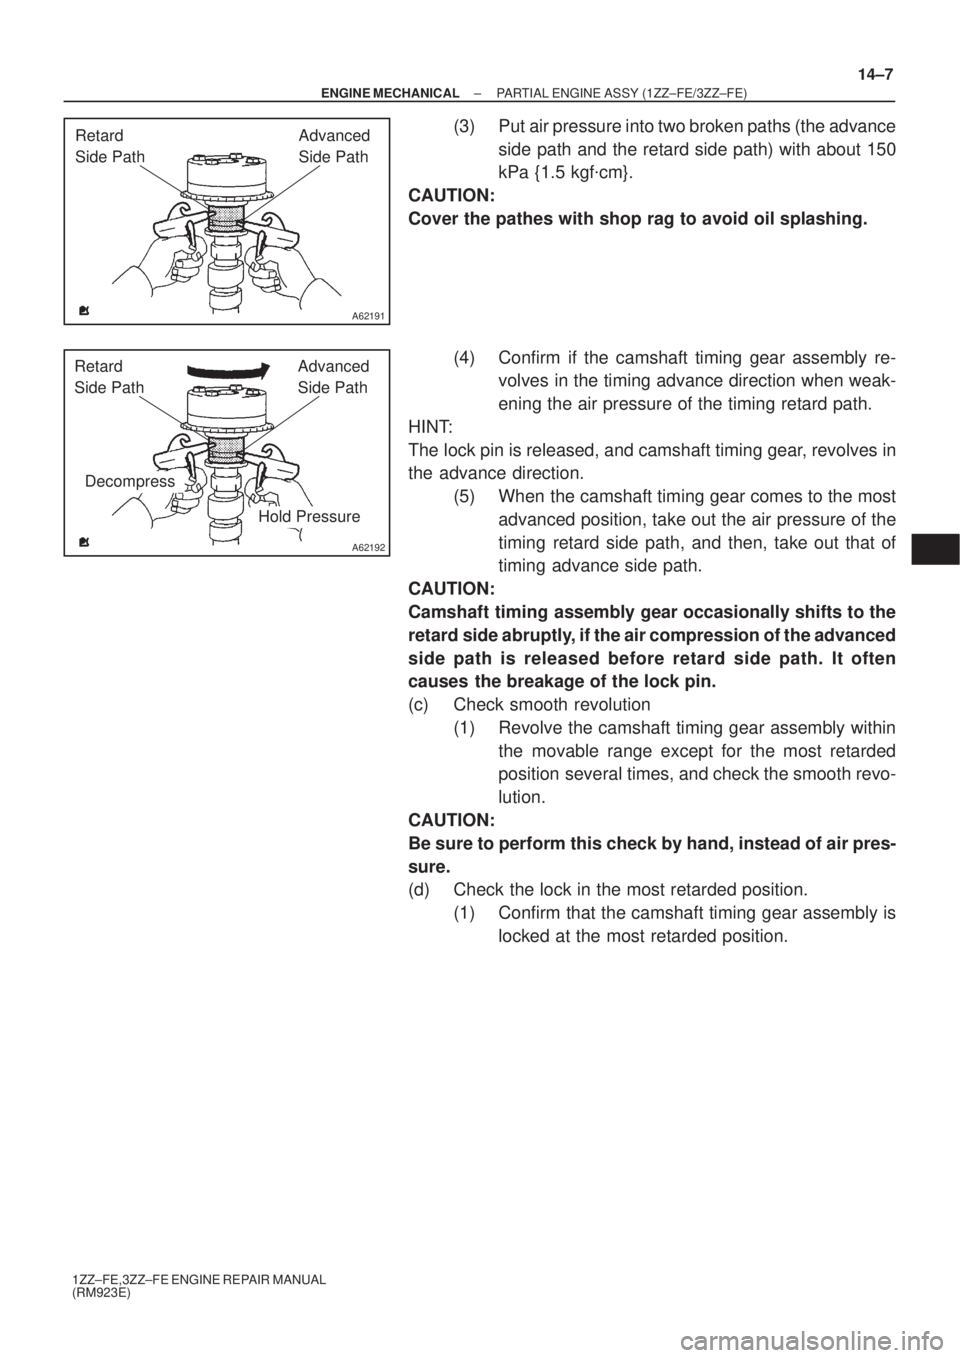
(3) Put air pressure into two broken paths (the advance
side path and the retard side path) with about 150
kPa {1.5 kgf�cm}.
CAUTION:
Cover the pathes with shop rag to avoid oil splashing.
(4) Confirm if the camshaft timing gear assembly re-
volves in the timing advance direction when weak-
ening the air pressure of the timing retard path.
HINT:
The lock pin is released, and camshaft timing gear, revolves in
the advance direction.
(5) When the camshaft timing gear comes to the most
advanced position, take out the air pressure of the
timing retard side path, and then, take out that of
timing advance side path.
CAUTION:
Camshaft timing assembly gear occasionally shifts to the
retard side abruptly, if the air compression of the advanced
side path is released before retard side path. It often
causes the breakage of the lock pin.
(c) Check smooth revolution
(1) Revolve the camshaft timing gear assembly within
the movable range except for the most retarded
position several times, and check the smooth revo-
lution.
CAUTION:
Be sure to perform this check by hand, instead of air pres-
sure.
(d) Check the lock in the most retarded position.
(1) Confirm that the camshaft timing gear assembly is
locked at the most retarded position.
Page 3785 of 5135
A62190
Advance
Side Path Retard Side
Path
Open
Close
Rubber Vinyl Tape Open Close
A62191
Advanced
Side Path Retard
Side Path
A62192
Hold Pressure
DecompressAdvanced
Side Path Retard
Side Path
14±8
± ENGINE MECHANICALPARTIAL ENGINE ASSY (1ZZ±FE/3ZZ±FE)
1ZZ±FE,3ZZ±FE ENGINE REPAIR MANUAL
(RM923E)
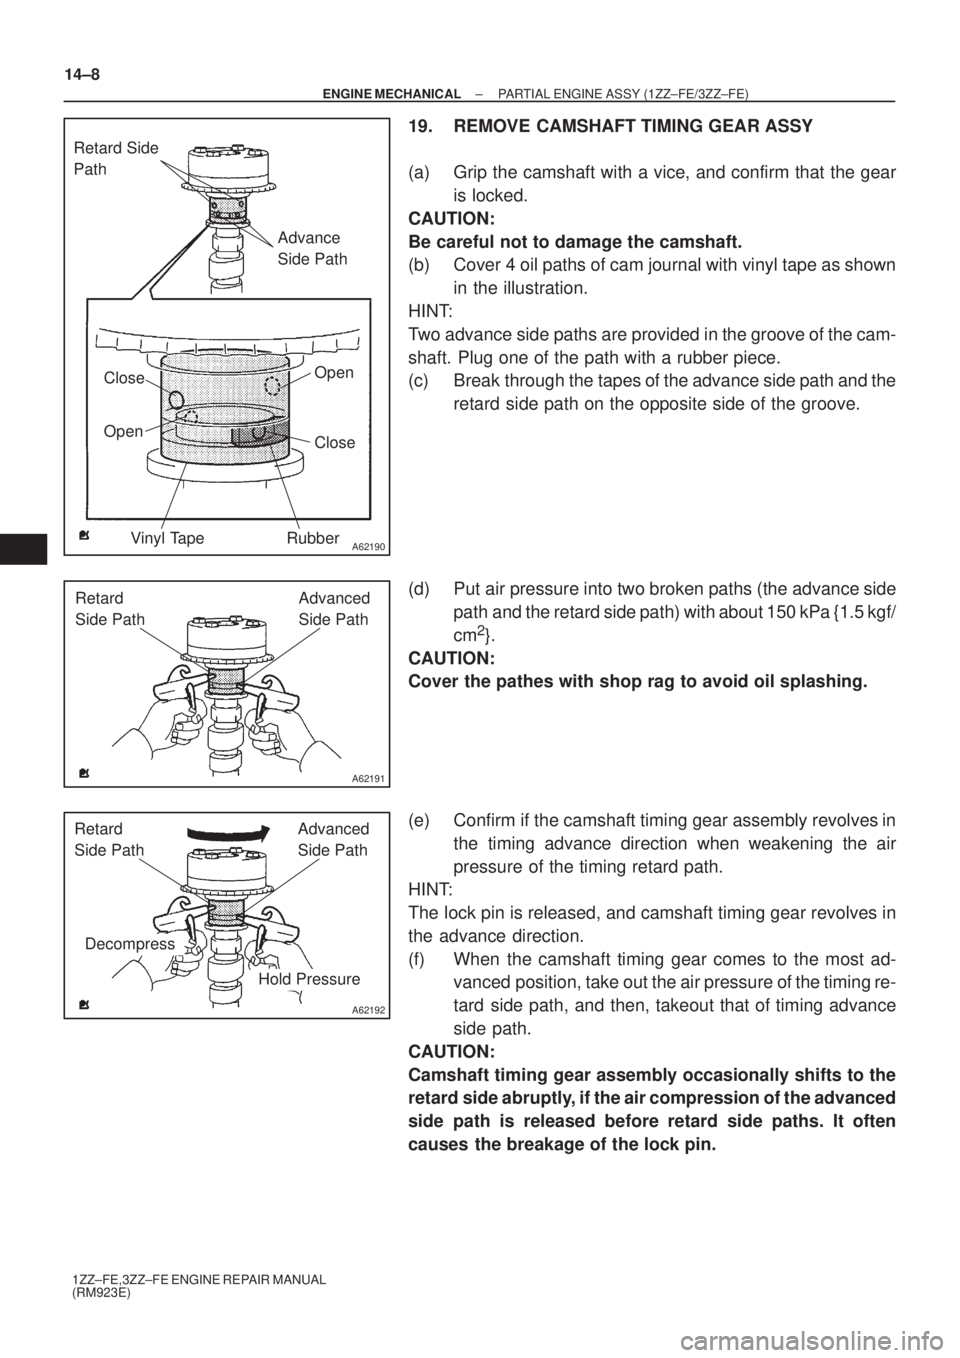
19. REMOVE CAMSHAFT TIMING GEAR ASSY
(a) Grip the camshaft with a vice, and confirm that the gear
is locked.
CAUTION:
Be careful not to damage the camshaft.
(b) Cover 4 oil paths of cam journal with vinyl tape as shown
in the illustration.
HINT:
Two advance side paths are provided in the groove of the cam-
shaft. Plug one of the path with a rubber piece.
(c) Break through the tapes of the advance side path and the
retard side path on the opposite side of the groove.
(d) Put air pressure into two broken paths (the advance side
path and the retard side path) with about 150 kPa {1.5 kgf/
cm
2}.
CAUTION:
Cover the pathes with shop rag to avoid oil splashing.
(e) Confirm if the camshaft timing gear assembly revolves in
the timing advance direction when weakening the air
pressure of the timing retard path.
HINT:
The lock pin is released, and camshaft timing gear revolves in
the advance direction.
(f) When the camshaft timing gear comes to the most ad-
vanced position, take out the air pressure of the timing re-
tard side path, and then, takeout that of timing advance
side path.
CAUTION:
Camshaft timing gear assembly occasionally shifts to the
retard side abruptly, if the air compression of the advanced
side path is released before retard side paths. It often
causes the breakage of the lock pin.
Page 3786 of 5135
A62193
Straight Pin Fringe Bolt
A62815
Mesh
A62816
37 9 62
4 8 10 5 1
B08737
± ENGINE MECHANICALPARTIAL ENGINE ASSY (1ZZ±FE/3ZZ±FE)
14±9
1ZZ±FE,3ZZ±FE ENGINE REPAIR MANUAL
(RM923E)
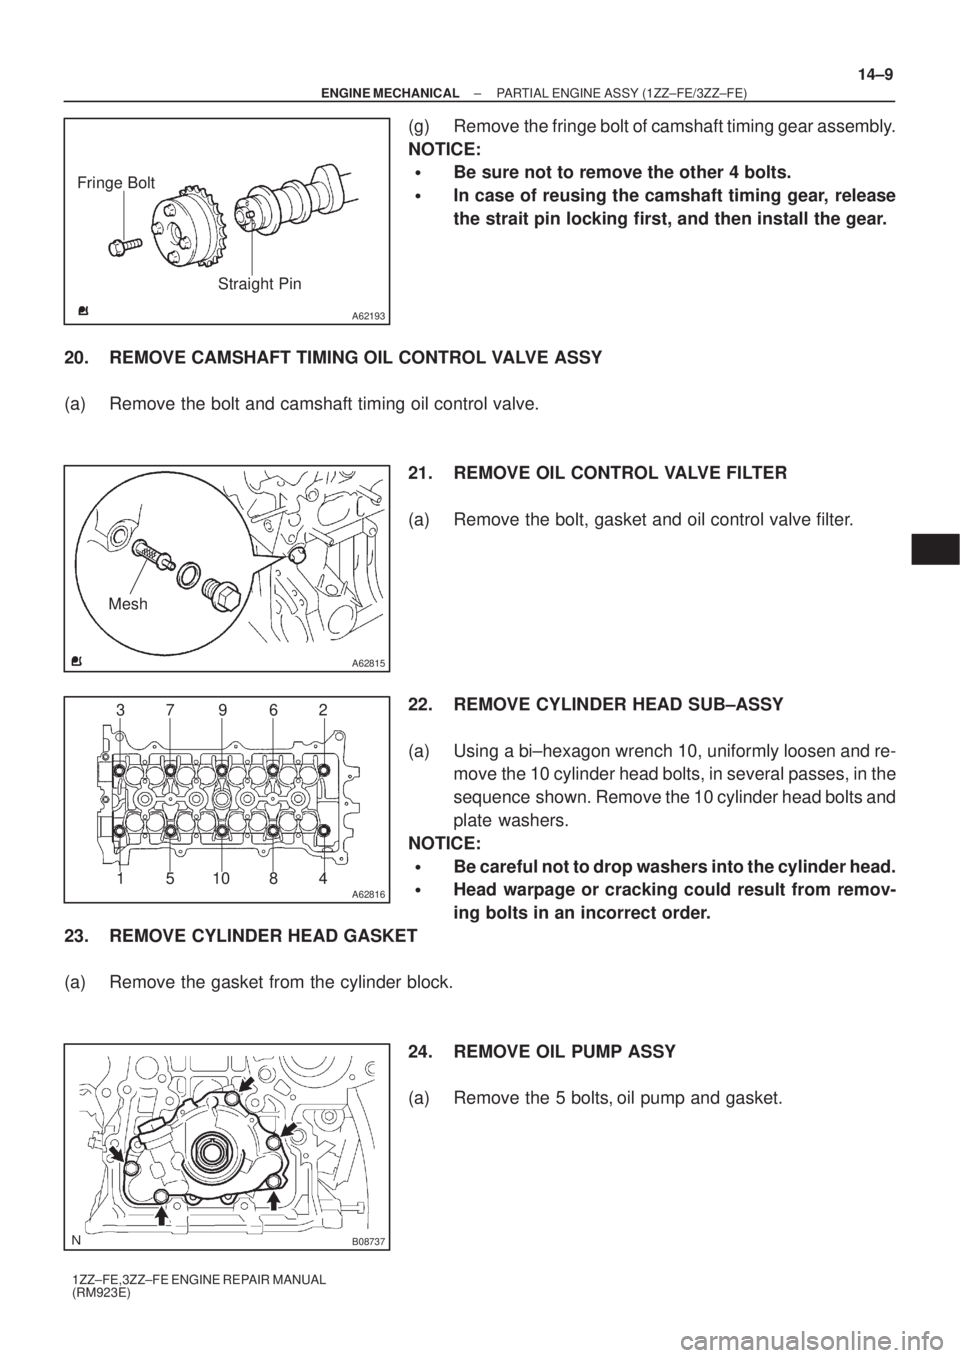
(g) Remove the fringe bolt of camshaft timing gear assembly.
NOTICE:
�Be sure not to remove the other 4 bolts.
�In case of reusing the camshaft timing gear, release
the strait pin locking first, and then install the gear.
20. REMOVE CAMSHAFT TIMING OIL CONTROL VALVE ASSY
(a) Remove the bolt and camshaft timing oil control valve.
21. REMOVE OIL CONTROL VALVE FILTER
(a) Remove the bolt, gasket and oil control valve filter.
22. REMOVE CYLINDER HEAD SUB±ASSY
(a) Using a bi±hexagon wrench 10, uniformly loosen and re-
move the 10 cylinder head bolts, in several passes, in the
sequence shown. Remove the 10 cylinder head bolts and
plate washers.
NOTICE:
�Be careful not to drop washers into the cylinder head.
�Head warpage or cracking could result from remov-
ing bolts in an incorrect order.
23. REMOVE CYLINDER HEAD GASKET
(a) Remove the gasket from the cylinder block.
24. REMOVE OIL PUMP ASSY
(a) Remove the 5 bolts, oil pump and gasket.