Page 3802 of 5135
A62185
Mark
Mark
Mark
Timing Chain
Cover Surface
Groove
A62177
Raise
Push
Hook
Pin
A62178
Push
A62180
Disconnect
Hook
Pin Turn
± ENGINE MECHANICALPARTIAL ENGINE ASSY (1ZZ±FE/3ZZ±FE)
14±25
1ZZ±FE,3ZZ±FE ENGINE REPAIR MANUAL
(RM923E)
(t) Check the match marks on the timing chain and camshaft
timing sprockets, and then the alignment of the pulley
groove with timing mark of the chain cover as shown in the
illustration.
(u) Install chain tensioner.
(1) Check the O±ring is clean, and set the hook as
shown in the illustration.
(2) Apply engine oil to the chain tensioner and install it.
Torque: 9.0 N�m (92 kgf�cm, 80 in�lbf)
NOTICE:
When installing the tensioner, set the hook again if the
hook release the plunger.
(3) Turn the crankshaft counterclockwise, and discon-
nect the plunger knock pin from the hook.
Page 3803 of 5135
A62181
Plunger
Turn
Push
A10085
A62182
Seal Packing
14±26
± ENGINE MECHANICALPARTIAL ENGINE ASSY (1ZZ±FE/3ZZ±FE)
1ZZ±FE,3ZZ±FE ENGINE REPAIR MANUAL
(RM923E)
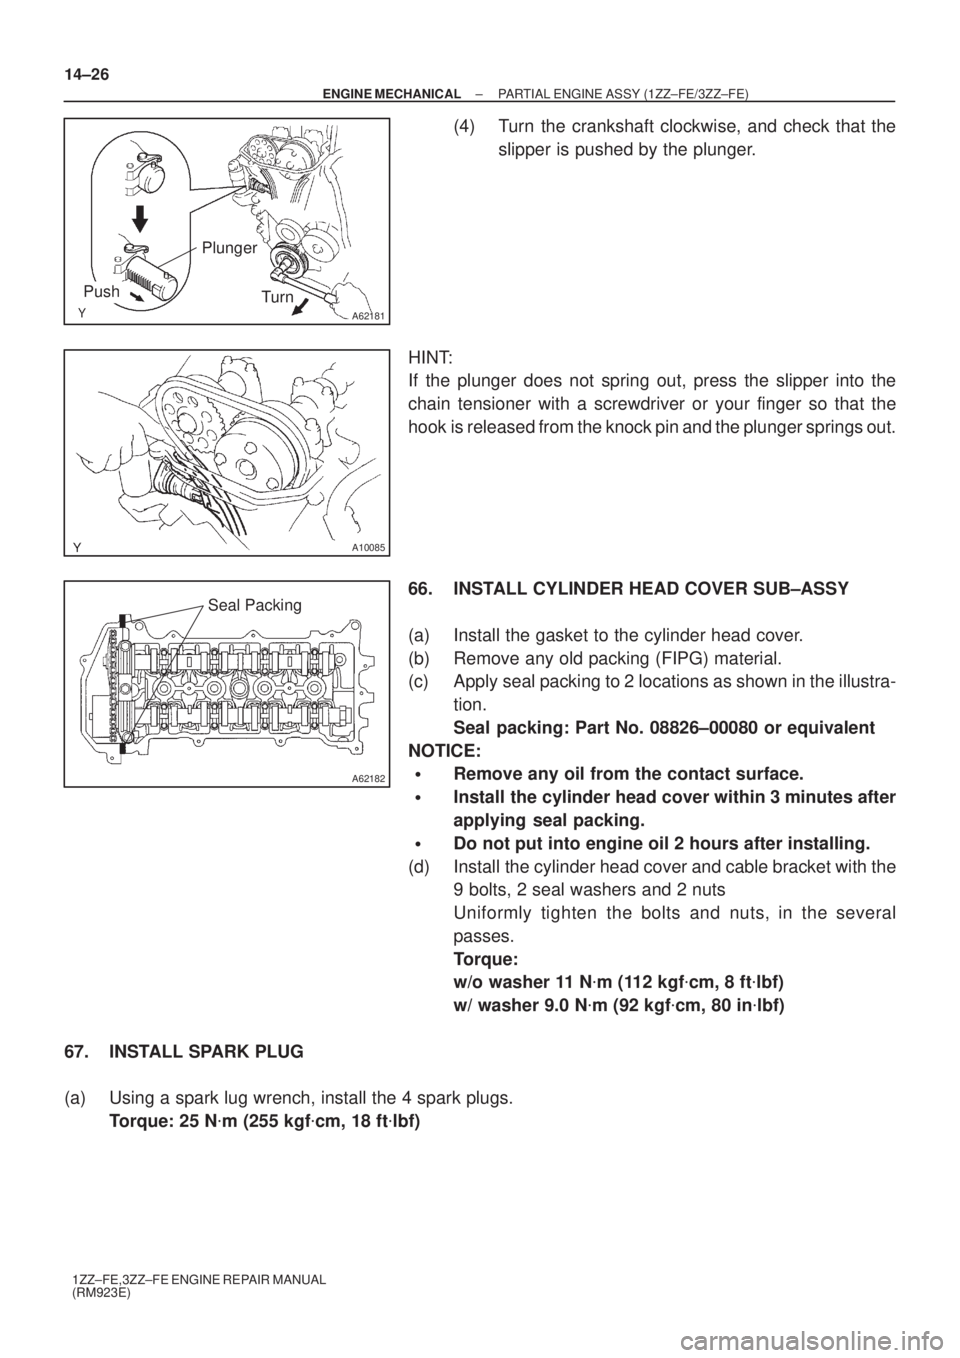
(4) Turn the crankshaft clockwise, and check that the
slipper is pushed by the plunger.
HINT:
If the plunger does not spring out, press the slipper into the
chain tensioner with a screwdriver or your finger so that the
hook is released from the knock pin and the plunger springs out.
66. INSTALL CYLINDER HEAD COVER SUB±ASSY
(a) Install the gasket to the cylinder head cover.
(b) Remove any old packing (FIPG) material.
(c) Apply seal packing to 2 locations as shown in the illustra-
tion.
Seal packing: Part No. 08826±00080 or equivalent
NOTICE:
�Remove any oil from the contact surface.
�Install the cylinder head cover within 3 minutes after
applying seal packing.
�Do not put into engine oil 2 hours after installing.
(d) Install the cylinder head cover and cable bracket with the
9 bolts, 2 seal washers and 2 nuts
Uniformly tighten the bolts and nuts, in the several
passes.
Torque:
w/o washer 11 N�m (112 kgf�cm, 8 ft�lbf)
w/ washer 9.0 N�m (92 kgf�cm, 80 in�lbf)
67. INSTALL SPARK PLUG
(a) Using a spark lug wrench, install the 4 spark plugs.
Torque: 25 N�m (255 kgf�cm, 18 ft�lbf)
Page 3804 of 5135
0214S±01
02±2
± PREPARATIONENGINE MECHANICAL
1CD±FTV ENGINE REPAIR MANUAL (RM927E)
ENGINE MECHANICAL
PREPARATION
SST
09032±00100Oil Pan Seal CutterPARTIAL ENGINE ASSY(1CD±FTV)
09201±10000Valve Guide Bushing Remover &
Replacer SetCYLINDER HEAD ASSY(1CD±FTV)
(09201±01060)Valve Guide Bushing Remover &
Replacer 6CYLINDER HEAD ASSY(1CD±FTV)
09202±70020Valve Spring CompressorCYLINDER HEAD ASSY(1CD±FTV)
(09202±00010)AttachmentCYLINDER HEAD ASSY(1CD±FTV)
09223±15030Oil Seal & Bearing ReplacerPARTIAL ENGINE ASSY(1CD±FTV)
09223±46011Crankshaft Front Oil Seal
ReplacerPARTIAL ENGINE ASSY(1CD±FTV)
09248±55050Valve Clearance Adjust Tool SetPARTIAL ENGINE ASSY(1CD±FTV)
(09248±05510)Valve Lifter PressPARTIAL ENGINE ASSY(1CD±FTV)
(09248±05520)Valve Lifter StopperPARTIAL ENGINE ASSY(1CD±FTV)
09316±60011Transmission & Transfer Bearing
ReplacerPARTIAL ENGINE ASSY(1CD±FTV)
(09316±00011)Replacer PipePARTIAL ENGINE ASSY(1CD±FTV)
Page 3808 of 5135
140DS±02
A09477
A09488
A09492
A09494
Plastigage
14±40
± ENGINE MECHANICALCYLINDER BLOCK (1CD±FTV)
1CD±FTV ENGINE REPAIR MANUAL (RM927E)
OVERHAUL
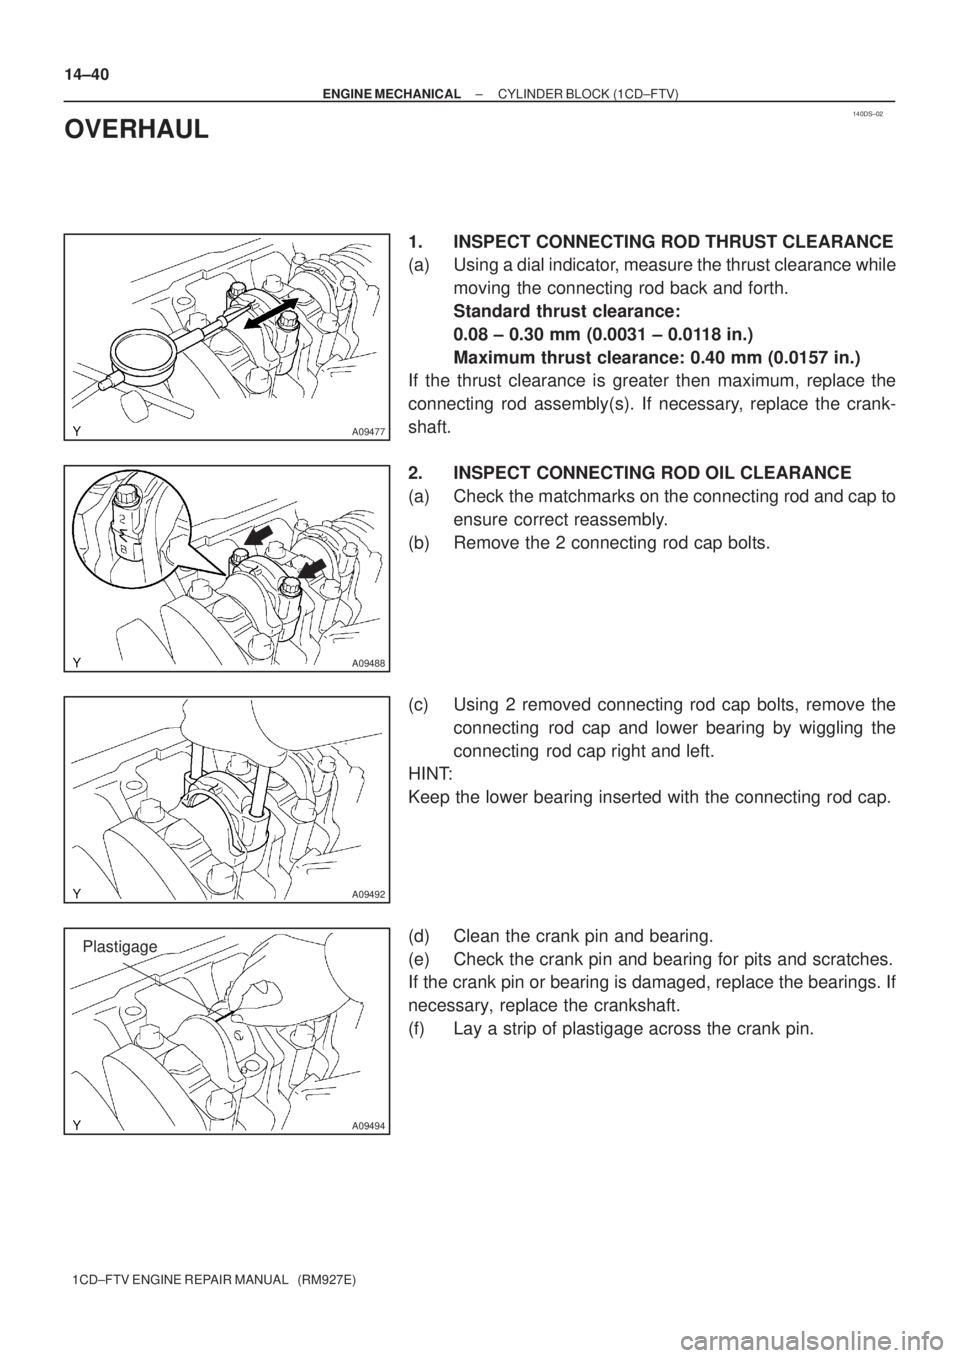
1. INSPECT CONNECTING ROD THRUST CLEARANCE
(a) Using a dial indicator, measure the thrust clearance while
moving the connecting rod back and forth.
Standard thrust clearance:
0.08 ± 0.30 mm (0.0031 ± 0.0118 in.)
Maximum thrust clearance: 0.40 mm (0.0157 in.)
If the thrust clearance is greater then maximum, replace the
connecting rod assembly(s). If necessary, replace the crank-
shaft.
2. INSPECT CONNECTING ROD OIL CLEARANCE
(a) Check the matchmarks on the connecting rod and cap to
ensure correct reassembly.
(b) Remove the 2 connecting rod cap bolts.
(c) Using 2 removed connecting rod cap bolts, remove the
connecting rod cap and lower bearing by wiggling the
connecting rod cap right and left.
HINT:
Keep the lower bearing inserted with the connecting rod cap.
(d) Clean the crank pin and bearing.
(e) Check the crank pin and bearing for pits and scratches.
If the crank pin or bearing is damaged, replace the bearings. If
necessary, replace the crankshaft.
(f) Lay a strip of plastigage across the crank pin.
Page 3809 of 5135
A09514
Front Mark
(Protrusion)
A09493
90�
90�
A09490
Front
Painted Mark
A09495
± ENGINE MECHANICALCYLINDER BLOCK (1CD±FTV)
14±41
1CD±FTV ENGINE REPAIR MANUAL (RM927E)
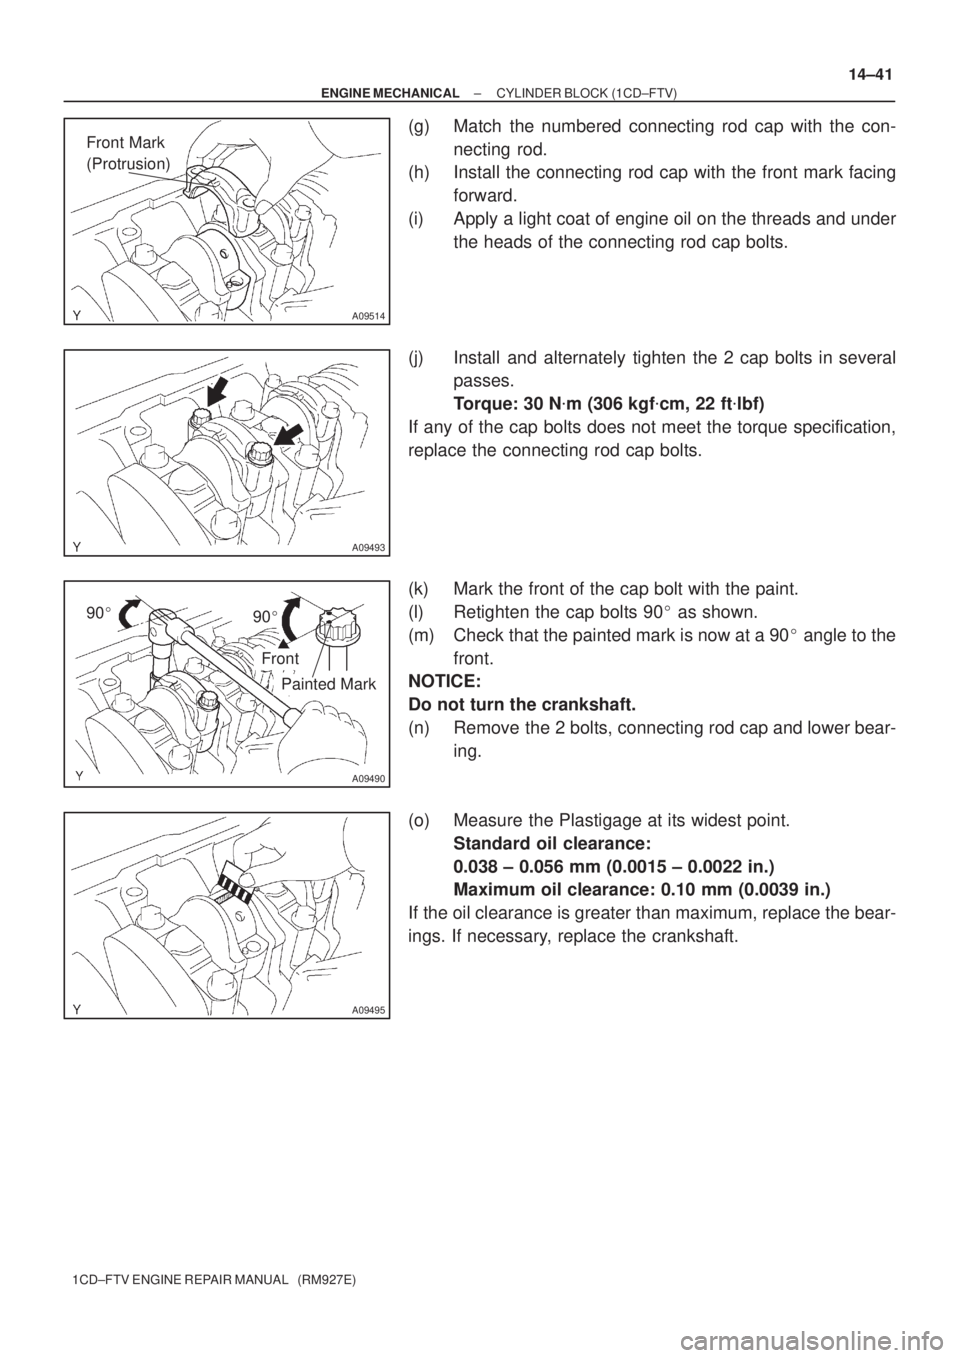
(g) Match the numbered connecting rod cap with the con-
necting rod.
(h) Install the connecting rod cap with the front mark facing
forward.
(i) Apply a light coat of engine oil on the threads and under
the heads of the connecting rod cap bolts.
(j) Install and alternately tighten the 2 cap bolts in several
passes.
Torque: 30 N�m (306 kgf�cm, 22 ft�lbf)
If any of the cap bolts does not meet the torque specification,
replace the connecting rod cap bolts.
(k) Mark the front of the cap bolt with the paint.
(l) Retighten the cap bolts 90� as shown.
(m) Check that the painted mark is now at a 90� angle to the
front.
NOTICE:
Do not turn the crankshaft.
(n) Remove the 2 bolts, connecting rod cap and lower bear-
ing.
(o) Measure the Plastigage at its widest point.
Standard oil clearance:
0.038 ± 0.056 mm (0.0015 ± 0.0022 in.)
Maximum oil clearance: 0.10 mm (0.0039 in.)
If the oil clearance is greater than maximum, replace the bear-
ings. If necessary, replace the crankshaft.
Page 3811 of 5135
A09496
A09497
A08026
A09503
± ENGINE MECHANICALCYLINDER BLOCK (1CD±FTV)
14±43
1CD±FTV ENGINE REPAIR MANUAL (RM927E)
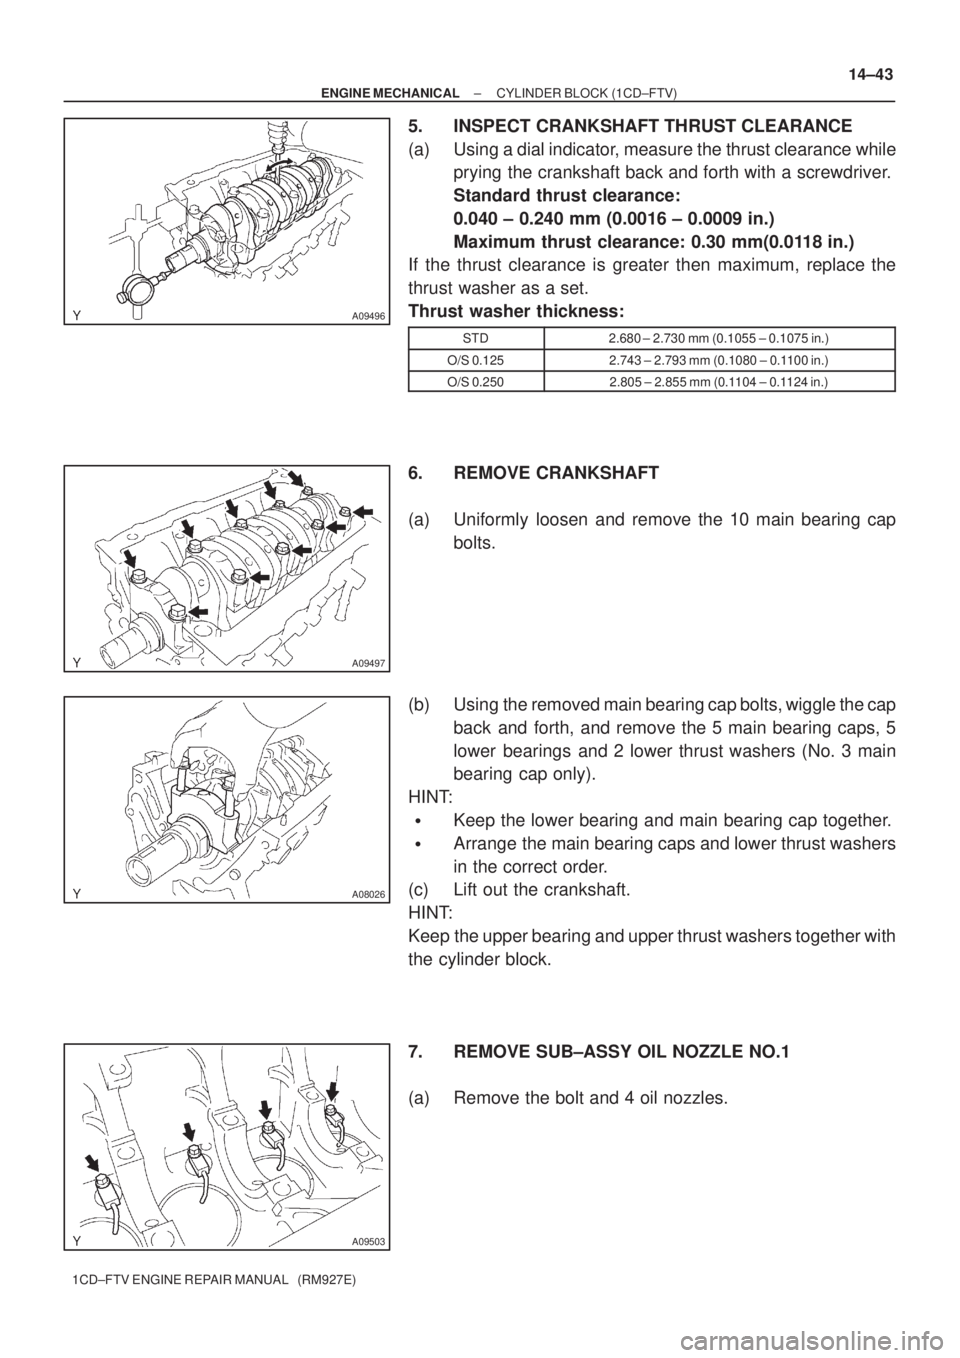
5. INSPECT CRANKSHAFT THRUST CLEARANCE
(a) Using a dial indicator, measure the thrust clearance while
prying the crankshaft back and forth with a screwdriver.
Standard thrust clearance:
0.040 ± 0.240 mm (0.0016 ± 0.0009 in.)
Maximum thrust clearance: 0.30 mm(0.0118 in.)
If the thrust clearance is greater then maximum, replace the
thrust washer as a set.
Thrust washer thickness:
STD2.680 ± 2.730 mm (0.1055 ± 0.1075 in.)
O/S 0.1252.743 ± 2.793 mm (0.1080 ± 0.1100 in.)
O/S 0.2502.805 ± 2.855 mm (0.1104 ± 0.1124 in.)
6. REMOVE CRANKSHAFT
(a) Uniformly loosen and remove the 10 main bearing cap
bolts.
(b) Using the removed main bearing cap bolts, wiggle the cap
back and forth, and remove the 5 main bearing caps, 5
lower bearings and 2 lower thrust washers (No. 3 main
bearing cap only).
HINT:
�Keep the lower bearing and main bearing cap together.
�Arrange the main bearing caps and lower thrust washers
in the correct order.
(c) Lift out the crankshaft.
HINT:
Keep the upper bearing and upper thrust washers together with
the cylinder block.
7. REMOVE SUB±ASSY OIL NOZZLE NO.1
(a) Remove the bolt and 4 oil nozzles.
Page 3812 of 5135
A09473
Hexagon
Wrench (6 mm)
A09457
A09502
A09501
14±44
± ENGINE MECHANICALCYLINDER BLOCK (1CD±FTV)
1CD±FTV ENGINE REPAIR MANUAL (RM927E)
8. REMOVE CYLINDER BLOCK OIL ORIFICE
(a) Using a hexagon wrench (6 mm), remove the oil orifice.
9. REMOVE PISTON RING SET
(a) Using a piston ring expander, remove the No. 1 piston
ring, No. 2 piston ring and oil ring.
NOTICE:
Make the expansion of the piston ring as small as neces-
sary.
(b) Remove the coil by hand.
HINT:
Arrange the piston rings in correct order.
10. REMOVE W/PIN PISTON SUB±ASSY
(a) Using a small screwdriver, pry off the snap rings from the
piston.
(b) Gradually heat the piston to approx. 60�C (140�F).
(c) Using a plastic±faced hammer and brass bar, lightly tap
out the piston pin and remove the connecting rod.
HINT:
�The piston and pin are a matched set.
�Arrange the pistons, pins, rings, connecting rods and
bearings in the correct order.
Page 3814 of 5135
A09693
EM0227
14±46
± ENGINE MECHANICALCYLINDER BLOCK (1CD±FTV)
1CD±FTV ENGINE REPAIR MANUAL (RM927E)
(b) Subtract the piston diameter measurement from the cylin-
der bore diameter measurement.
Standard oil clearance:
0.068 ± 0.095 mm (0.0027 ± 0.0037 in.)
Maximum oil clearance: 0.14 mm (0.0055 in.)
If the oil clearance is greater than maximum, replace all the 4
pistons. If necessary, replace the cylinder block.
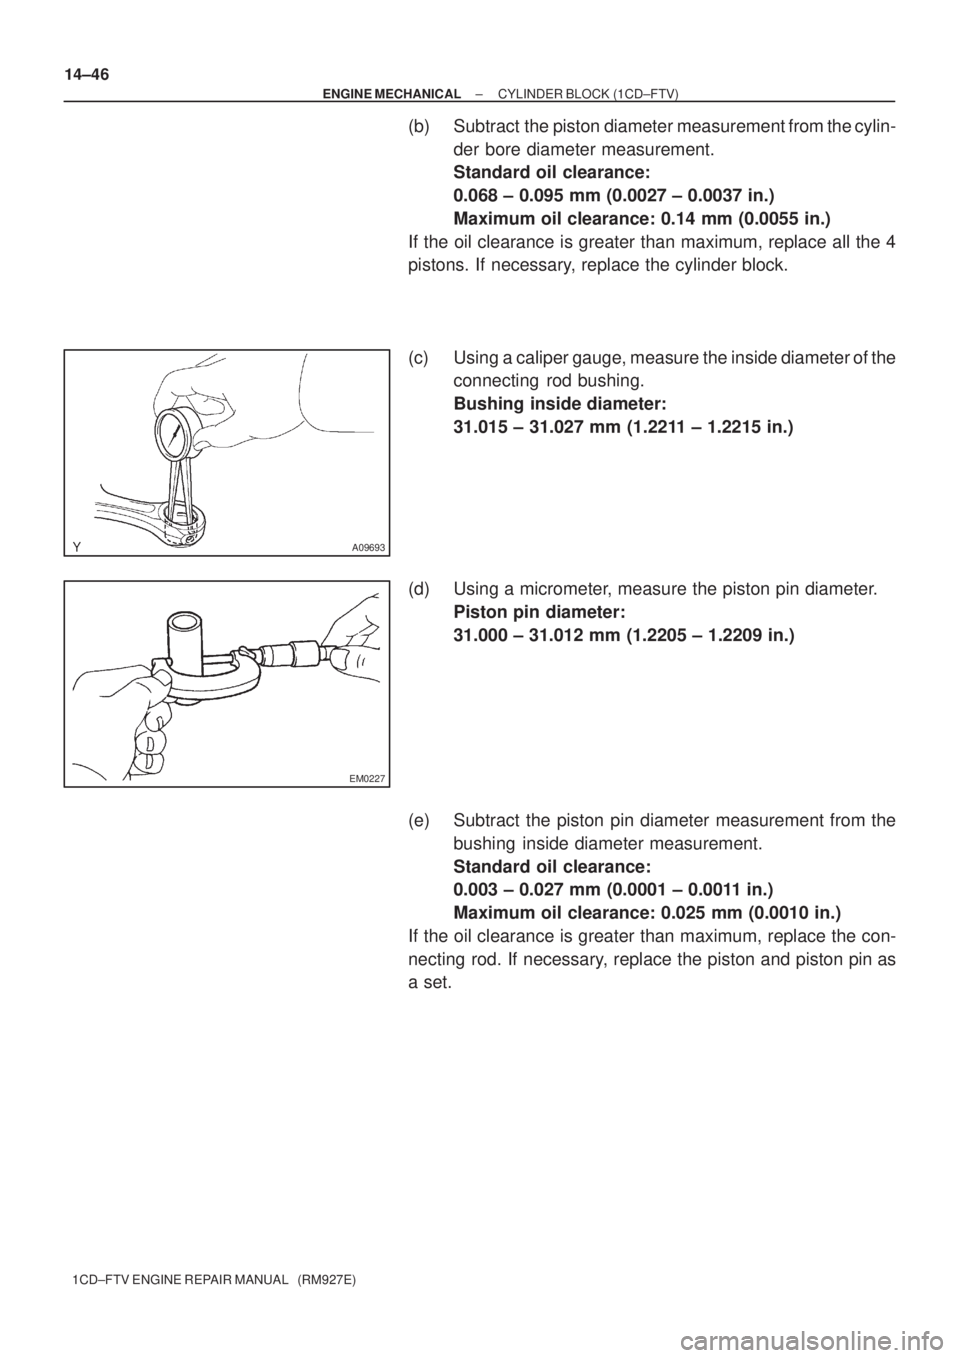
(c) Using a caliper gauge, measure the inside diameter of the
connecting rod bushing.
Bushing inside diameter:
31.015 ± 31.027 mm (1.2211 ± 1.2215 in.)
(d) Using a micrometer, measure the piston pin diameter.
Piston pin diameter:
31.000 ± 31.012 mm (1.2205 ± 1.2209 in.)
(e) Subtract the piston pin diameter measurement from the
bushing inside diameter measurement.
Standard oil clearance:
0.003 ± 0.027 mm (0.0001 ± 0.0011 in.)
Maximum oil clearance: 0.025 mm (0.0010 in.)
If the oil clearance is greater than maximum, replace the con-
necting rod. If necessary, replace the piston and piston pin as
a set.