Page 3672 of 5135
C83141
D09193
C83140
D09194
40±50
± AUTOMATIC TRANSMISSION / TRANSAUTOMATIC TRANSAXLE ASSY (U241E)
U241E A/T REPAIR MANUAL (RM840U)
97. INSTALL TRANSAXLE CASE NO.1 PLUG
(a) Install 2 new O±rings to the 2 transaxle case No. 1 plugs.
(b) Install 2 transaxle case No. 1 plugs to the transaxle rear
cover.
Torque: 7.4 N�m (75 kgf�cm, 65 in.�lbf)
98. INSTALL TRANSAXLE REAR COVER SUB±ASSY
(a) Using SST and a press, install the bearing.
SST 09950±60010 (09951±00230, 09951±00350)
Press fit depth: 12.05 ± 12.75 mm (0.4744 ± 0.5020 in.)
NOTICE:
�Face the inscribed mark side of the bearing race up.
�Repeat the press fit until the specified value is ob-
tained.
(b) Apply liquid sealer to the 2 screws.
Sealant:
Part No. 08833±00080, THREE BOND 2430 or equiva-
lent.
(c) Using a torx socket wrench T30, install the transaxle rear
cover plate with the 2 screws.
Torque: 7.5 N�m (76 kgf�cm, 66 in.�lbf)
(d) Coat 2 new oil seal rings with ATF, install them to the
transaxle rear cover.
Page 3673 of 5135

40±51
U241E A/T REPAIR MANUAL (RM840U)
(e) Remove any packing material")
D09946
FIPG
D09943A
D03914
D03809
Vinyl Tape
SST
D03810
SST
± AUTOMATIC TRANSMISSION / TRANSAUTOMATIC TRANSAXLE ASSY (U241E)
40±51
U241E A/T REPAIR MANUAL (RM840U)
(e) Remove any packing material and be careful not to get oil
on the contacting surfaces of the transaxle rear cover or
the transaxle case.
(f) Apply FIPG to the cover.
FIPG:
Part No. 08826±00090, THREE BOND 1281 or equiva-
lent.
(g) Coat a needle roller bearing with ATF.
(h) Apply liquid sealer to the ºAº bolt threads.
Sealant:
Part No. 08833±00080, THREE BOND 1344, LOCTITE
242 or equivalent.
(i) Install the 11 bolts.
Torque:
Bolt A: 18.6 N�m (190 kgf�cm, 14 ft�lbf)
Other bolt: 24.5 N�m (250 kgf�cm, 18 ft�lbf)
99. INSTALL UNDERDRIVE CLUTCH DRUM OIL SEAL
RING
(a) Install the new 2 oil seal rings to the transaxle case.
100. INSTALL UNDERDRIVE BRAKE PISTON
(a) Wind a vinyl tape around SST at the place 4.0 mm (0.157
in.) above from the bottom end until the thickness of the
wound tape is about 5.0 mm (0.197 in.).
SST 09550±60010 (09951±00320)
NOTICE:
Clean SST to remove deposited oil, before winding a vinyl
tape.
(b) Using SST and a press, install the needle±roller bearing
to the transaxle case.
SST 09550±60010 (09951±00320), 09950±70010
(09951±07100), 09387±00020
NOTICE:
When the wound vinyl tape contacts the transaxle case,
stop press±fitting.
Page 3679 of 5135

40− 57
Correction to R/M Pub. No. RM840U (Bullet")
D11358
Race ”B”
Race ”A”
Forward Clutch Side
D03574
D03573
C50035
D03569
−
AUTOMATIC TRANSMISSION / TRANS AUTOMATIC TRANSAXLE ASSY (U24
1E)
40− 57
Correction to R/M Pub. No. RM840U (Bulletin No. OB −1123)
108. INSTALL FORWARD CLUTCH ASSY
(a) Install the input shaft thrust bearing to the forward clutch.
Bearing diameter: mm (in.)
InsideOutside
Bearing33.85 ( 1.3327)52.2 (2.055)
NOTICE:
Install the thrust bearing properly so that the race ”B” will
be visible.
(b) Install the forward clutch to the multiple clutch hub.
NOTICE:
Align the splines of all discs in the forward clutch with
those of multiple clutch hub to assemble them securely.
109. INSTALL OVERDRIVE BRAKE GASKET
[35179 / 98− 3]
(a) Install 2 new O/D brake gaskets to the transaxle case.
11 0. INSTALL FRONNT DIFFERENTIAL ASSY
(a) Install the differential assy to the transaxle case.
111 . INSTALL OIL PUMP ASSEMBLY
(a) Install the oil pump assy and 7 bolts to the transaxle case.
Torque: 22 N ⋅m (226 kgf⋅cm, 16ft⋅lbf)
Page 3680 of 5135

U241E A/T REPAIR MANUAL (RM840U)
112. INSTALL THRUST BEARING UNDERDRIVE RACE
NO.2
(a) Install the thrust")
D25506
D25505
D03915
40±58
± AUTOMATIC TRANSMISSION / TRANSAUTOMATIC TRANSAXLE ASSY (U241E)
U241E A/T REPAIR MANUAL (RM840U)
112. INSTALL THRUST BEARING UNDERDRIVE RACE
NO.2
(a) Install the thrust bearing race to the U/D planetary gear
assy.
113. INSTALL THRUST NEEDLE ROLLER BEARING
(a) Calculate the end play value using the following formula
and values of Dimension D and E that ware measured
when installing cylindrical roller bearing and U/D plane-
tary gear, Select an appropriate U/D planetary gear thrust
bearing race No. 2 which satisfies the specified end play
value, and install it.
End play: 0.20 ± 0.69 mm (0.0079 ± 0.0272 in.)
HINT:
End play = Dimension E ± Dimension D ± thrust bearing thick-
ness 3.28 mm (0.1291 in.) ± U/D thrust bearing race No. 2 thick-
ness.
Race thickness: mm (in.)
E ± DThickness
Less than 7.34 (0.2890)3.5 (0.138)
7.34 (0.2890)3.8 (0.150)
Bearing and bearing race diameter: mm (in.)
InsideOutside
Bearing53.0 (2.087)78.2 (3.079)
Bearing race52.1 (2.051)75.5 (2.972)
114. INSTALL UNDERDRIVE OUTPUT SHAFT OIL SEAL
RING
(a) Install new oil seal ring to the transaxle housing.
Page 3681 of 5135
 FIPG
C50259
C
C
C
CA
AA B
BB
C83145
± AUTOMATIC TRANSMISSION / TRANSAUTOMATIC TRANSAXLE ASSY (U241E)
40±59
U241E A/T REPAIR MANUAL (RM840U)
115.")
D03807
SST
D03630Seal Bend Width 1.2 mm (0.047 in.) FIPG
C50259
C
C
C
CA
AA B
BB
C83145
± AUTOMATIC TRANSMISSION / TRANSAUTOMATIC TRANSAXLE ASSY (U241E)
40±59
U241E A/T REPAIR MANUAL (RM840U)
115. INSTALL UNDERDRIVE CYLINDRICAL ROLLER
BEARING
(a) Using SST and a press, install the U/D cylindrical roller
bearing.
SST 09950±60020 (09951±00810), 09950±70010
(09951±07100)
NOTICE:
Do not apply excessive pressure to it.
116. INSTALL TRANSAXLE HOUSING
(a) Remove any parking material and be careful not to get oil
on the contacting surfaces of the transaxle case or trans-
axle housing.
(b) Apply FIPG to the transaxle case.
FIPG:
Part No. 08826±00090, THREE BOND 1281 or equiva-
lent
(c) Install the transaxle housing and 16 bolts to the transaxle
case.
Torque:
Bolt A: 22 N�m (226 kgf�cm, 16 ft�lbf)
Bolt B and C: 29 N�m (300 kgf�cm, 22 ft�lbf)
HINT:
Apply seal packing or equivalent to the bolt A.
Seal packing:
THREE BOND 2403 or equivalent
Bolt length:
Bolt A: 50 mm (1.969 in.)
Bolt B: 50 mm (1.969 in.)
Bolt C: 42 mm (1.654 in.)
NOTICE:
Because the bolt A is a seal bolt, apply the seal packing to
new bolts and tighten them within 10 minutes after applica-
tion.
117. INSTALL TRANSAXLE CASE NO.1 PLUG
(a) Install 2 new O±rings to the 2 transaxle case No. 1 plugs.
(b) Install the 2 transaxle case No. 1 plugs to the transaxle
housing.
Torque: 7.4 N�m (75 kgf�cm, 65 in.�lbf)
Page 3682 of 5135
D08091
D03631
D03632
D03905
D03565
40±60
± AUTOMATIC TRANSMISSION / TRANSAUTOMATIC TRANSAXLE ASSY (U241E)
U241E A/T REPAIR MANUAL (RM840U)
118. INSPECT INPUT SHAFT ENDPLAY
(a) Using a dial indicator, measure the input shaft end play.
End play: 0.26 ± 1.25 mm (0.0103 ± 0.0492 in.)
119. FIX AUTOMATIC TRANSAXLE ASSY
120. INSTALL MANUAL VALVE LEVER SHAFT OIL SEAL
(a) Coat a new oil seal with ATF, install it to the transaxle
case.
(b) Install the oil seal to the transaxle case.
121. INSTALL PARKING LOCK ROD SUB±ASSY
(a) Install the parking lock rod to the manual valve lever.
122. INSTALL MANUAL VALVE LEVER SUB±ASSY
(a) Install a new spacer and manual valve lever shaft to the
transaxle case.
Page 3687 of 5135
D09178
D09180
D09179
± AUTOMATIC TRANSMISSION / TRANSAUTOMATIC TRANSAXLE ASSY (U241E)
40±65
U241E A/T REPAIR MANUAL (RM840U)
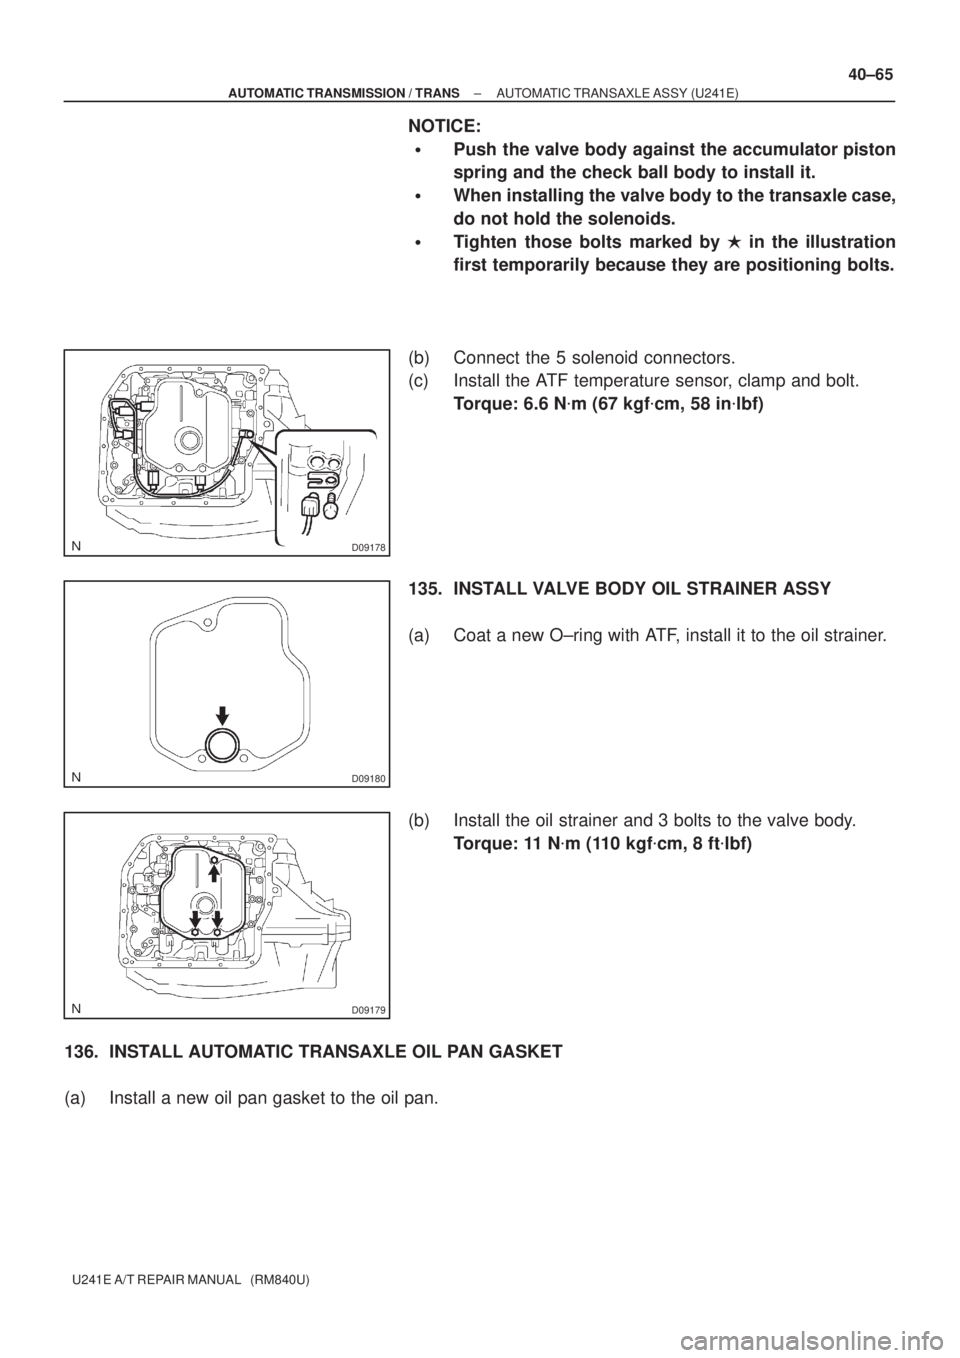
NOTICE:
�Push the valve body against the accumulator piston
spring and the check ball body to install it.
�When installing the valve body to the transaxle case,
do not hold the solenoids.
�Tighten those bolts marked by � in the illustration
first temporarily because they are positioning bolts.
(b) Connect the 5 solenoid connectors.
(c) Install the ATF temperature sensor, clamp and bolt.
Torque: 6.6 N�m (67 kgf�cm, 58 in�lbf)
135. INSTALL VALVE BODY OIL STRAINER ASSY
(a) Coat a new O±ring with ATF, install it to the oil strainer.
(b) Install the oil strainer and 3 bolts to the valve body.
Torque: 11 N�m (110 kgf�cm, 8 ft�lbf)
136. INSTALL AUTOMATIC TRANSAXLE OIL PAN GASKET
(a) Install a new oil pan gasket to the oil pan.
Page 3688 of 5135

U241E A/T REPAIR MANUAL (RM840U)
137. I N S TA L L A U TO M AT I C TRANSAXLE OIL PAN
SUB±")
D25674
D09176
D03900
D03900
C83144
40±66
± AUTOMATIC TRANSMISSION / TRANSAUTOMATIC TRANSAXLE ASSY (U241E)
U241E A/T REPAIR MANUAL (RM840U)
137. I N S TA L L A U TO M AT I C TRANSAXLE OIL PAN
SUB±ASSY
(a) Install the 2 magnets in the oil pan.
(b) Apply seal packing or equivalent to new 18 bolts.
Seal packing:
THREE BOND 2430 or equivalent
(c) Install oil pan and 18 bolts to the transaxle case.
Torque: 7.8 N�m (80 kgf�cm, 69 in.�lbf)
NOTICE:
Because the bolts should be seal bolts, apply seal packing
to new bolts and tighten them within 10 minutes after ap-
plication.
138. INSTALL SPEED SENSOR(TMC ±MADE)
(a) Coat 2 new O±rings with ATF, install them to the 2 sen-
sors.
(b) Install the 2 sensors with the 2 bolts to the transaxle case.
Torque: 11.3 N�m (115 kgf�cm, 8 ft�lbf)
139. I N S TA L L TRANSMISSION REVOLUTION
SENSOR(AISIN ±MADE)
(a) Coat 2 new O±rings with ATF, install them to the 2 sen-
sors.
(b) Install the 2 sensors with the 2 bolts to the transaxle case.
Torque: 11.3 N�m (115 kgf�cm, 8 ft�lbf)
140. INSTALL OIL COOLER TUBE UNION
(a) Coat a new O±ring with ATF, install it to the elbow.
(b) Install the elbow to the transaxle case.
Torque: 27 N�m (276 kgf�cm, 20 ft�lbf)

U241E A/T REPAIR MANUAL (RM840U)
97. INSTALL TRANSAXLE CASE NO.1 PLUG
(a) Install 2 new O±rings")

U241E A/T REPAIR MANUAL (RM840U)
118. INSPECT INPUT SHAFT ENDPLAY
(a) Using a dial indicat")