Page 1899 of 5135
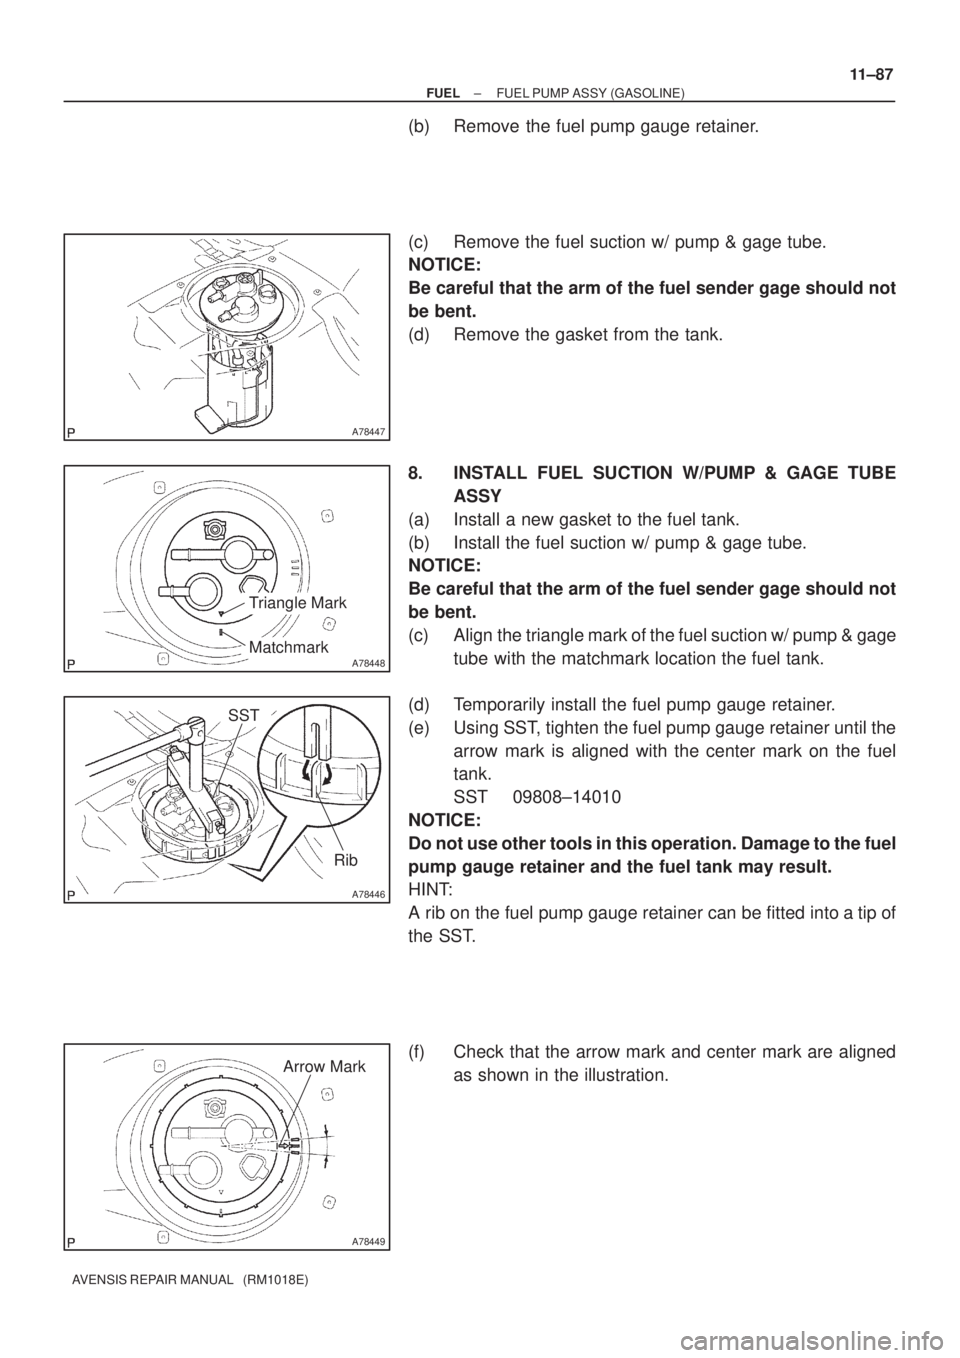
A78447
A78448
Triangle Mark
Matchmark
A78446
SST
Rib
A78449
Arrow Mark
± FUELFUEL PUMP ASSY (GASOLINE)
11±87
AVENSIS REPAIR MANUAL (RM1018E)
(b) Remove the fuel pump gauge retainer.
(c) Remove the fuel suction w/ pump & gage tube.
NOTICE:
Be careful that the arm of the fuel sender gage should not
be bent.
(d) Remove the gasket from the tank.
8. INSTALL FUEL SUCTION W/PUMP & GAGE TUBE
ASSY
(a) Install a new gasket to the fuel tank.
(b) Install the fuel suction w/ pump & gage tube.
NOTICE:
Be careful that the arm of the fuel sender gage should not
be bent.
(c) Align the triangle mark of the fuel suction w/ pump & gage
tube with the matchmark location the fuel tank.
(d) Temporarily install the fuel pump gauge retainer.
(e) Using SST, tighten the fuel pump gauge retainer until the
arrow mark is aligned with the center mark on the fuel
tank.
SST 09808±14010
NOTICE:
Do not use other tools in this operation. Damage to the fuel
pump gauge retainer and the fuel tank may result.
HINT:
A rib on the fuel pump gauge retainer can be fitted into a tip of
the SST.
(f) Check that the arrow mark and center mark are aligned
as shown in the illustration.
Page 1900 of 5135

A81614
Push
A81615
Push
A81616
Tube Joint Clip
Collar
2
1
11±88
±
FUEL FUEL PUMP ASSY(GASOLINE)
AVENSIS REPAIR MANUAL (RM1018E)
9.CONNECT FUEL EVAPORATION TUBE SUB±ASSY NO.2
(a)Push in the fuel tube connector to the pipe until it makes
ºclickº sound.
NOTICE:
�Check if there is any damage or foreign objects on the
connected part.
�After connecting, check if the fuel tube connector and
the pipe are securely connected by pulling on them.
10.CONNECT FUEL TANK MAIN TUBE SUB±ASSY
(a)Push in the fuel tube connector to the pipe until it makes ºclickº sound.
NOTICE:
�Check if there is any damage or foreign objects on the
connected part.
�After connecting, check if the fuel tube connector and
the pipe are securely connected by pulling on them.
11.C ONNECT FUEL TANK RETURN TUBE (1AZ±F SE
ENGINE TYPE)
(a)Install in the fuel return tube with the tube joint clip.
NOTICE:
�Check that there is no scratch or foreign objects on
the connecting part.
�Check that the fuel tube joint is inserted securely.
�Check that the tube joint clip is on the collar of the fuel
tube joint.
�After installing the tube joint clip, check that the fuel
tube joint has not been pulled off.
12.CHECK FOR FUEL LEAKS
HINT:
�1ZZ±FE/3ZZ±FE: 11±5
�1AZ±FE: 11±19
�1AZ±FSE: 11±33
13.INSTALL REAR FLOOR SERVICE HOLE COVER
14.INSTALL REAR SEAT CUSHION ASSY (SEAT FIXED TYPE) (See page 72±32)
Page 1901 of 5135
110U3±01
A78441� Non±reusable part
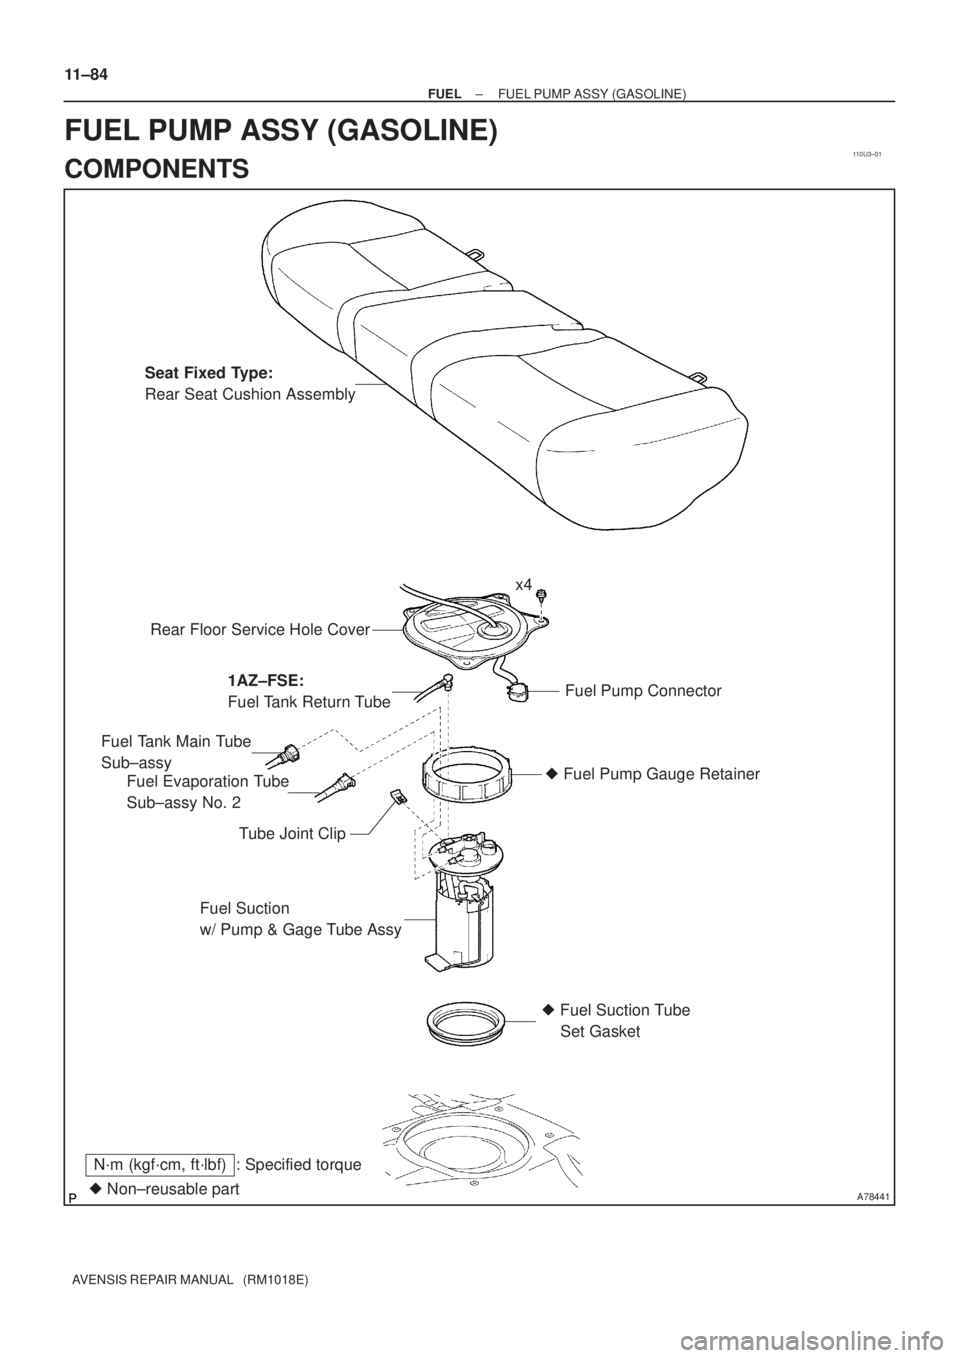
N´m (kgf´cm, ft´lbf) : Specified torqueSeat Fixed Type:
Rear Seat Cushion Assembly
Rear Floor Service Hole Cover
Fuel Pump Connector
Fuel Evaporation Tube
Sub±assy No. 2 Fuel Tank Main Tube
Sub±assy
Tube Joint Clip� Fuel Pump Gauge Retainer
Fuel Suction
w/ Pump & Gage Tube Assy
� Fuel Suction Tube
Set Gasket x4
1AZ±FSE:
Fuel Tank Return Tube
11±84
± FUELFUEL PUMP ASSY (GASOLINE)
AVENSIS REPAIR MANUAL (RM1018E)
FUEL PUMP ASSY (GASOLINE)
COMPONENTS
Page 1904 of 5135
110UC±01
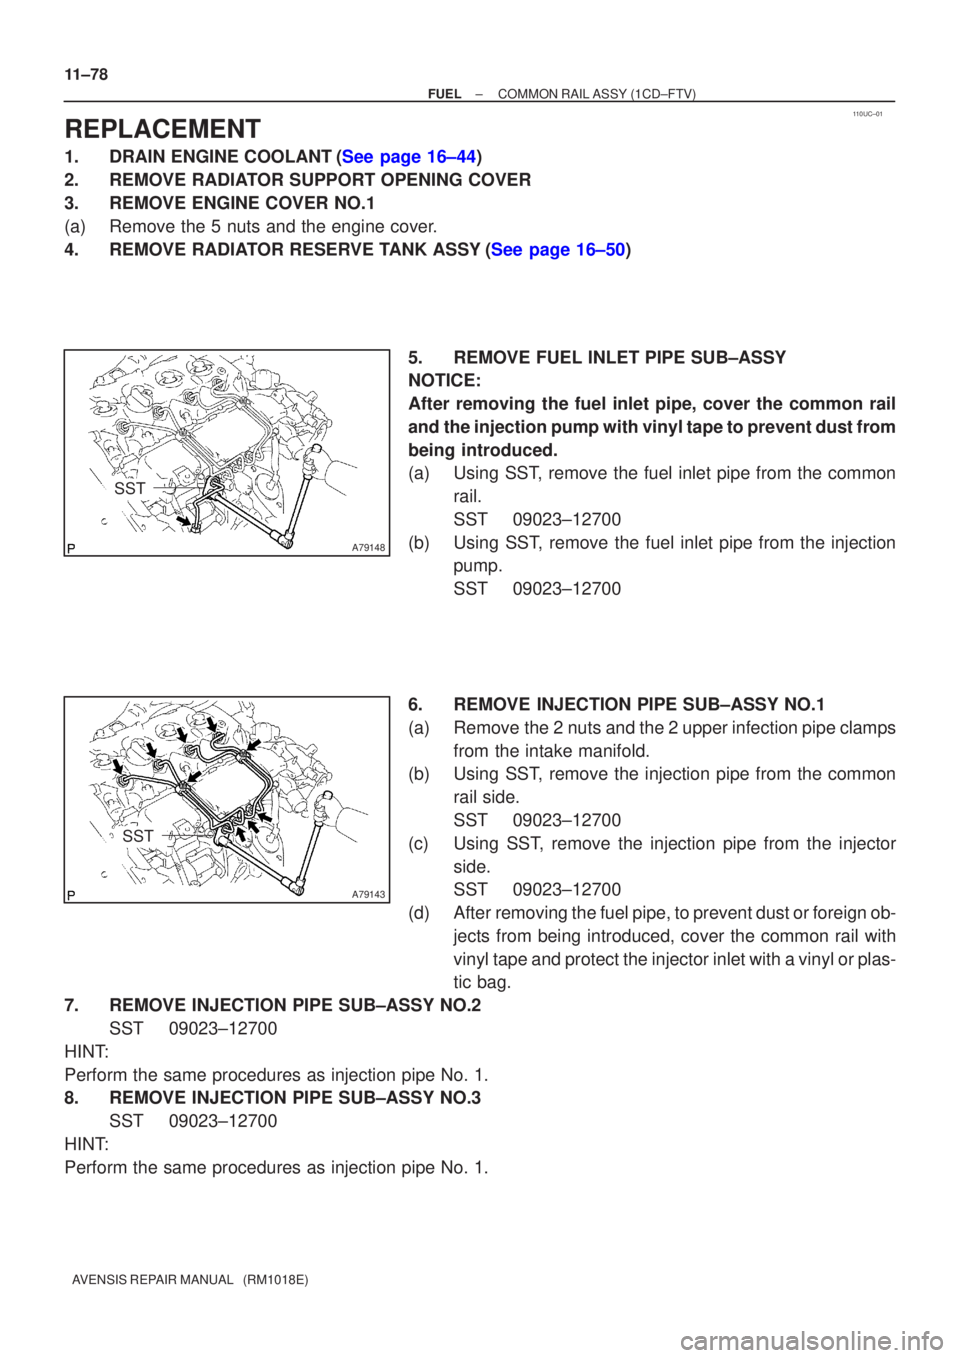
A79148
SST
A79143
SST
11±78
±
FUEL COMMON RAIL ASSY(1CD±FTV)
AVENSIS REPAIR MANUAL (RM1018E)
REPLACEMENT
1.DRAIN ENGINE COOLANT(See page 16±44)
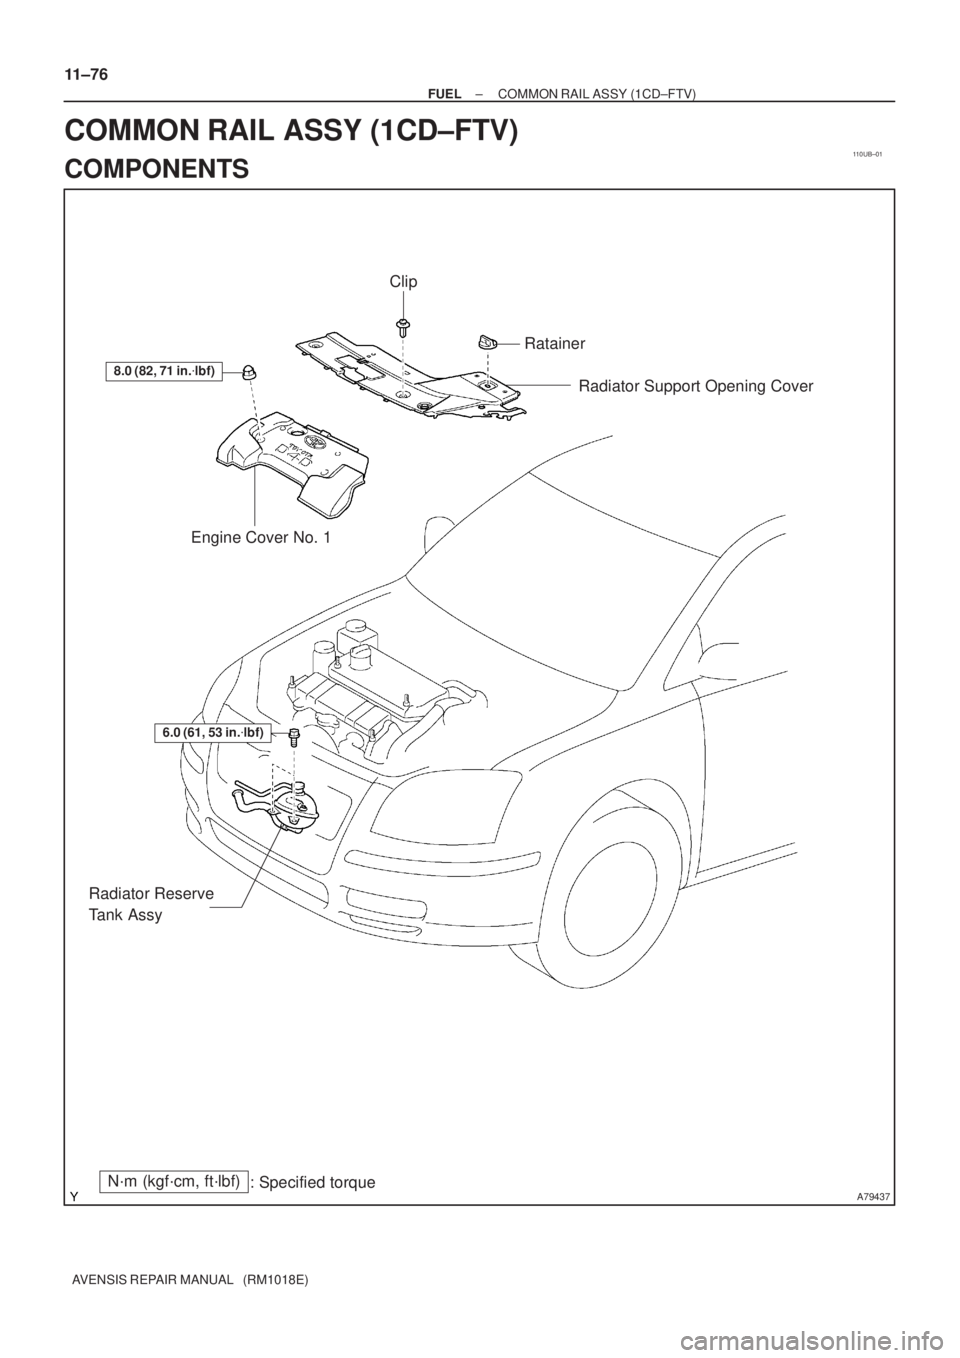
2. REMOVE RADIATOR SUPPORT OPENING COVER
3. REMOVE ENGINE COVER NO.1
(a) Remove the 5 nuts and the engine cover.
4.REMOVE RADIATOR RESERVE TANK ASSY(See page 16±50) 5. REMOVE FUEL INLET PIPE SUB±ASSY
NOTICE:
After removing the fuel inlet pipe, cover the common rail
and the injection pump with vinyl tape to prevent dust from
being introduced.
(a) Using SST, remove the fuel inlet pipe from the commonrail.
SST 09023±12700
(b) Using SST, remove the fuel inlet pipe from the injection pump.
SST 09023±12700
6. REMOVE INJECTION PIPE SUB±ASSY NO.1
(a) Remove the 2 nuts and the 2 upper infection pipe clamps from the intake manifold.
(b) Using SST, remove the injection pipe from the common
rail side.
SST 09023±12700
(c) Using SST, remove the injection pipe from the injector side.
SST 09023±12700
(d) After removing the fuel pipe, to prevent dust or foreign ob- jects from being introduced, cover the common rail with
vinyl tape and protect the injector inlet with a vinyl or plas-
tic bag.
7. REMOVE INJECTION PIPE SUB±ASSY NO.2 SST 09023±12700
HINT:
Perform the same procedures as injection pipe No. 1.
8. REMOVE INJECTION PIPE SUB±ASSY NO.3 SST 09023±12700
HINT:
Perform the same procedures as injection pipe No. 1.
Page 1907 of 5135
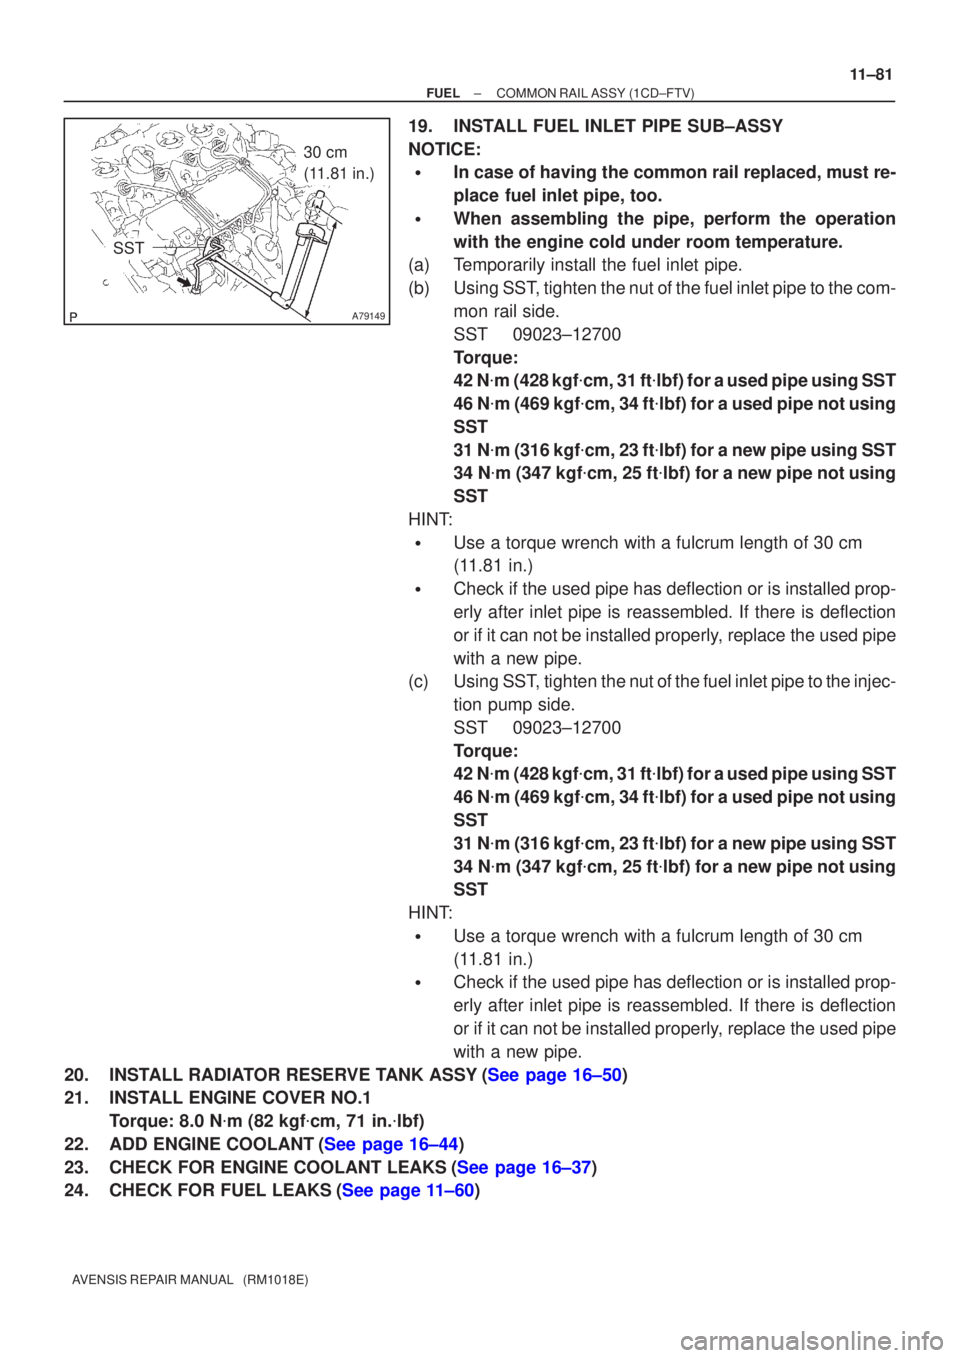
A79149
30 cm
(11.81 in.)
SST
±
FUEL COMMON RAIL ASSY(1CD±FTV)
11±81
AVENSIS REPAIR MANUAL (RM1018E)
19.INSTALL FUEL INLET PIPE SUB±ASSY
NOTICE:
�In case of having the common rail replaced, must re-
place fuel inlet pipe, too.
�When assembling the pipe, perform the operation
with the engine cold under room temperature.
(a)Temporarily install the fuel inlet pipe.
(b)Using SST, tighten the nut of the fuel inlet pipe to the com-
mon rail side.
SST09023±12700
Torque:
42 N�m (428 kgf �cm, 31 ft �lbf) for a used pipe using SST
46 N �m (469 kgf �cm, 34 ft �lbf) for a used pipe not using
SST
31 N �m (316 kgf �cm, 23 ft �lbf) for a new pipe using SST
34 N �m (347 kgf �cm, 25 ft �lbf) for a new pipe not using
SST
HINT:
�Use a torque wrench with a fulcrum length of 30 cm
(11.81 in.)
�Check if the used pipe has deflection or is installed prop-
erly after inlet pipe is reassembled. If there is deflection
or if it can not be installed properly, replace the used pipe
with a new pipe.
(c)Using SST, tighten the nut of the fuel inlet pipe to the injec-
tion pump side.
SST09023±12700
Torque:
42 N�m (428 kgf �cm, 31 ft �lbf) for a used pipe using SST
46 N �m (469 kgf �cm, 34 ft �lbf) for a used pipe not using
SST
31 N �m (316 kgf �cm, 23 ft �lbf) for a new pipe using SST
34 N �m (347 kgf �cm, 25 ft �lbf) for a new pipe not using
SST
HINT:
�Use a torque wrench with a fulcrum length of 30 cm
(11.81 in.)
�Check if the used pipe has deflection or is installed prop-
erly after inlet pipe is reassembled. If there is deflection
or if it can not be installed properly, replace the used pipe
with a new pipe.
20.INSTALL RADIATOR RESERVE TANK ASSY(See page 16±50)
21. INSTALL ENGINE COVER NO.1 Torque: 8.0 N �m (82 kgf �cm, 71 in. �lbf)
22.ADD ENGINE COOLANT(See page 16±44)
23.CHECK FOR ENGINE COOLANT LEAKS(See page 16±37)
24.CHECK FOR FUEL LEAKS(See page 11±60)
Page 1908 of 5135
110UB±01
A79437
8.0 (82, 71 in.�lbf)
Engine Cover No. 1Radiator Support Opening Cover
N´m (kgf´cm, ft´lbf)
: Specified torque
6.0 (61, 53 in.�lbf)
Radiator Reserve
Tank Assy
Clip
Ratainer
11±76
± FUELCOMMON RAIL ASSY (1CD±FTV)
AVENSIS REPAIR MANUAL (RM1018E)
COMMON RAIL ASSY (1CD±FTV)
COMPONENTS
Page 1910 of 5135
110UA±01
A15950
±
FUEL INJECTION OR SUPPLY PUMP ASSY(1CD±FTV)
11±69
AVENSIS REPAIR MANUAL (RM1018E)
REPLACEMENT
1.REMOVE FRONT WHEEL RH
2.DRAIN ENGINE COOLANT(See page 16±44)
3.REMOVE ENGINE UNDER COVER SUB±ASSY NO.1
4.REMOVE ENGINE UNDER COVER RH
5.REMOVE RADIATOR SUPPORT OPENING COVER
6.REMOVE ENGINE ROOM COVER SIDE
7.REMOVE AIR CLEANER ASSY (See page 11±60)
8.REMOVE ENGINE COVER NO.1
(a)Remove the 5 nuts and the engine cover.
9.REMOVE RADIATOR RESERVE TANK ASSY(See page 16±50)
10.DISCONNECT RADIATOR HOSE OUTLET
(a)Disconnect the radiator hose outlet from the water inlet.
11.REMOVE V (COOLER COMPRESSOR TO CRANKSHAFT PULLEY) BELT NO.1
(See page 14±269)
12.REMOVE GENERATOR V BELT (See page 14±269)
13.REMOVE INJECTOR DRIVER
(a)Remove the 2 nuts which are used to secure the injector driver.
(b)Disconnect the injector driver connector and the harness clamp.
(c)Remove the injector driver.
14.REMOVE ENGINE MOUNTING INSULATOR SUB±ASSY RH(See page 14±307)
15.REMOVE CRANKSHAFT PULLEY(See page 14±307)
SST09213±54015 (90105±08076), 09330±00021, 09950±50013 (0995\
1±05010, 09952±05010, 09953±05020, 09954±05031)
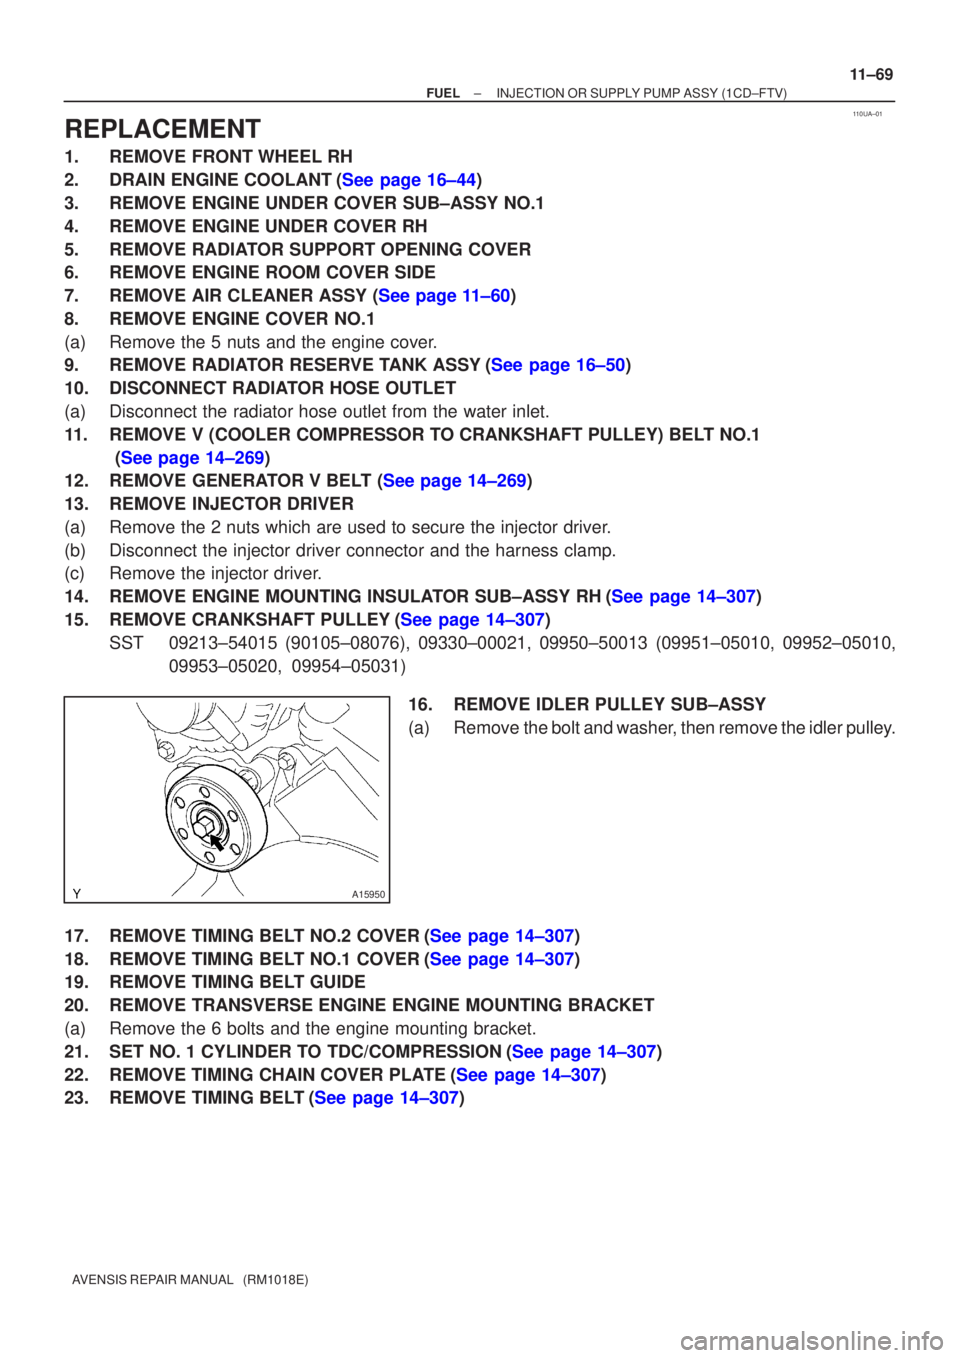
16.REMOVE IDLER PULLEY SUB±ASSY
(a)Remove the bolt and washer, then remove the idler pulley.
17.REMOVE TIMING BELT NO.2 COVER(See page 14±307)
18.REMOVE TIMING BELT NO.1 COVER(See page 14±307)
19. REMOVE TIMING BELT GUIDE
20. REMOVE TRANSVERSE ENGINE ENGINE MOUNTING BRACKET
(a) Remove the 6 bolts and the engine mounting bracket.
21.SET NO. 1 CYLINDER TO TDC/COMPRESSION(See page 14±307)
22.REMOVE TIMING CHAIN COVER PLATE(See page 14±307)
23.REMOVE TIMING BELT(See page 14±307)
Page 1916 of 5135
±
FUEL INJECTION OR SUPPLY PUMP ASSY (1CD±FTV)
11±75
AVENSIS REPAIR MANUAL (RM1018E)
52.INSTALL TIMING BELT GUIDE(See page 14±307)
53.INSTALL TIMING BELT NO.1 COVER(See page 14±307)
54.INSTALL TIMING BELT NO.2 COVER(See page 14±307)
55. INSTALL IDLER PULLEY SUB±ASSY
Torque: 40 N �m (408 kgf �cm, 30 ft �lbf)
56.INSTALL CRANKSHAFT PULLEY(See page 14±307) SST 09213±54015 (90105±08076), 09330±00021
57.INSTALL ENGINE MOUNTING INSULATOR SUB±ASSY RH(See page 14±307)
58. INSTALL INJECTOR DRIVER Torque: 5.0 N �m (51 kgf �cm, 44 in. �lbf)
59. ADJUST V (COOLER COMPRESSOR TO CRANKSHAFT PULLEY) BELT NO.1 (See page 14±269)
60.INSTALL RADIATOR RESERVE TANK ASSY(See page 16±50)
61. INSTALL ENGINE COVER NO.1 Torque: 8.0 N �m (82 kgf �cm, 71 in. �lbf)
62.INSTALL AIR CLEANER ASSY (See page 11±60)
63. INSTALL FRONT WHEEL RH
Torque: 103 N �m (1,050 kgf �cm, 76 ft �lbf)
64.ADD ENGINE COOLANT(See page 16±44)
65.CHECK FOR ENGINE COOLANT LEAKS(See page 16±37)
66.CHECK FOR FUEL LEAKS(See page 11±60)