Page 3525 of 5135
410DG±01
D30520
Apply MP grease
1st Gear Thrust Washer Pin Or Ball
Output Shaft
1st Gear Needle Roller Bearing
1st Gear Thrust Washer
1st Gear
Reverse Gear
Synchronizer Ring No.1 (For 1st)
Synchromesh Shifting Key No.1
Synchromesh Shifting Key Spring No.1
Synchronizer Ring No.1 (For 2nd)
Clutch Hub No.1
Shaft Snap Ring
Transmission Clutch Hub No.1
2nd Gear Bearing Spacer
2nd Gear Needle Roller Bearing
2nd Gear
3rd Driven Gear
Output Gear Spacer
4th Driver Gear
Output Shaft Rear Bearing
x3
x3
± MANUAL TRANSMISSION/TRANSAXLEOUTPUT SHAFT ASSY (C250)
41±47
C250 M/T REPAIR MANUAL (RM1020E)
OUTPUT SHAFT ASSY (C250)
COMPONENTS
Page 3526 of 5135
410DF±01
C80557
C67816
C80558
C67815
41±38
± MANUAL TRANSMISSION/TRANSAXLEINPUT SHAFT ASSY (C250)
C250 M/T REPAIR MANUAL (RM1020E)
OVERHAUL
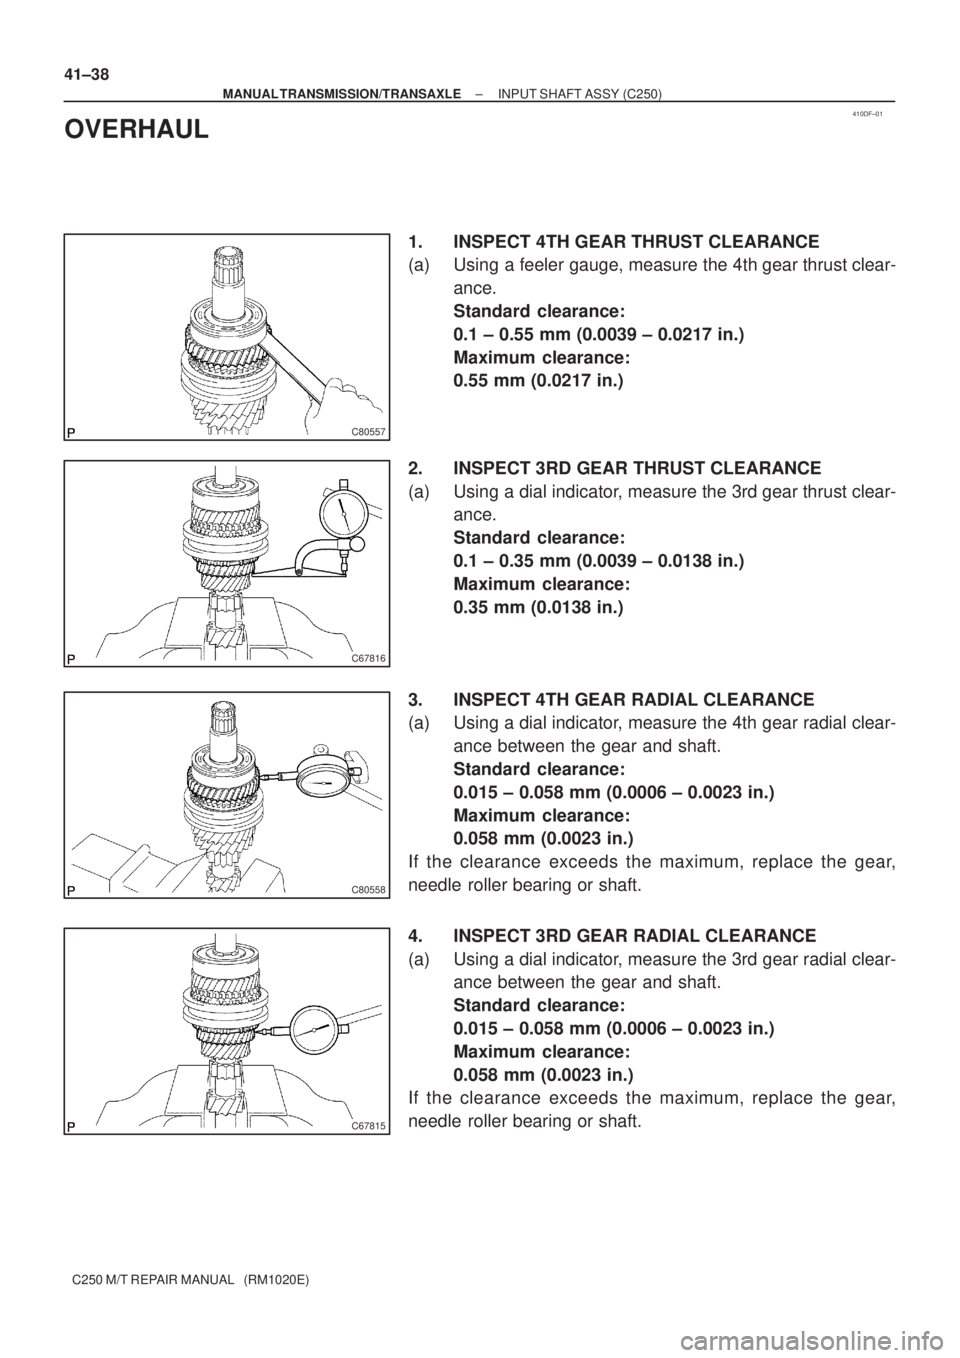
1. INSPECT 4TH GEAR THRUST CLEARANCE
(a) Using a feeler gauge, measure the 4th gear thrust clear-
ance.
Standard clearance:
0.1 ± 0.55 mm (0.0039 ± 0.0217 in.)
Maximum clearance:
0.55 mm (0.0217 in.)
2. INSPECT 3RD GEAR THRUST CLEARANCE
(a) Using a dial indicator, measure the 3rd gear thrust clear-
ance.
Standard clearance:
0.1 ± 0.35 mm (0.0039 ± 0.0138 in.)
Maximum clearance:
0.35 mm (0.0138 in.)
3. INSPECT 4TH GEAR RADIAL CLEARANCE
(a) Using a dial indicator, measure the 4th gear radial clear-
ance between the gear and shaft.
Standard clearance:
0.015 ± 0.058 mm (0.0006 ± 0.0023 in.)
Maximum clearance:
0.058 mm (0.0023 in.)
If the clearance exceeds the maximum, replace the gear,
needle roller bearing or shaft.
4. INSPECT 3RD GEAR RADIAL CLEARANCE
(a) Using a dial indicator, measure the 3rd gear radial clear-
ance between the gear and shaft.
Standard clearance:
0.015 ± 0.058 mm (0.0006 ± 0.0023 in.)
Maximum clearance:
0.058 mm (0.0023 in.)
If the clearance exceeds the maximum, replace the gear,
needle roller bearing or shaft.
Page 3527 of 5135
C80559
Q04983
SST
C80560
C80561
C67821
± MANUAL TRANSMISSION/TRANSAXLEINPUT SHAFT ASSY (C250)
41±39
C250 M/T REPAIR MANUAL (RM1020E)
5. REMOVE 4TH GEAR
(a) Using 2 screwdrivers and a hammer, remove the input
shaft rear bearing shaft snap ring from input shaft.
(b) Using SST and a press, remove the input shaft radial ball
bearing rear and 4th gear from input shaft.
NOTICE:
Do not tighten SST excessively.
SST 09950±00020
6. REMOVE 4TH GEAR NEEDLE ROLLER BEARING
(a) Remove the 4th gear needle roller bearing and 4th gear
bearing spacer from input shaft.
7. REMOVE SYNCHRONIZER RING NO.2 (FOR FOURTH
SYNCHRONIZER RING)
(a) Remove synchronizer ring No.2 from transmission clutch
hub No.2.
8. REMOVE 3RD GEAR
(a) Using 2 screwdrivers and a hammer, remove the clutch
hub No.2 setting shaft snap ring from the input shaft.
NOTICE:
Using a shop rug to prevent the snap ring from being scat-
tered.
Page 3528 of 5135
CM0064
SST
C68515
C67823
C67832
CM0013
41±40
± MANUAL TRANSMISSION/TRANSAXLEINPUT SHAFT ASSY (C250)
C250 M/T REPAIR MANUAL (RM1020E)
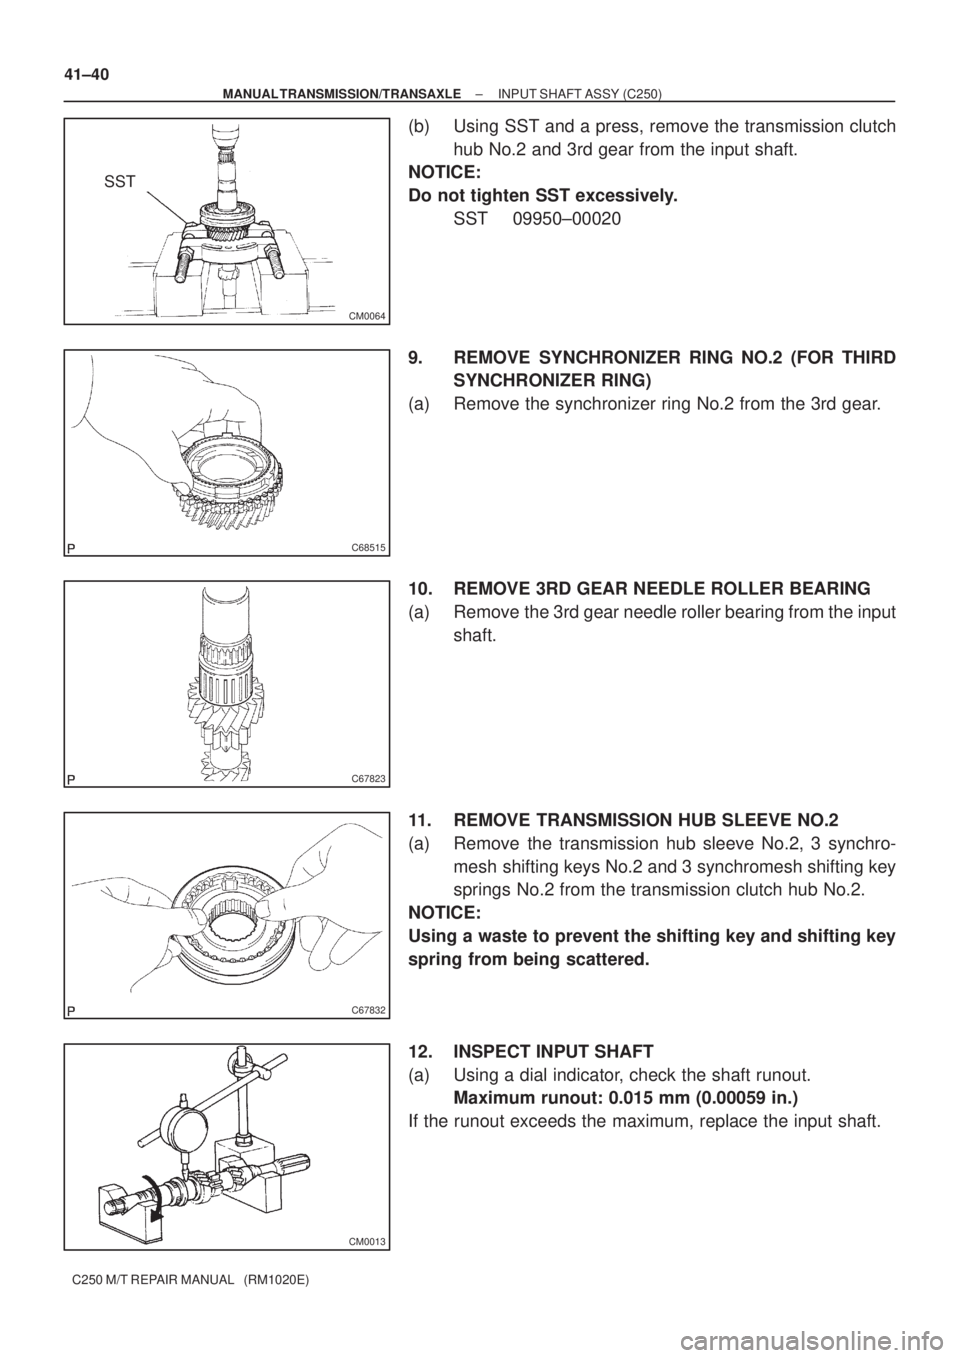
(b) Using SST and a press, remove the transmission clutch
hub No.2 and 3rd gear from the input shaft.
NOTICE:
Do not tighten SST excessively.
SST 09950±00020
9. REMOVE SYNCHRONIZER RING NO.2 (FOR THIRD
SYNCHRONIZER RING)
(a) Remove the synchronizer ring No.2 from the 3rd gear.
10. REMOVE 3RD GEAR NEEDLE ROLLER BEARING
(a) Remove the 3rd gear needle roller bearing from the input
shaft.
11. REMOVE TRANSMISSION HUB SLEEVE NO.2
(a) Remove the transmission hub sleeve No.2, 3 synchro-
mesh shifting keys No.2 and 3 synchromesh shifting key
springs No.2 from the transmission clutch hub No.2.
NOTICE:
Using a waste to prevent the shifting key and shifting key
spring from being scattered.
12. INSPECT INPUT SHAFT
(a) Using a dial indicator, check the shaft runout.
Maximum runout: 0.015 mm (0.00059 in.)
If the runout exceeds the maximum, replace the input shaft.
Page 3529 of 5135
ABC
D
C80562
C67826
C67827
± MANUAL TRANSMISSION/TRANSAXLEINPUT SHAFT ASSY (C250)
41±41
C250 M/T REPAIR MANUAL (RM1020E)
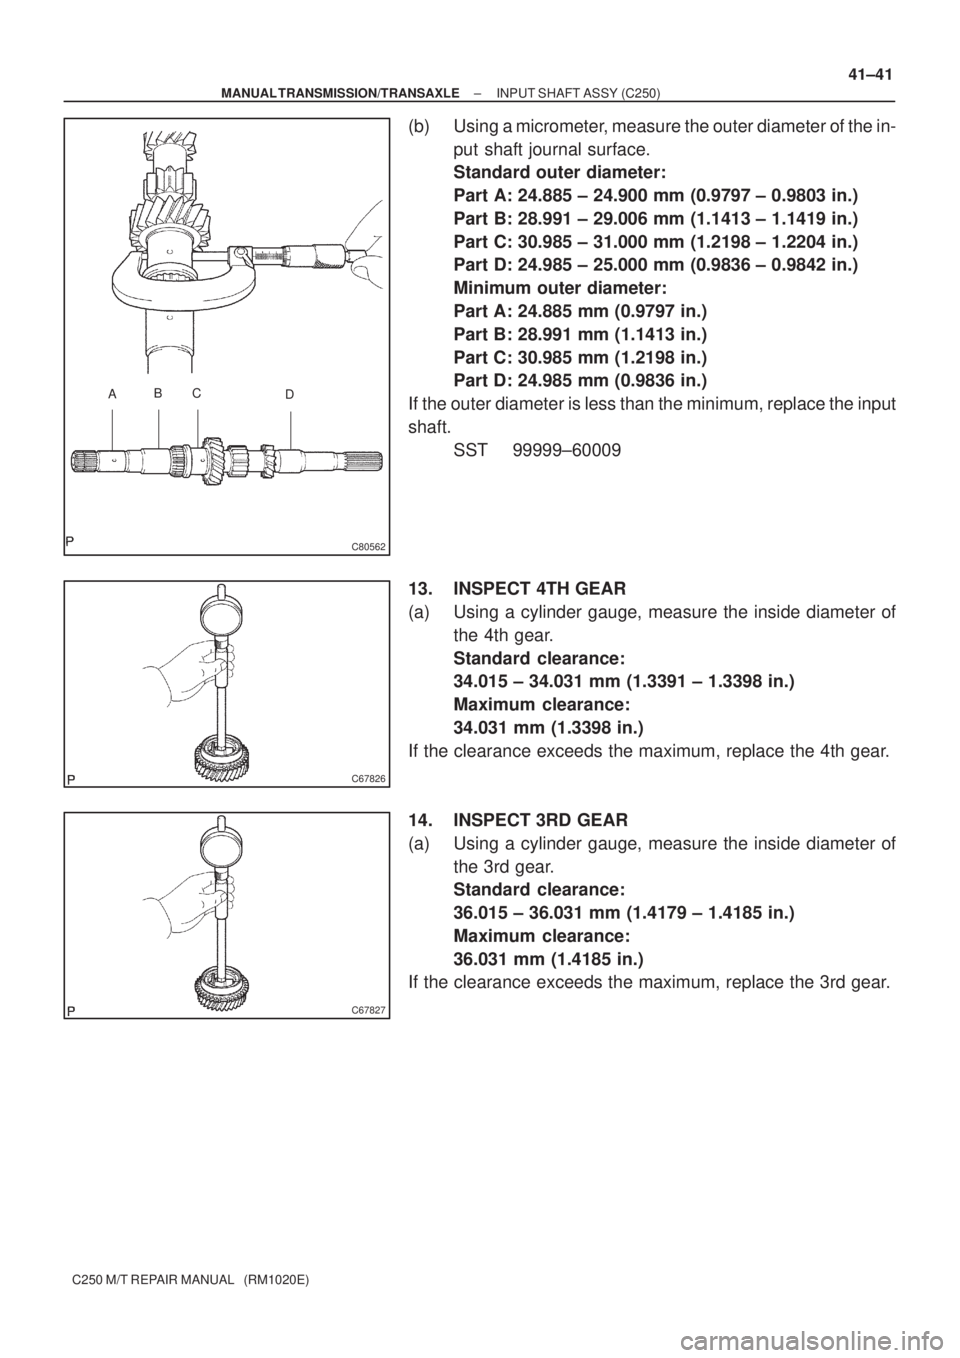
(b) Using a micrometer, measure the outer diameter of the in-
put shaft journal surface.
Standard outer diameter:
Part A: 24.885 ± 24.900 mm (0.9797 ± 0.9803 in.)
Part B: 28.991 ± 29.006 mm (1.1413 ± 1.1419 in.)
Part C: 30.985 ± 31.000 mm (1.2198 ± 1.2204 in.)
Part D: 24.985 ± 25.000 mm (0.9836 ± 0.9842 in.)
Minimum outer diameter:
Part A: 24.885 mm (0.9797 in.)
Part B: 28.991 mm (1.1413 in.)
Part C: 30.985 mm (1.2198 in.)
Part D: 24.985 mm (0.9836 in.)
If the outer diameter is less than the minimum, replace the input
shaft.
SST 99999±60009
13. INSPECT 4TH GEAR
(a) Using a cylinder gauge, measure the inside diameter of
the 4th gear.
Standard clearance:
34.015 ± 34.031 mm (1.3391 ± 1.3398 in.)
Maximum clearance:
34.031 mm (1.3398 in.)
If the clearance exceeds the maximum, replace the 4th gear.
14. INSPECT 3RD GEAR
(a) Using a cylinder gauge, measure the inside diameter of
the 3rd gear.
Standard clearance:
36.015 ± 36.031 mm (1.4179 ± 1.4185 in.)
Maximum clearance:
36.031 mm (1.4185 in.)
If the clearance exceeds the maximum, replace the 3rd gear.
Page 3530 of 5135
C67828
C67829
C67830
41±42
± MANUAL TRANSMISSION/TRANSAXLEINPUT SHAFT ASSY (C250)
C250 M/T REPAIR MANUAL (RM1020E)
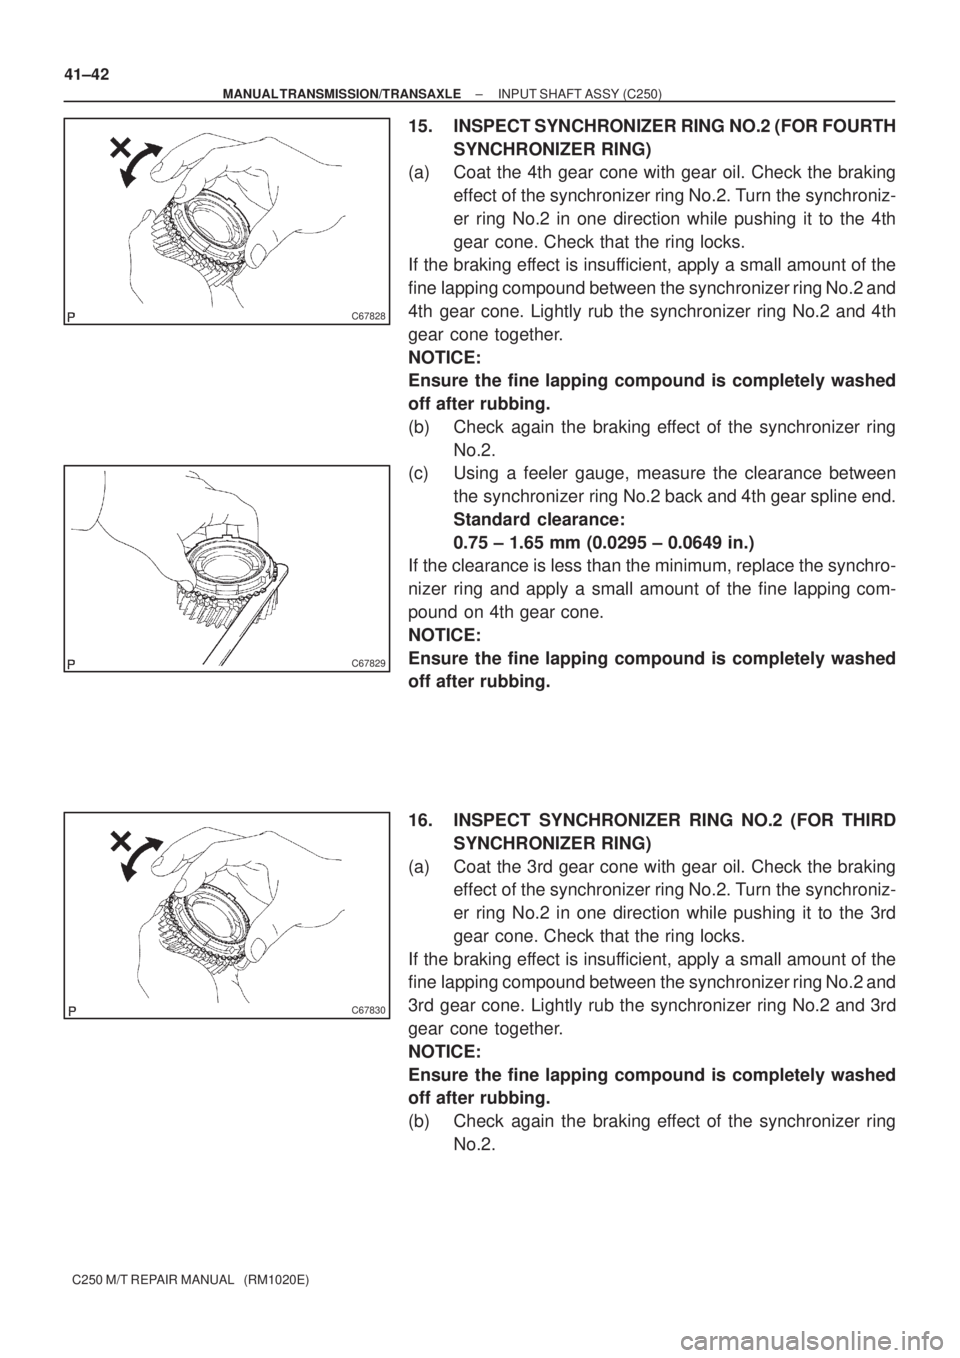
15. INSPECT SYNCHRONIZER RING NO.2 (FOR FOURTH
SYNCHRONIZER RING)
(a) Coat the 4th gear cone with gear oil. Check the braking
effect of the synchronizer ring No.2. Turn the synchroniz-
er ring No.2 in one direction while pushing it to the 4th
gear cone. Check that the ring locks.
If the braking effect is insufficient, apply a small amount of the
fine lapping compound between the synchronizer ring No.2 and
4th gear cone. Lightly rub the synchronizer ring No.2 and 4th
gear cone together.
NOTICE:
Ensure the fine lapping compound is completely washed
off after rubbing.
(b) Check again the braking effect of the synchronizer ring
No.2.
(c) Using a feeler gauge, measure the clearance between
the synchronizer ring No.2 back and 4th gear spline end.
Standard clearance:
0.75 ± 1.65 mm (0.0295 ± 0.0649 in.)
If the clearance is less than the minimum, replace the synchro-
nizer ring and apply a small amount of the fine lapping com-
pound on 4th gear cone.
NOTICE:
Ensure the fine lapping compound is completely washed
off after rubbing.
16. INSPECT SYNCHRONIZER RING NO.2 (FOR THIRD
SYNCHRONIZER RING)
(a) Coat the 3rd gear cone with gear oil. Check the braking
effect of the synchronizer ring No.2. Turn the synchroniz-
er ring No.2 in one direction while pushing it to the 3rd
gear cone. Check that the ring locks.
If the braking effect is insufficient, apply a small amount of the
fine lapping compound between the synchronizer ring No.2 and
3rd gear cone. Lightly rub the synchronizer ring No.2 and 3rd
gear cone together.
NOTICE:
Ensure the fine lapping compound is completely washed
off after rubbing.
(b) Check again the braking effect of the synchronizer ring
No.2.
Page 3531 of 5135
C67831
C67843
C67842
C67833
± MANUAL TRANSMISSION/TRANSAXLEINPUT SHAFT ASSY (C250)
41±43
C250 M/T REPAIR MANUAL (RM1020E)
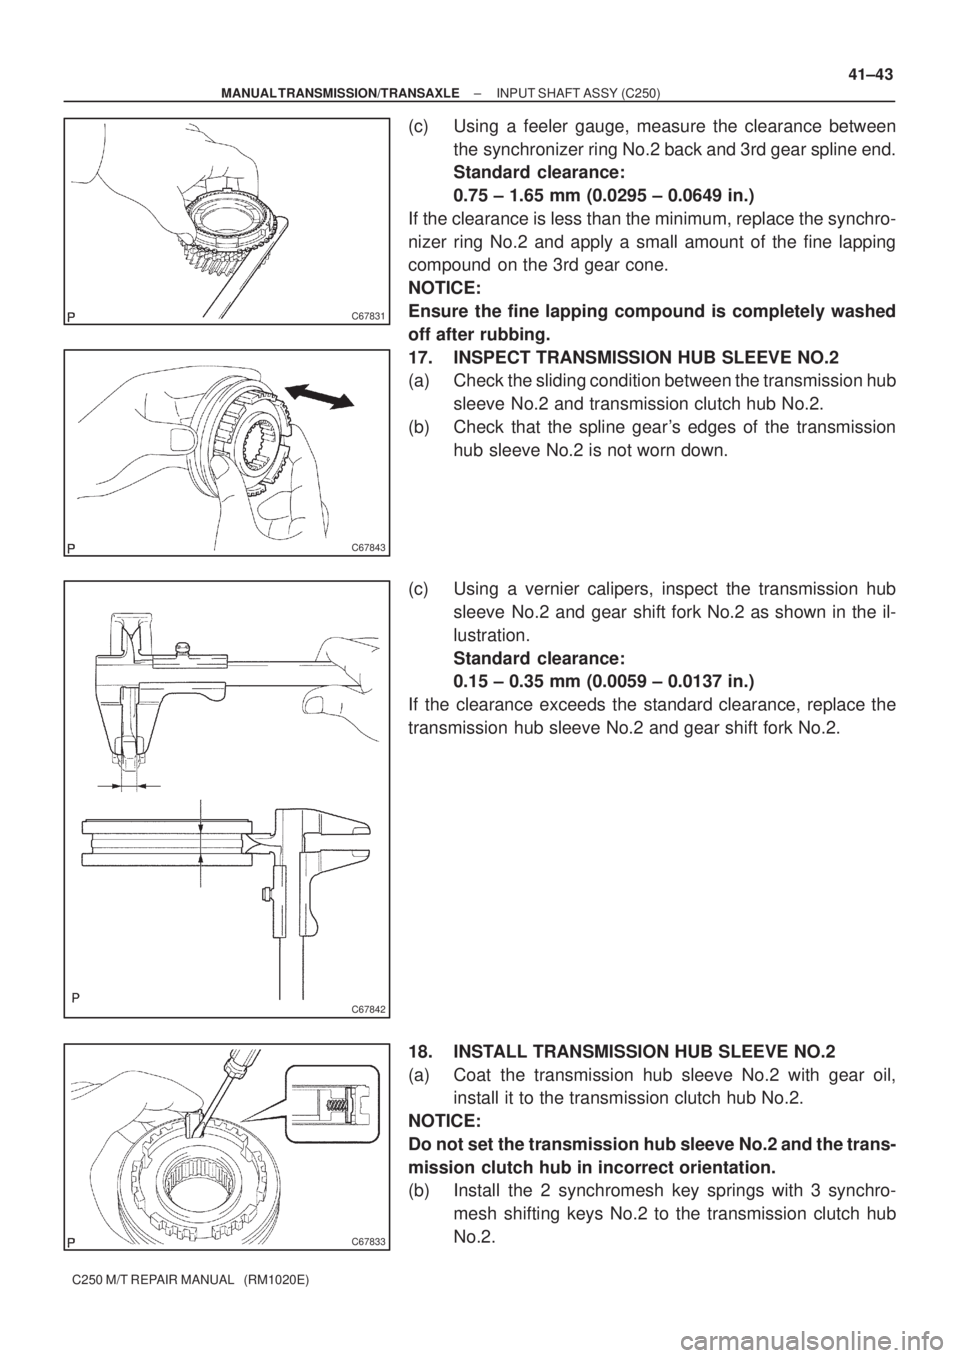
(c) Using a feeler gauge, measure the clearance between
the synchronizer ring No.2 back and 3rd gear spline end.
Standard clearance:
0.75 ± 1.65 mm (0.0295 ± 0.0649 in.)
If the clearance is less than the minimum, replace the synchro-
nizer ring No.2 and apply a small amount of the fine lapping
compound on the 3rd gear cone.
NOTICE:
Ensure the fine lapping compound is completely washed
off after rubbing.
17. INSPECT TRANSMISSION HUB SLEEVE NO.2
(a) Check the sliding condition between the transmission hub
sleeve No.2 and transmission clutch hub No.2.
(b) Check that the spline gear's edges of the transmission
hub sleeve No.2 is not worn down.
(c) Using a vernier calipers, inspect the transmission hub
sleeve No.2 and gear shift fork No.2 as shown in the il-
lustration.
Standard clearance:
0.15 ± 0.35 mm (0.0059 ± 0.0137 in.)
If the clearance exceeds the standard clearance, replace the
transmission hub sleeve No.2 and gear shift fork No.2.
18. INSTALL TRANSMISSION HUB SLEEVE NO.2
(a) Coat the transmission hub sleeve No.2 with gear oil,
install it to the transmission clutch hub No.2.
NOTICE:
Do not set the transmission hub sleeve No.2 and the trans-
mission clutch hub in incorrect orientation.
(b) Install the 2 synchromesh key springs with 3 synchro-
mesh shifting keys No.2 to the transmission clutch hub
No.2.
Page 3532 of 5135
C67823
C67834
C82010
Key Position
For 3rd gear
C80563
SST
C67837
41±44
± MANUAL TRANSMISSION/TRANSAXLEINPUT SHAFT ASSY (C250)
C250 M/T REPAIR MANUAL (RM1020E)
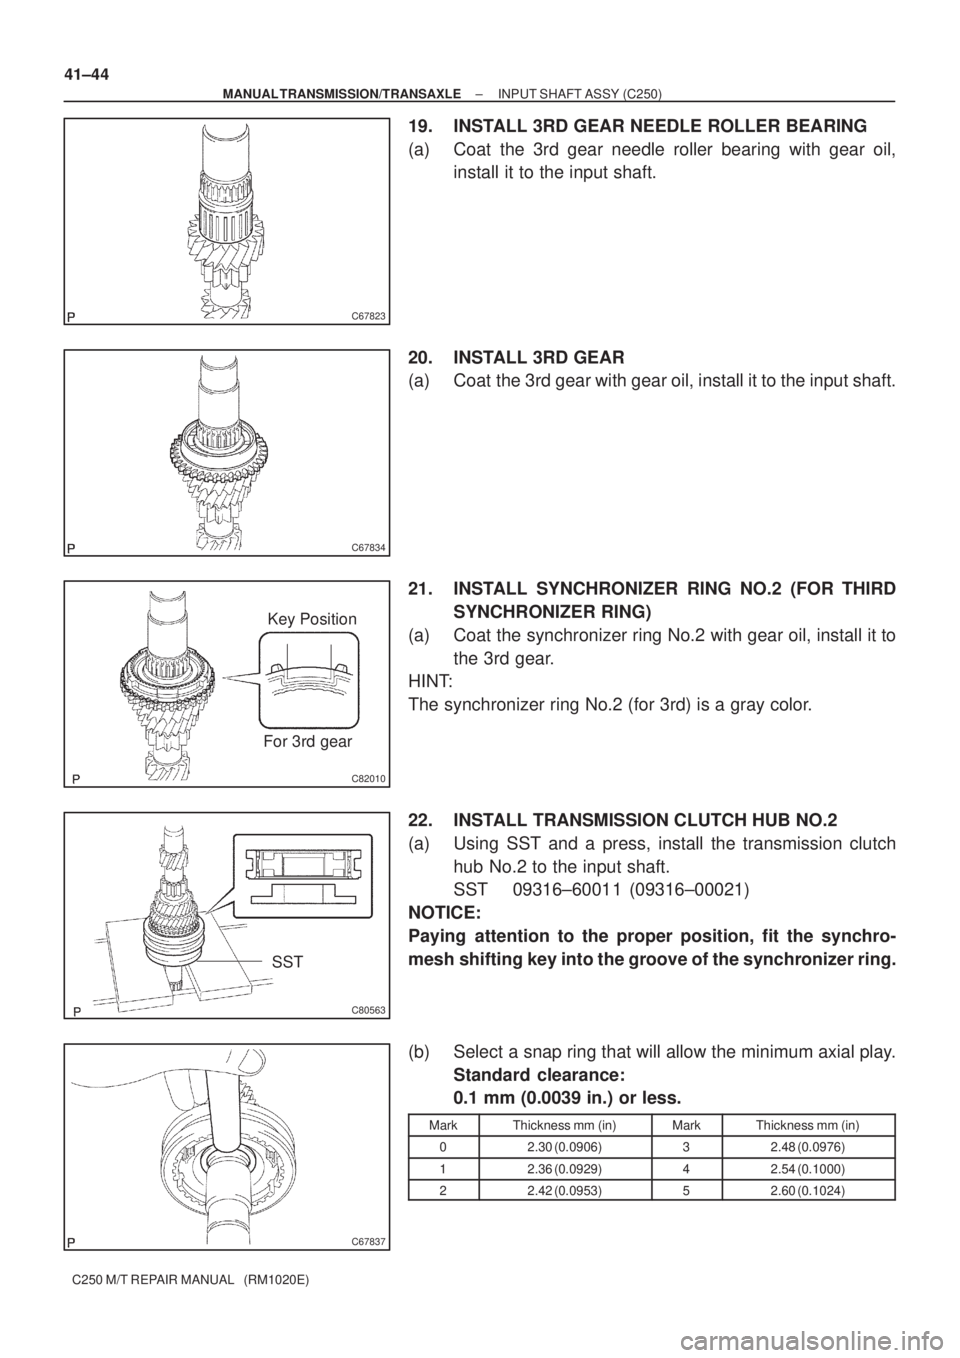
19. INSTALL 3RD GEAR NEEDLE ROLLER BEARING
(a) Coat the 3rd gear needle roller bearing with gear oil,
install it to the input shaft.
20. INSTALL 3RD GEAR
(a) Coat the 3rd gear with gear oil, install it to the input shaft.
21. INSTALL SYNCHRONIZER RING NO.2 (FOR THIRD
SYNCHRONIZER RING)
(a) Coat the synchronizer ring No.2 with gear oil, install it to
the 3rd gear.
HINT:
The synchronizer ring No.2 (for 3rd) is a gray color.
22. INSTALL TRANSMISSION CLUTCH HUB NO.2
(a) Using SST and a press, install the transmission clutch
hub No.2 to the input shaft.
SST 09316±60011 (09316±00021)
NOTICE:
Paying attention to the proper position, fit the synchro-
mesh shifting key into the groove of the synchronizer ring.
(b) Select a snap ring that will allow the minimum axial play.
Standard clearance:
0.1 mm (0.0039 in.) or less.
MarkThickness mm (in)MarkThickness mm (in)
02.30 (0.0906)32.48 (0.0976)
12.36 (0.0929)42.54 (0.1000)
22.42 (0.0953)52.60 (0.1024)