Page 1325 of 1500
SPECIAL TOOLS
TRACTION CONTROL SYSTEM (TCL)13C-46
MB991223
A: MB991219
B: MB991220
C: MB991221
D: MB991222
Harness set
A: Inspection harness
B: LED harness
C: LED harness adapter
D: ProbeGeneral service tools Checking the continuity
and measuring the
voltage at the harness
connector TOOL TOOL NUMBER AND NAME SUPERSESSION APPLICATION
Page 1326 of 1500
ON-VEHICLE SERVICE
TRACTION CONTROL SYSTEM (TCL)13C-47
ON-VEHICLE SERVICE
TCL INDICATOR LIGHT CHECKM1136000900058
1. Check that the "TCL OFF" indicator light and the TCL work
indicator light illuminate for three seconds when the ignition
switch is turned to the "ON" position.
2. Check that the "TCL OFF" indicator light illuminates and
goes off in cycles each time the TCL switch is pushed after
starting the engine.
3. Check that the "TCL OFF" indicator light and the TCL work
indicator light do not illuminate, when driving at 30km/h
(37.5 mph) for more than 2 seconds.
4. If defective, repair it. (Refer to P.13C-23, TCL diagnosis
Symptom Procedures
Inspection Procedure 1, 2, 3 and 4).
TCL OPERATION CHECKM1136001100055
Required Special Tools:
MB991958: Diagnostic Tool (MUT-III Sub Assembly)
MB991824: V.C.I.
MB991827: MUT-III USB Cable
MB991910: MUT-III Main Harness A
Page 1327 of 1500
ON-VEHICLE SERVICE
TRACTION CONTROL SYSTEM (TCL)13C-48
To prevent damage to diagnostic tool MB991958, always
turn the ignition switch to the "LOCK" (OFF) position
before connecting or disconnecting diagnostic tool
MB991958.
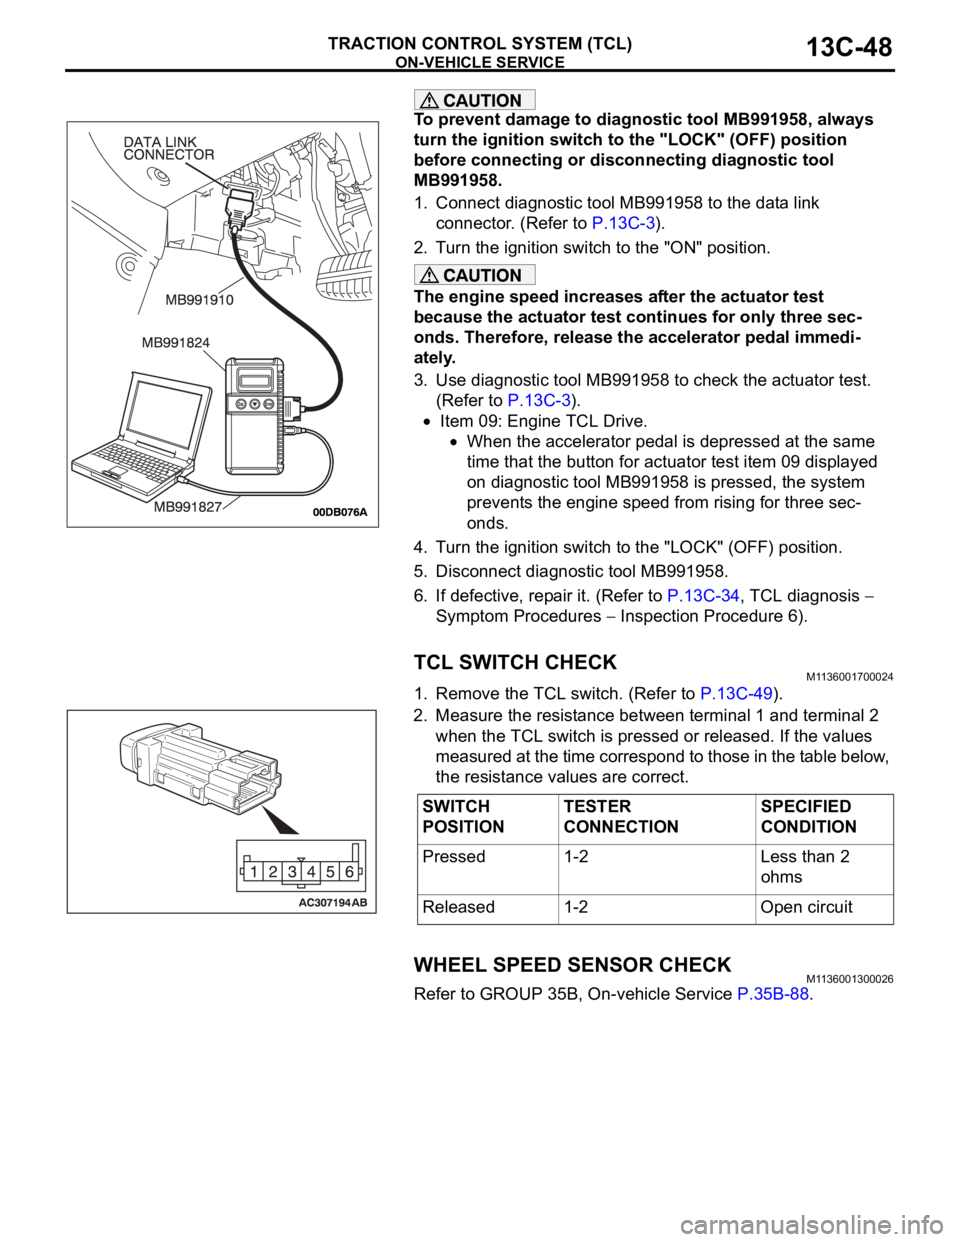
1. Connect diagnostic tool MB991958 to the data link
connector. (Refer to P.13C-3).
2. Turn the ignition switch to the "ON" position.
The engine speed increases after the actuator test
because the actuator test continues for only three sec-
onds. Therefore, release the accelerator pedal immedi-
ately.
3. Use diagnostic tool MB991958 to check the actuator test.
(Refer to P.13C-3).
Item 09: Engine TCL Drive.
When the accelerator pedal is depressed at the same
time that the button for actuator test item 09 displayed
on diagnostic tool MB991958 is pressed, the system
prevents the engine speed from rising for three sec-
onds.
4. Turn the ignition switch to the "LOCK" (OFF) position.
5. Disconnect diagnostic tool MB991958.
6. If defective, repair it. (Refer to P.13C-34, TCL diagnosis
Symptom Procedures
Inspection Procedure 6).
TCL SWITCH CHECKM1136001700024
1. Remove the TCL switch. (Refer to P.13C-49).
2. Measure the resistance between terminal 1 and terminal 2
when the TCL switch is pressed or released. If the values
measured at the time correspond to those in the table below,
the resistance values are correct.
WHEEL SPEED SENSOR CHECKM1136001300026
Refer to GROUP 35B, On-vehicle Service P.35B-88.
SWITCH
POSITIONTESTER
CONNECTIONSPECIFIED
CONDITION
Pressed 1-2 Less than 2
ohms
Released 1-2 Open circuit
Page 1332 of 1500
17-1
GROUP 17
ENGINE AND
EMISSION
CONTROL
CONTENTS
ENGINE CONTROL. . . . . . . . . .
17-3
GENERAL DESCRIPTION . . . . . .
17-3
ENGINE CONTROL SYSTEM
DIAGNOSIS . . . . . . . . . . . . . . . . . .
17-3
INTRODUCTION . . . . . . . . . . . . . . . . . . 17-3
TROUBLESHOOTING STRATEGY . . . 17-3
SYMPTOM CHART . . . . . . . . . . . . . . . . 17-4
SYMPTOM PROCEDURES . . . . . . . . . 17-4
SPECIAL TOOL . . . . . . . . . . . . . . .17-8
ACCELERATOR PEDAL . . . . . . . .17-9
REMOVAL AND INSTALLATION . . . . . 17-9
AUTO-CRUISE CONTROL . . . .17-10
GENERAL DESCRIPTION . . . . . .
17-10
AUTO-CRUISE CONTROL SYSTEM
DIAGNOSIS . . . . . . . . . . . . . . . . . .
17-10
INTRODUCTION TO AUTO-CRUISE
CONTROL SYSTEM DIAGNOSIS . . . . . 17-10
DIAGNOSTIC TROUBLESHOOTING
STRATEGY . . . . . . . . . . . . . . . . . . . . . . 17-11
DIAGNOSTIC FUNCTION . . . . . . . . . . . 17-11
DIAGNOSTIC TROUBLE CODE CHART17-14
DIAGNOSTIC TROUBLE CODE
PROCEDURES . . . . . . . . . . . . . . . . . . . 17-15
SYMPTOM CHART . . . . . . . . . . . . . . . . 17-53
SYMPTOM PROCEDURES . . . . . . . . . . 17-54
DATA LIST REFERENCE TABLE . . . . . 17-65
ENGINE ECU TERMINAL VOLTAGE
REFERENCE CHART FOR AUTO-CRUISE
CONTROL SYSTEM OPERATION . . . . 17-67
SPECIAL TOOLS . . . . . . . . . . . . . .17-69
ON-VEHICLE SERVICE . . . . . . . . .17-71
AUTO-CRUISE CONTROL SWITCH
CHECK . . . . . . . . . . . . . . . . . . . . . . . . . . 17-71
AUTO-CRUISE CONTROL SYSTEM
COMPONENT CHECK. . . . . . . . . . . . . . 17-73
AUTO-CRUISE CONTROL. . . . . . .17-75
REMOVAL AND INSTALLATION . . . . . . 17-75
Continued on next page
Page 1342 of 1500
AUTO-CRUISE CONTROL
ENGINE AND EMISSION CONTROL17-11
components, the Engine ECU estimates where the
problem may be occurring, and will set a diagnostic
trouble code. Diagnostic trouble codes cover the
auto-cruise control switch, stoplamp switch and
Engine ECU.
DIAGNOSTIC TROUBLESHOOTING STRATEGYM1172002000484
Use these steps to plan your diagnostic strategy. If
you follow them carefully, you will check most of the
possible causes of an auto-cruise control system
problem.
1. Gather information from the customer.
2. Verify that the condition described by the
customer exists.
3. Check the vehicle for any auto-cruise control
system DTC. (Refer to P.17-11, Diagnostic
Function
How to Read and Erase Diagnostic
Trouble Codes).
4. If you can verify the condition but no auto-cruise
control system DTCs are set, the malfunction may
be intermittent. (Refer to GROUP 00, How to Use
Troubleshooting/Inspection Service Points
How
to Cope with Intermittent Malfunctions P.00-14).5. If you can verify the condition but there are no
auto-cruise control system DTCs, or the system
cannot communicate with Diagnostic Tool
MB991958 (MUT-III sub assembly), and find the
fault. (Refer to P.17-53, Symptom Chart).
6. If there is an auto-cruise control system DTC,
record the number of the code, then erase the
code from Engine ECU memory using the
Diagnostic Tool MB991958 (MUT-III sub
assembly). (Refer to P.17-11, Diagnostic Function
How to Read and Erase Diagnostic Trouble
Codes).
7. Re-create the auto-cruise control system DTC set
conditions to see if the same Auto-cruise Control
System DTC will set again. (Refer to P.17-11,
Diagnostic Function
How to Read and Erase
Diagnostic Trouble Codes).
If the same Auto-cruise Control System DTC sets
again, perform the diagnostic procedures for the
set code. (Refer to P.17-14, Diagnostic Trouble
Code Chart).
DIAGNOSTIC FUNCTIONM1172004900171
HOW TO CONNECT THE DIAGNOSTIC TOOL.
Required Special Tools:
MB991958: Diagnostic Tool (MUT-III Sub Assembly)
MB991824: Vehicle Communication Interface (V.C.I.)
MB991827: MUT-III USB Cable
MB991910: MUT-III Main Harness A
Page 1347 of 1500
AUTO-CRUISE CONTROL
ENGINE AND EMISSION CONTROL17-16
STEP 1. Using diagnostic tool , check data list item 78:
Clutch Switch.
To prevent damage to diagnostic tool , always turn the
ignition switch to the "LOCK"(OFF) position before con-
necting or disconnecting diagnostic tool .
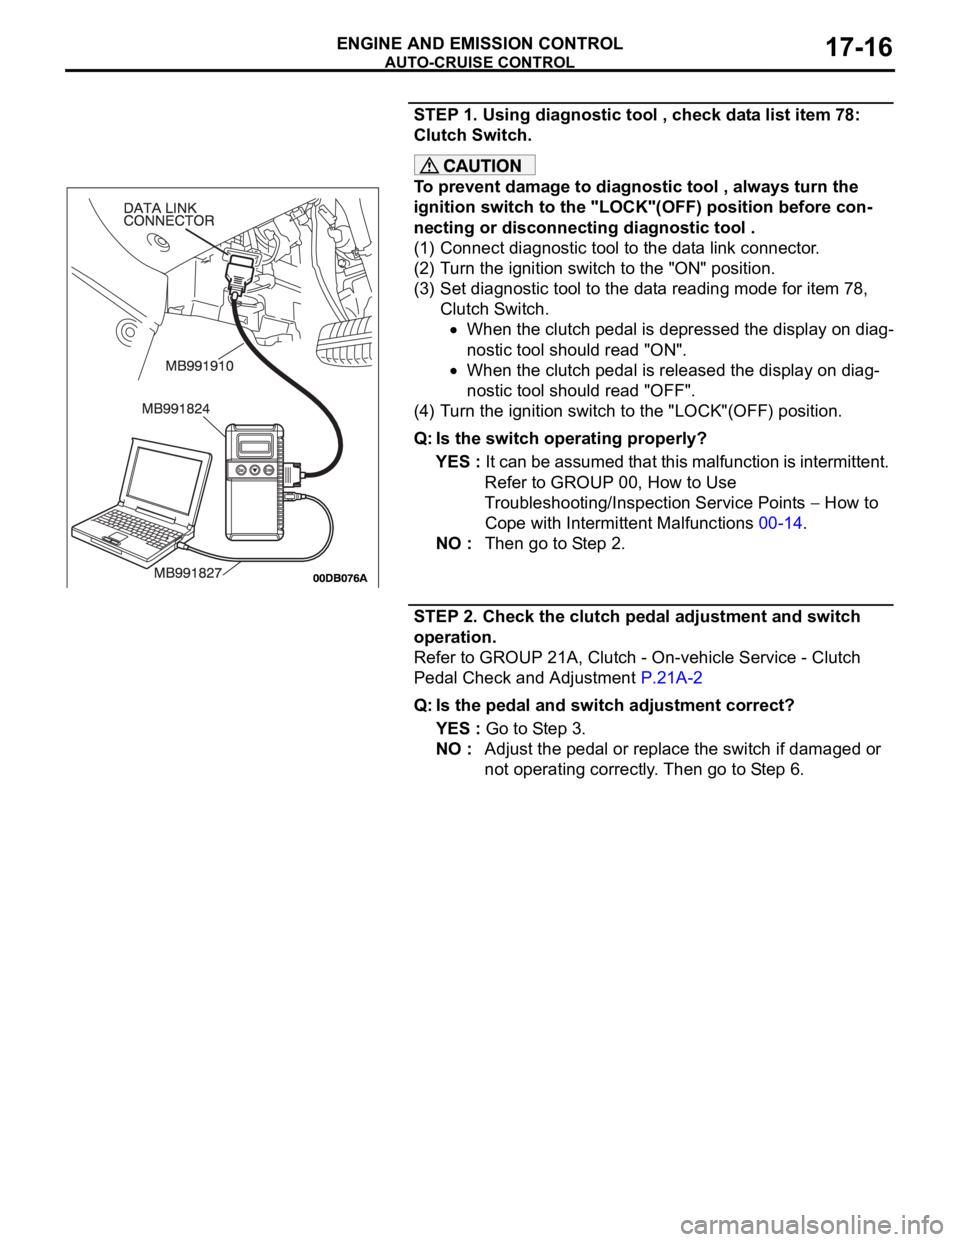
(1) Connect diagnostic tool to the data link connector.
(2) Turn the ignition switch to the "ON" position.
(3) Set diagnostic tool to the data reading mode for item 78,
Clutch Switch.
When the clutch pedal is depressed the display on diag-
nostic tool should read "ON".
When the clutch pedal is released the display on diag-
nostic tool should read "OFF".
(4) Turn the ignition switch to the "LOCK"(OFF) position.
Q: Is the switch operating properly?
YES : It can be assumed that this malfunction is intermittent.
Refer to GROUP 00, How to Use
Troubleshooting/Inspection Service Points
How to
Cope with Intermittent Malfunctions 00-14.
NO : Then go to Step 2.
STEP 2. Check the clutch pedal adjustment and switch
operation.
Refer to GROUP 21A, Clutch - On-vehicle Service - Clutch
Pedal Check and Adjustment P.21A-2
Q: Is the pedal and switch adjustment correct?
YES : Go to Step 3.
NO : Adjust the pedal or replace the switch if damaged or
not operating correctly. Then go to Step 6.
Page 1349 of 1500
AUTO-CRUISE CONTROL
ENGINE AND EMISSION CONTROL17-18
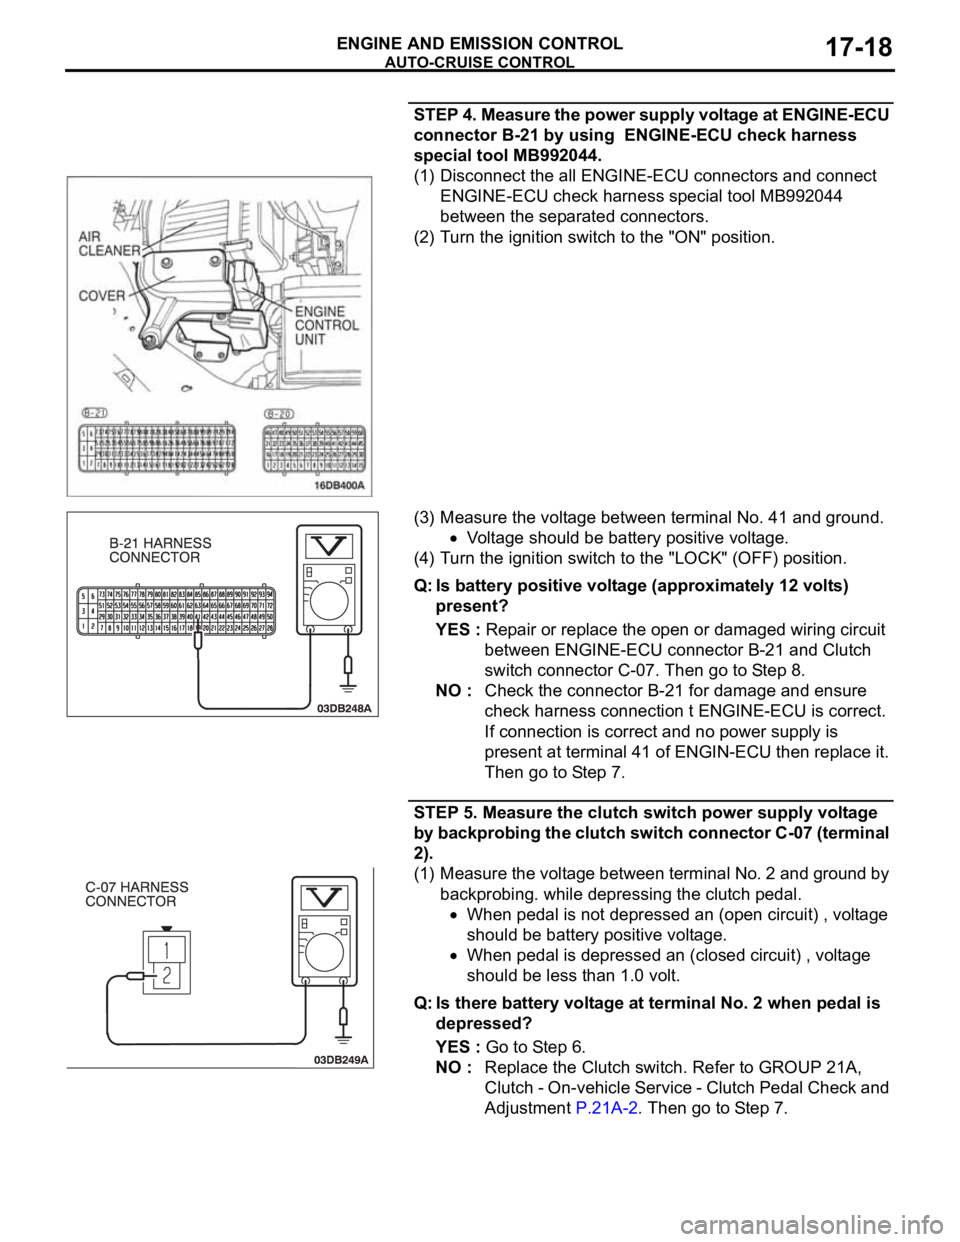
STEP 4. Measure the power supply voltage at ENGINE-ECU
connector B-21 by using ENGINE-ECU check harness
special tool MB992044.
(1) Disconnect the all ENGINE-ECU connectors and connect
ENGINE-ECU check harness special tool MB992044
between the separated connectors.
(2) Turn the ignition switch to the "ON" position.
(3) Measure the voltage between terminal No. 41 and ground.
Voltage should be battery positive voltage.
(4) Turn the ignition switch to the "LOCK" (OFF) position.
Q: Is battery positive voltage (approximately 12 volts)
present?
YES : Repair or replace the open or damaged wiring circuit
between ENGINE-ECU connector B-21 and Clutch
switch connector C-07. Then go to Step 8.
NO : Check the connector B-21 for damage and ensure
check harness connection t ENGINE-ECU is correct.
If connection is correct and no power supply is
present at terminal 41 of ENGIN-ECU then replace it.
Then go to Step 7.
STEP 5. Measure the clutch switch power supply voltage
by backprobing the clutch switch connector C-07 (terminal
2).
(1) Measure the voltage between terminal No. 2 and ground by
backprobing. while depressing the clutch pedal.
When pedal is not depressed an (open circuit) , voltage
should be battery positive voltage.
When pedal is depressed an (closed circuit) , voltage
should be less than 1.0 volt.
Q: Is there battery voltage at terminal No. 2 when pedal is
depressed?
YES : Go to Step 6.
NO : Replace the Clutch switch. Refer to GROUP 21A,
Clutch - On-vehicle Service - Clutch Pedal Check and
Adjustment P.21A-2. Then go to Step 7.
Page 1357 of 1500
AUTO-CRUISE CONTROL
ENGINE AND EMISSION CONTROL17-26
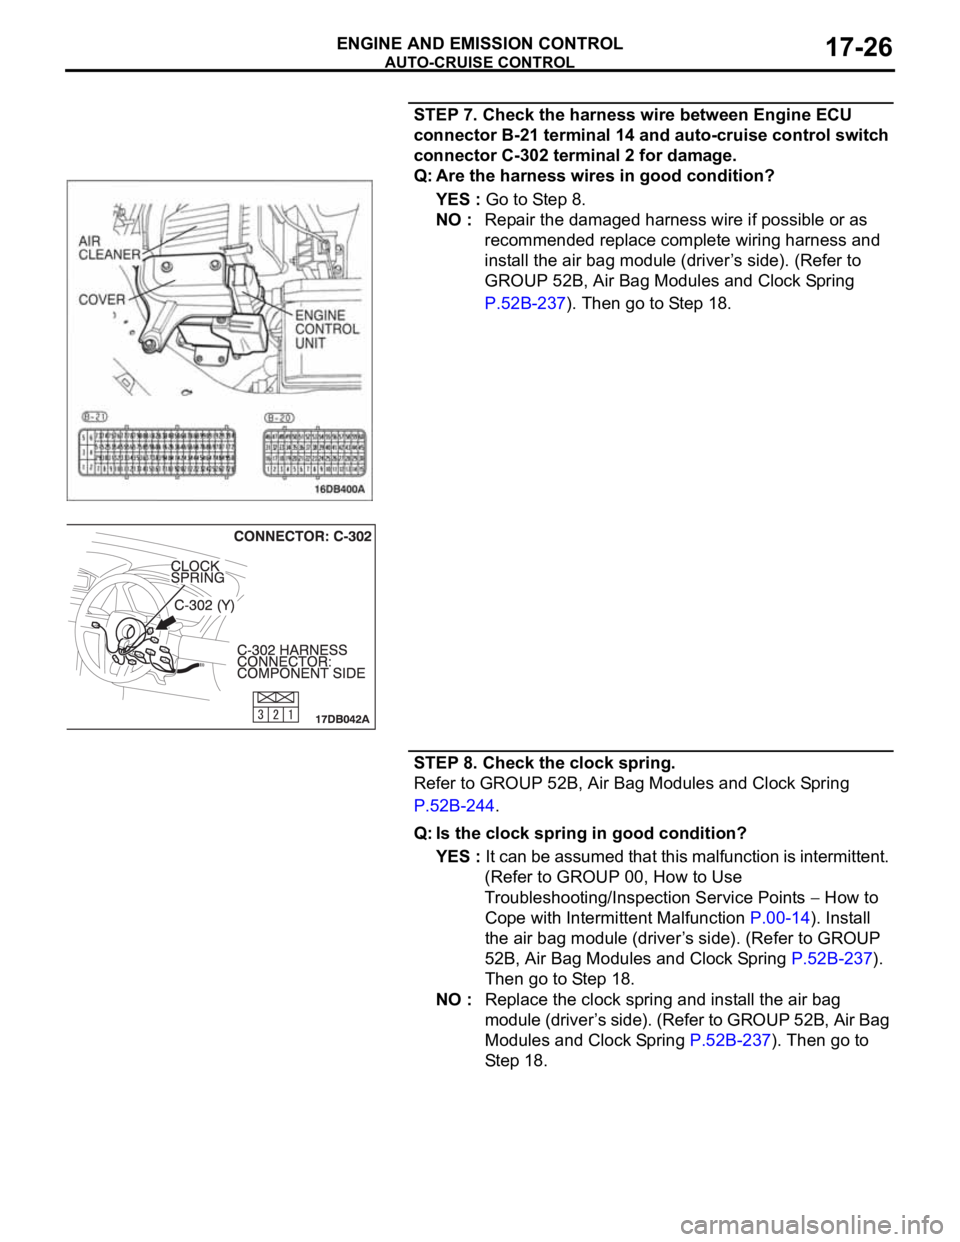
STEP 7. Check the harness wire between Engine ECU
connector B-21 terminal 14 and auto-cruise control switch
connector C-302 terminal 2 for damage.
Q: Are the harness wires in good condition?
YES : Go to Step 8.
NO : Repair the damaged harness wire if possible or as
recommended replace complete wiring harness and
install the air bag module (driver’s side). (Refer to
GROUP 52B, Air Bag Modules and Clock Spring
P.52B-237). Then go to Step 18.
STEP 8. Check the clock spring.
Refer to GROUP 52B, Air Bag Modules and Clock Spring
P.52B-244.
Q: Is the clock spring in good condition?
YES : It can be assumed that this malfunction is intermittent.
(Refer to GROUP 00, How to Use
Troubleshooting/Inspection Service Points
How to
Cope with Intermittent Malfunction P.00-14). Install
the air bag module (driver’s side). (Refer to GROUP
52B, Air Bag Modules and Clock Spring P.52B-237).
Then go to Step 18.
NO : Replace the clock spring and install the air bag
module (driver’s side). (Refer to GROUP 52B, Air Bag
Modules and Clock Spring P.52B-237). Then go to
Step 18.