Page 1423 of 1500
SPECIAL TOOLS
FRONT AXLE26-6
MB991172
Inner shaft
installer basePress-fitting of the inner shaft
MB991248
Inner shaft
removerMD998348-01 or
General service
tool Removal of the inner shaft
MB991561
Boot band
crimping toolMB991561 BJ boot (resin boot) band installation
MB990925
Bearing and oil
seal installer setMB990925-01 or
General service
tool
Removal and installation of the
center bearing
Press-fitting of the dust seal outer,
inner
MB990890
Rear suspension
bushing baseMB990890-01 Press-fitting of the dust seal outer, inner TOOL TOOL NUMBER
AND NAMESUPERSESSION APPLICATION
Page 1425 of 1500

ON-VEHICLE SERVICE
FRONT AXLE26-8
ON-VEHICLE SERVICE
WHEEL BEARING END PLAY CHECKM1261000900246
1. Remove the caliper assembly and suspend it with a wire.
2. Remove the brake disc from the front hub.
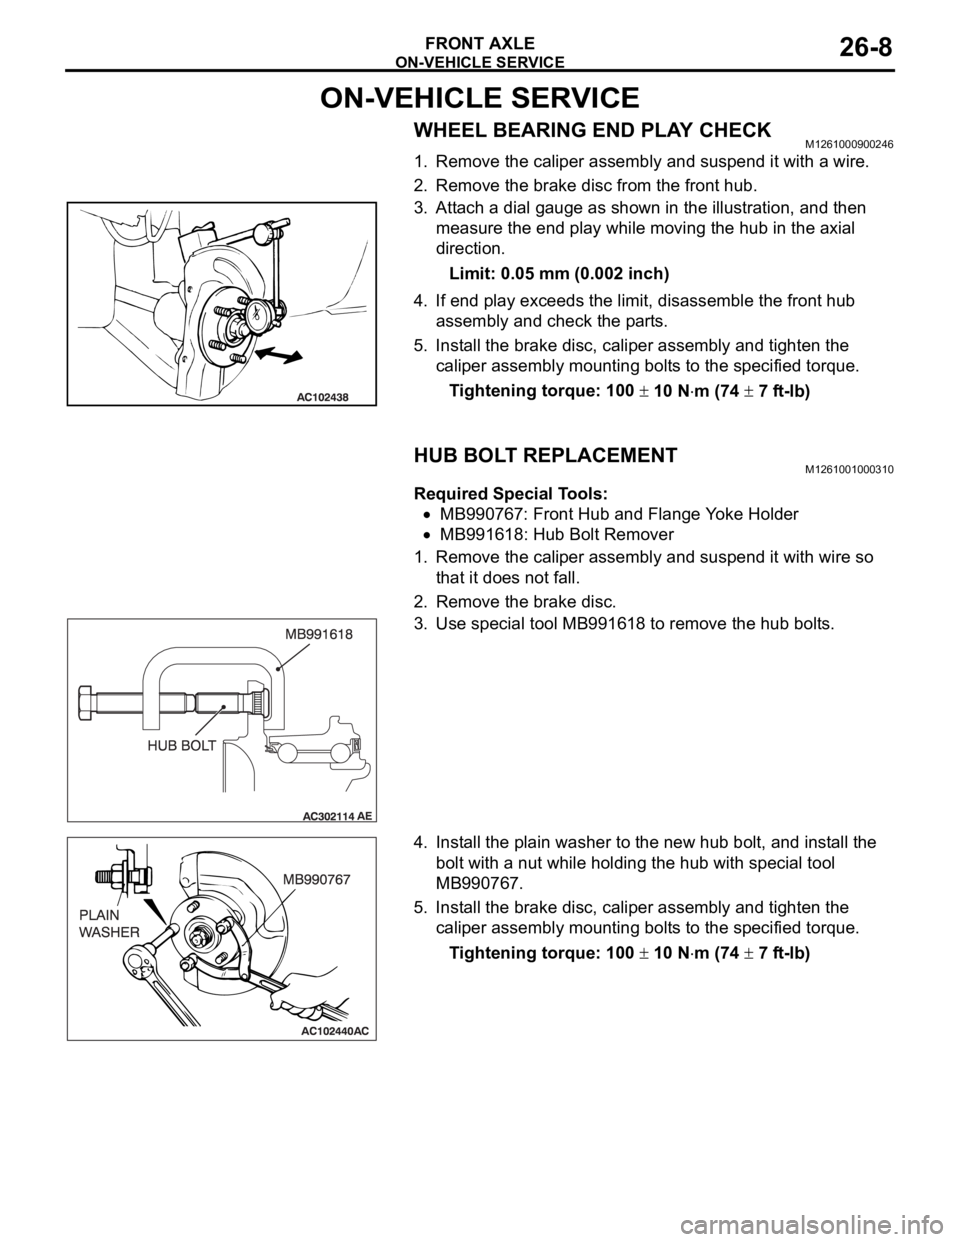
3. Attach a dial gauge as shown in the illustration, and then
measure the end play while moving the hub in the axial
direction.
Limit: 0.05 mm (0.002 inch)
4. If end play exceeds the limit, disassemble the front hub
assembly and check the parts.
5. Install the brake disc, caliper assembly and tighten the
caliper assembly mounting bolts to the specified torque.
Tightening torque: 100
10 Nm (74 7 ft-lb)
HUB BOLT REPLACEMENTM1261001000310
Required Special Tools:
MB990767: Front Hub and Flange Yoke Holder
MB991618: Hub Bolt Remover
1. Remove the caliper assembly and suspend it with wire so
that it does not fall.
2. Remove the brake disc.
3. Use special tool MB991618 to remove the hub bolts.
4. Install the plain washer to the new hub bolt, and install the
bolt with a nut while holding the hub with special tool
MB990767.
5. Install the brake disc, caliper assembly and tighten the
caliper assembly mounting bolts to the specified torque.
Tightening torque: 100
10 Nm (74 7 ft-lb)
Page 1427 of 1500
Page 1429 of 1500

FRONT AXLE HUB ASSEMBLY
FRONT AXLE26-12
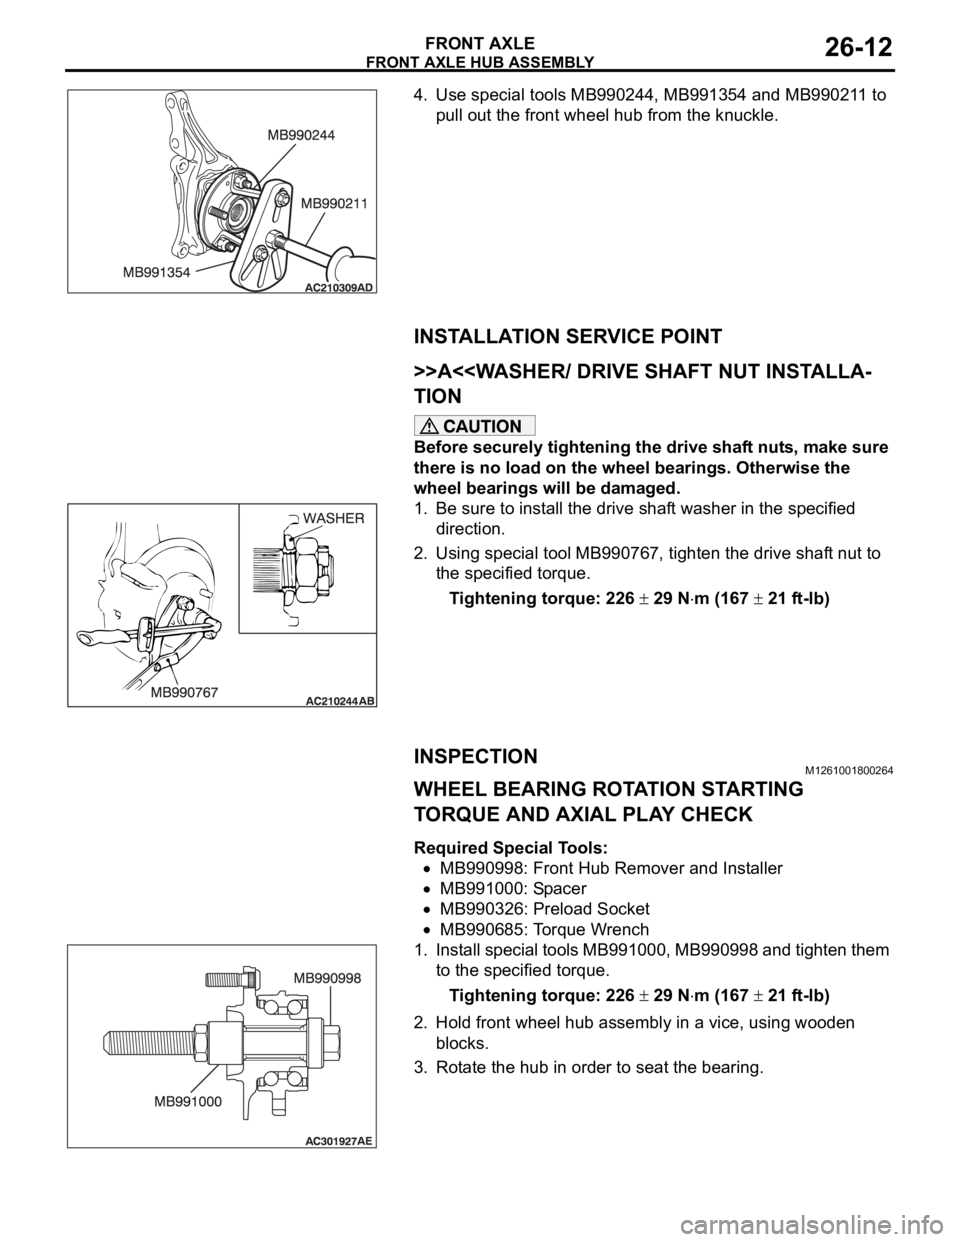
4. Use special tools MB990244, MB991354 and MB990211 to
pull out the front wheel hub from the knuckle.
INSTALLATION SERVICE POINT
.
>>A<
TION
Before securely tightening the drive shaft nuts, make sure
there is no load on the wheel bearings. Otherwise the
wheel bearings will be damaged.
1. Be sure to install the drive shaft washer in the specified
direction.
2. Using special tool MB990767, tighten the drive shaft nut to
the specified torque.
Tightening torque: 226
29 Nm (167 21 ft-lb)
INSPECTIONM1261001800264
WHEEL BEARING ROTATION STARTING
TORQUE AND AXIAL PLAY CHECK
Required Special Tools:
MB990998: Front Hub Remover and Installer
MB991000: Spacer
MB990326: Preload Socket
MB990685: Torque Wrench
1. Install special tools MB991000, MB990998 and tighten them
to the specified torque.
Tightening torque: 226
29 Nm (167 21 ft-lb)
2. Hold front wheel hub assembly in a vice, using wooden
blocks.
3. Rotate the hub in order to seat the bearing.
Page 1430 of 1500

DRIVE SHAFT ASSEMBLY
FRONT AXLE26-13
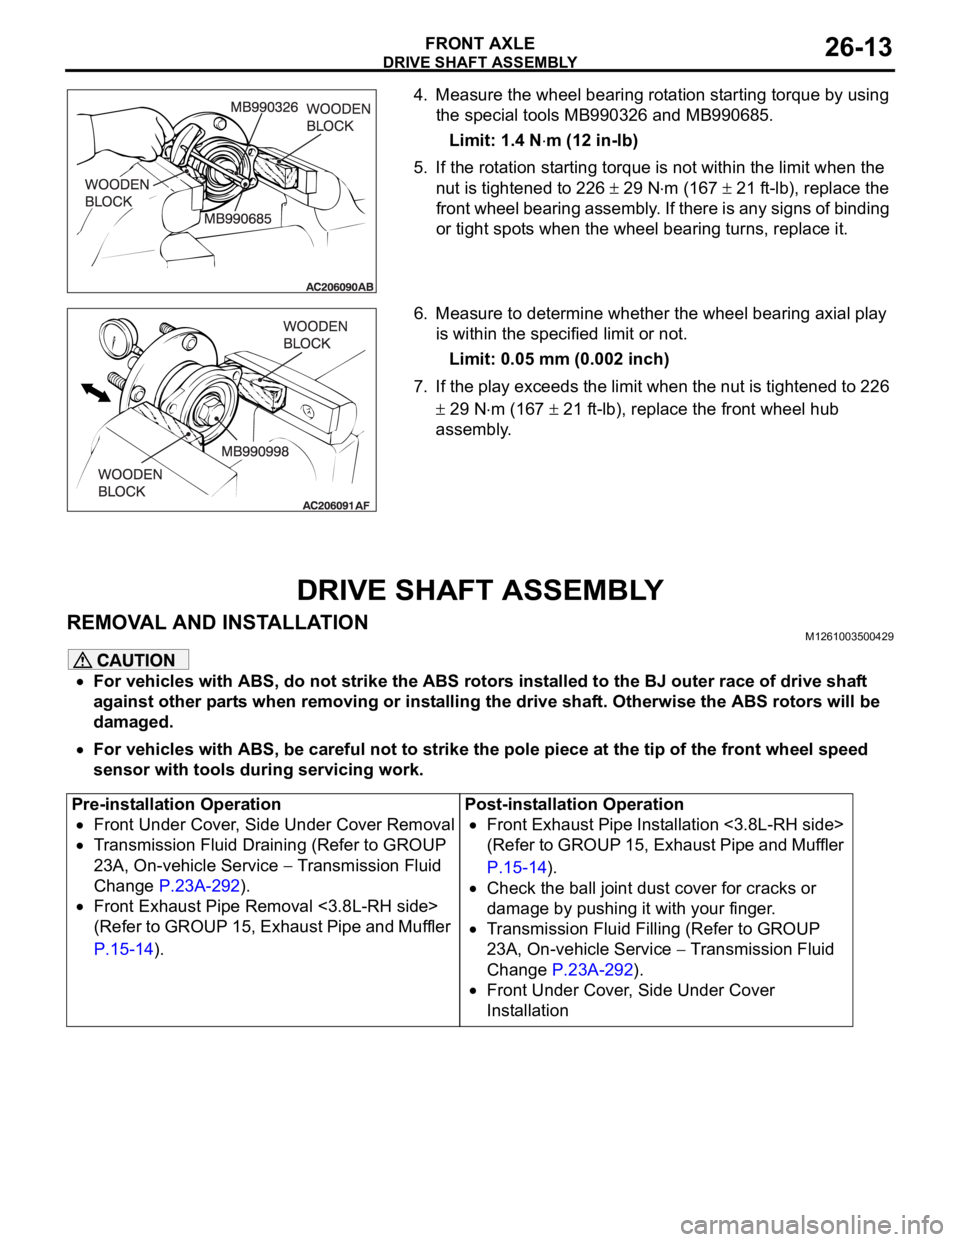
4. Measure the wheel bearing rotation starting torque by using
the special tools MB990326 and MB990685.
Limit: 1.4 N
m (12 in-lb)
5. If the rotation starting torque is not within the limit when the
nut is tightened to 226
29 Nm (167 21 ft-lb), replace the
front wheel bearing assembly. If there is any signs of binding
or tight spots when the wheel bearing turns, replace it.
6. Measure to determine whether the wheel bearing axial play
is within the specified limit or not.
Limit: 0.05 mm (0.002 inch)
7. If the play exceeds the limit when the nut is tightened to 226
29 Nm (167 21 ft-lb), replace the front wheel hub
assembly.
DRIVE SHAFT ASSEMBLY
REMOVAL AND INSTALLATIONM1261003500429
For vehicles with ABS, do not strike the ABS rotors installed to the BJ outer race of drive shaft
against other parts when removing or installing the drive shaft. Otherwise the ABS rotors will be
damaged.
For vehicles with ABS, be careful not to strike the pole piece at the tip of the front wheel speed
sensor with tools during servicing work.
Pre-installation Operation
Front Under Cover, Side Under Cover Removal
Transmission Fluid Draining (Refer to GROUP
23A, On-vehicle Service
Transmission Fluid
Change P.23A-292).
Front Exhaust Pipe Removal <3.8L-RH side>
(Refer to GROUP 15, Exhaust Pipe and Muffler
P.15-14).Post-installation Operation
Front Exhaust Pipe Installation <3.8L-RH side>
(Refer to GROUP 15, Exhaust Pipe and Muffler
P.15-14).
Check the ball joint dust cover for cracks or
damage by pushing it with your finger.
Transmission Fluid Filling (Refer to GROUP
23A, On-vehicle Service
Transmission Fluid
Change P.23A-292).
Front Under Cover, Side Under Cover
Installation
Page 1432 of 1500
Page 1434 of 1500

DRIVE SHAFT ASSEMBLY
FRONT AXLE26-17
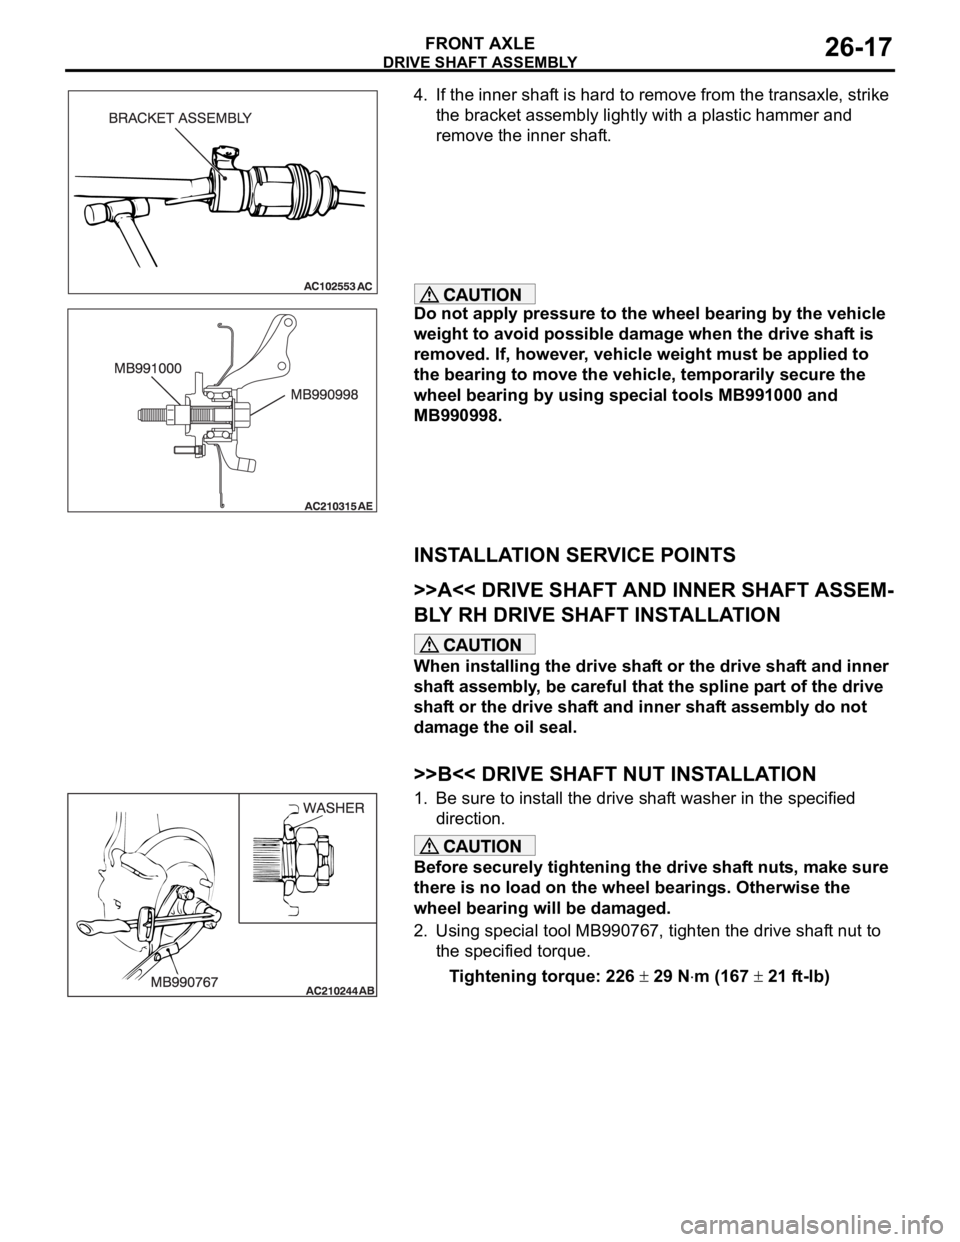
4. If the inner shaft is hard to remove from the transaxle, strike
the bracket assembly lightly with a plastic hammer and
remove the inner shaft.
Do not apply pressure to the wheel bearing by the vehicle
weight to avoid possible damage when the drive shaft is
removed. If, however, vehicle weight must be applied to
the bearing to move the vehicle, temporarily secure the
wheel bearing by using special tools MB991000 and
MB990998.
INSTALLATION SERVICE POINTS
.
>>A<< DRIVE SHAFT AND INNER SHAFT ASSEM-
BLY RH DRIVE SHAFT INSTALLATION
When installing the drive shaft or the drive shaft and inner
shaft assembly, be careful that the spline part of the drive
shaft or the drive shaft and inner shaft assembly do not
damage the oil seal.
.
>>B<< DRIVE SHAFT NUT INSTALLATION
1. Be sure to install the drive shaft washer in the specified
direction.
Before securely tightening the drive shaft nuts, make sure
there is no load on the wheel bearings. Otherwise the
wheel bearing will be damaged.
2. Using special tool MB990767, tighten the drive shaft nut to
the specified torque.
Tightening torque: 226
29 Nm (167 21 ft-lb)
Page 1438 of 1500
DRIVE SHAFT ASSEMBLY
FRONT AXLE26-21
DISASSEMBLY SERVICE POINTS
.
PTJ CASE/SPIDER ASSEMBLY REMOVAL
Do not disassemble the spider assembly.
1. Wipe off grease from the spider assembly and the inside of
the PTJ case.
2. Clean the spider assembly if water or foreign material is
observed.
.
<>INNER SHAFT RH REMOVAL
1. Use special tool MB991248 to remove the inner shaft
assembly from the PTJ case.
2. Use special tool MB990810 to remove the center bearing
bracket from the inner shaft.
.