Page 1246 of 1500
PRECAUTIONS BEFORE SERVICE
GENERAL00-25
APPLICATION OF ANTI-CORROSION AGENTS
AND UNDERCOATS
M1001011000043
Do not to apply oil or grease to the heated oxygen sensor. If
applied, the sensor may malfunction. Protect the heated oxy-
gen sensor with a cover before applying anti-corrosion agent,
etc.
DIAGNOSTIC TOOL (MUT-III)M1001012200062
Turn the ignition switch to the "LOCK" (OFF) position
before disconnecting or connecting the diagnostic tool
(MUT-III).
NOTE: MUT-III trigger harness is not necessary when pushing
V.C.I. ENTER key.
Page 1251 of 1500
TOWING AND HOISTING
GENERAL00-30
When service procedures require removing rear sus-
pension, fuel tank and spare tyre, place additional
weight on the rear end of vehicle, or anchor vehicle to
hoist to prevent tipping when the location of the center
of gravity changes.
If the lifting support area contacts with the sill cover
(arrow area as shown in the illustration), the sill cover
will be damaged. Ensure that the lifting support does
not contact the sill cover.
Page 1255 of 1500

LUBRICATION AND MAINTENANCE
GENERAL00-34
LUBRICATION AND MAINTENANCEM1001001200336
Maintenance and lubrication service recommenda-
tions have been compiled to provide maximum pro-
tection for the vehicle owner's investment against all
reasonable types of driving conditions. Since these
conditions vary with the individual vehicle owner's
driving habits, the area in which the vehicle is oper-
ated and the type of driving to which the vehicle is
subjected, it is necessary to prescribe lubrication and
maintenance service on a time frequency as well as
mileage interval basis.
Oils, lubricants and greases are classified and
graded according to standards recommended by the
Society of Automotive Engineers (SAE) and the Aus-
tralian Petroleum Institute (API).
MAINTENANCE SCHEDULES
For Information on service maintenance refer to the
"Service handbook".
ENGINE OIL
Tests have shown that laboratory animals
develop skin cancer after prolonged contact with
used engine oil. Accordingly, the potential exists
for humans to develop a number of skin disor-
ders, including cancer, from such exposure to
used engine oil. Therefore, when changing
engine oil, be careful not to touch it as much as
possible. Protective clothing and gloves, that
cannot be penetrated by oil, should be worn. The
skin should be thoroughly washed with soap and
water, or use waterless hand cleaner, to remove
any used engine oil. Do not use petrol, thinners,
or solvents.Either of the following engine oils should be used:
1. Engine oil conforming to the ACEA classification:
"For service A1, A2 or A3.
2. Engine oil conforming to the API classification:
"For service SG" or higher.
FUEL USAGE STATEMENT
Using leaded petrol in this car will damage the
catalytic converters and heated oxygen sensors,
and affect the warranty coverage validity.
This vehicle must use unleaded petrol only.
This vehicle has a fuel filler tube which is especially
designed to accept only the smaller-diameter
unleaded petrol dispensing nozzle.
The 3.8L model is designed to operate on unleaded
petrol having an octane rating (DIN 51607) of 90
RON or higher.
.
PETROL CONTAINING ALCOHOL
Some petrol sold at service stations contain alcohol
although they may not be so identified.
Using fuels containing alcohol is not recommended
unless the nature of the blend can be determined as
being satisfactory, as follows.
Gasohol: A mixture of 10% ethanol and 90%
unleaded gasoline may be used in your vehicle. If
driveability problems are experienced as a result of
using gasohol, it is recommended that the vehicle be
operated on petrol.
Methanol: Do not use petrol containing methanol
(wood alcohol). Using this type of alcohol can result
in vehicle performance deterioration and damage
critical parts in the fuel system components. Fuel
system damage and performance problems resulting
from the use of petrol containing methanol may not
be covered by the new vehicle warranty.
MATERIALS ADDED TO FUEL
Indiscriminate use of fuel system cleaning agents
should be avoided. Many materials intended for gum
and varnish removal may contain highly active sol-
vents or similar ingredients that can be harmful to
gasket and diaphragm materials used in fuel system
component parts.
Page 1258 of 1500

MAINTENANCE SERVICE
GENERAL00-37
MAINTENANCE SERVICE
1. FUEL SYSTEM (TANK, PIPE LINE AND
CONNECTION, AND FUEL TANK FILLER TUBE
CAP) (CHECK FOR LEAKS)
M1001001600312
Check for damage or leakage in the fuel lines and connections.
2. FUEL HOSES (CHECK CONDITION)M1001001700308
1. Inspect the surface of fuel hoses for heat and mechanical
damage. Hard and brittle rubber, cracking, tears, cuts,
abrasions and excessive swelling indicate deterioration of
the rubber.
2. If the fabric casing of the rubber hose is exposed by cracks
and abrasions in the fuel system, the hose should be
replaced.
3. AIR CLEANER FILTER (REPLACE)M1001001800338
The air cleaner element will become dirty during use, reducing
its effectiveness. Replace it with a new one.
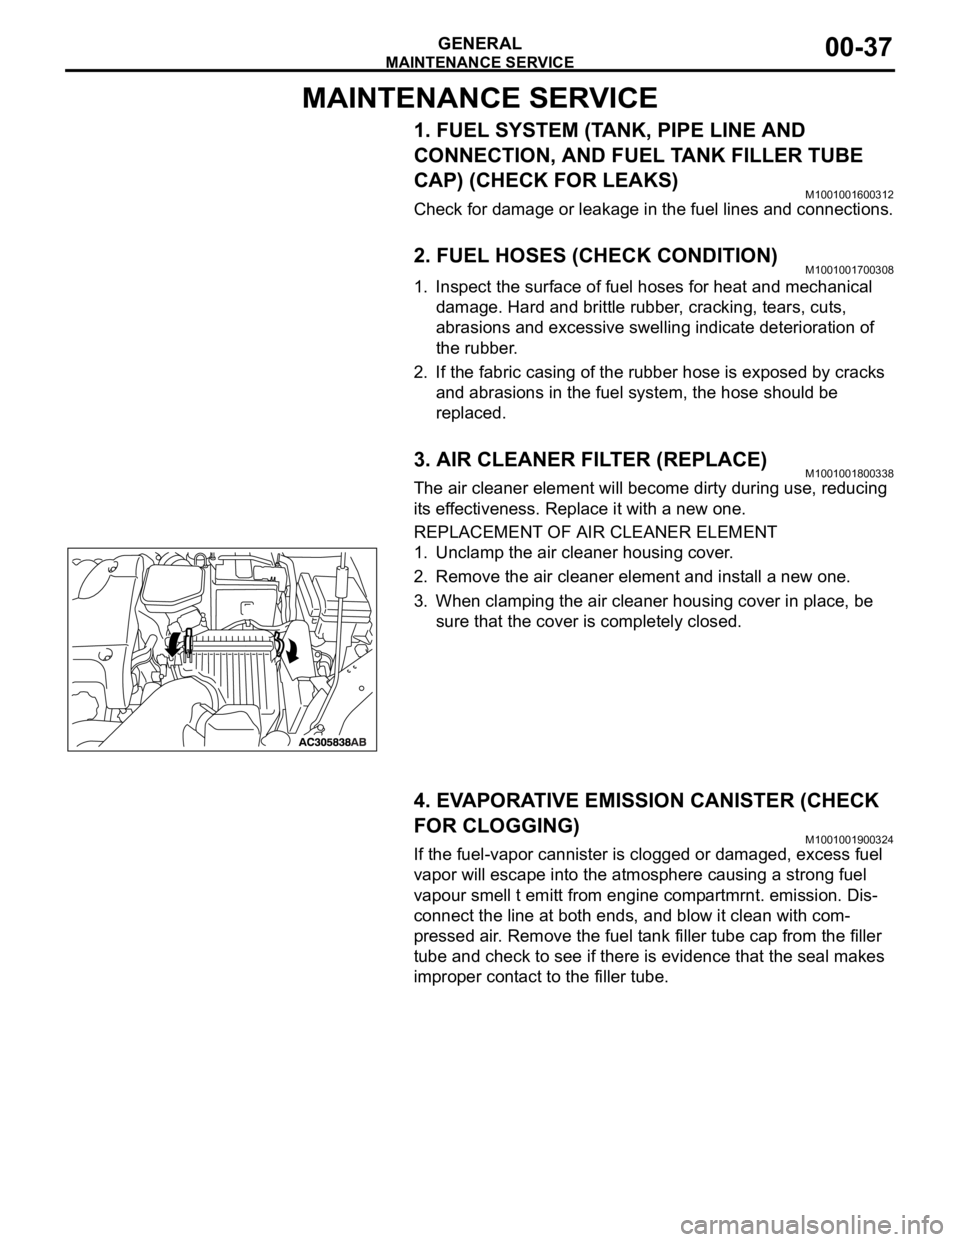
REPLACEMENT OF AIR CLEANER ELEMENT
1. Unclamp the air cleaner housing cover.
2. Remove the air cleaner element and install a new one.
3. When clamping the air cleaner housing cover in place, be
sure that the cover is completely closed.
4. EVAPORATIVE EMISSION CANISTER (CHECK
FOR CLOGGING)
M1001001900324
If the fuel-vapor cannister is clogged or damaged, excess fuel
vapor will escape into the atmosphere causing a strong fuel
vapour smell t emitt from engine compartmrnt. emission. Dis-
connect the line at both ends, and blow it clean with com-
pressed air. Remove the fuel tank filler tube cap from the filler
tube and check to see if there is evidence that the seal makes
improper contact to the filler tube.
Page 1259 of 1500
MAINTENANCE SERVICE
GENERAL00-38
5. SPARK PLUGS (REPLACE)M1001002000346
Iridium plugs are used. Use care not to damage the iridium
tips of the plugs. Do not adjust the spark plug gap.
1. Spark plugs must spark properly to assure proper engine
performance and reduce exhaust emission level. Therefore,
they should be replaced periodically with new ones( Refer to
Maintainence Schedule).
Spark plug type
2. The new plugs should be checked for the proper gap.
Spark plug gap: 1.0
1.1 mm
3. Install the spark plugs and tighten to 25
5 Nm (18 4
ft-lb).
6. TIMING BELT (REPLACE)M1001002300273
Replace the belt with a new one according to the vehicle main-
tenance schedule to assure proper engine performance.
<3.8L ENGINE>
For removal and installation procedures, refer to GROUP 11C,
Engine Mechanical <3.8L Engine>
Timing Belt Removal
and Installation P.11A-46.MAKER 3.8L ENGINE
BOSCH FR8DI30
Page 1260 of 1500
MAINTENANCE SERVICE
GENERAL00-39
7. DRIVE BELTS (FOR ALTERNATOR, POWER
STEERING PUMP AND AIR CONDITIONING)
(CHECK)
M1001008700031
ALTERNATOR DRIVE BELT TENSION CHECK
<3.8L ENGINE>
.
WHEN USING DIAGNOSTIC TOOL (MUT-III)
Required Special Tools:
MB991668: Belt Tension Meter Set
Diagnostic Tool (MUT-III)
MB991824: Vehicle Communication Interface (V.C.I.)
MB991910: MUT-III Main Harness A (BLUE)
To prevent damage to DIAGNOSTIC TOOL (MUT-III), always
turn the ignition switch to the "LOCK" (OFF) position
before connecting or disconnecting.
1. Connect Belt Tension Meter Set (MB991668) to V.C.I
(MB991824).
2. Connect MUT-III Main Harness A (BLUE) (MB991910) to
V.C.I (MB991824).
3. Connect MUT-III Main Harness A (BLUE) (MB991910) to the
data link connector.
4. Turn the ignition switch to the "ON" position and select "Belt
Tension" from the menu V.C.I (MB991824) screen.
Page 1261 of 1500

MAINTENANCE SERVICE
GENERAL00-40
The temperature of the surface of the belt should be as
close as possible to underhood temperature.
Do not let any contaminants such as water or oil get
onto the microphone.
If strong gusts of wind blow against the microphone or
if there are any loud sources of noise nearby, the val-
ues measured by the microphone may not correspond
to actual values.
If the microphone is touching the belt while the mea-
surement is being made, the values measured by the
microphone may not correspond to actual values.
Do not take the measurement while the vehicle's engine
is running.
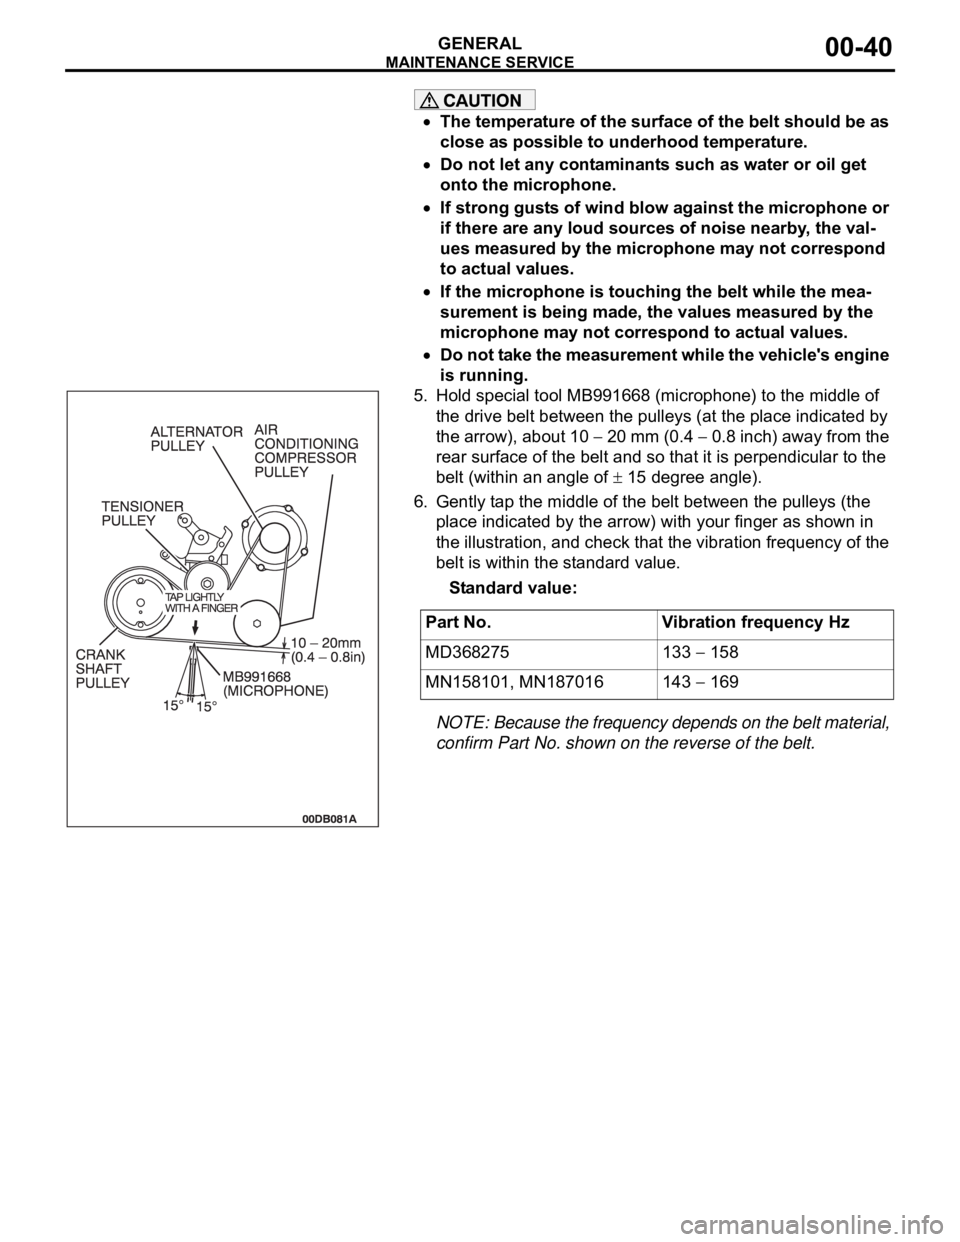
5. Hold special tool MB991668 (microphone) to the middle of
the drive belt between the pulleys (at the place indicated by
the arrow), about 10
20 mm (0.4 0.8 inch) away from the
rear surface of the belt and so that it is perpendicular to the
belt (within an angle of
15 degree angle).
6. Gently tap the middle of the belt between the pulleys (the
place indicated by the arrow) with your finger as shown in
the illustration, and check that the vibration frequency of the
belt is within the standard value.
Standard value:
NOTE: Because the frequency depends on the belt material,
confirm Part No. shown on the reverse of the belt.
.
Part No. Vibration frequency Hz
MD368275 133
158
MN158101, MN187016 143
169
Page 1262 of 1500
MAINTENANCE SERVICE
GENERAL00-41
WHEN USING THE TENSION GAUGE
Use a belt tension gauge to check that the belt tension is within
the standard value.
Standard value: 490
686 N (110 154 lb)
.
BELT DEFLECTION CHECK
Apply approximately 98 N (22 lb) of force to the middle of the
drive belt between the pulleys (at the place indicated by the
arrow) and check that the amount of deflection in within the
standard value.
Standard value: 8.4
10.7 mm (0.33 0.42 in)