Page 1322 of 1500

TRACTION CONTROL SYSTEM (TCL) DIAGNOSIS
TRACTION CONTROL SYSTEM (TCL)13C-43
(7) The recommended Supply Voltage at terminals 16, 9, 6,
and 8 are:
Set value: 10.0Volts - 14.5Volts
Q: Is the supply voltage within the set value?
YES : Check wheel speed sensor signal at ABS-ECU using
an oscillopscope
NO :
Refer to Power supply systemP.35B-63
Refer to Motor supply systemP.35B-48
Refer to Valve relay systemP.35B-56
Measure wheel speed sensor signals using an
oscilloscope.
NOTE: To check connections of the wheel speed sensors,
remove the rear seat to access the rear wheel speed sen-
sor connectors, and remove inner front guard (splash
shield) to access the front wheel speed sensors.
(1) Wheel speed sensor must remain connected to measure
active sensor.
(2) ABS-ECU must remain connected.
(3) Remove ABS connector protection cap to access terminal
location from the rear of connector for back-probing.
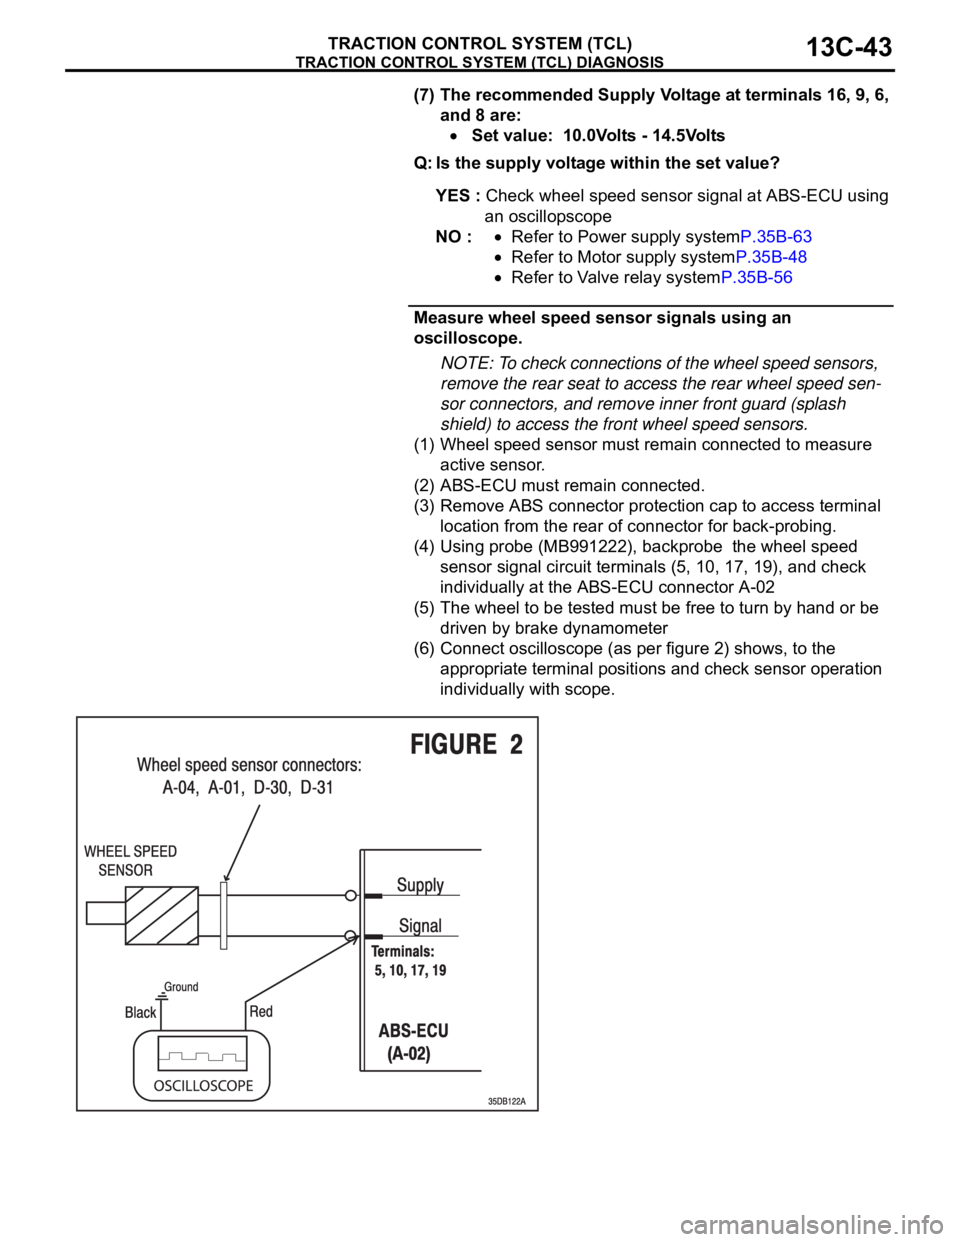
(4) Using probe (MB991222), backprobe the wheel speed
sensor signal circuit terminals (5, 10, 17, 19), and check
individually at the ABS-ECU connector A-02
(5) The wheel to be tested must be free to turn by hand or be
driven by brake dynamometer
(6) Connect oscilloscope (as per figure 2) shows, to the
appropriate terminal positions and check sensor operation
individually with scope.
Page 1323 of 1500
TRACTION CONTROL SYSTEM (TCL) DIAGNOSIS
TRACTION CONTROL SYSTEM (TCL)13C-44
Connect oscilloscope to FL sensor signal terminal (5) at
ABS-ECU (A-02)
Connect oscilloscope to FR sensor signal terminal (10)
at ABS-ECU (A-02)
Connect oscilloscope to RL sensor signal terminal (17)
at ABS-ECU (A-02)
Connect oscilloscope to RR sensor signal terminal (19)
at ABS-ECU (A-02)
(7) Recommended Oscilloscope setting:
Y-axis: 2Volts
X-axis: 100ms
(8) Turn the ignition switch to the "ON" position.
(9) Turn wheel by hand at approximately 1 revolution per
second (r/sec) or drive on brake dynamometer at 5km/h.
The measurement reading of the active wheel speed sen-
sors on the oscilloscope should correspond to figure 3
below.
NOTE: If the oscilloscope signal shape is correct and wheel
sensor air gap is within specification, but the voltage values are
either higher or lower as shown in the table below, the wheel
speed sensor must be changed.
Page 1327 of 1500

ON-VEHICLE SERVICE
TRACTION CONTROL SYSTEM (TCL)13C-48
To prevent damage to diagnostic tool MB991958, always
turn the ignition switch to the "LOCK" (OFF) position
before connecting or disconnecting diagnostic tool
MB991958.
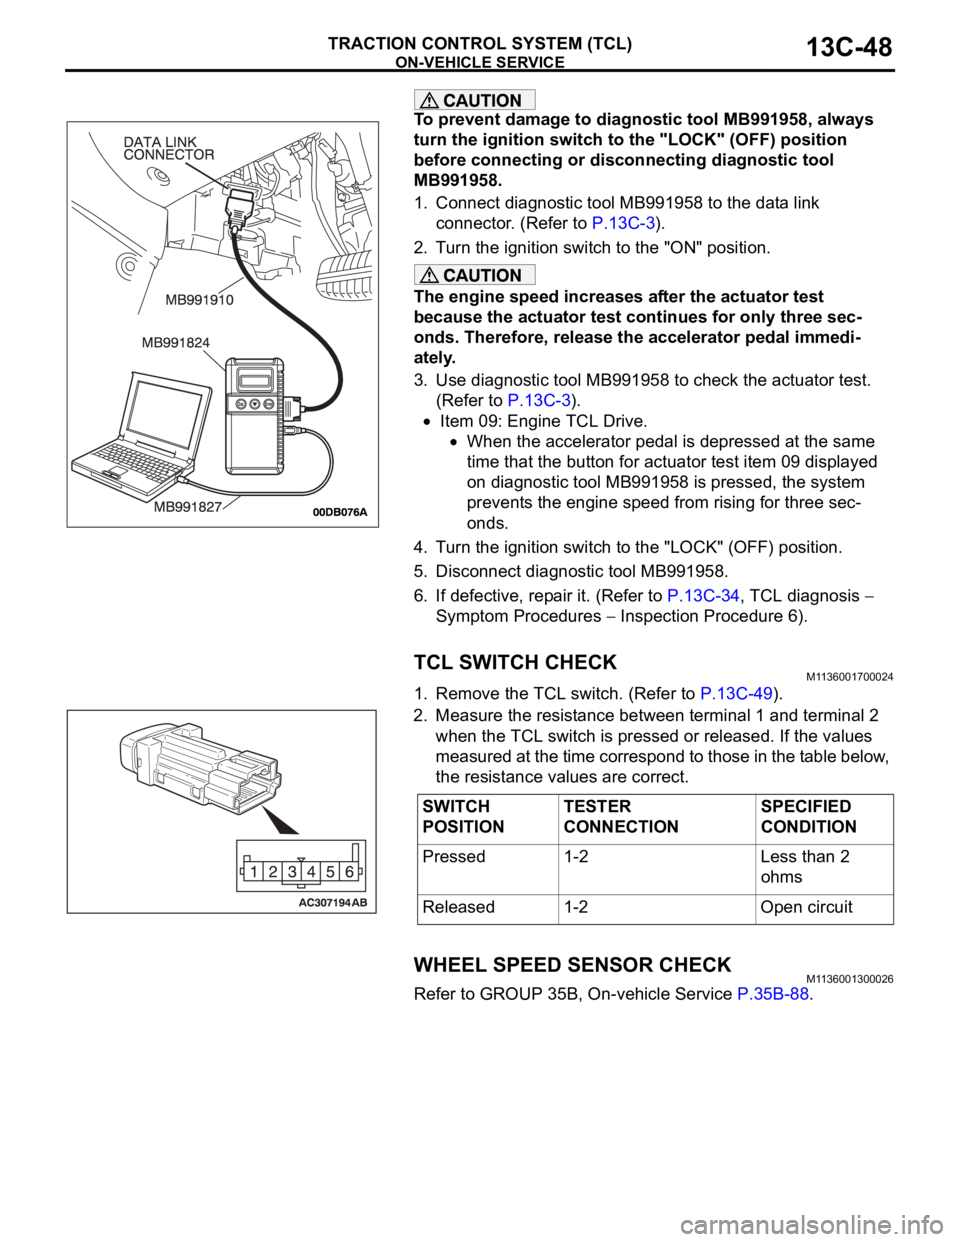
1. Connect diagnostic tool MB991958 to the data link
connector. (Refer to P.13C-3).
2. Turn the ignition switch to the "ON" position.
The engine speed increases after the actuator test
because the actuator test continues for only three sec-
onds. Therefore, release the accelerator pedal immedi-
ately.
3. Use diagnostic tool MB991958 to check the actuator test.
(Refer to P.13C-3).
Item 09: Engine TCL Drive.
When the accelerator pedal is depressed at the same
time that the button for actuator test item 09 displayed
on diagnostic tool MB991958 is pressed, the system
prevents the engine speed from rising for three sec-
onds.
4. Turn the ignition switch to the "LOCK" (OFF) position.
5. Disconnect diagnostic tool MB991958.
6. If defective, repair it. (Refer to P.13C-34, TCL diagnosis
Symptom Procedures
Inspection Procedure 6).
TCL SWITCH CHECKM1136001700024
1. Remove the TCL switch. (Refer to P.13C-49).
2. Measure the resistance between terminal 1 and terminal 2
when the TCL switch is pressed or released. If the values
measured at the time correspond to those in the table below,
the resistance values are correct.
WHEEL SPEED SENSOR CHECKM1136001300026
Refer to GROUP 35B, On-vehicle Service P.35B-88.
SWITCH
POSITIONTESTER
CONNECTIONSPECIFIED
CONDITION
Pressed 1-2 Less than 2
ohms
Released 1-2 Open circuit
Page 1328 of 1500
TCL SWITCH
TRACTION CONTROL SYSTEM (TCL)13C-49
TCL SWITCH
REMOVAL AND INSTALLATIONM1136001600027
WHEEL SPEED SENSOR
REMOVAL AND INSTALLATIONM1136002500023
Refer to GROUP 35B, Wheel Speed Sensor P.35B-95.
ABS/TCL-ECU
REMOVAL AND INSTALLATIONM1136005300017
Replace the hydraulic unit (integrated with ABS/TCL-ECU). (Refer to GROUP 35B, Hydraulic Unit P.35B-93).
REMOVAL STEPS
HOOD LOCK RELEASE HANDLE
(REFER TO GROUP 42, HOOD P.42-8.)
INSTRUMENT LOWER PANEL (REFER
TO GROUP 52A, INSTRUMENT PANEL
ASSEMBLY P.52A-4.)
INSTRUMENT PANEL GARNISH
(REFER TO GROUP 52A,
INSTRUMENT PANEL ASSEMBLY
P.52A-4.)
1. SWITCH BEZEL ASSEMBLY
2. SWITCH PANEL ASSEMBLY
3. TCL SWITCH REMOVAL STEPS (Continued)
Page 1333 of 1500

ENGINE AND EMISSION CONTROL17-2
EMISSION CONTROL . . . . . . . .17-76
GENERAL DESCRIPTION . . . . . .
17-76
DIAGNOSIS . . . . . . . . . . . . . . . . . .17-76
SPECIAL TOOLS. . . . . . . . . . . . . .17-76
VACUUM HOSES . . . . . . . . . . . . .17-77
VACUUM HOSE ROUTING. . . . . . . . . . 17-77
VACUUM CIRCUIT DIAGRAM . . . . . . . 17-78
VACUUM HOSE INSTALLATION . . . . . 17-78
VACUUM HOSE CHECK. . . . . . . . . . . . 17-79
POSITIVE CRANKCASE VENTILATION
SYSTEM . . . . . . . . . . . . . . . . . . . . .
17-79
GENERAL DESCRIPTION (POSITIVE
CRANKCASE VENTILATION SYSTEM)17-79
COMPONENT LOCATION . . . . . . . . . . 17-80
POSITIVE CRANKCASE VENTILATION
SYSTEM CHECK. . . . . . . . . . . . . . . . . . 17-80
POSITIVE CRANKCASE VENTILATION
VALVE CHECK . . . . . . . . . . . . . . . . . . . 17-80
EVAPORATIVE EMISSION CONTROL SYSTEM . . . . . . . . . . . . . . . . . . . . .
17-81
GENERAL DESCRIPTION (EVAPORATIVE
EMISSION SYSTEM) . . . . . . . . . . . . . . . 17-81
COMPONENT LOCATION . . . . . . . . . . . 17-82
PURGE CONTROL SYSTEM CHECK
(PURGE FLOW CHECK) . . . . . . . . . . . . 17-82
EVAPORATIVE EMISSION PURGE
SOLENOID CHECK . . . . . . . . . . . . . . . . 17-83
MASS AIRFLOW SENSOR CHECK . . . 17-84
ENGINE COOLANT TEMPERATURE
SENSOR CHECK . . . . . . . . . . . . . . . . . . 17-84
INTAKE AIR TEMPERATURE SENSOR
CHECK. . . . . . . . . . . . . . . . . . . . . .17-84
EVAPORATIVE EMISSION CANISTER
. . . . . . . . . . . . . . . . . . . . . . . . . . . .
17-81
REMOVAL AND INSTALLATION . . . . . . 17-81
INSPECTION . . . . . . . . . . . . . . . . . . . . . 17-81
CATALYTIC CONVERTER . . . . . .17-84
GENERAL DESCRIPTION (CATALYTIC
CONVERTER) . . . . . . . . . . . . . . . . . . . . 17-84
SPECIFICATIONS . . . . . . . . . . 17-85
FASTENER TIGHTENING
SPECIFICATIONS . . . . . . . . . . . . . . . . . 17-85
Page 1335 of 1500
ENGINE CONTROL
ENGINE AND EMISSION CONTROL17-4
SYMPTOM CHARTM1171002200292
SYMPTOM PROCEDURES
INSPECTION PROCEDURE 1: Throttle Valve Will Not Fully Open or Close
.
COMMENT
The throttle body or accelerator pedal position (APP)
sensor is suspected.
.
TROUBLESHOOTING HINTS (THE MOST
LIKELY CAUSES FOR THIS CASE:)
Malfunction of the throttle body.
Malfunction of the accelerator pedal position
(APP) sensor.
Malfunction of the Engine ECU.
Circuit drawings
Refer to circuit diagrams GROUP-90
Refer to configuration diagrams GROUP-80
Refer to component locations GROUP-70 SYMPTOM INSPECTION PROCEDURE REFERENCE PAGE
Throttle Valve Will Not Fully Open or Close 1
P.17-4
Accelerator Pedal Operation Not Smooth (Over
Acceleration)2
P.17-6
Page 1337 of 1500
ENGINE CONTROL
ENGINE AND EMISSION CONTROL17-6
INSPECTION PROCEDURE 2: Accelerator Pedal Operation Not Smooth (Over Acceleration)
.
COMMENT
The accelerator pedal, its installation condition or the
accelerator pedal position (APP) sensor is sus-
pected.
.
TROUBLESHOOTING HINTS (THE MOST
LIKELY CAUSES FOR THIS CASE:)
Malfunction of the accelerator pedal.
Incorrectly installed accelerator pedal.
Malfunction of the accelerator pedal position
(APP) sensor.
Circuit drawings
Refer to circuit diagrams GROUP-90
Refer to configuration diagrams GROUP-80
Refer to component locations GROUP-70
DIAGNOSIS
Required Special Tools:
MB991958: Diagnostic Tool (MUT-III Sub Assembly)
MB991824: V.C.I.
MB991827: MUT-III USB Cable
MB991910: MUT-III Main Harness A
STEP 1. Check if the accelerator pedal is installed
correctly.
Q: Is the accelerator pedal installed correctly?
YES : Go to Step 2.
NO : Replace and reinstall the accelerator pedal. (Refer to
P.17-9). Go to Step 3.
Page 1340 of 1500
ENGINE CONTROL
ENGINE AND EMISSION CONTROL17-9
ACCELERATOR PEDAL
REMOVAL AND INSTALLATIONM1171003000116
REMOVAL STEPS
1. ACCELERATOR PEDAL POSITION
(APP) SENSOR CONNECTOR2. ACCELERATOR PEDAL ASSEMBLY
3. ACCELERATOR STOPPERREMOVAL STEPS (Continued)