2005 MERCEDES-BENZ SPRINTER engine
[x] Cancel search: enginePage 835 of 1232
INSTALLATION - HIGH PRESSURE LINES
WARNING: HIGH-PRESSURE FUEL LINES DELIVER
DIESEL FUEL UNDER EXTREME PRESSURE FROM
THE INJECTION PUMP TO THE FUEL INJECTORS.
THIS MAY BE AS HIGH AS 1600BAR (23,200 PSI).
USE EXTREME CAUTION WHEN INSPECTING FOR
HIGH-PRESSURE FUEL LEAKS. FUEL UNDER THIS
AMOUNT OF PRESSURE CAN PENETRATE SKIN
CAUSING PERSONAL INJURY OR DEATH. INSPECT
FOR HIGH-PRESSURE LEAKS WITH A SHEET OF
CARD BOARD. WEAR SAFETY GOGGLES AND
ADEQUATE PROTECTIVE CLOTHING WHEN SER-
VICING FUEL SYSTEM.
WARNING: NO SPARKS, OPEN FLAMES OR SMOK-
ING. RISK OF POISONING FROM INHALING AND
SWALLOWING FUEL. RISK OF INJURY TO EYES
AND SKIN FROM CONTACT WITH FUEL. POUR
FUELS ONLY INTO SUITABLE AND APPROPRI-
ATELY MARKED CONTAINERS. WEAR PROTECTIVE
CLOTHING.
(1) Loosen the fuel rail mounting bolts to install
lines free of stress.
CAUTION: Inspect sealing cone at lines. Replace if
compression points exist. Ensure lines are exactly
located.
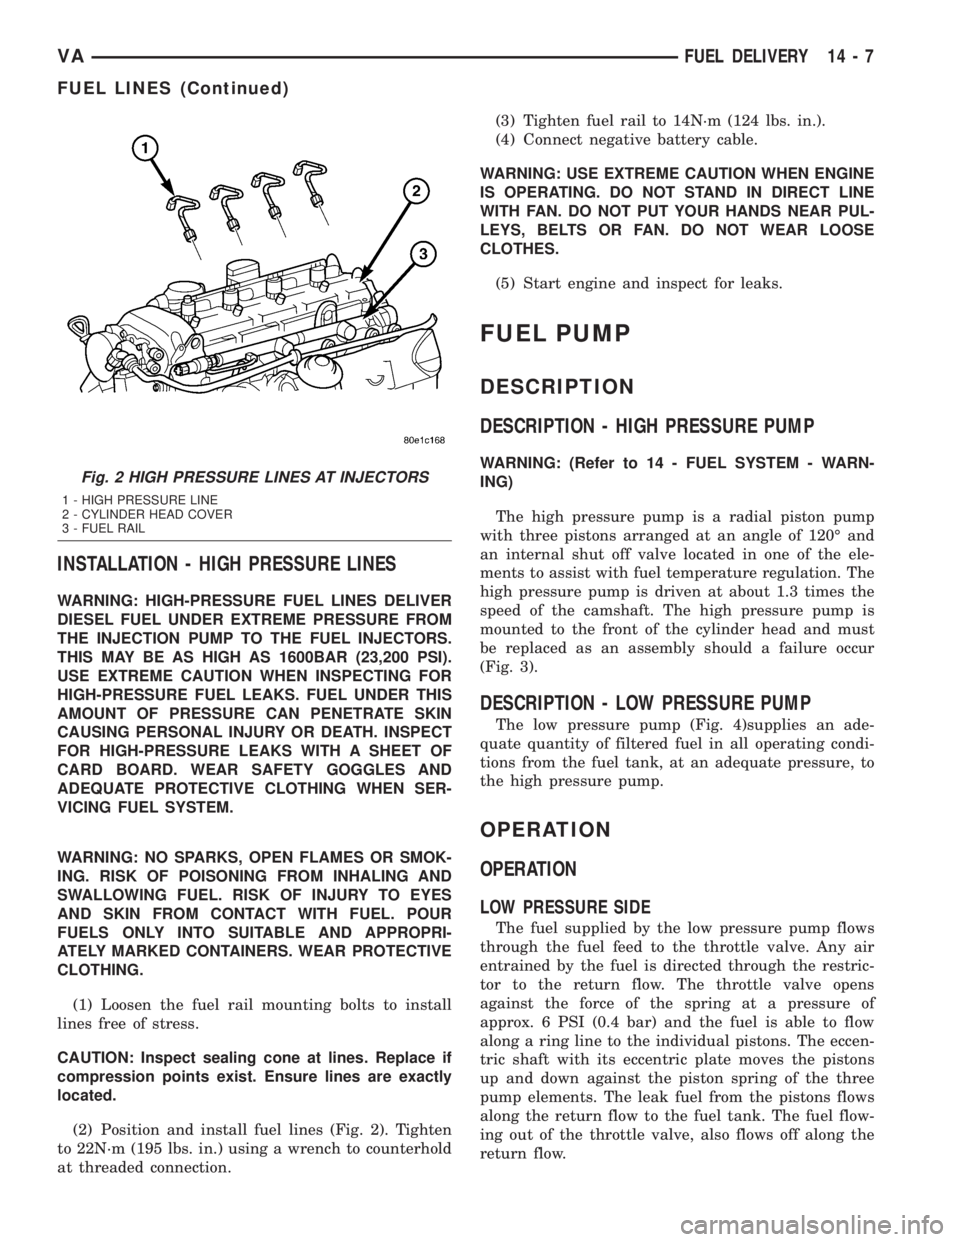
(2) Position and install fuel lines (Fig. 2). Tighten
to 22N´m (195 lbs. in.) using a wrench to counterhold
at threaded connection.(3) Tighten fuel rail to 14N´m (124 lbs. in.).
(4) Connect negative battery cable.
WARNING: USE EXTREME CAUTION WHEN ENGINE
IS OPERATING. DO NOT STAND IN DIRECT LINE
WITH FAN. DO NOT PUT YOUR HANDS NEAR PUL-
LEYS, BELTS OR FAN. DO NOT WEAR LOOSE
CLOTHES.
(5) Start engine and inspect for leaks.
FUEL PUMP
DESCRIPTION
DESCRIPTION - HIGH PRESSURE PUMP
WARNING: (Refer to 14 - FUEL SYSTEM - WARN-
ING)
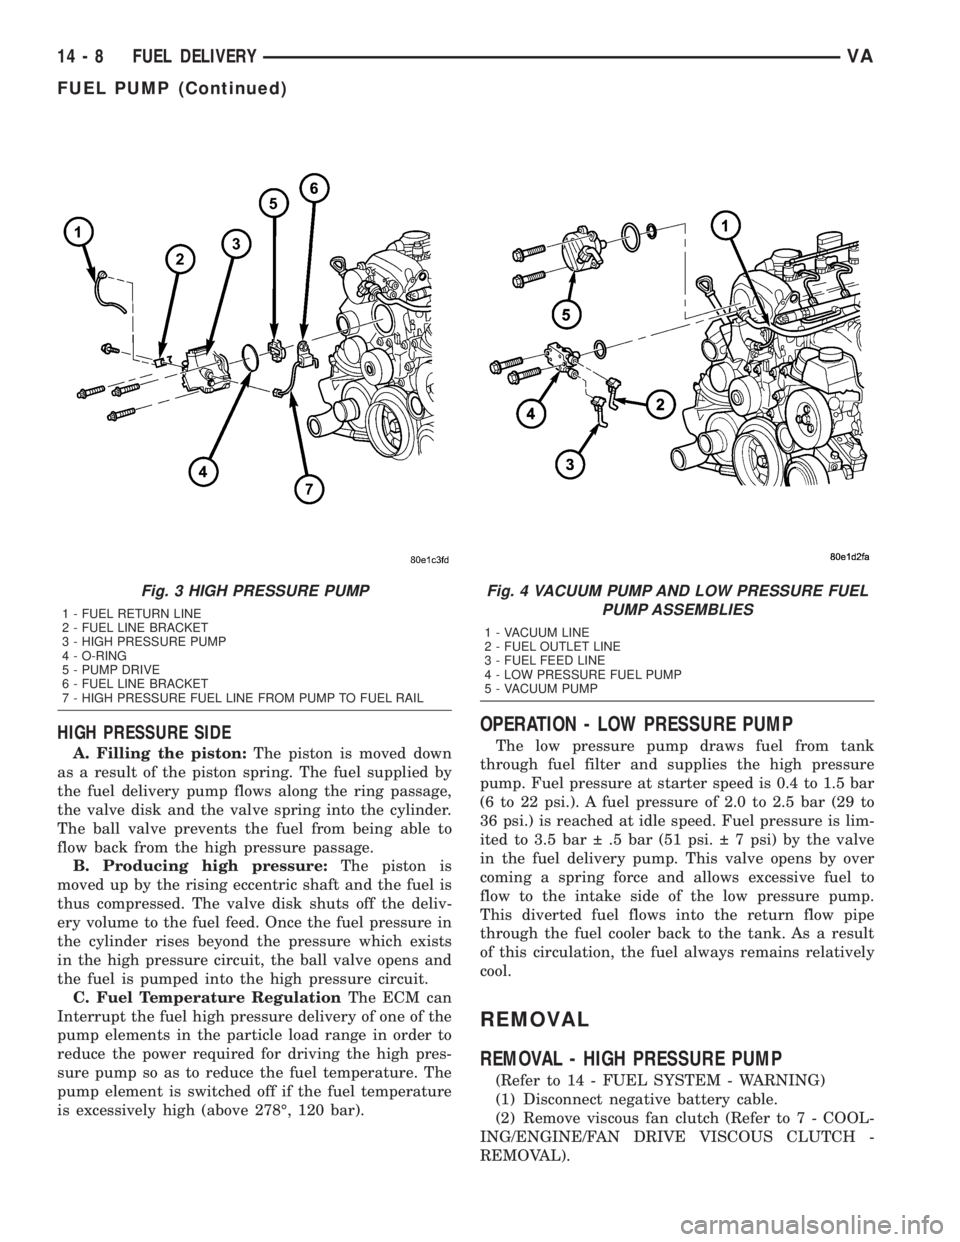
The high pressure pump is a radial piston pump
with three pistons arranged at an angle of 120É and
an internal shut off valve located in one of the ele-
ments to assist with fuel temperature regulation. The
high pressure pump is driven at about 1.3 times the
speed of the camshaft. The high pressure pump is
mounted to the front of the cylinder head and must
be replaced as an assembly should a failure occur
(Fig. 3).
DESCRIPTION - LOW PRESSURE PUMP
The low pressure pump (Fig. 4)supplies an ade-
quate quantity of filtered fuel in all operating condi-
tions from the fuel tank, at an adequate pressure, to
the high pressure pump.
OPERATION
OPERATION
LOW PRESSURE SIDE
The fuel supplied by the low pressure pump flows
through the fuel feed to the throttle valve. Any air
entrained by the fuel is directed through the restric-
tor to the return flow. The throttle valve opens
against the force of the spring at a pressure of
approx. 6 PSI (0.4 bar) and the fuel is able to flow
along a ring line to the individual pistons. The eccen-
tric shaft with its eccentric plate moves the pistons
up and down against the piston spring of the three
pump elements. The leak fuel from the pistons flows
along the return flow to the fuel tank. The fuel flow-
ing out of the throttle valve, also flows off along the
return flow.
Fig. 2 HIGH PRESSURE LINES AT INJECTORS
1 - HIGH PRESSURE LINE
2 - CYLINDER HEAD COVER
3 - FUEL RAIL
VAFUEL DELIVERY 14 - 7
FUEL LINES (Continued)
Page 836 of 1232
HIGH PRESSURE SIDE
A. Filling the piston:The piston is moved down
as a result of the piston spring. The fuel supplied by
the fuel delivery pump flows along the ring passage,
the valve disk and the valve spring into the cylinder.
The ball valve prevents the fuel from being able to
flow back from the high pressure passage.
B. Producing high pressure:The piston is
moved up by the rising eccentric shaft and the fuel is
thus compressed. The valve disk shuts off the deliv-
ery volume to the fuel feed. Once the fuel pressure in
the cylinder rises beyond the pressure which exists
in the high pressure circuit, the ball valve opens and
the fuel is pumped into the high pressure circuit.
C. Fuel Temperature RegulationThe ECM can
Interrupt the fuel high pressure delivery of one of the
pump elements in the particle load range in order to
reduce the power required for driving the high pres-
sure pump so as to reduce the fuel temperature. The
pump element is switched off if the fuel temperature
is excessively high (above 278É, 120 bar).
OPERATION - LOW PRESSURE PUMP
The low pressure pump draws fuel from tank
through fuel filter and supplies the high pressure
pump. Fuel pressure at starter speed is 0.4 to 1.5 bar
(6 to 22 psi.). A fuel pressure of 2.0 to 2.5 bar (29 to
36 psi.) is reached at idle speed. Fuel pressure is lim-
ited to 3.5 bar .5 bar (51 psi. 7 psi) by the valve
in the fuel delivery pump. This valve opens by over
coming a spring force and allows excessive fuel to
flow to the intake side of the low pressure pump.
This diverted fuel flows into the return flow pipe
through the fuel cooler back to the tank. As a result
of this circulation, the fuel always remains relatively
cool.
REMOVAL
REMOVAL - HIGH PRESSURE PUMP
(Refer to 14 - FUEL SYSTEM - WARNING)
(1) Disconnect negative battery cable.
(2) Remove viscous fan clutch (Refer to 7 - COOL-
ING/ENGINE/FAN DRIVE VISCOUS CLUTCH -
REMOVAL).
Fig. 3 HIGH PRESSURE PUMP
1 - FUEL RETURN LINE
2 - FUEL LINE BRACKET
3 - HIGH PRESSURE PUMP
4 - O-RING
5 - PUMP DRIVE
6 - FUEL LINE BRACKET
7 - HIGH PRESSURE FUEL LINE FROM PUMP TO FUEL RAIL
Fig. 4 VACUUM PUMP AND LOW PRESSURE FUEL
PUMP ASSEMBLIES
1 - VACUUM LINE
2 - FUEL OUTLET LINE
3 - FUEL FEED LINE
4 - LOW PRESSURE FUEL PUMP
5 - VACUUM PUMP
14 - 8 FUEL DELIVERYVA
FUEL PUMP (Continued)
Page 837 of 1232
(3) Unplug electrical connector at high pressure
pump.
CAUTION: DO NOT slacken the threaded connec-
tion. Use a wrench to counterhold at the threaded
connection when loosening and tightening the
union nut. DO NOT EXCEED tightening torque.
CAUTION: DO NOT crimp or bend fuel line. Capture
all fluids that flow out of connections.
NOTE: Using a marking pen, make a mark on the
outside fuel return line to easily identify proper
position during assembly.
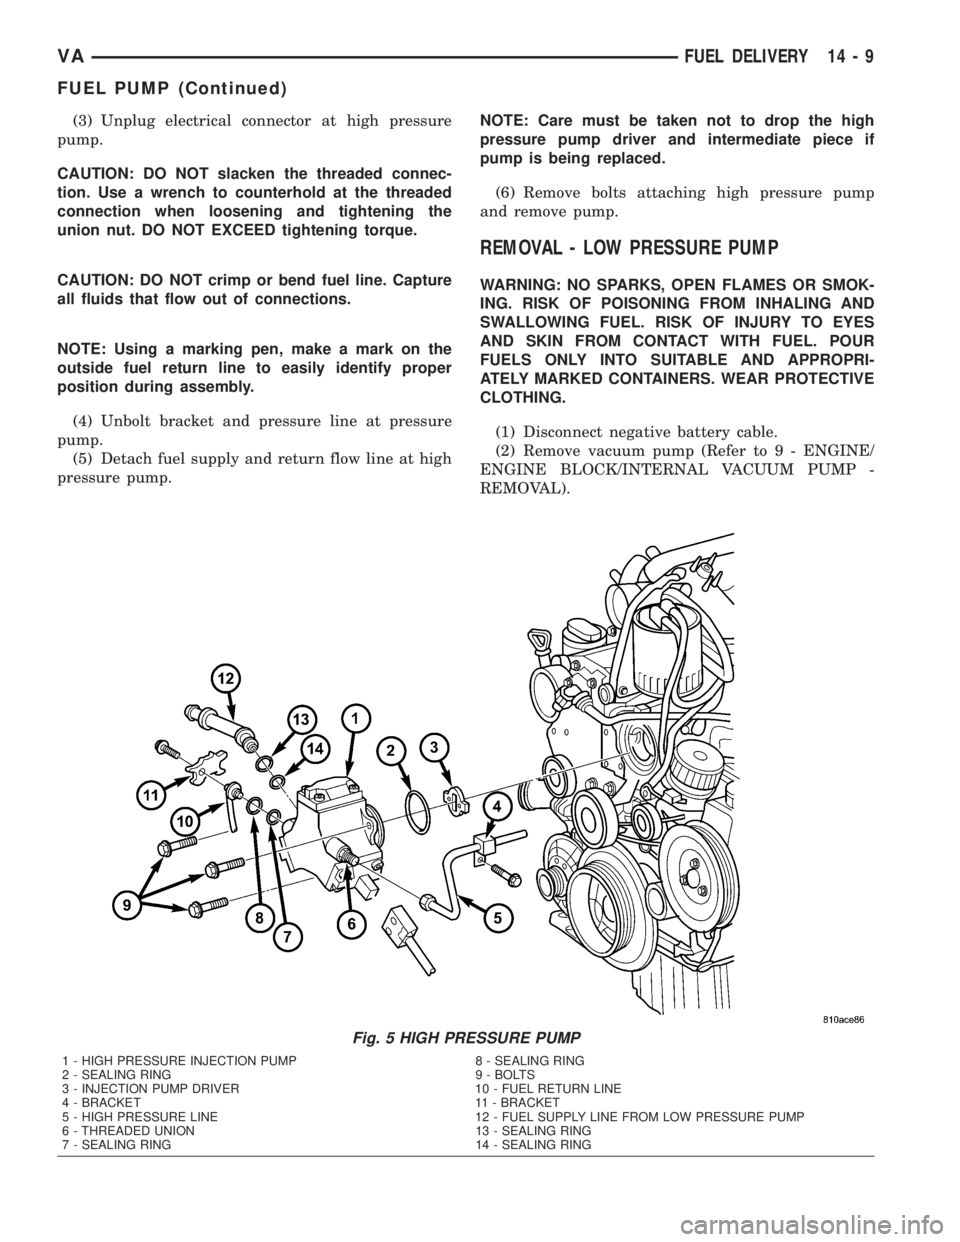
(4) Unbolt bracket and pressure line at pressure
pump.
(5) Detach fuel supply and return flow line at high
pressure pump.NOTE: Care must be taken not to drop the high
pressure pump driver and intermediate piece if
pump is being replaced.
(6) Remove bolts attaching high pressure pump
and remove pump.
REMOVAL - LOW PRESSURE PUMP
WARNING: NO SPARKS, OPEN FLAMES OR SMOK-
ING. RISK OF POISONING FROM INHALING AND
SWALLOWING FUEL. RISK OF INJURY TO EYES
AND SKIN FROM CONTACT WITH FUEL. POUR
FUELS ONLY INTO SUITABLE AND APPROPRI-
ATELY MARKED CONTAINERS. WEAR PROTECTIVE
CLOTHING.
(1) Disconnect negative battery cable.
(2) Remove vacuum pump (Refer to 9 - ENGINE/
ENGINE BLOCK/INTERNAL VACUUM PUMP -
REMOVAL).
Fig. 5 HIGH PRESSURE PUMP
1 - HIGH PRESSURE INJECTION PUMP 8 - SEALING RING
2 - SEALING RING 9 - BOLTS
3 - INJECTION PUMP DRIVER 10 - FUEL RETURN LINE
4 - BRACKET 11 - BRACKET
5 - HIGH PRESSURE LINE 12 - FUEL SUPPLY LINE FROM LOW PRESSURE PUMP
6 - THREADED UNION 13 - SEALING RING
7 - SEALING RING 14 - SEALING RING
VAFUEL DELIVERY 14 - 9
FUEL PUMP (Continued)
Page 838 of 1232
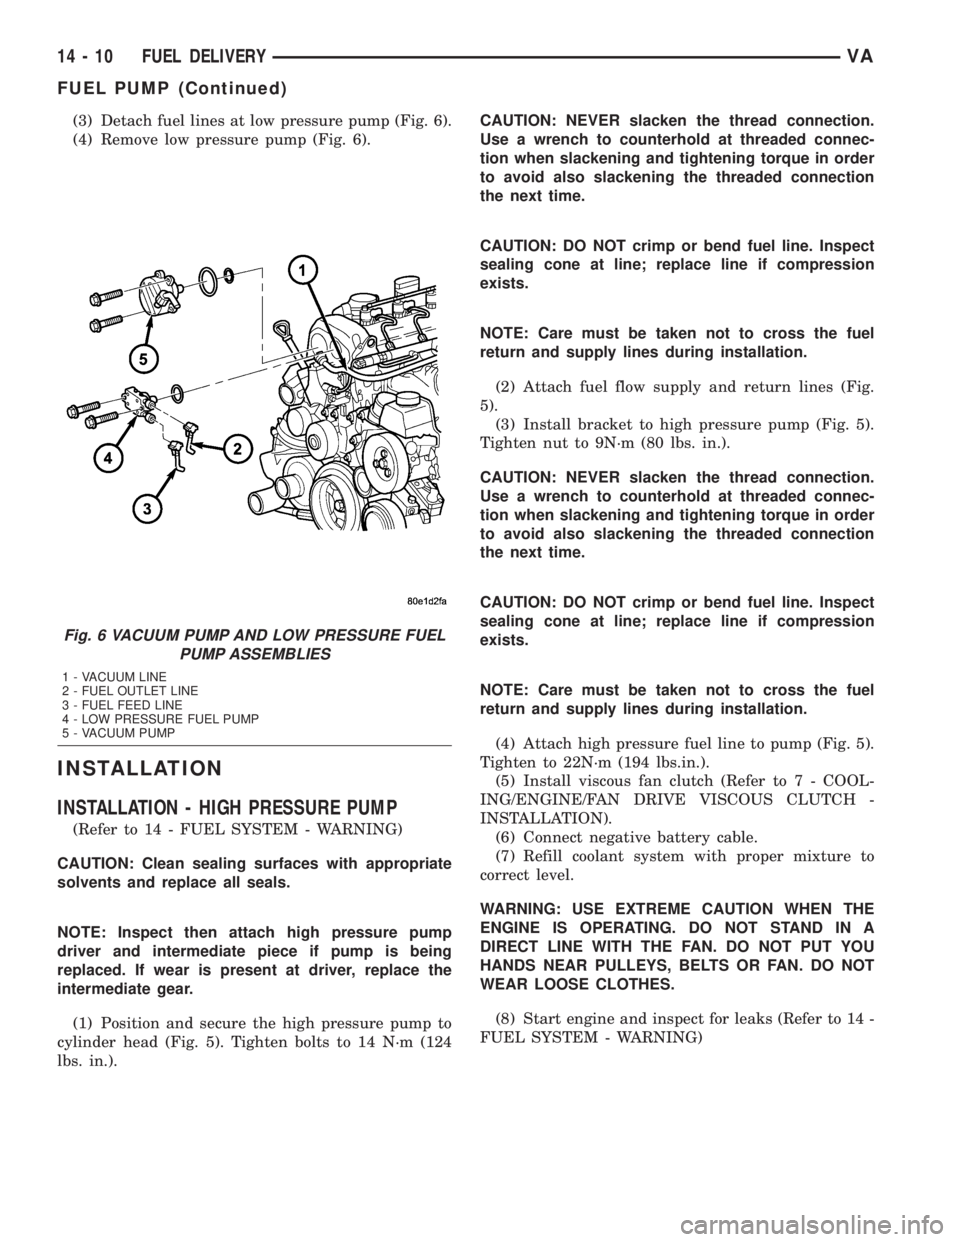
(3) Detach fuel lines at low pressure pump (Fig. 6).
(4) Remove low pressure pump (Fig. 6).
INSTALLATION
INSTALLATION - HIGH PRESSURE PUMP
(Refer to 14 - FUEL SYSTEM - WARNING)
CAUTION: Clean sealing surfaces with appropriate
solvents and replace all seals.
NOTE: Inspect then attach high pressure pump
driver and intermediate piece if pump is being
replaced. If wear is present at driver, replace the
intermediate gear.
(1) Position and secure the high pressure pump to
cylinder head (Fig. 5). Tighten bolts to 14 N´m (124
lbs. in.).CAUTION: NEVER slacken the thread connection.
Use a wrench to counterhold at threaded connec-
tion when slackening and tightening torque in order
to avoid also slackening the threaded connection
the next time.
CAUTION: DO NOT crimp or bend fuel line. Inspect
sealing cone at line; replace line if compression
exists.
NOTE: Care must be taken not to cross the fuel
return and supply lines during installation.
(2) Attach fuel flow supply and return lines (Fig.
5).
(3) Install bracket to high pressure pump (Fig. 5).
Tighten nut to 9N´m (80 lbs. in.).
CAUTION: NEVER slacken the thread connection.
Use a wrench to counterhold at threaded connec-
tion when slackening and tightening torque in order
to avoid also slackening the threaded connection
the next time.
CAUTION: DO NOT crimp or bend fuel line. Inspect
sealing cone at line; replace line if compression
exists.
NOTE: Care must be taken not to cross the fuel
return and supply lines during installation.
(4) Attach high pressure fuel line to pump (Fig. 5).
Tighten to 22N´m (194 lbs.in.).
(5) Install viscous fan clutch (Refer to 7 - COOL-
ING/ENGINE/FAN DRIVE VISCOUS CLUTCH -
INSTALLATION).
(6) Connect negative battery cable.
(7) Refill coolant system with proper mixture to
correct level.
WARNING: USE EXTREME CAUTION WHEN THE
ENGINE IS OPERATING. DO NOT STAND IN A
DIRECT LINE WITH THE FAN. DO NOT PUT YOU
HANDS NEAR PULLEYS, BELTS OR FAN. DO NOT
WEAR LOOSE CLOTHES.
(8) Start engine and inspect for leaks (Refer to 14 -
FUEL SYSTEM - WARNING)
Fig. 6 VACUUM PUMP AND LOW PRESSURE FUEL
PUMP ASSEMBLIES
1 - VACUUM LINE
2 - FUEL OUTLET LINE
3 - FUEL FEED LINE
4 - LOW PRESSURE FUEL PUMP
5 - VACUUM PUMP
14 - 10 FUEL DELIVERYVA
FUEL PUMP (Continued)
Page 839 of 1232
INSTALLATION - LOW PRESSURE PUMP
WARNING: NO SPARKS, OPEN FLAMES OR SMOK-
ING. RISK OF POISONING FROM INHALING AND
SWALLOWING FUEL. RISK OF INJURY TO EYES
AND SKIN FROM CONTACT WITH FUEL. POUR
FUELS ONLY INTO SUITABLE AND APPROPRI-
ATELY MARKED CONTAINERS. WEAR PROTECTIVE
CLOTHING.
NOTE: Clean sealing surfaces, replace seal if nec-
essary.
(1) Prime the low pressure pump with the appro-
priate fuel.
(2) Attach low pressure fuel pump to cylinder head
front cover. Tighten bolt to 9N´m (80 lbs. in.).
(3) Attach fuel lines to low pressure pump.
(4) Install vacuum pump (Refer to 9 - ENGINE/
ENGINE BLOCK/INTERNAL VACUUM PUMP -
INSTALLATION).
(5) Reconnect negative battery cable.
WARNING: USE EXTREME CAUTION WHEN THE
ENGINE IS OPERATING. DO NOT STAND IN A
DIRECT LINE WITH FAN. DO NOT PUT YOUR
HANDS NEAR PULLEYS, BELTS OR FAN. DO NOT
WEAR LOOSE CLOTHING.
(6) Start engine and inspect for leaks.
FUEL RAIL
DESCRIPTION
The fuel rail acts like a high pressure store. It is
available to all injectors for drawing fuel which has
been compressed by the injection pump. The rail
pressure sensor, rail pressure solenoid, high pressure
line, and the return flow line are attached to the fuel
rail (Fig. 7).
OPERATION
The stored fuel volume inside the rail acts as a
damper for pressure fluctuations which result
because of pulsating supply and brief large extrac-
tions of fuel during injector firing. The rail primarily
influences the atomization of fuel at the injector noz-
zle, and the accuracy of injected quantity during
injection.
REMOVAL
(Refer to 14 - FUEL SYSTEM - WARNING).
WARNING: NO SPARKS, OPEN FLAMES OR SMOK-
ING. RISK OF POISONING FROM INHALING AND
SWALLOWING FUEL. RISK OF INJURY TO EYES
AND SKIN FROM CONTACT WITH FUEL. POUR
FUELS ONLY INTO SUITABLE AND APPROPRI-
ATELY MARKED CONTAINERS. WEAR PROTECTIVE
CLOTHING.
(1) Disconnect negative battery cable.
(2) Partially drain cooling system from radiator
only.
(3) Remove thermostat housing.
(4) Disconnect engine wiring electrical connectors
from sensors restricting harness movement.
(5) Remove engine harness retaining bolts.
(6) Remove fuel temperature sensor from fuel rail.
(7) Remove fuel rail retaining bolts and disconnect
glow plug connectors.
(8) Remove front engine lift support.
CAUTION: When slackening and tightening fuel
injection line union nuts, counter hold with wrench
at threaded connection. ON NO ACCOUNT exceed
the tightening torque at any time. Do NOT crimp or
bend lines.
NOTE: After removing lines, seal connections and
ensure cleanliness.
(9) Remove injector high pressure lines (Refer to
14 - FUEL SYSTEM/FUEL DELIVERY/FUEL LINES
- REMOVAL) (Fig. 7).
(10) Remove pressure line of high pressure pump
(Fig. 7).
(11) Detach fuel return flow line to high pressure
pump at rail (Fig. 7).
(12) Detach fuel return flow line to fuel filter at
fuel filter (Fig. 7).
(13) Remove fuel rail (Fig. 7).
INSTALLATION
(Refer to 14 - FUEL SYSTEM - WARNING)
WARNING: NO FIRE, FLAMES OR SMOKING. RISK
OF POISONING FROM INHALING OR SWALLOWING
FUEL. RISK OF INJURY TO EYES AND SKIN FROM
CONTACT WITH FUEL. POUR FUELS ONLY INTO
SUITABLE AND APPROPRIATELY MARKED CON-
TAINERS. WEAR PROTECTIVE CLOTHING.
VAFUEL DELIVERY 14 - 11
FUEL PUMP (Continued)
Page 840 of 1232
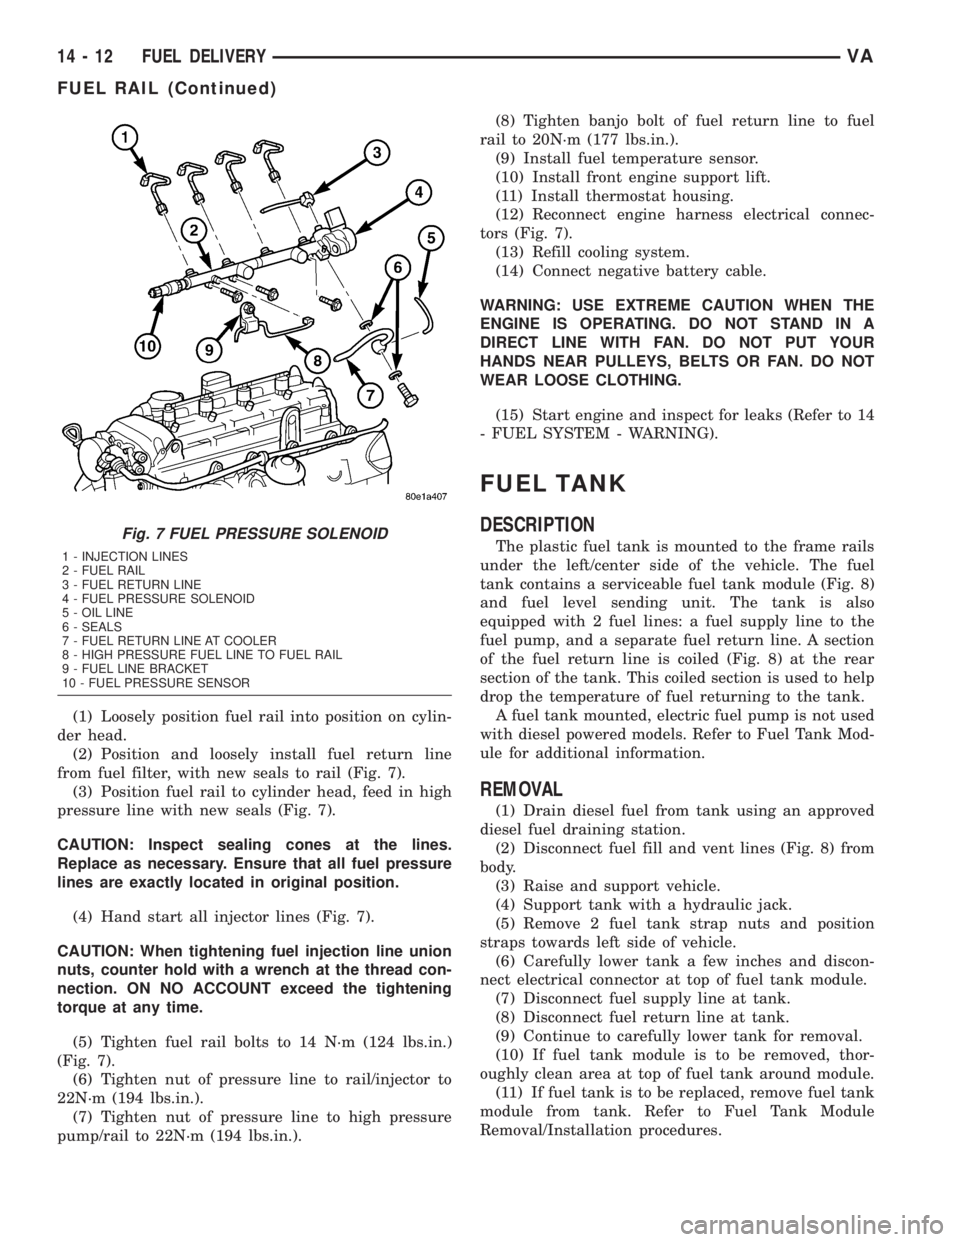
(1) Loosely position fuel rail into position on cylin-
der head.
(2) Position and loosely install fuel return line
from fuel filter, with new seals to rail (Fig. 7).
(3) Position fuel rail to cylinder head, feed in high
pressure line with new seals (Fig. 7).
CAUTION: Inspect sealing cones at the lines.
Replace as necessary. Ensure that all fuel pressure
lines are exactly located in original position.
(4) Hand start all injector lines (Fig. 7).
CAUTION: When tightening fuel injection line union
nuts, counter hold with a wrench at the thread con-
nection. ON NO ACCOUNT exceed the tightening
torque at any time.
(5) Tighten fuel rail bolts to 14 N´m (124 lbs.in.)
(Fig. 7).
(6) Tighten nut of pressure line to rail/injector to
22N´m (194 lbs.in.).
(7) Tighten nut of pressure line to high pressure
pump/rail to 22N´m (194 lbs.in.).(8) Tighten banjo bolt of fuel return line to fuel
rail to 20N´m (177 lbs.in.).
(9) Install fuel temperature sensor.
(10) Install front engine support lift.
(11) Install thermostat housing.
(12) Reconnect engine harness electrical connec-
tors (Fig. 7).
(13) Refill cooling system.
(14) Connect negative battery cable.
WARNING: USE EXTREME CAUTION WHEN THE
ENGINE IS OPERATING. DO NOT STAND IN A
DIRECT LINE WITH FAN. DO NOT PUT YOUR
HANDS NEAR PULLEYS, BELTS OR FAN. DO NOT
WEAR LOOSE CLOTHING.
(15) Start engine and inspect for leaks (Refer to 14
- FUEL SYSTEM - WARNING).
FUEL TANK
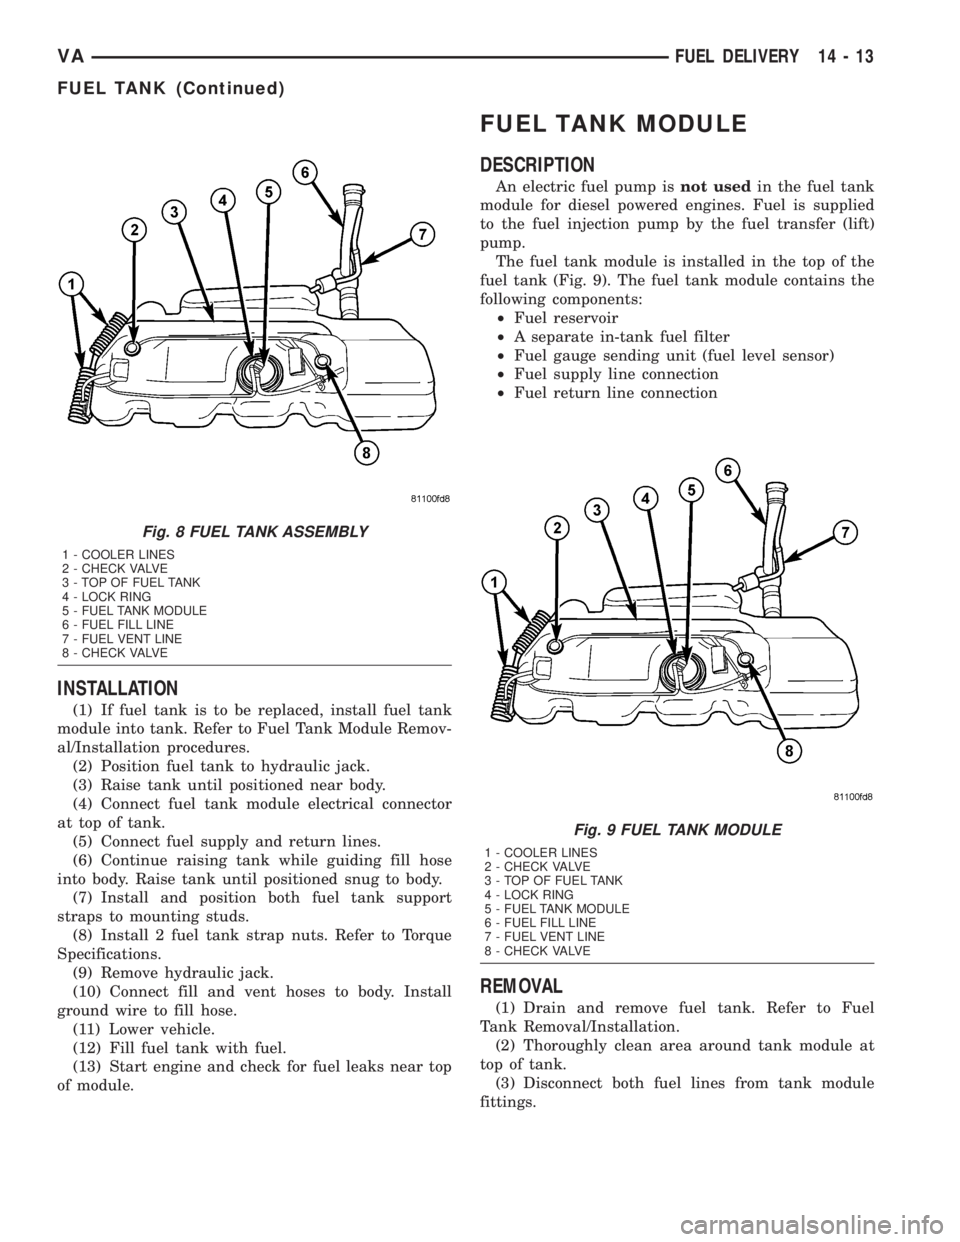
DESCRIPTION
The plastic fuel tank is mounted to the frame rails
under the left/center side of the vehicle. The fuel
tank contains a serviceable fuel tank module (Fig. 8)
and fuel level sending unit. The tank is also
equipped with 2 fuel lines: a fuel supply line to the
fuel pump, and a separate fuel return line. A section
of the fuel return line is coiled (Fig. 8) at the rear
section of the tank. This coiled section is used to help
drop the temperature of fuel returning to the tank.
A fuel tank mounted, electric fuel pump is not used
with diesel powered models. Refer to Fuel Tank Mod-
ule for additional information.
REMOVAL
(1) Drain diesel fuel from tank using an approved
diesel fuel draining station.
(2) Disconnect fuel fill and vent lines (Fig. 8) from
body.
(3) Raise and support vehicle.
(4) Support tank with a hydraulic jack.
(5) Remove 2 fuel tank strap nuts and position
straps towards left side of vehicle.
(6) Carefully lower tank a few inches and discon-
nect electrical connector at top of fuel tank module.
(7) Disconnect fuel supply line at tank.
(8) Disconnect fuel return line at tank.
(9) Continue to carefully lower tank for removal.
(10) If fuel tank module is to be removed, thor-
oughly clean area at top of fuel tank around module.
(11) If fuel tank is to be replaced, remove fuel tank
module from tank. Refer to Fuel Tank Module
Removal/Installation procedures.
Fig. 7 FUEL PRESSURE SOLENOID
1 - INJECTION LINES
2 - FUEL RAIL
3 - FUEL RETURN LINE
4 - FUEL PRESSURE SOLENOID
5 - OIL LINE
6 - SEALS
7 - FUEL RETURN LINE AT COOLER
8 - HIGH PRESSURE FUEL LINE TO FUEL RAIL
9 - FUEL LINE BRACKET
10 - FUEL PRESSURE SENSOR
14 - 12 FUEL DELIVERYVA
FUEL RAIL (Continued)
Page 841 of 1232
INSTALLATION
(1) If fuel tank is to be replaced, install fuel tank
module into tank. Refer to Fuel Tank Module Remov-
al/Installation procedures.
(2) Position fuel tank to hydraulic jack.
(3) Raise tank until positioned near body.
(4) Connect fuel tank module electrical connector
at top of tank.
(5) Connect fuel supply and return lines.
(6) Continue raising tank while guiding fill hose
into body. Raise tank until positioned snug to body.
(7) Install and position both fuel tank support
straps to mounting studs.
(8) Install 2 fuel tank strap nuts. Refer to Torque
Specifications.
(9) Remove hydraulic jack.
(10) Connect fill and vent hoses to body. Install
ground wire to fill hose.
(11) Lower vehicle.
(12) Fill fuel tank with fuel.
(13) Start engine and check for fuel leaks near top
of module.
FUEL TANK MODULE
DESCRIPTION
An electric fuel pump isnot usedin the fuel tank
module for diesel powered engines. Fuel is supplied
to the fuel injection pump by the fuel transfer (lift)
pump.
The fuel tank module is installed in the top of the
fuel tank (Fig. 9). The fuel tank module contains the
following components:
²Fuel reservoir
²A separate in-tank fuel filter
²Fuel gauge sending unit (fuel level sensor)
²Fuel supply line connection
²Fuel return line connection
REMOVAL
(1) Drain and remove fuel tank. Refer to Fuel
Tank Removal/Installation.
(2) Thoroughly clean area around tank module at
top of tank.
(3) Disconnect both fuel lines from tank module
fittings.
Fig. 8 FUEL TANK ASSEMBLY
1 - COOLER LINES
2 - CHECK VALVE
3 - TOP OF FUEL TANK
4 - LOCK RING
5 - FUEL TANK MODULE
6 - FUEL FILL LINE
7 - FUEL VENT LINE
8 - CHECK VALVE
Fig. 9 FUEL TANK MODULE
1 - COOLER LINES
2 - CHECK VALVE
3 - TOP OF FUEL TANK
4 - LOCK RING
5 - FUEL TANK MODULE
6 - FUEL FILL LINE
7 - FUEL VENT LINE
8 - CHECK VALVE
VAFUEL DELIVERY 14 - 13
FUEL TANK (Continued)
Page 844 of 1232
HI PRESSURE FUEL SHUTOFF
SOL
DESCRIPTION
The high pressure fuel injection pump has a inte-
grated shut off valve for one of the high pressure
pump elements. The ECM monitors the fuel temper-
ature and will switch off the element if the fuel tem-
perature reaches above 287ÉF (120C) with the engine
speed above 2200 rpm. The shut off valve is not ser-
viced separately.
OPERATION
The high pressure injection pump element shut off
valve interrupts the fuel high pressure delivery of
one of the injection pump elements in the part load
range. This will reduce the power required for driv-
ing the high pressure pump so as to reduce the fuel
temperature. The pump element is switched off if the
fuel temperature is excessively high forcing it to
return again to the fuel feed to cool. The element
shut off limits the increasing pressure of the injection
pump to ensure that the critical fuel temperature for
the system is not exceeded.
WATER IN FUEL SENSOR
DESCRIPTION
The water in fuel sensor if located in the bottom of
the fuel filter housing. This sensor detects the pres-
ence of water in the fuel. If water is present in the
fuel a signal is sent to the ECM and the ECM signals
the instrument cluster, over the CAN bus, to illumi-
nate the water in fuel warning.
OPERATION
The non-dielectric properties of the water allow the
sensors probes to close the electronic circuit when
water is present in the system. When diesel fuel is
present in the system, it's dielectric (does not conduct
electricity well) properties do not allow any electrical
contact between the probes. A 12V power signal is
always present in order to illuminate the indicator on
the instrument cluster. For removal and installation
procedure refer to (Refer to 14 - FUEL SYSTEM/
FUEL DELIVERY/FUEL FILTER - REMOVAL).
14 - 16 FUEL DELIVERYVA