2005 MERCEDES-BENZ SPRINTER wheel
[x] Cancel search: wheelPage 899 of 1232
DIAGNOSIS AND TESTING
DIAGNOSIS AND TESTING - AUTOMATIC
TRANSMISSION
CAUTION: Before attempting any repair on a NAG1
automatic transmission, check for Diagnostic Trou-
ble Codes with the DRBTscan tool.
Transmission malfunctions may be caused by these
general conditions:
²Poor engine performance.
²Improper adjustments.
²Hydraulic malfunctions.
²Mechanical malfunctions.
²Electronic malfunctions.
²Transfer case performance.
Diagnosis of these problems should always begin
by checking the easily accessible variables: fluid level
and condition, gearshift cable adjustment. Then per-
form a road test to determine if the problem has been
corrected or if more diagnosis is necessary.
DIAGNOSIS AND TESTING - PRELIMINARY
Two basic procedures are required. One procedure
for vehicles that are drivable and an alternate proce-
dure for disabled vehicles (will not back up or move
forward).
VEHICLE IS DRIVABLE
(1) Check for transmission fault codes using DRBt
scan tool.
(2) Check fluid level and condition.
(3) Adjust gearshift cable if complaint was based
on delayed, erratic, or harsh shifts.
(4) Road test and note how transmission upshifts,
downshifts, and engages.
VEHICLE IS DISABLED
(1) Check fluid level and condition.(2) Check for broken or disconnected gearshift
cable.
(3) Check for cracked, leaking cooler lines, or loose
or missing pressure-port plugs.
(4) Raise and support vehicle on safety stands,
start engine, shift transmission into gear, and note
following:
(a) If propeller shaft turns but wheels do not,
problem is with differential or axle shafts.
(b) If propeller shaft does not turn and transmis-
sion is noisy, stop engine. Remove oil pan, and
check for debris. If pan is clear, remove transmis-
sion and check for damaged driveplate, converter,
oil pump, or input shaft.
(c) If propeller shaft does not turn and transmis-
sion is not noisy, perform hydraulic-pressure test to
determine if problem is hydraulic or mechanical.
DIAGNOSIS AND TESTING - ROAD TESTING
Before road testing, be sure the fluid level and con-
trol cable adjustments have been checked and
adjusted if necessary. Verify that all diagnostic trou-
ble codes have been resolved.
Observe engine performance during the road test.
A poorly tuned engine will not allow accurate analy-
sis of transmission operation.
Operate the transmission in all gear ranges. Check
for shift variations and engine flare which indicates
slippage. Note if shifts are harsh, spongy, delayed,
early, or if part throttle downshifts are sensitive.
Slippage indicated by engine flare, usually means
clutch, overrunning clutch, or line pressure problems.
A slipping clutch can often be determined by com-
paring which internal units are applied in the vari-
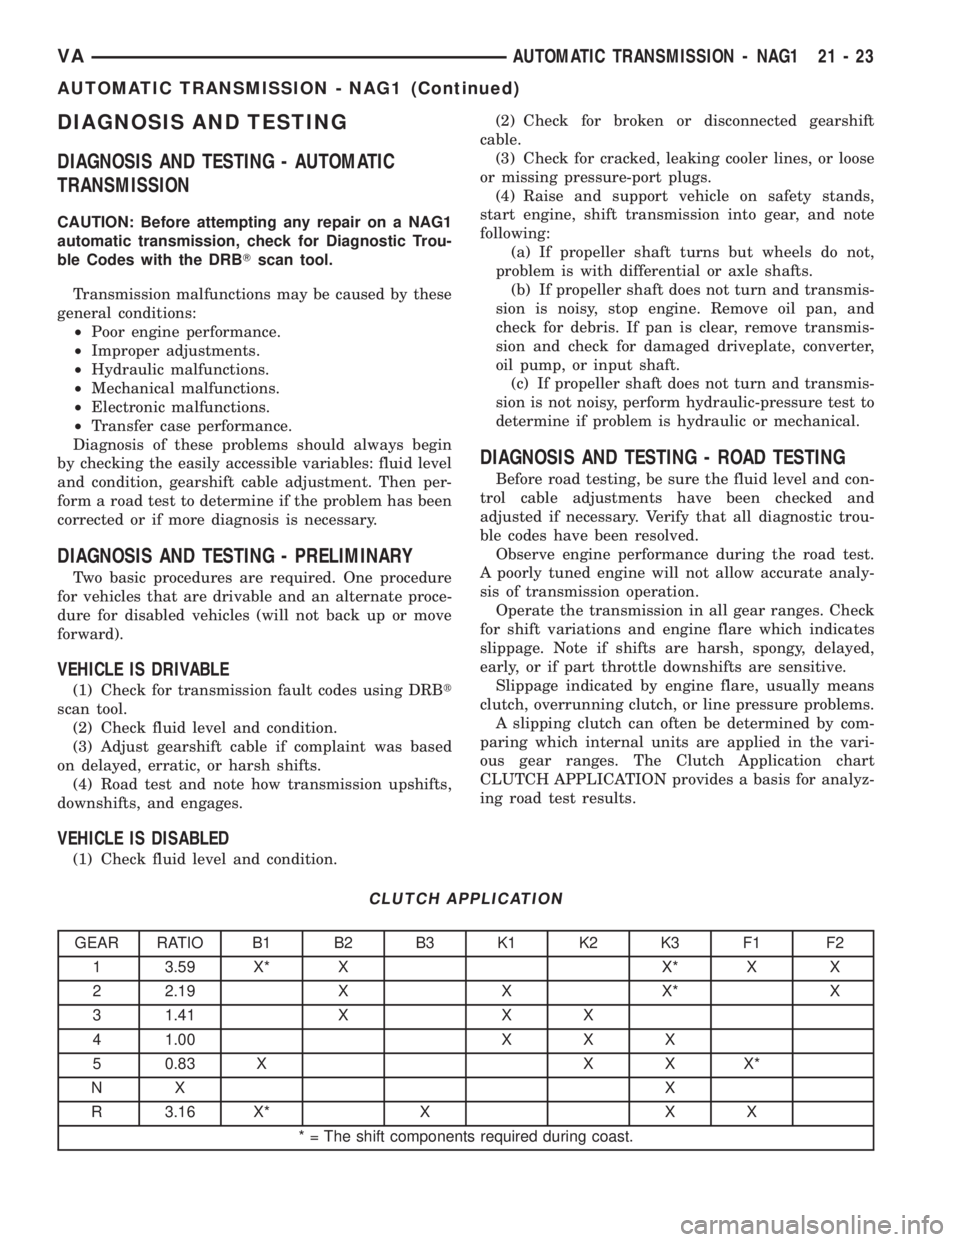
ous gear ranges. The Clutch Application chart
CLUTCH APPLICATION provides a basis for analyz-
ing road test results.
CLUTCH APPLICATION
GEAR RATIO B1 B2 B3 K1 K2 K3 F1 F2
1 3.59 X* X X* X X
2 2.19 X X X* X
3 1.41 X X X
4 1.00 X X X
5 0.83 X X X X*
NX X
R 3.16 X* X X X
* = The shift components required during coast.
VAAUTOMATIC TRANSMISSION - NAG1 21 - 23
AUTOMATIC TRANSMISSION - NAG1 (Continued)
Page 900 of 1232
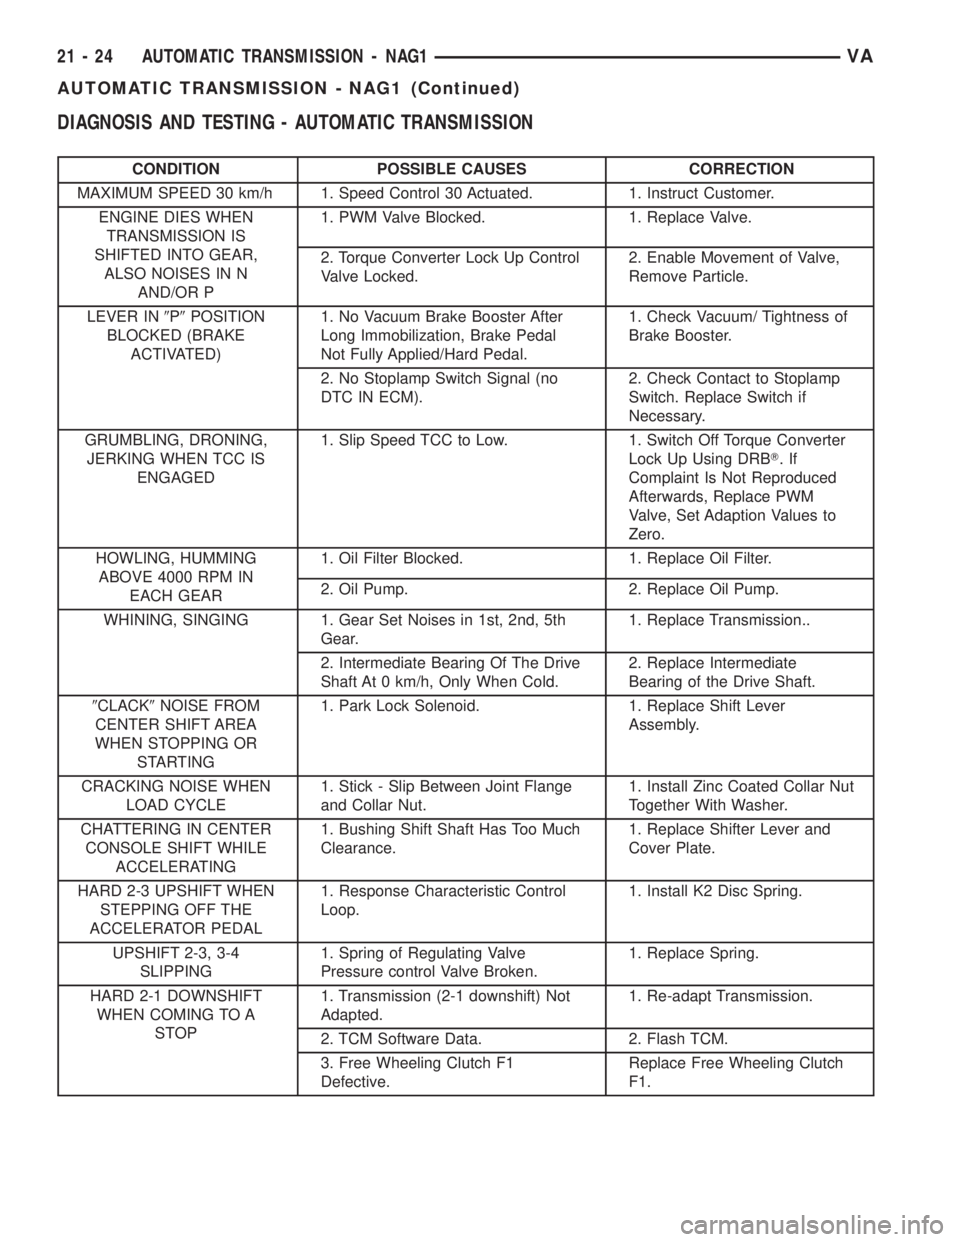
DIAGNOSIS AND TESTING - AUTOMATIC TRANSMISSION
CONDITION POSSIBLE CAUSES CORRECTION
MAXIMUM SPEED 30 km/h 1. Speed Control 30 Actuated. 1. Instruct Customer.
ENGINE DIES WHEN
TRANSMISSION IS
SHIFTED INTO GEAR,
ALSO NOISES IN N
AND/OR P1. PWM Valve Blocked. 1. Replace Valve.
2. Torque Converter Lock Up Control
Valve Locked.2. Enable Movement of Valve,
Remove Particle.
LEVER IN9P9POSITION
BLOCKED (BRAKE
ACTIVATED)1. No Vacuum Brake Booster After
Long Immobilization, Brake Pedal
Not Fully Applied/Hard Pedal.1. Check Vacuum/ Tightness of
Brake Booster.
2. No Stoplamp Switch Signal (no
DTC IN ECM).2. Check Contact to Stoplamp
Switch. Replace Switch if
Necessary.
GRUMBLING, DRONING,
JERKING WHEN TCC IS
ENGAGED1. Slip Speed TCC to Low. 1. Switch Off Torque Converter
Lock Up Using DRBT.If
Complaint Is Not Reproduced
Afterwards, Replace PWM
Valve, Set Adaption Values to
Zero.
HOWLING, HUMMING
ABOVE 4000 RPM IN
EACH GEAR1. Oil Filter Blocked. 1. Replace Oil Filter.
2. Oil Pump. 2. Replace Oil Pump.
WHINING, SINGING 1. Gear Set Noises in 1st, 2nd, 5th
Gear.1. Replace Transmission..
2. Intermediate Bearing Of The Drive
Shaft At 0 km/h, Only When Cold.2. Replace Intermediate
Bearing of the Drive Shaft.
9CLACK9NOISE FROM
CENTER SHIFT AREA
WHEN STOPPING OR
STARTING1. Park Lock Solenoid. 1. Replace Shift Lever
Assembly.
CRACKING NOISE WHEN
LOAD CYCLE1. Stick - Slip Between Joint Flange
and Collar Nut.1. Install Zinc Coated Collar Nut
Together With Washer.
CHATTERING IN CENTER
CONSOLE SHIFT WHILE
ACCELERATING1. Bushing Shift Shaft Has Too Much
Clearance.1. Replace Shifter Lever and
Cover Plate.
HARD 2-3 UPSHIFT WHEN
STEPPING OFF THE
ACCELERATOR PEDAL1. Response Characteristic Control
Loop.1. Install K2 Disc Spring.
UPSHIFT 2-3, 3-4
SLIPPING1. Spring of Regulating Valve
Pressure control Valve Broken.1. Replace Spring.
HARD 2-1 DOWNSHIFT
WHEN COMING TO A
STOP1. Transmission (2-1 downshift) Not
Adapted.1. Re-adapt Transmission.
2. TCM Software Data. 2. Flash TCM.
3. Free Wheeling Clutch F1
Defective.Replace Free Wheeling Clutch
F1.
21 - 24 AUTOMATIC TRANSMISSION - NAG1VA
AUTOMATIC TRANSMISSION - NAG1 (Continued)
Page 901 of 1232
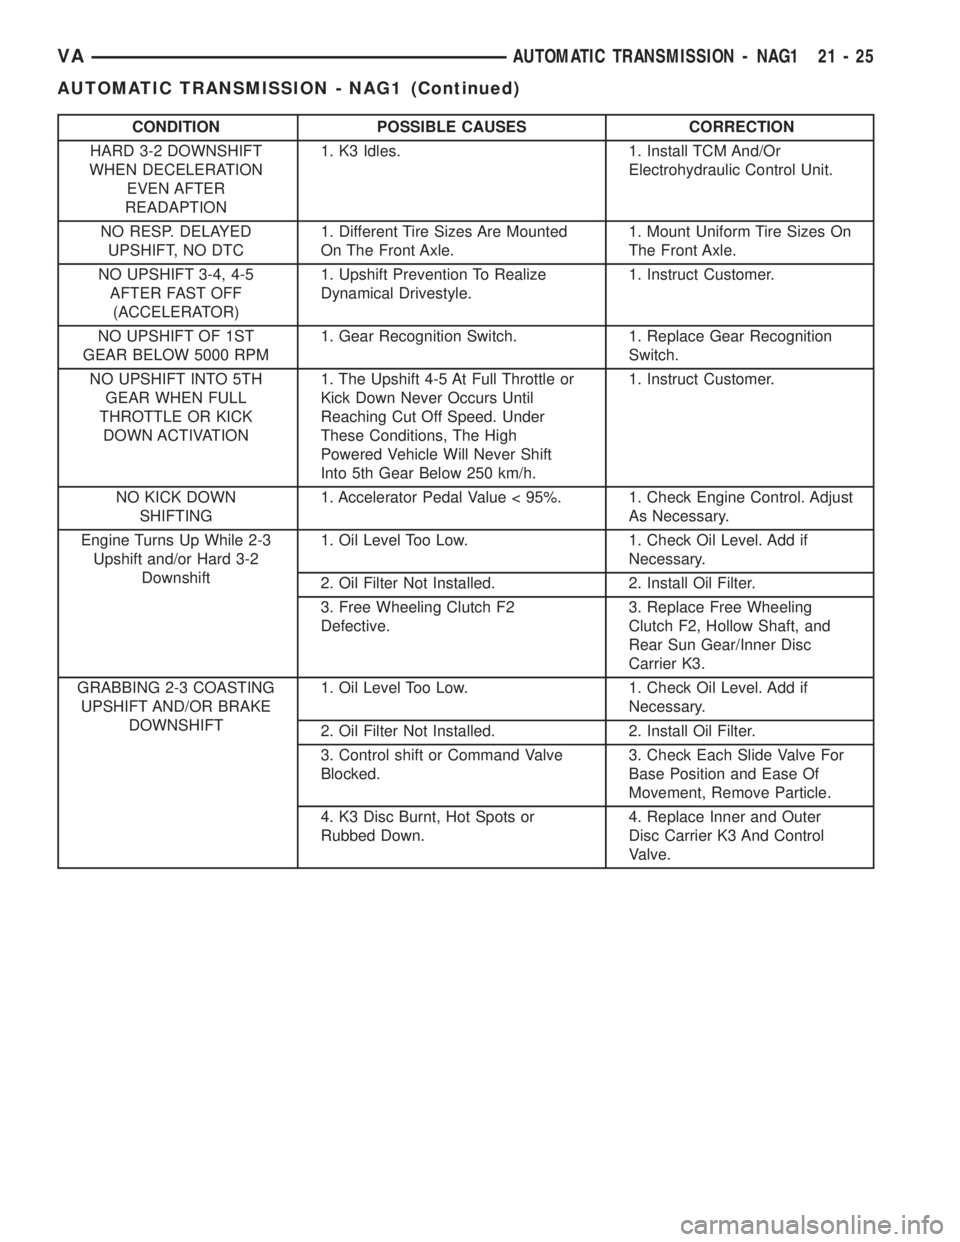
CONDITION POSSIBLE CAUSES CORRECTION
HARD 3-2 DOWNSHIFT
WHEN DECELERATION
EVEN AFTER
READAPTION1. K3 Idles. 1. Install TCM And/Or
Electrohydraulic Control Unit.
NO RESP. DELAYED
UPSHIFT, NO DTC1. Different Tire Sizes Are Mounted
On The Front Axle.1. Mount Uniform Tire Sizes On
The Front Axle.
NO UPSHIFT 3-4, 4-5
AFTER FAST OFF
(ACCELERATOR)1. Upshift Prevention To Realize
Dynamical Drivestyle.1. Instruct Customer.
NO UPSHIFT OF 1ST
GEAR BELOW 5000 RPM1. Gear Recognition Switch. 1. Replace Gear Recognition
Switch.
NO UPSHIFT INTO 5TH
GEAR WHEN FULL
THROTTLE OR KICK
DOWN ACTIVATION1. The Upshift 4-5 At Full Throttle or
Kick Down Never Occurs Until
Reaching Cut Off Speed. Under
These Conditions, The High
Powered Vehicle Will Never Shift
Into 5th Gear Below 250 km/h.1. Instruct Customer.
NO KICK DOWN
SHIFTING1. Accelerator Pedal Value < 95%. 1. Check Engine Control. Adjust
As Necessary.
Engine Turns Up While 2-3
Upshift and/or Hard 3-2
Downshift1. Oil Level Too Low. 1. Check Oil Level. Add if
Necessary.
2. Oil Filter Not Installed. 2. Install Oil Filter.
3. Free Wheeling Clutch F2
Defective.3. Replace Free Wheeling
Clutch F2, Hollow Shaft, and
Rear Sun Gear/Inner Disc
Carrier K3.
GRABBING 2-3 COASTING
UPSHIFT AND/OR BRAKE
DOWNSHIFT1. Oil Level Too Low. 1. Check Oil Level. Add if
Necessary.
2. Oil Filter Not Installed. 2. Install Oil Filter.
3. Control shift or Command Valve
Blocked.3. Check Each Slide Valve For
Base Position and Ease Of
Movement, Remove Particle.
4. K3 Disc Burnt, Hot Spots or
Rubbed Down.4. Replace Inner and Outer
Disc Carrier K3 And Control
Valve.
VAAUTOMATIC TRANSMISSION - NAG1 21 - 25
AUTOMATIC TRANSMISSION - NAG1 (Continued)
Page 950 of 1232
DRIVING CLUTCH K1
DISASSEMBLY
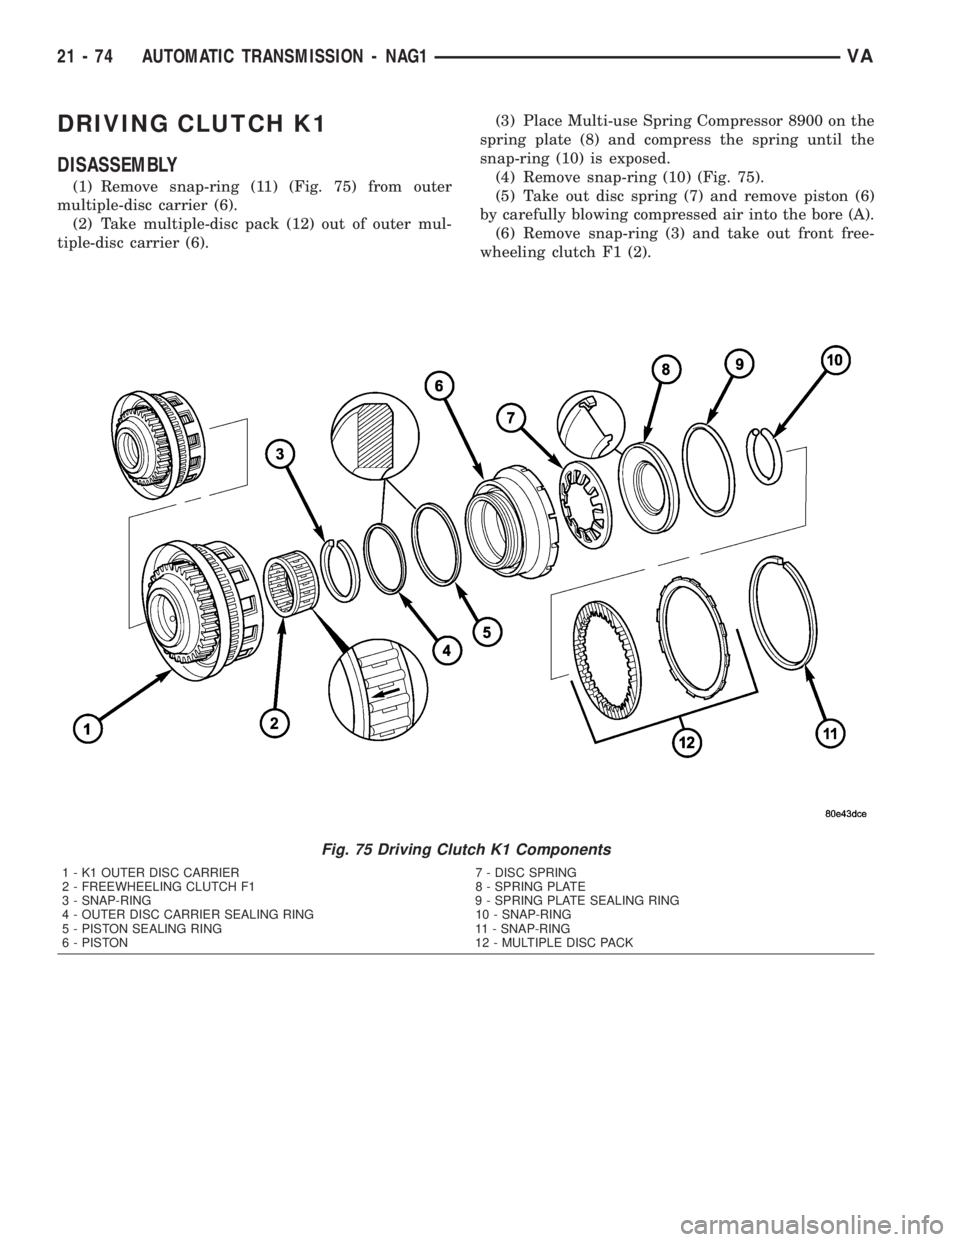
(1) Remove snap-ring (11) (Fig. 75) from outer
multiple-disc carrier (6).
(2) Take multiple-disc pack (12) out of outer mul-
tiple-disc carrier (6).(3) Place Multi-use Spring Compressor 8900 on the
spring plate (8) and compress the spring until the
snap-ring (10) is exposed.
(4) Remove snap-ring (10) (Fig. 75).
(5) Take out disc spring (7) and remove piston (6)
by carefully blowing compressed air into the bore (A).
(6) Remove snap-ring (3) and take out front free-
wheeling clutch F1 (2).
Fig. 75 Driving Clutch K1 Components
1 - K1 OUTER DISC CARRIER 7 - DISC SPRING
2 - FREEWHEELING CLUTCH F1 8 - SPRING PLATE
3 - SNAP-RING 9 - SPRING PLATE SEALING RING
4 - OUTER DISC CARRIER SEALING RING 10 - SNAP-RING
5 - PISTON SEALING RING 11 - SNAP-RING
6 - PISTON 12 - MULTIPLE DISC PACK
21 - 74 AUTOMATIC TRANSMISSION - NAG1VA
Page 951 of 1232
ASSEMBLY
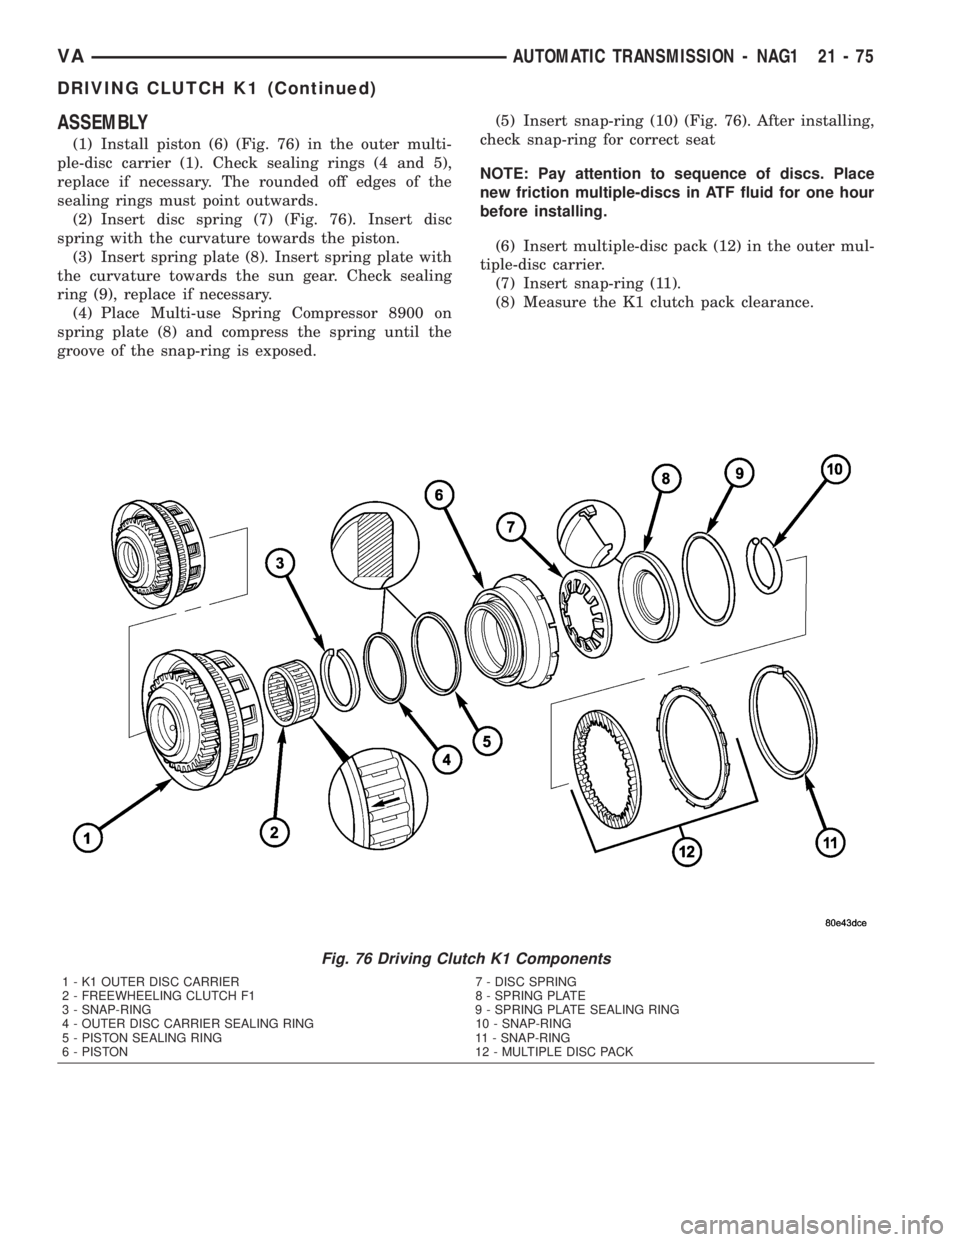
(1) Install piston (6) (Fig. 76) in the outer multi-
ple-disc carrier (1). Check sealing rings (4 and 5),
replace if necessary. The rounded off edges of the
sealing rings must point outwards.
(2) Insert disc spring (7) (Fig. 76). Insert disc
spring with the curvature towards the piston.
(3) Insert spring plate (8). Insert spring plate with
the curvature towards the sun gear. Check sealing
ring (9), replace if necessary.
(4) Place Multi-use Spring Compressor 8900 on
spring plate (8) and compress the spring until the
groove of the snap-ring is exposed.(5) Insert snap-ring (10) (Fig. 76). After installing,
check snap-ring for correct seat
NOTE: Pay attention to sequence of discs. Place
new friction multiple-discs in ATF fluid for one hour
before installing.
(6) Insert multiple-disc pack (12) in the outer mul-
tiple-disc carrier.
(7) Insert snap-ring (11).
(8) Measure the K1 clutch pack clearance.
Fig. 76 Driving Clutch K1 Components
1 - K1 OUTER DISC CARRIER 7 - DISC SPRING
2 - FREEWHEELING CLUTCH F1 8 - SPRING PLATE
3 - SNAP-RING 9 - SPRING PLATE SEALING RING
4 - OUTER DISC CARRIER SEALING RING 10 - SNAP-RING
5 - PISTON SEALING RING 11 - SNAP-RING
6 - PISTON 12 - MULTIPLE DISC PACK
VAAUTOMATIC TRANSMISSION - NAG1 21 - 75
DRIVING CLUTCH K1 (Continued)
Page 952 of 1232
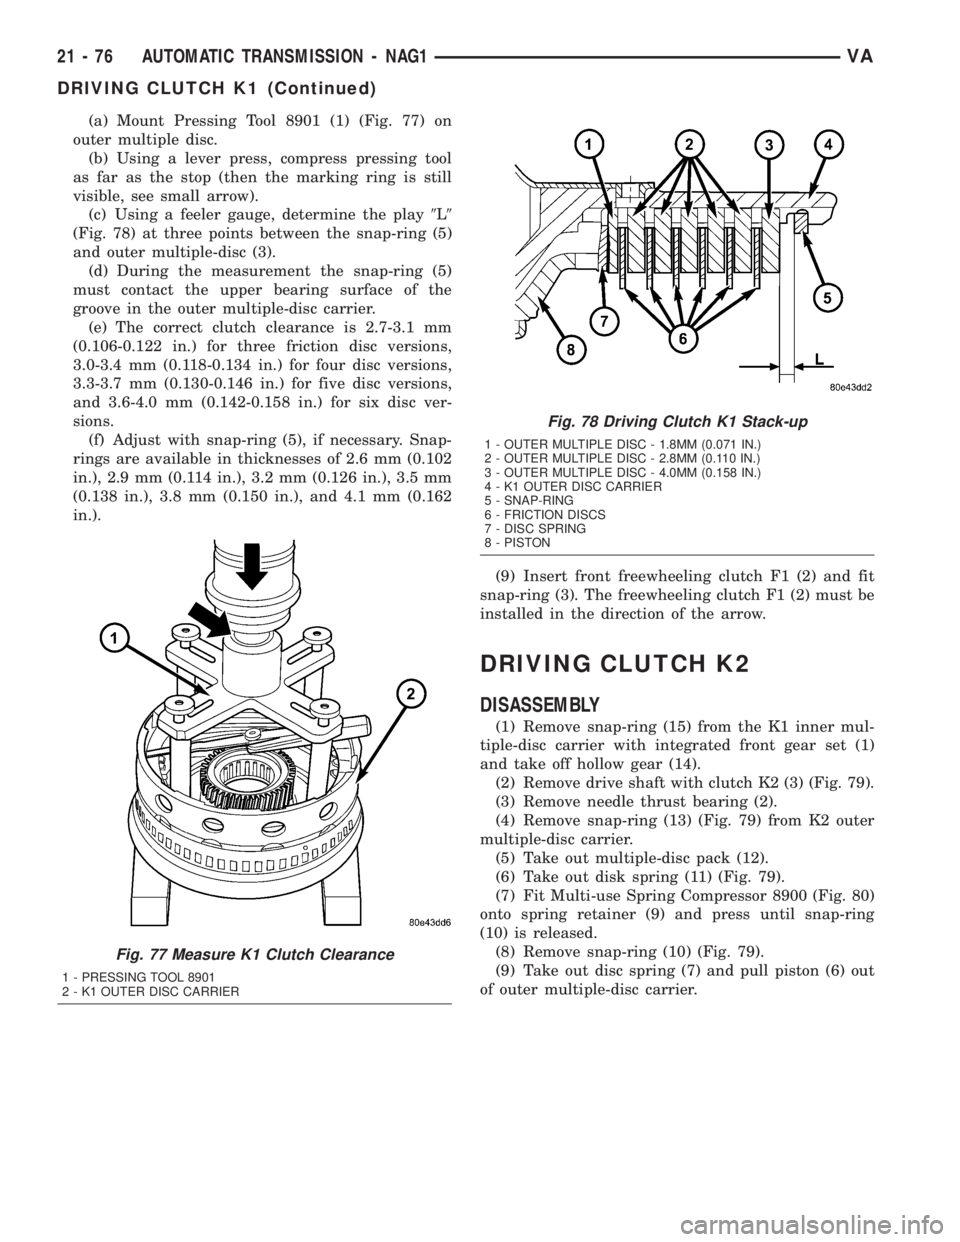
(a) Mount Pressing Tool 8901 (1) (Fig. 77) on
outer multiple disc.
(b) Using a lever press, compress pressing tool
as far as the stop (then the marking ring is still
visible, see small arrow).
(c) Using a feeler gauge, determine the play9L9
(Fig. 78) at three points between the snap-ring (5)
and outer multiple-disc (3).
(d) During the measurement the snap-ring (5)
must contact the upper bearing surface of the
groove in the outer multiple-disc carrier.
(e) The correct clutch clearance is 2.7-3.1 mm
(0.106-0.122 in.) for three friction disc versions,
3.0-3.4 mm (0.118-0.134 in.) for four disc versions,
3.3-3.7 mm (0.130-0.146 in.) for five disc versions,
and 3.6-4.0 mm (0.142-0.158 in.) for six disc ver-
sions.
(f) Adjust with snap-ring (5), if necessary. Snap-
rings are available in thicknesses of 2.6 mm (0.102
in.), 2.9 mm (0.114 in.), 3.2 mm (0.126 in.), 3.5 mm
(0.138 in.), 3.8 mm (0.150 in.), and 4.1 mm (0.162
in.).
(9) Insert front freewheeling clutch F1 (2) and fit
snap-ring (3). The freewheeling clutch F1 (2) must be
installed in the direction of the arrow.
DRIVING CLUTCH K2
DISASSEMBLY
(1) Remove snap-ring (15) from the K1 inner mul-
tiple-disc carrier with integrated front gear set (1)
and take off hollow gear (14).
(2) Remove drive shaft with clutch K2 (3) (Fig. 79).
(3) Remove needle thrust bearing (2).
(4) Remove snap-ring (13) (Fig. 79) from K2 outer
multiple-disc carrier.
(5) Take out multiple-disc pack (12).
(6) Take out disk spring (11) (Fig. 79).
(7) Fit Multi-use Spring Compressor 8900 (Fig. 80)
onto spring retainer (9) and press until snap-ring
(10) is released.
(8) Remove snap-ring (10) (Fig. 79).
(9) Take out disc spring (7) and pull piston (6) out
of outer multiple-disc carrier.
Fig. 77 Measure K1 Clutch Clearance
1 - PRESSING TOOL 8901
2 - K1 OUTER DISC CARRIER
Fig. 78 Driving Clutch K1 Stack-up
1 - OUTER MULTIPLE DISC - 1.8MM (0.071 IN.)
2 - OUTER MULTIPLE DISC - 2.8MM (0.110 IN.)
3 - OUTER MULTIPLE DISC - 4.0MM (0.158 IN.)
4 - K1 OUTER DISC CARRIER
5 - SNAP-RING
6 - FRICTION DISCS
7 - DISC SPRING
8 - PISTON
21 - 76 AUTOMATIC TRANSMISSION - NAG1VA
DRIVING CLUTCH K1 (Continued)
Page 954 of 1232
ASSEMBLY
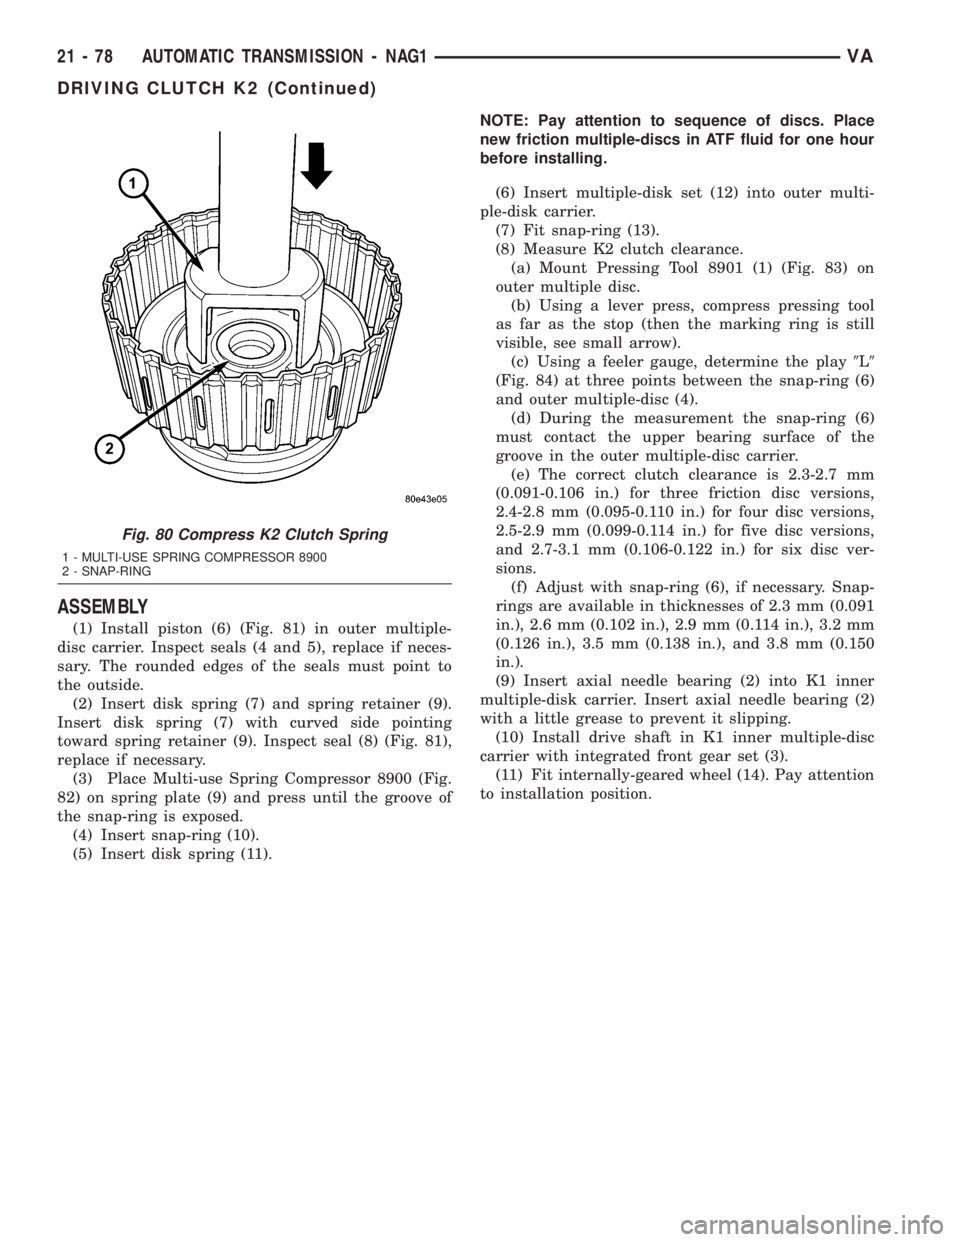
(1) Install piston (6) (Fig. 81) in outer multiple-
disc carrier. Inspect seals (4 and 5), replace if neces-
sary. The rounded edges of the seals must point to
the outside.
(2) Insert disk spring (7) and spring retainer (9).
Insert disk spring (7) with curved side pointing
toward spring retainer (9). Inspect seal (8) (Fig. 81),
replace if necessary.
(3) Place Multi-use Spring Compressor 8900 (Fig.
82) on spring plate (9) and press until the groove of
the snap-ring is exposed.
(4) Insert snap-ring (10).
(5) Insert disk spring (11).NOTE: Pay attention to sequence of discs. Place
new friction multiple-discs in ATF fluid for one hour
before installing.
(6) Insert multiple-disk set (12) into outer multi-
ple-disk carrier.
(7) Fit snap-ring (13).
(8) Measure K2 clutch clearance.
(a) Mount Pressing Tool 8901 (1) (Fig. 83) on
outer multiple disc.
(b) Using a lever press, compress pressing tool
as far as the stop (then the marking ring is still
visible, see small arrow).
(c) Using a feeler gauge, determine the play9L9
(Fig. 84) at three points between the snap-ring (6)
and outer multiple-disc (4).
(d) During the measurement the snap-ring (6)
must contact the upper bearing surface of the
groove in the outer multiple-disc carrier.
(e) The correct clutch clearance is 2.3-2.7 mm
(0.091-0.106 in.) for three friction disc versions,
2.4-2.8 mm (0.095-0.110 in.) for four disc versions,
2.5-2.9 mm (0.099-0.114 in.) for five disc versions,
and 2.7-3.1 mm (0.106-0.122 in.) for six disc ver-
sions.
(f) Adjust with snap-ring (6), if necessary. Snap-
rings are available in thicknesses of 2.3 mm (0.091
in.), 2.6 mm (0.102 in.), 2.9 mm (0.114 in.), 3.2 mm
(0.126 in.), 3.5 mm (0.138 in.), and 3.8 mm (0.150
in.).
(9) Insert axial needle bearing (2) into K1 inner
multiple-disk carrier. Insert axial needle bearing (2)
with a little grease to prevent it slipping.
(10) Install drive shaft in K1 inner multiple-disc
carrier with integrated front gear set (3).
(11) Fit internally-geared wheel (14). Pay attention
to installation position.
Fig. 80 Compress K2 Clutch Spring
1 - MULTI-USE SPRING COMPRESSOR 8900
2 - SNAP-RING
21 - 78 AUTOMATIC TRANSMISSION - NAG1VA
DRIVING CLUTCH K2 (Continued)
Page 981 of 1232
(14) Remove the transmission oil filter and o-ring
from the electrohydraulic control unit.
(15) Clean the inside of the oil pan of any debris.
Inspect the oil pan gasket and replace if necessary.
(16) Install a new oil filter and o-ring into the elec-
trohydraulic control unit.
(17) Install the oil pan and gasket onto the trans-
mission.
(18) Install the oil pan bolts and retainers. Torque
the bolts to 8 N´m (70 in.lbs.).
(19) Lower the vehicle and add 7.0 L (7.4 qts.) of
transmission fluid to the transmission.
(20) Check the oil level (Refer to 21 - TRANSMIS-
SION/AUTOMATIC - NAG1/FLUID AND FILTER -
STANDARD PROCEDURE).
FREEWHEELING CLUTCH
DESCRIPTION
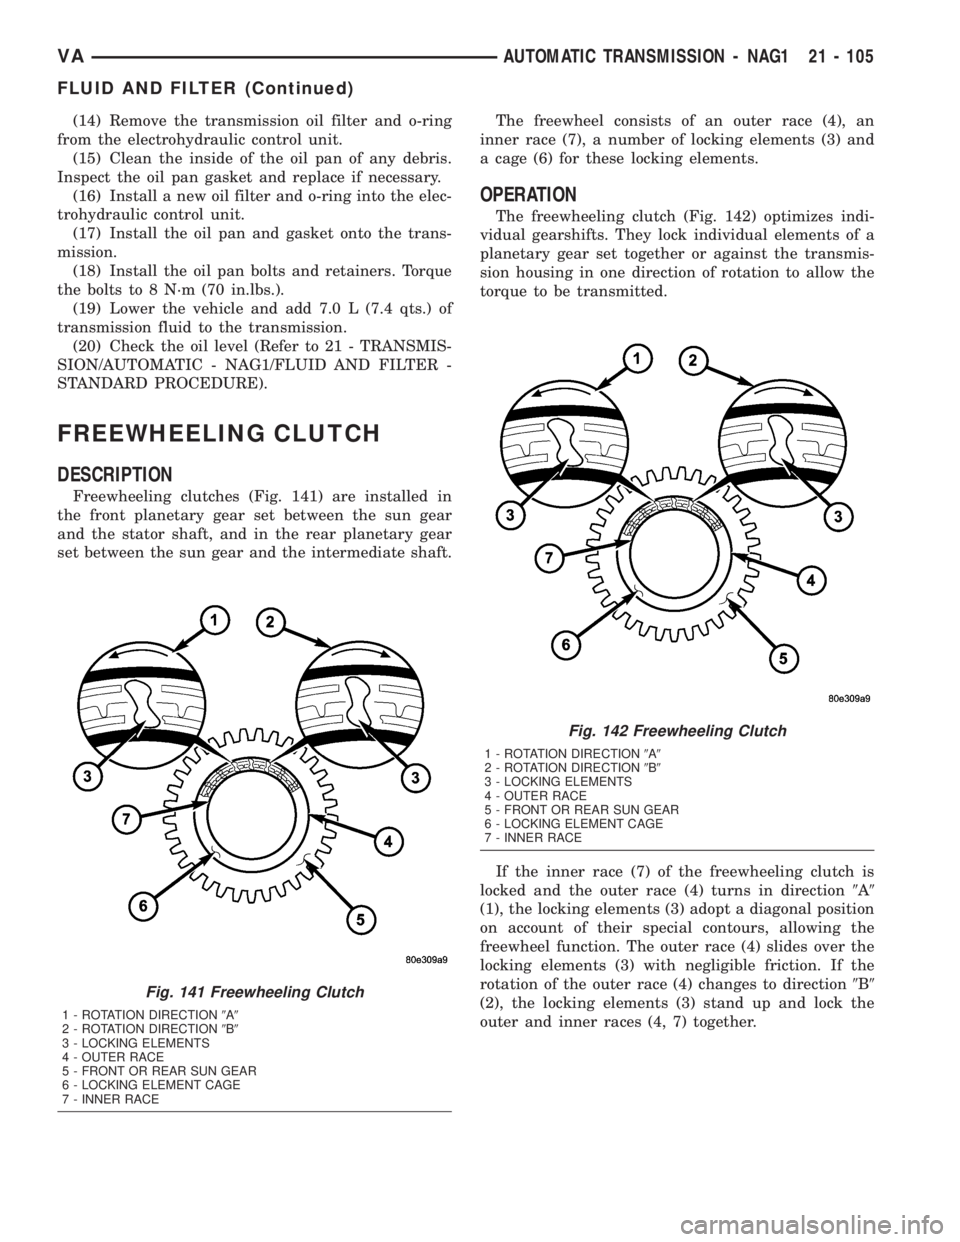
Freewheeling clutches (Fig. 141) are installed in
the front planetary gear set between the sun gear
and the stator shaft, and in the rear planetary gear
set between the sun gear and the intermediate shaft.The freewheel consists of an outer race (4), an
inner race (7), a number of locking elements (3) and
a cage (6) for these locking elements.
OPERATION
The freewheeling clutch (Fig. 142) optimizes indi-
vidual gearshifts. They lock individual elements of a
planetary gear set together or against the transmis-
sion housing in one direction of rotation to allow the
torque to be transmitted.
If the inner race (7) of the freewheeling clutch is
locked and the outer race (4) turns in direction9A9
(1), the locking elements (3) adopt a diagonal position
on account of their special contours, allowing the
freewheel function. The outer race (4) slides over the
locking elements (3) with negligible friction. If the
rotation of the outer race (4) changes to direction9B9
(2), the locking elements (3) stand up and lock the
outer and inner races (4, 7) together.
Fig. 141 Freewheeling Clutch
1 - ROTATION DIRECTION9A9
2 - ROTATION DIRECTION9B9
3 - LOCKING ELEMENTS
4 - OUTER RACE
5 - FRONT OR REAR SUN GEAR
6 - LOCKING ELEMENT CAGE
7 - INNER RACE
Fig. 142 Freewheeling Clutch
1 - ROTATION DIRECTION9A9
2 - ROTATION DIRECTION9B9
3 - LOCKING ELEMENTS
4 - OUTER RACE
5 - FRONT OR REAR SUN GEAR
6 - LOCKING ELEMENT CAGE
7 - INNER RACE
VAAUTOMATIC TRANSMISSION - NAG1 21 - 105
FLUID AND FILTER (Continued)