2005 MERCEDES-BENZ SPRINTER wheel torque
[x] Cancel search: wheel torquePage 3 of 1232
INTRODUCTION
TABLE OF CONTENTS
page page
VEHICLE IDENTIFICATION NUMBER
DESCRIPTION..........................1
INTERNATIONAL SYMBOLS
DESCRIPTION..........................2
FASTENER IDENTIFICATION
DESCRIPTION..........................2
FASTENER USAGE
DESCRIPTION - FASTENER USAGE.........5THREADED HOLE REPAIR
DESCRIPTION - THREADED HOLE REPAIR....5
METRIC SYSTEM
DESCRIPTION..........................5
TORQUE REFERENCES
DESCRIPTION..........................7
VEHICLE IDENTIFICATION
NUMBER
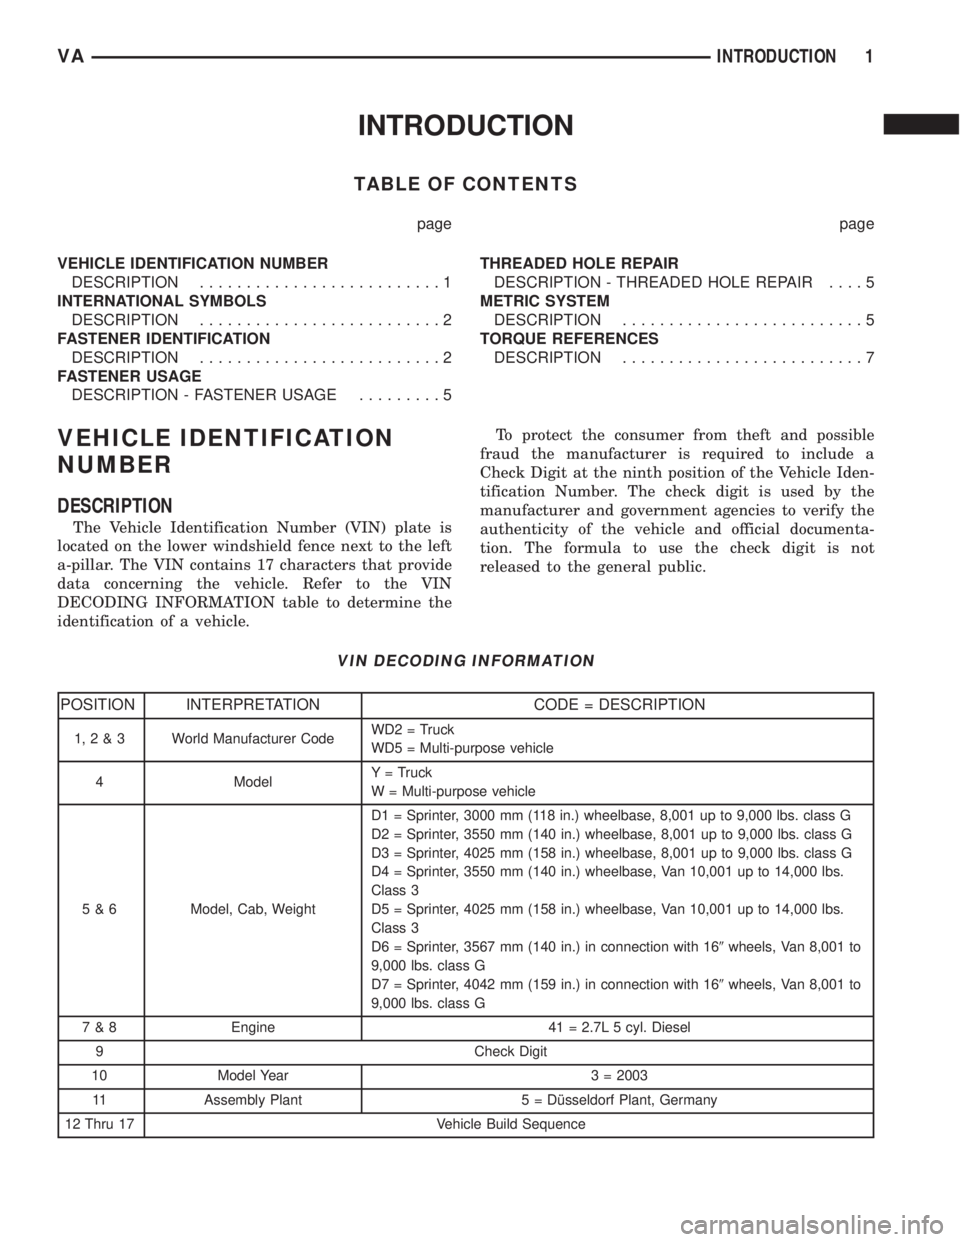
DESCRIPTION
The Vehicle Identification Number (VIN) plate is
located on the lower windshield fence next to the left
a-pillar. The VIN contains 17 characters that provide
data concerning the vehicle. Refer to the VIN
DECODING INFORMATION table to determine the
identification of a vehicle.To protect the consumer from theft and possible
fraud the manufacturer is required to include a
Check Digit at the ninth position of the Vehicle Iden-
tification Number. The check digit is used by the
manufacturer and government agencies to verify the
authenticity of the vehicle and official documenta-
tion. The formula to use the check digit is not
released to the general public.
VIN DECODING INFORMATION
POSITION INTERPRETATION CODE = DESCRIPTION
1,2&3 World Manufacturer CodeWD2 = Truck
WD5 = Multi-purpose vehicle
4 ModelY = Truck
W = Multi-purpose vehicle
5 & 6 Model, Cab, WeightD1 = Sprinter, 3000 mm (118 in.) wheelbase, 8,001 up to 9,000 lbs. class G
D2 = Sprinter, 3550 mm (140 in.) wheelbase, 8,001 up to 9,000 lbs. class G
D3 = Sprinter, 4025 mm (158 in.) wheelbase, 8,001 up to 9,000 lbs. class G
D4 = Sprinter, 3550 mm (140 in.) wheelbase, Van 10,001 up to 14,000 lbs.
Class 3
D5 = Sprinter, 4025 mm (158 in.) wheelbase, Van 10,001 up to 14,000 lbs.
Class 3
D6 = Sprinter, 3567 mm (140 in.) in connection with 169wheels, Van 8,001 to
9,000 lbs. class G
D7 = Sprinter, 4042 mm (159 in.) in connection with 169wheels, Van 8,001 to
9,000 lbs. class G
7 & 8 Engine 41 = 2.7L 5 cyl. Diesel
9 Check Digit
10 Model Year 3 = 2003
11 Assembly Plant 5 = Dîsseldorf Plant, Germany
12 Thru 17 Vehicle Build Sequence
VAINTRODUCTION 1
Page 21 of 1232
SUSPENSION
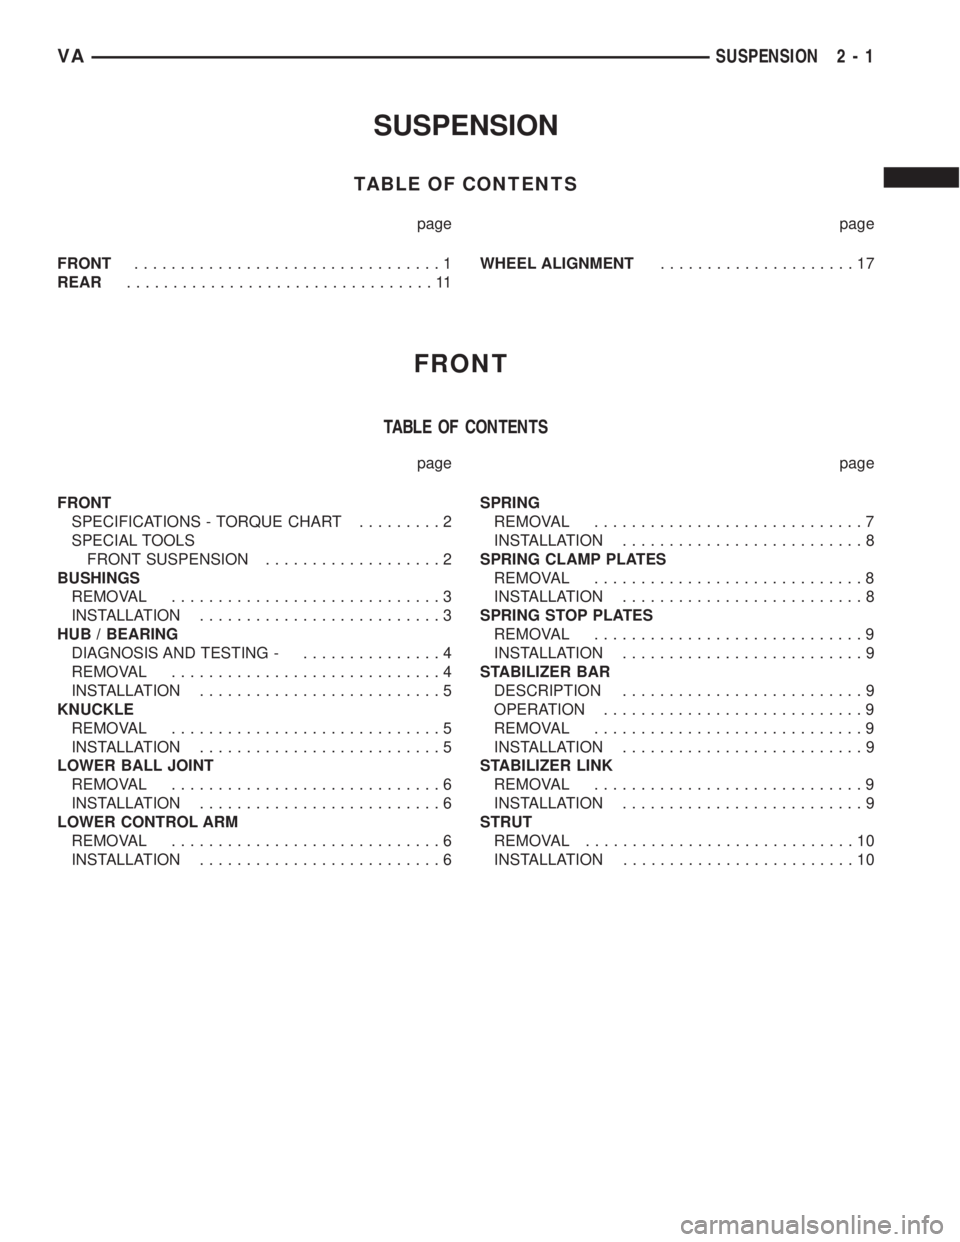
TABLE OF CONTENTS
page page
FRONT.................................1
REAR.................................11WHEEL ALIGNMENT.....................17
FRONT
TABLE OF CONTENTS
page page
FRONT
SPECIFICATIONS - TORQUE CHART.........2
SPECIAL TOOLS
FRONT SUSPENSION...................2
BUSHINGS
REMOVAL.............................3
INSTALLATION..........................3
HUB / BEARING
DIAGNOSIS AND TESTING -...............4
REMOVAL.............................4
INSTALLATION..........................5
KNUCKLE
REMOVAL.............................5
INSTALLATION..........................5
LOWER BALL JOINT
REMOVAL.............................6
INSTALLATION..........................6
LOWER CONTROL ARM
REMOVAL.............................6
INSTALLATION..........................6SPRING
REMOVAL.............................7
INSTALLATION..........................8
SPRING CLAMP PLATES
REMOVAL.............................8
INSTALLATION..........................8
SPRING STOP PLATES
REMOVAL.............................9
INSTALLATION..........................9
STABILIZER BAR
DESCRIPTION..........................9
OPERATION............................9
REMOVAL.............................9
INSTALLATION..........................9
STABILIZER LINK
REMOVAL.............................9
INSTALLATION..........................9
STRUT
REMOVAL.............................10
INSTALLATION.........................10
VASUSPENSION 2 - 1
Page 22 of 1232
FRONT
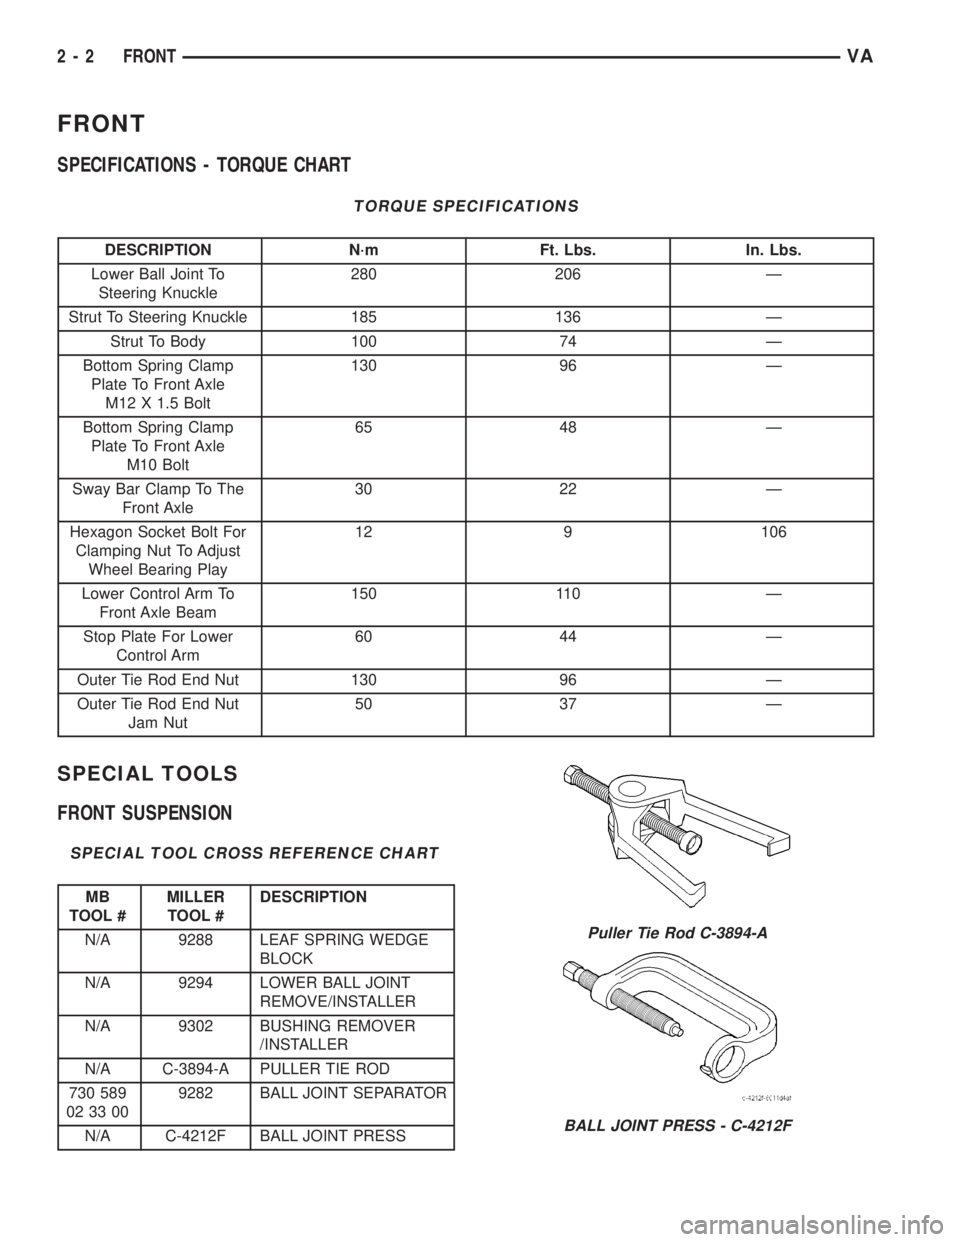
SPECIFICATIONS - TORQUE CHART
TORQUE SPECIFICATIONS
DESCRIPTION N´m Ft. Lbs. In. Lbs.
Lower Ball Joint To
Steering Knuckle280 206 Ð
Strut To Steering Knuckle 185 136 Ð
Strut To Body 100 74 Ð
Bottom Spring Clamp
Plate To Front Axle
M12 X 1.5 Bolt130 96 Ð
Bottom Spring Clamp
Plate To Front Axle
M10 Bolt65 48 Ð
Sway Bar Clamp To The
Front Axle30 22 Ð
Hexagon Socket Bolt For
Clamping Nut To Adjust
Wheel Bearing Play12 9 106
Lower Control Arm To
Front Axle Beam150 110 Ð
Stop Plate For Lower
Control Arm60 44 Ð
Outer Tie Rod End Nut 130 96 Ð
Outer Tie Rod End Nut
Jam Nut50 37 Ð
SPECIAL TOOLS
FRONT SUSPENSION
SPECIAL TOOL CROSS REFERENCE CHART
MB
TOOL #MILLER
TOOL #DESCRIPTION
N/A 9288 LEAF SPRING WEDGE
BLOCK
N/A 9294 LOWER BALL JOINT
REMOVE/INSTALLER
N/A 9302 BUSHING REMOVER
/INSTALLER
N/A C-3894-A PULLER TIE ROD
730 589
02 33 009282 BALL JOINT SEPARATOR
N/A C-4212F BALL JOINT PRESS
Puller Tie Rod C-3894-A
BALL JOINT PRESS - C-4212F
2 - 2 FRONTVA
Page 37 of 1232
WHEEL ALIGNMENT
TABLE OF CONTENTS
page page
WHEEL ALIGNMENT
DESCRIPTION.........................17
DIAGNOSIS AND TESTING - PRE-ALIGNMENT
INSPECTION.........................17STANDARD PROCEDURE - TOE
ADJUSTMENT........................19
SPECIFICATIONS.......................19
WHEEL ALIGNMENT
DESCRIPTION
NOTE: Camber and Caster are not adjustable on
this vehicle. (TOE ONLY).
NOTE: Suspension components with rubber/ure-
thane bushings should be tightened with the vehi-
cle at normal ride height. It is important to have the
springs supporting the weight of the vehicle when
the fasteners are torqued. If springs are not at their
normal ride position, vehicle ride comfort could be
affected and premature bushing wear may occur.
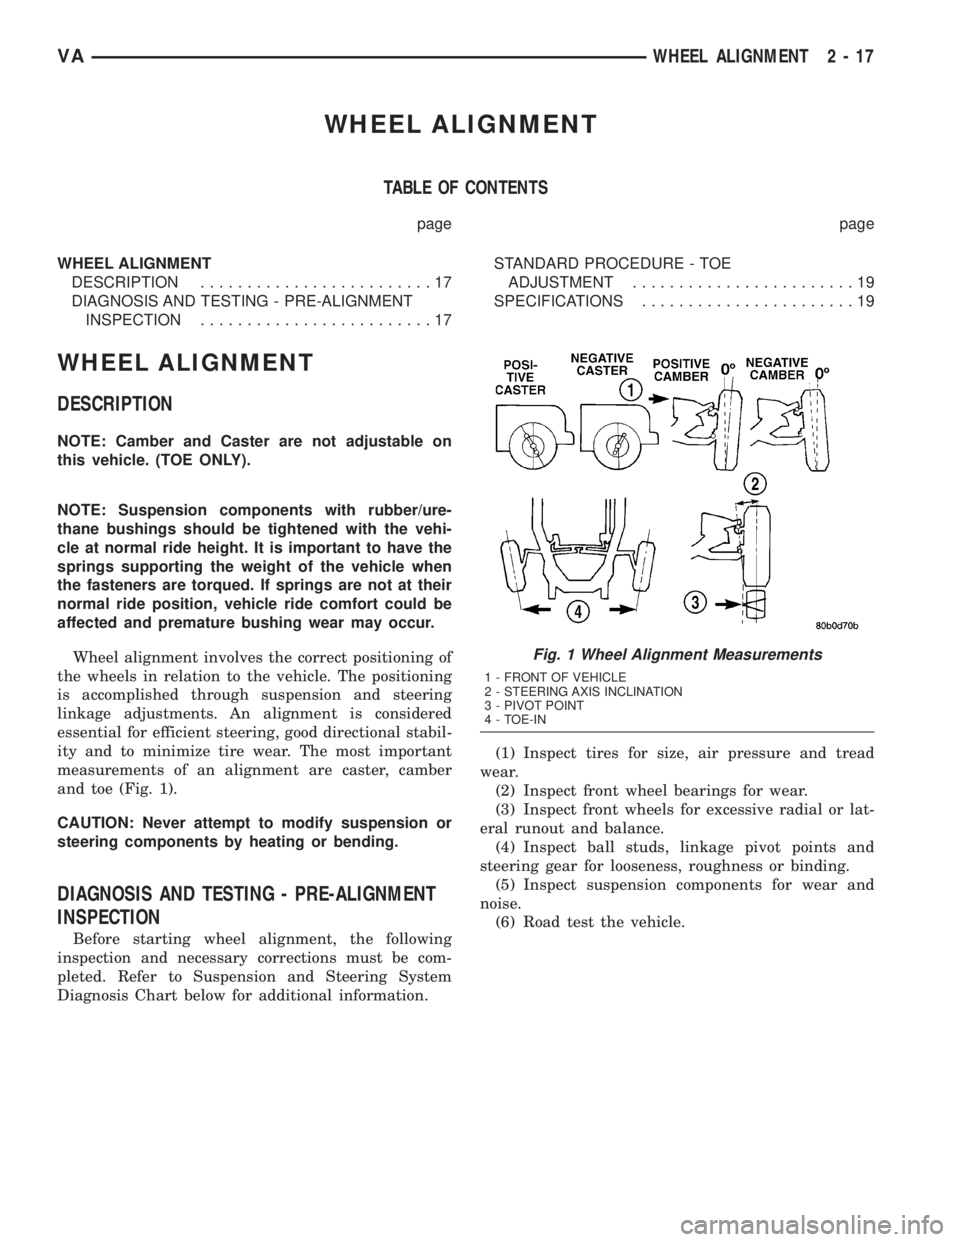
Wheel alignment involves the correct positioning of
the wheels in relation to the vehicle. The positioning
is accomplished through suspension and steering
linkage adjustments. An alignment is considered
essential for efficient steering, good directional stabil-
ity and to minimize tire wear. The most important
measurements of an alignment are caster, camber
and toe (Fig. 1).
CAUTION: Never attempt to modify suspension or
steering components by heating or bending.
DIAGNOSIS AND TESTING - PRE-ALIGNMENT
INSPECTION
Before starting wheel alignment, the following
inspection and necessary corrections must be com-
pleted. Refer to Suspension and Steering System
Diagnosis Chart below for additional information.(1) Inspect tires for size, air pressure and tread
wear.
(2) Inspect front wheel bearings for wear.
(3) Inspect front wheels for excessive radial or lat-
eral runout and balance.
(4) Inspect ball studs, linkage pivot points and
steering gear for looseness, roughness or binding.
(5) Inspect suspension components for wear and
noise.
(6) Road test the vehicle.
Fig. 1 Wheel Alignment Measurements
1 - FRONT OF VEHICLE
2 - STEERING AXIS INCLINATION
3 - PIVOT POINT
4 - TOE-IN
VAWHEEL ALIGNMENT 2 - 17
Page 39 of 1232
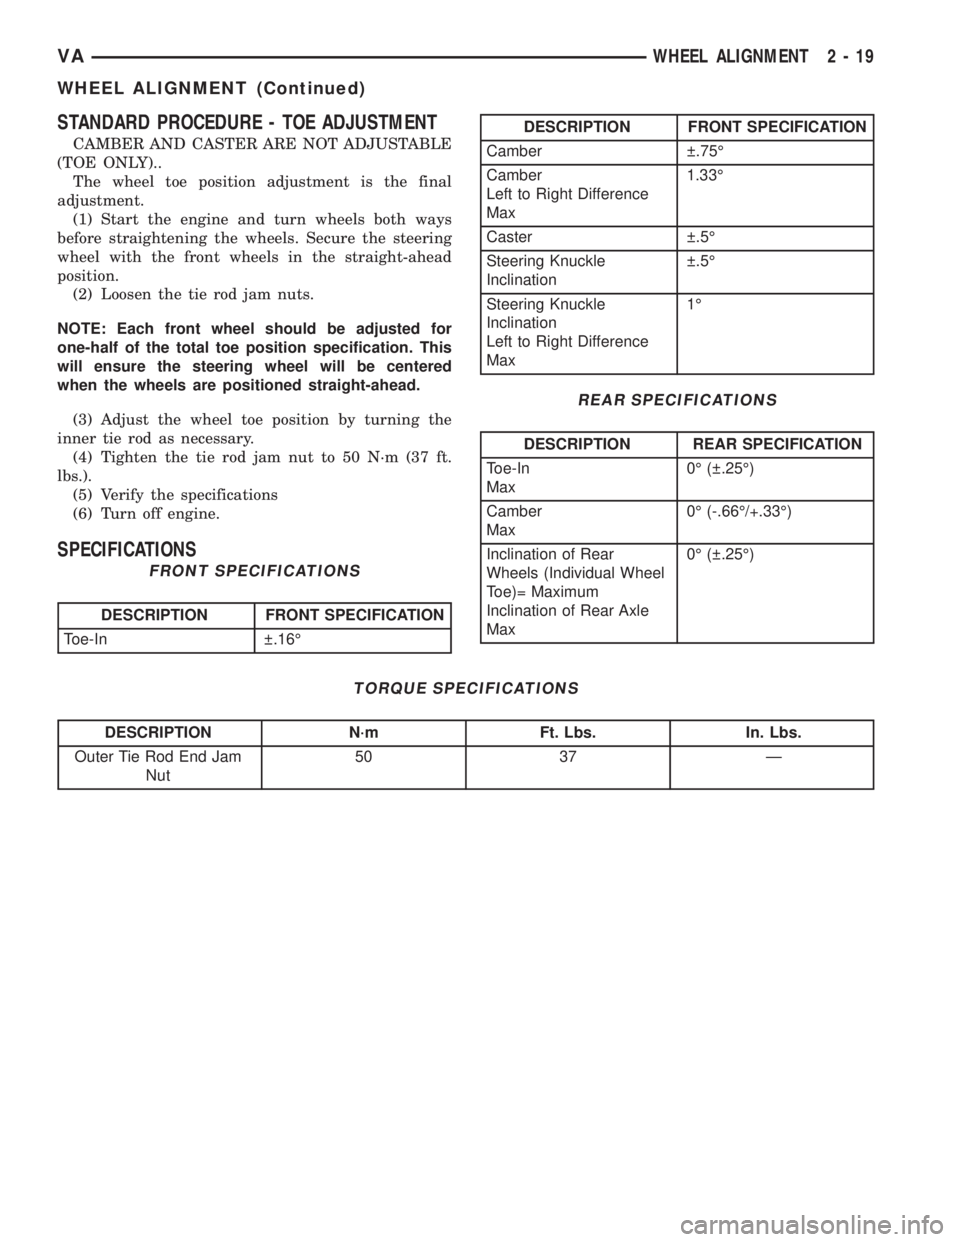
STANDARD PROCEDURE - TOE ADJUSTMENT
CAMBER AND CASTER ARE NOT ADJUSTABLE
(TOE ONLY)..
The wheel toe position adjustment is the final
adjustment.
(1) Start the engine and turn wheels both ways
before straightening the wheels. Secure the steering
wheel with the front wheels in the straight-ahead
position.
(2) Loosen the tie rod jam nuts.
NOTE: Each front wheel should be adjusted for
one-half of the total toe position specification. This
will ensure the steering wheel will be centered
when the wheels are positioned straight-ahead.
(3) Adjust the wheel toe position by turning the
inner tie rod as necessary.
(4) Tighten the tie rod jam nut to 50 N´m (37 ft.
lbs.).
(5) Verify the specifications
(6) Turn off engine.
SPECIFICATIONS
FRONT SPECIFICATIONS
DESCRIPTION FRONT SPECIFICATION
Toe-In .16É
DESCRIPTION FRONT SPECIFICATION
Camber .75É
Camber
Left to Right Difference
Max1.33É
Caster .5É
Steering Knuckle
Inclination .5É
Steering Knuckle
Inclination
Left to Right Difference
Max1É
REAR SPECIFICATIONS
DESCRIPTION REAR SPECIFICATION
Toe-In
Max0É ( .25É)
Camber
Max0É (-.66É/+.33É)
Inclination of Rear
Wheels (Individual Wheel
Toe)= Maximum
Inclination of Rear Axle
Max0É ( .25É)
TORQUE SPECIFICATIONS
DESCRIPTION N´m Ft. Lbs. In. Lbs.
Outer Tie Rod End Jam
Nut50 37 Ð
VAWHEEL ALIGNMENT 2 - 19
WHEEL ALIGNMENT (Continued)
Page 42 of 1232
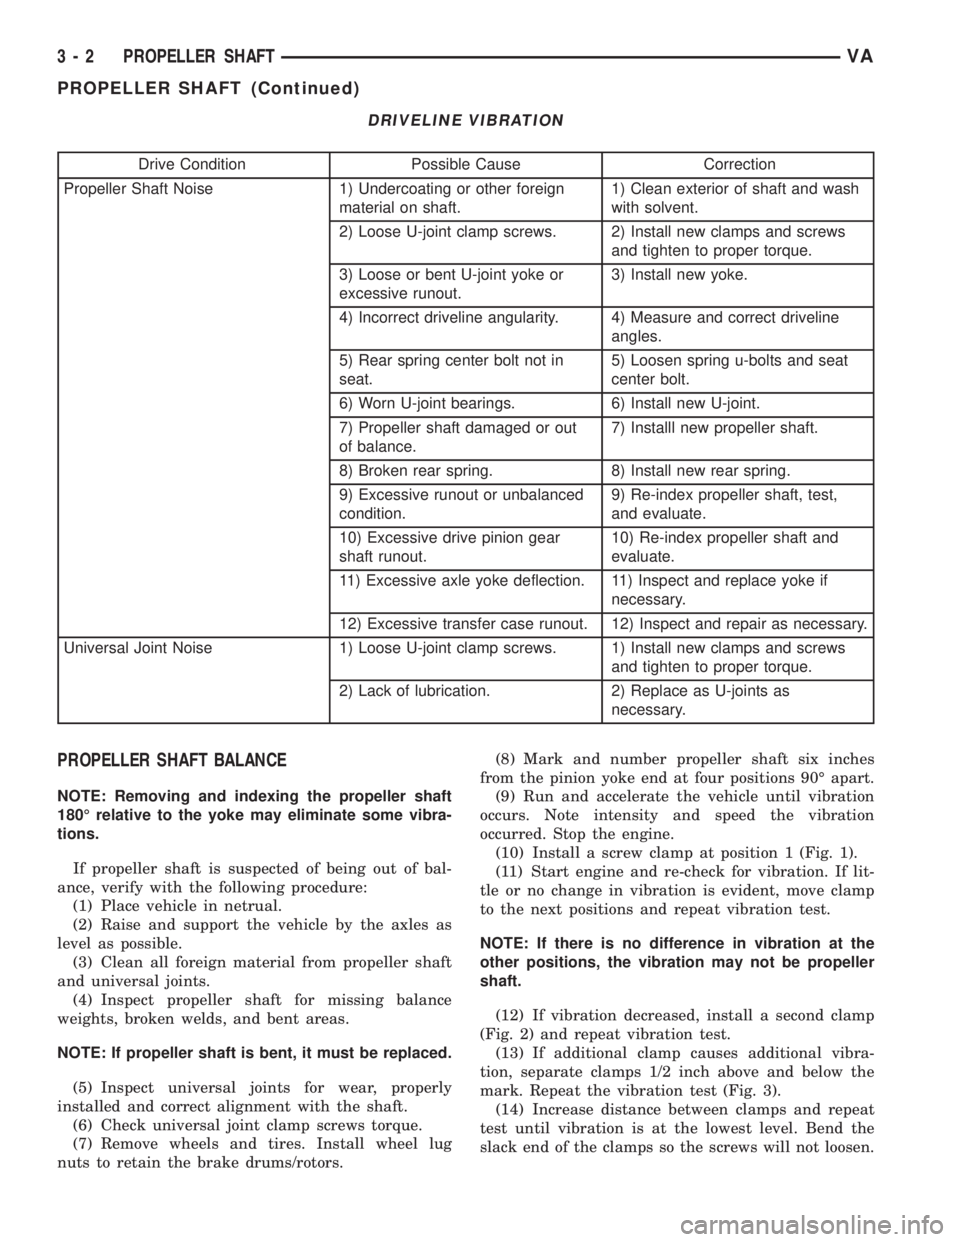
DRIVELINE VIBRATION
Drive Condition Possible Cause Correction
Propeller Shaft Noise 1) Undercoating or other foreign
material on shaft.1) Clean exterior of shaft and wash
with solvent.
2) Loose U-joint clamp screws. 2) Install new clamps and screws
and tighten to proper torque.
3) Loose or bent U-joint yoke or
excessive runout.3) Install new yoke.
4) Incorrect driveline angularity. 4) Measure and correct driveline
angles.
5) Rear spring center bolt not in
seat.5) Loosen spring u-bolts and seat
center bolt.
6) Worn U-joint bearings. 6) Install new U-joint.
7) Propeller shaft damaged or out
of balance.7) Installl new propeller shaft.
8) Broken rear spring. 8) Install new rear spring.
9) Excessive runout or unbalanced
condition.9) Re-index propeller shaft, test,
and evaluate.
10) Excessive drive pinion gear
shaft runout.10) Re-index propeller shaft and
evaluate.
11) Excessive axle yoke deflection. 11) Inspect and replace yoke if
necessary.
12) Excessive transfer case runout. 12) Inspect and repair as necessary.
Universal Joint Noise 1) Loose U-joint clamp screws. 1) Install new clamps and screws
and tighten to proper torque.
2) Lack of lubrication. 2) Replace as U-joints as
necessary.
PROPELLER SHAFT BALANCE
NOTE: Removing and indexing the propeller shaft
180É relative to the yoke may eliminate some vibra-
tions.
If propeller shaft is suspected of being out of bal-
ance, verify with the following procedure:
(1) Place vehicle in netrual.
(2) Raise and support the vehicle by the axles as
level as possible.
(3) Clean all foreign material from propeller shaft
and universal joints.
(4) Inspect propeller shaft for missing balance
weights, broken welds, and bent areas.
NOTE: If propeller shaft is bent, it must be replaced.
(5) Inspect universal joints for wear, properly
installed and correct alignment with the shaft.
(6) Check universal joint clamp screws torque.
(7) Remove wheels and tires. Install wheel lug
nuts to retain the brake drums/rotors.(8) Mark and number propeller shaft six inches
from the pinion yoke end at four positions 90É apart.
(9) Run and accelerate the vehicle until vibration
occurs. Note intensity and speed the vibration
occurred. Stop the engine.
(10) Install a screw clamp at position 1 (Fig. 1).
(11) Start engine and re-check for vibration. If lit-
tle or no change in vibration is evident, move clamp
to the next positions and repeat vibration test.
NOTE: If there is no difference in vibration at the
other positions, the vibration may not be propeller
shaft.
(12) If vibration decreased, install a second clamp
(Fig. 2) and repeat vibration test.
(13) If additional clamp causes additional vibra-
tion, separate clamps 1/2 inch above and below the
mark. Repeat the vibration test (Fig. 3).
(14) Increase distance between clamps and repeat
test until vibration is at the lowest level. Bend the
slack end of the clamps so the screws will not loosen.
3 - 2 PROPELLER SHAFTVA
PROPELLER SHAFT (Continued)
Page 62 of 1232
PINION SEAL
REMOVAL
(1) Remove wheels.
(2) Push back brake pads and release hand brake.
NOTE: If it is not possible to spin rear axle shafts
manually, detach rear brake cables.
(3) Drain rear axle oil.
(4) Remove propeller shaft.
(5) Spin pinion flange by hand and check axial
play of bearing.
CAUTION: There must not be any thrust bearing
play. If play excess or there are particles (shavings)
in the drained oil, replace gear assembly.
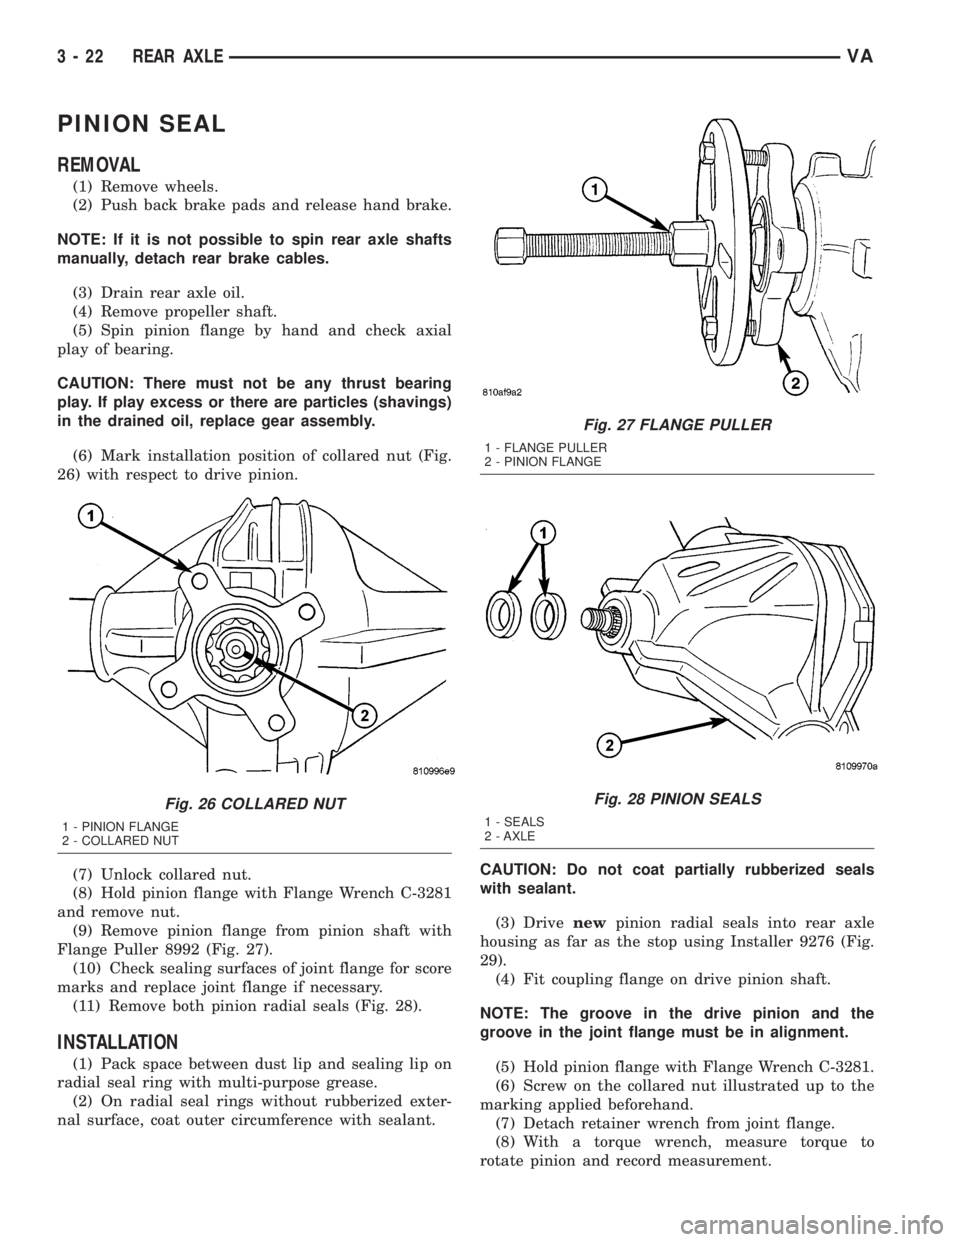
(6) Mark installation position of collared nut (Fig.
26) with respect to drive pinion.
(7) Unlock collared nut.
(8) Hold pinion flange with Flange Wrench C-3281
and remove nut.
(9) Remove pinion flange from pinion shaft with
Flange Puller 8992 (Fig. 27).
(10) Check sealing surfaces of joint flange for score
marks and replace joint flange if necessary.
(11) Remove both pinion radial seals (Fig. 28).
INSTALLATION
(1) Pack space between dust lip and sealing lip on
radial seal ring with multi-purpose grease.
(2) On radial seal rings without rubberized exter-
nal surface, coat outer circumference with sealant.CAUTION: Do not coat partially rubberized seals
with sealant.
(3) Drivenewpinion radial seals into rear axle
housing as far as the stop using Installer 9276 (Fig.
29).
(4) Fit coupling flange on drive pinion shaft.
NOTE: The groove in the drive pinion and the
groove in the joint flange must be in alignment.
(5) Hold pinion flange with Flange Wrench C-3281.
(6) Screw on the collared nut illustrated up to the
marking applied beforehand.
(7) Detach retainer wrench from joint flange.
(8) With a torque wrench, measure torque to
rotate pinion and record measurement.
Fig. 26 COLLARED NUT
1 - PINION FLANGE
2 - COLLARED NUT
Fig. 27 FLANGE PULLER
1 - FLANGE PULLER
2 - PINION FLANGE
Fig. 28 PINION SEALS
1 - SEALS
2 - AXLE
3 - 22 REAR AXLEVA
Page 63 of 1232
(9) Unscrew the marked nut.
(10) Reattach retainer wrench to joint flange.
(11) Screw onnewcollared nut and tighten care-
fully in stages until the previously value of torque to
rotate is exceeded by 0.5 N´m. (4.4 in. lbs.).
CAUTION: The total friction moment must not be
obtained by slackening the collared nut. Avoid over-
tightening the collared nut otherwise the compres-
sion ring inside will be compressed and will have to
be replaced. This requires total disassembly of the
gear set.
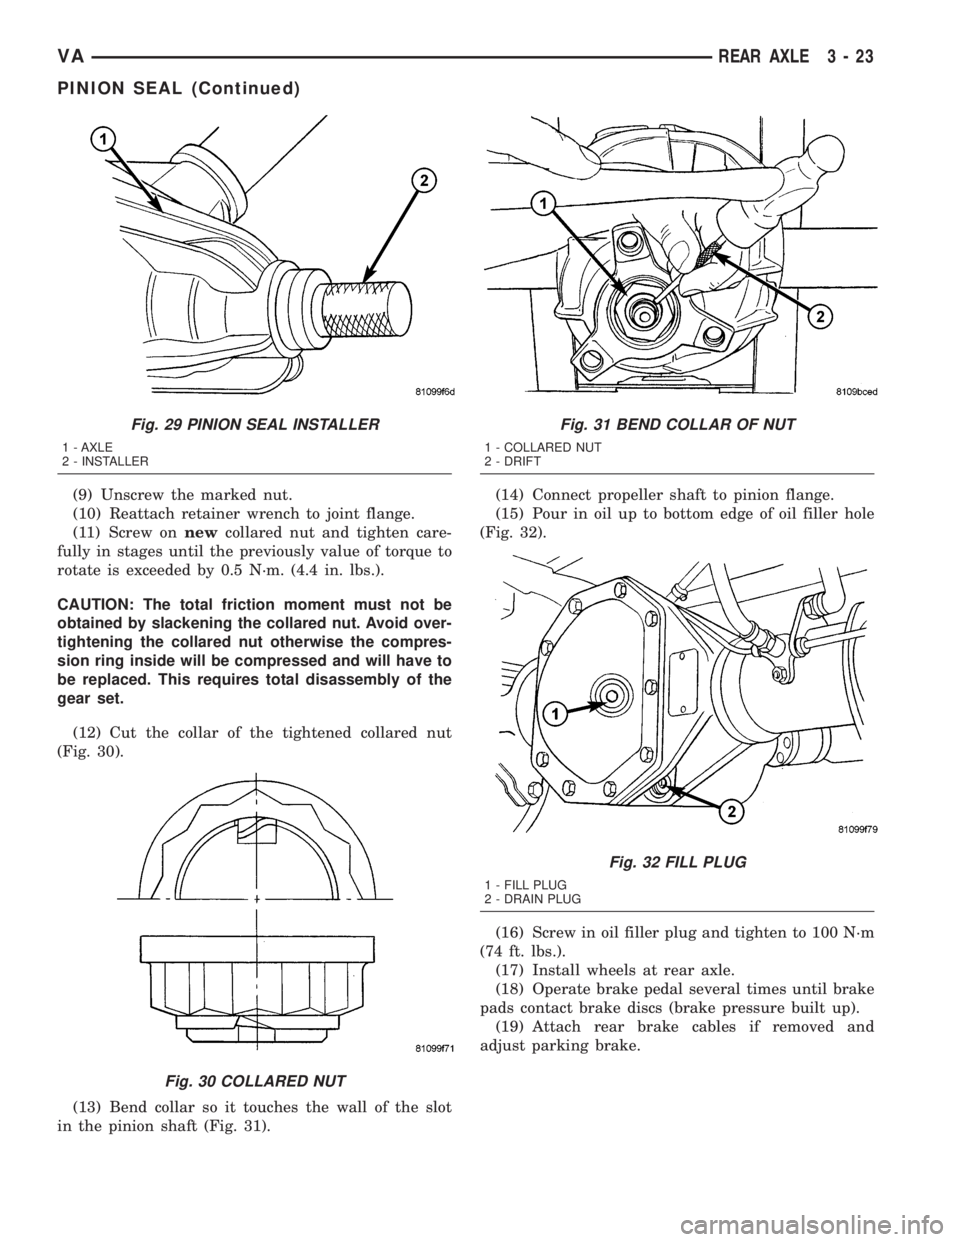
(12) Cut the collar of the tightened collared nut
(Fig. 30).
(13) Bend collar so it touches the wall of the slot
in the pinion shaft (Fig. 31).(14) Connect propeller shaft to pinion flange.
(15) Pour in oil up to bottom edge of oil filler hole
(Fig. 32).
(16) Screw in oil filler plug and tighten to 100 N´m
(74 ft. lbs.).
(17) Install wheels at rear axle.
(18) Operate brake pedal several times until brake
pads contact brake discs (brake pressure built up).
(19) Attach rear brake cables if removed and
adjust parking brake.
Fig. 29 PINION SEAL INSTALLER
1 - AXLE
2 - INSTALLER
Fig. 30 COLLARED NUT
Fig. 31 BEND COLLAR OF NUT
1 - COLLARED NUT
2 - DRIFT
Fig. 32 FILL PLUG
1 - FILL PLUG
2 - DRAIN PLUG
VAREAR AXLE 3 - 23
PINION SEAL (Continued)