Page 592 of 969
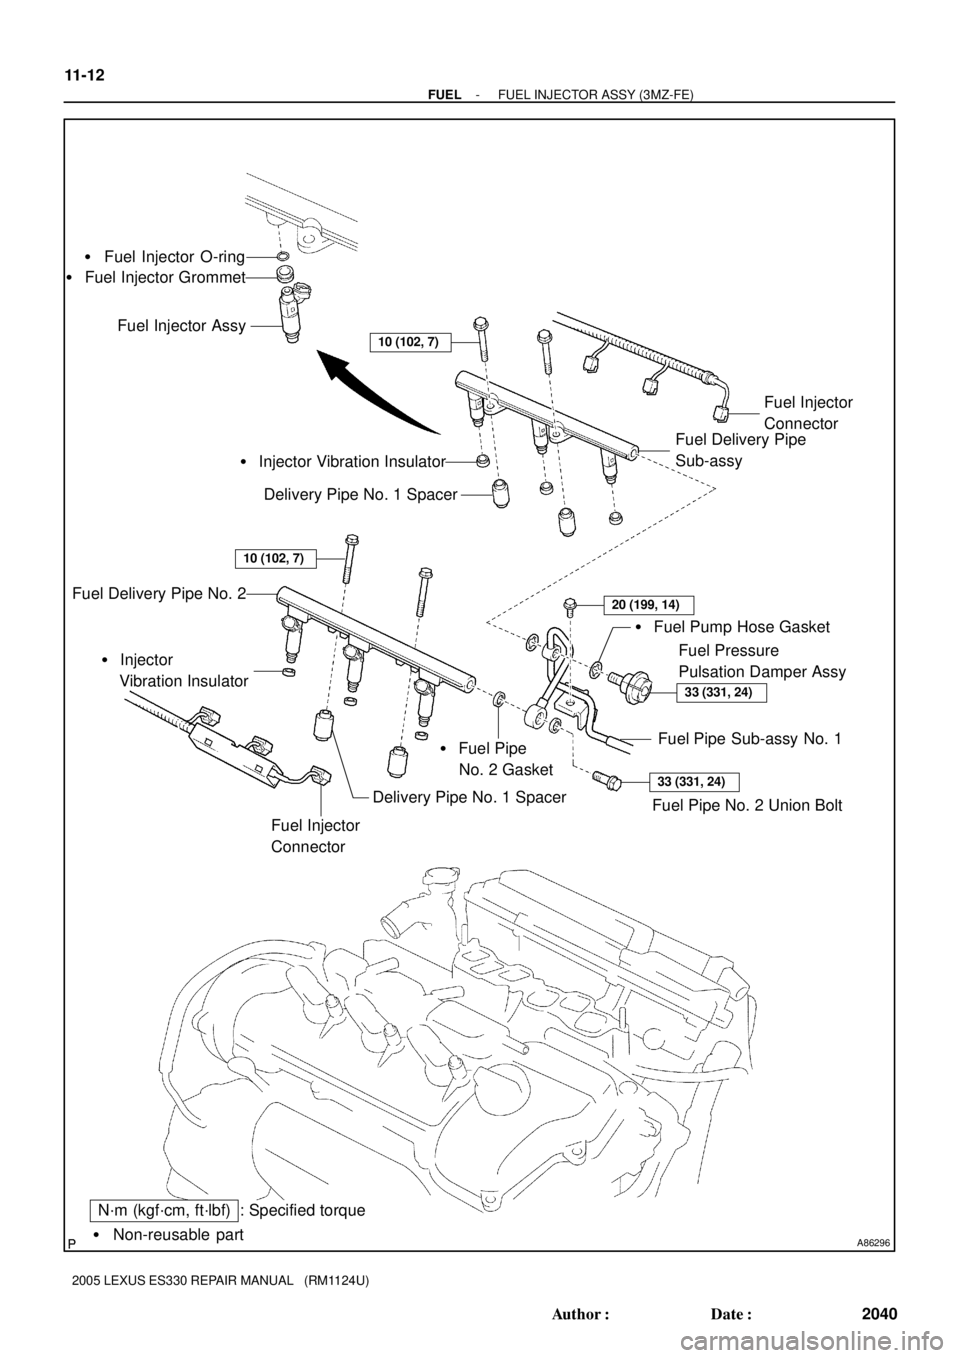
A86296� Non-reusable part
: Specified torqueN´m (kgf´cm, ft´lbf) � Fuel Injector O-ring
� Fuel Injector Grommet
Fuel Injector Assy
Fuel Delivery Pipe
Sub-assyFuel Injector
Connector
� Injector Vibration Insulator
Fuel Pressure
Pulsation Damper Assy � Fuel Pump Hose Gasket
� Fuel Pipe
No. 2 Gasket Delivery Pipe No. 1 Spacer
Delivery Pipe No. 1 Spacer Fuel Delivery Pipe No. 2
Fuel Injector
Connector � Injector
Vibration Insulator
Fuel Pipe Sub-assy No. 1
33 (331, 24)
20 (199, 14)
33 (331, 24)
10 (102, 7)
10 (102, 7)
Fuel Pipe No. 2 Union Bolt
11-12
- FUELFUEL INJECTOR ASSY (3MZ-FE)
2040 Author�: Date�:
2005 LEXUS ES330 REPAIR MANUAL (RM1124U)
Page 593 of 969
(a)
(a)
A86300(c)
(e)
(e)(f)
(d)
(g)
(g)
A86297
(b)
(a)
(c)
(d)
A79706
(e)
- FUELFUEL INJECTOR ASSY (3MZ-FE)
11-13
2041 Author�: Date�:
2005 LEXUS ES330 REPAIR MANUAL (RM1124U)
RE")
110XV-01
A79751
(b)(a)
(a)
A86300(c)
(e)
(e)(f)
(d)
(g)
(g)
A86297
(b)
(a)
(c)
(d)
A79706
(e)
- FUELFUEL INJECTOR ASSY (3MZ-FE)
11-13
2041 Author�: Date�:
2005 LEXUS ES330 REPAIR MANUAL (RM1124U)
REPLACEMENT
1. DISCHARGE FUEL SYSTEM PRESSURE (See page 11-1)
2. DISCONNECT ENGINE WIRE NO. 3 (BATTERY NEGATIVE TERMINAL)
3. DRAIN ENGINE COOLANT (See page 16-9)
4. REMOVE FRONT SUSPENSION UPPER BRACE CENTER (W/O TEMS) (See page 10-1 1)
5. REMOVE V-BANK COVER SUB-ASSY (See page 10-1 1)
6. REMOVE AIR CLEANER CAP SUB-ASSY (See page 10-1 1)
7. REMOVE EMISSION CONTROL VALVE SET
(a) Disconnect the 2 VSV connectors.
(b) Remove the wire harness clamp.
(c) Disconnect the fuel vapor feed hose No. 1.
(d) Disconnect the fuel vapor feed hose No. 2.
(e) Disconnect the 2 vacuum hoses.
(f) Remove the clamp.
(g) Remove the 2 nuts, then remove the emission control
valve set.
8. REMOVE INTAKE AIR SURGE TANK
(a) Disconnect the throttle motor connector.
(b) Disconnect the water by-pass hose No. 3.
(c) Disconnect the water by-pass hose No. 2.
(d) Disconnect the union to check valve hose.
(e) Disconnect the ventilation hose.
Page 594 of 969

(f)
A86299
(g)
(g)
(i)
(h)
(h)
(i)
A86301
(l)
(k)(k)
(k)(l)
(k)
(i)
A79710
(a)
(b)(c)
A86302
(a)(a)
(a)
(a)
(a)
(a) 11-14
- FUELFUEL INJECTOR ASSY (3MZ-FE)
2042 Author�: Date�:
2005 LEXUS E")
A86298
(f)
(f)
A86299
(g)
(g)
(i)
(h)
(h)
(i)
A86301
(l)
(k)(k)
(k)(l)
(k)
(i)
A79710
(a)
(b)(c)
A86302
(a)(a)
(a)
(a)
(a)
(a) 11-14
- FUELFUEL INJECTOR ASSY (3MZ-FE)
2042 Author�: Date�:
2005 LEXUS ES330 REPAIR MANUAL (RM1124U)
(f) Remove the 2 nuts, then remove the pressure feed tube.
(g) Remove the 2 bolts, then remove the engine hunger No.
1.
(h) Remove the 2 bolts, then remove the surge tank stay No.
1.
(i) Remove the 2 bolts, then remove the surge tank stay No.
2.
(j) Disconnect the bond cable No. 1 connector.
(k) Using a socket hexagon wrench 8, remove the 4 bolts.
(l) Remove the 2 nuts, then remove the emission control
valve bracket and intake air surge tank.
(m) Remove the gasket from the intake air surge tank.
9. SEPARATE FUEL PIPE SUB-ASSY NO.1
(a) Remove the fuel pressure pulsation damper and 2 gas-
kets.
(b) Remove the fuel pipe No. 2 union bolt and 2 gaskets.
(c) Remove the bolt, then separate the fuel pipe No. 1.
10. REMOVE FUEL INJECTOR ASSY
(a) Disconnect the 6 fuel injector connectors.
Page 596 of 969

2044 Author�: Date�:
2005 LEXUS ES330 REPAIR MANUAL (RM1124U)
(e) Install 6 new insulators and the 4 delivery pipe No. 1
spacers to the intake mani")
A86305Turn 11-16
- FUELFUEL INJECTOR ASSY (3MZ-FE)
2044 Author�: Date�:
2005 LEXUS ES330 REPAIR MANUAL (RM1124U)
(e) Install 6 new insulators and the 4 delivery pipe No. 1
spacers to the intake manifold.
(f) Place the 2 fuel delivery pipes together with the 6 fuel in-
jectors to the intake manifold.
NOTICE:
Be careful not to drop the fuel injectors when installing the
fuel delivery pipe.
(g) Temporarily install the 4 bolts which attach the fuel deliv-
ery pipe to the intake manifold.
(h) Check that the fuel injectors rotate smoothly.
If the fuel injectors do not rotate smoothly, the probable cause
is incorrect installation of the O-ring. Replace it with a new one.
(i) Tighten the 4 bolts.
Torque: 10 NVm (102 kgfVcm, 7 ftVlbf)
(j) Connect the 6 fuel injector connectors.
12. INSTALL FUEL PIPE SUB-ASSY NO.1
(a) Install 2 new gaskets and fuel pipe No. 2 union bolt.
Torque: 33 NVm (331 kgfVcm, 24 ftVlbf)
(b) Install 2 new gaskets and fuel pressure pulsation damper.
Torque: 33 NVm (331 kgfVcm, 24 ftVlbf)
(c) Install the fuel pipe No. 1 with the bolt.
Torque: 20 NVm (199 kgfVcm, 14 ftVlbf)
13. INSTALL INTAKE AIR SURGE TANK
(a) Install a new gasket to the intake air surge tank.
(b) Install the intake air surge tank and emission control valve bracket with the 2 nuts.
Torque: 28 NVm (286 kgfVcm, 21 ftVlbf)
(c) Using a socket hexagon wrench 8, tighten the 4 bolts.
Torque: 28 NVm (286 kgfVcm, 21 ftVlbf)
(d) Install the surge tank stay No. 2 with the 2 bolts.
Torque: 20 NVm (199 kgfVcm, 14 ftVlbf)
(e) Install the surge tank stay No. 1 with the 2 bolts.
Torque: 20 NVm (199 kgfVcm, 14 ftVlbf)
(f) Install the engine hunger No. 1 with the 2 bolts.
Torque: 20 NVm (199 kgfVcm, 14 ftVlbf)
(g) Install the pressure feed tube with the 2 nuts.
Torque: 7.8 NVm (80 kgfVcm, 69 in.Vlbf)
(h) Connect the ventilation hose.
(i) Connect the union to check valve hose.
(j) Connect the water by-pass hose No. 2.
(k) Connect the water by-pass hose No. 3.
(l) Connect the throttle motor connector.
14. INSTALL EMISSION CONTROL VALVE SET
Torque: 8.0 NVm (82 kgfVcm, 71 in.Vlbf)
15. INSTALL AIR CLEANER CAP SUB-ASSY (See page 10-1 1)
16. CHECK CONNECTION OF VACUUM HOSE (See page 14-29)
17. CONNECT ENGINE WIRE NO. 3 (BATTERY NEGATIVE TERMINAL)
Torque: 5.4 NVm (55 kgfVcm, 48 in.Vlbf)
Page 598 of 969
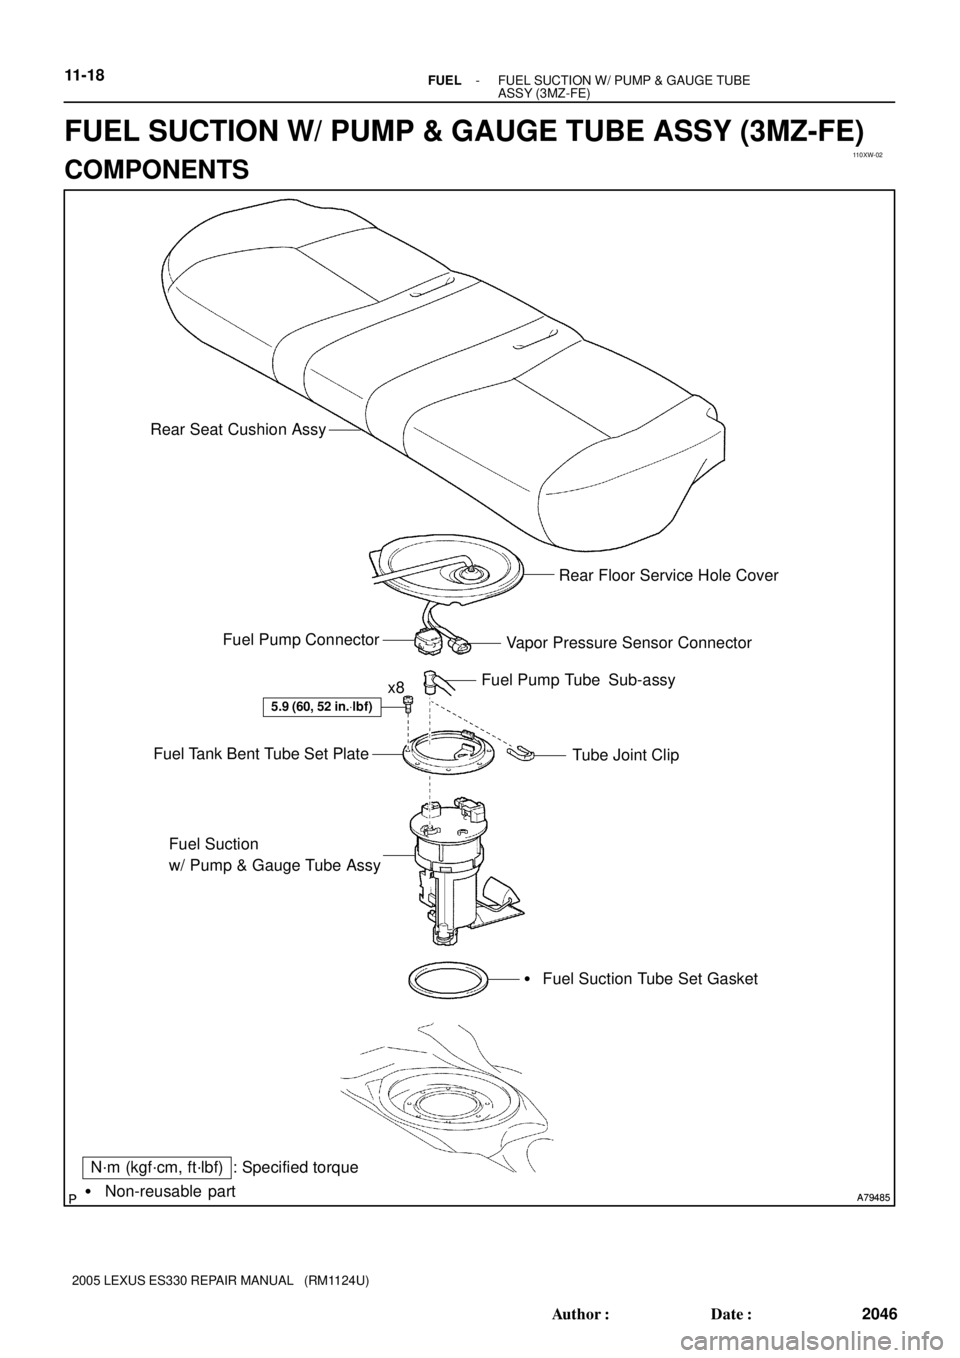
110XW-02
A79485 A79485� Non-reusable part
N´m (kgf´cm, ft´lbf) : Specified torque
5.9 (60, 52 in.Vlbf)
x8Fuel Pump Tube Sub-assy
Tube Joint Clip Fuel Tank Bent Tube Set Plate
Fuel Suction
w/ Pump & Gauge Tube Assy
� Fuel Suction Tube Set Gasket Vapor Pressure Sensor Connector Fuel Pump ConnectorRear Floor Service Hole Cover Rear Seat Cushion Assy
11-18- FUELFUEL SUCTION W/ PUMP & GAUGE TUBE
ASSY (3MZ-FE)
2046 Author�: Date�:
2005 LEXUS ES330 REPAIR MANUAL (RM1124U)
FUEL SUCTION W/ PUMP & GAUGE TUBE ASSY (3MZ-FE)
COMPONENTS
Page 599 of 969
A79486 A79486� Non-reusable part
Vapor Pressure Sensor Assy
Tube Joint Clip Fuel Suction Plate Sub-assy
Fuel Pump Harness
Fuel Tank Fuel Filter Fuel Sender Gauge Assy
� Fuel Pressure Regulator
O-ring
Fuel Pressure Regulator AssyFuel Pump Assy
Fuel Pump Filter
� Fuel Pump Filter Clip
Fuel Pump Cushion Rubber
Fuel Suction Support No. 2
- FUELFUEL SUCTION W/ PUMP & GAUGE TUBE
ASSY (3MZ-FE)11-19
2047 Author�: Date�:
2005 LEXUS ES330 REPAIR MANUAL (RM1124U)
Page 600 of 969

(c)
A91017
Nylon Tube Fuel Tube Joint
O-ring
Tube Joint Clip Fuel Suction Plate
A79488
Tube Joint Clip
A79489
(b)
(b)
(b)(b)(b)
(b)
(b)
(b) 11-20
- FUELFUEL SUCTION W/ PUMP & GAUGE")
110XX-02
A79487
(b)
(c)
A91017
Nylon Tube Fuel Tube Joint
O-ring
Tube Joint Clip Fuel Suction Plate
A79488
Tube Joint Clip
A79489
(b)
(b)
(b)(b)(b)
(b)
(b)
(b) 11-20
- FUELFUEL SUCTION W/ PUMP & GAUGE TUBE
ASSY (3MZ-FE)
2048 Author�: Date�:
2005 LEXUS ES330 REPAIR MANUAL (RM1124U)
Removal & Installation and Disassembly & Reassembly
1. DISCHARGE FUEL SYSTEM PRESSURE (See page 11-1)
2. DISCONNECT ENGINE WIRE NO. 3 (BATTERY NEGATIVE TERMINAL)
3. REMOVE REAR SEAT CUSHION ASSY (See page 72-39)
4. REMOVE REAR FLOOR SERVICE HOLE COVER
(a) Remove the rear floor service hole cover.
(b) Disconnect the vapor pressure sensor connector.
(c) Disconnect the fuel pump connector.
5. REMOVE FUEL SUCTION W/ PUMP & GAUGE TUBE
ASSY
(a) Remove the tube joint clip, then pull out the fuel pump
tube.
NOTICE:
�Check around the connector for dirt or mud before
this operation. Remove the dirt if necessary.
�Be careful of mud because the fuel tube joint has an
O-ring which seals the pipe and connector that can
be contaminated.
�Do not use any tools in this operation.
�Do not bend or twist the nylon tube. Protect the con-
nector by covering it with a vinyl or plastic bag.
�When the pipe and connector are stuck, push and pull
the connector to release. Pull the connector carefully.
(b) Remove the 8 bolts, then remove the fuel tank vent tube
set plate.
Page 601 of 969

Slide
- FUELFUEL SUCTION W/ PUMP & GAUGE TUBE
ASSY (3MZ-FE)11-21
2049 Author�: Date�:
2005 LEXUS ES330 REPAIR MANUAL (RM1124U)
(")
A79490
A79491
Cover
Tube Joint Clip
A77832Tape
A79492
A79494
Tape
(a)
Slide
- FUELFUEL SUCTION W/ PUMP & GAUGE TUBE
ASSY (3MZ-FE)11-21
2049 Author�: Date�:
2005 LEXUS ES330 REPAIR MANUAL (RM1124U)
(c) Remove the fuel suction tube w/ pump & gauge from the
fuel tank.
NOTICE:
�Do not damage the fuel pump filter.
�Do not bend the arm of the fuel sender gauge.
(d) Remove the gasket from the fuel suction tube w/ pump &
gauge.
6. REMOVE VAPOR PRESSURE SENSOR ASSY
(a) Remove the cover.
(b) Remove the tube joint clip, then pull out the vapor pres-
sure sensor.
7. REMOVE FUEL SUCTION SUPPORT NO.2
(a) Using a screwdriver with the tip wrapped in tape, unfasten
the 5 claws. Then remove the fuel suction support No. 2.
NOTICE:
Do not damage the fuel suction support No. 2.
8. REMOVE FUEL PUMP CUSHION RUBBER
9. REMOVE FUEL SENDER GAUGE ASSY
(a) Disconnect the fuel sender gauge connector.
(b) Using a screwdriver with the tip wrapped in tape, unfasten
the clamp to release the fuel sender gauge. Then slide the
fuel sender gauge to remove it from the fuel pump.