Page 620 of 969
A86387
Pressure Gauge
A86386
Pressure Gauge
- EMISSION CONTROLEMISSION CONTROL SYSTEM (3MZ-FE)
12-7
2068 Author�: Date�:
2005 LEXUS ES330 REPAIR MANUAL (RM1124U)
(o) Disconnect the pressure gauge from the EVAP service
port on the purge line.
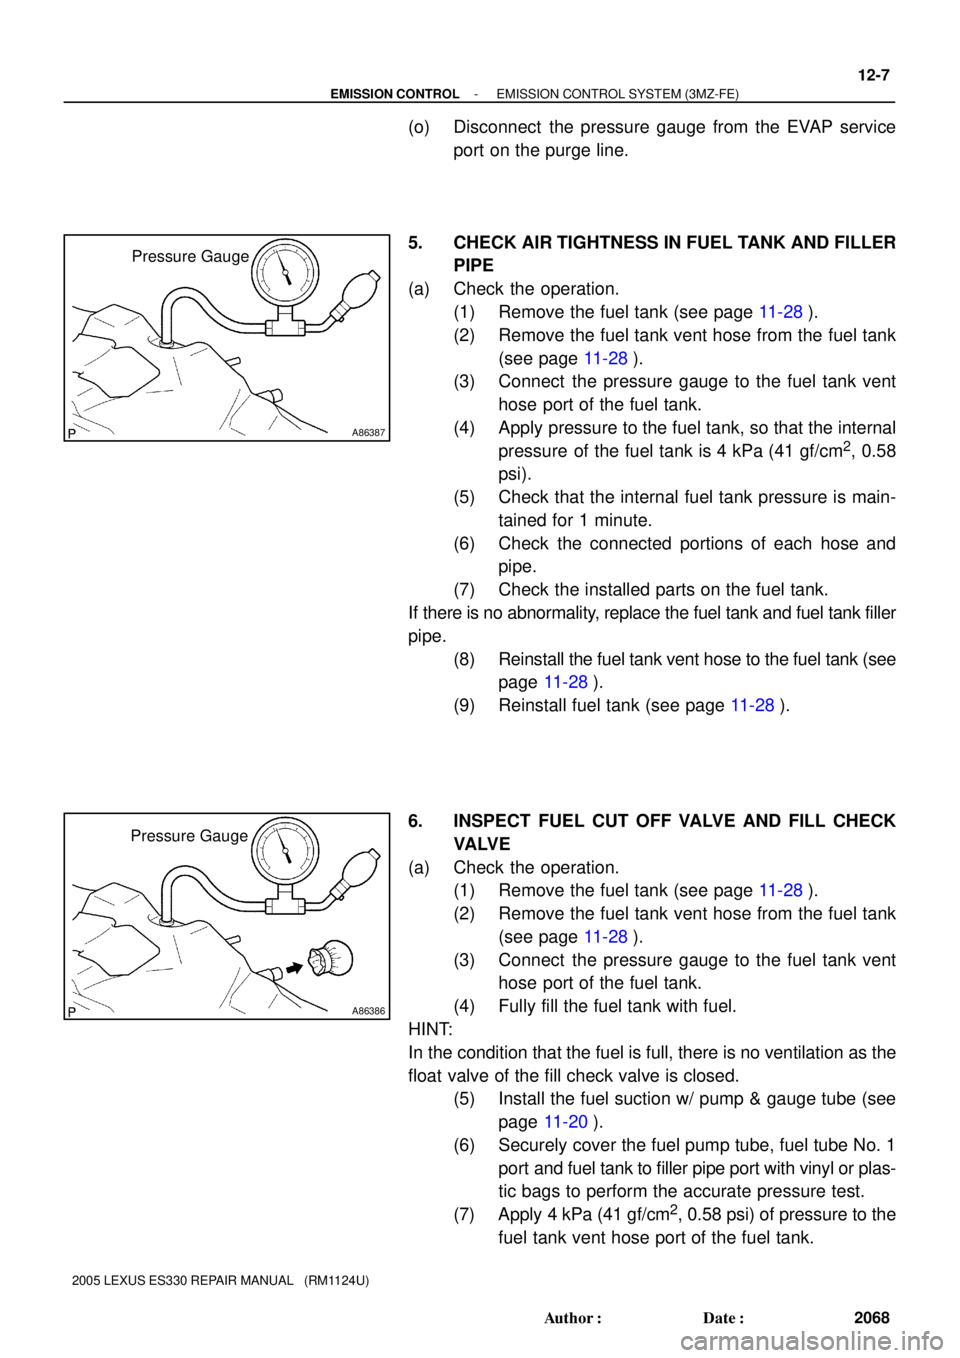
5. CHECK AIR TIGHTNESS IN FUEL TANK AND FILLER
PIPE
(a) Check the operation.
(1) Remove the fuel tank (see page 11-28).
(2) Remove the fuel tank vent hose from the fuel tank
(see page 11-28).
(3) Connect the pressure gauge to the fuel tank vent
hose port of the fuel tank.
(4) Apply pressure to the fuel tank, so that the internal
pressure of the fuel tank is 4 kPa (41 gf/cm
2, 0.58
psi).
(5) Check that the internal fuel tank pressure is main-
tained for 1 minute.
(6) Check the connected portions of each hose and
pipe.
(7) Check the installed parts on the fuel tank.
If there is no abnormality, replace the fuel tank and fuel tank filler
pipe.
(8) Reinstall the fuel tank vent hose to the fuel tank (see
page 11-28).
(9) Reinstall fuel tank (see page 11-28).
6. INSPECT FUEL CUT OFF VALVE AND FILL CHECK
VA LV E
(a) Check the operation.
(1) Remove the fuel tank (see page 11-28).
(2) Remove the fuel tank vent hose from the fuel tank
(see page 11-28).
(3) Connect the pressure gauge to the fuel tank vent
hose port of the fuel tank.
(4) Fully fill the fuel tank with fuel.
HINT:
In the condition that the fuel is full, there is no ventilation as the
float valve of the fill check valve is closed.
(5) Install the fuel suction w/ pump & gauge tube (see
page 11-20).
(6) Securely cover the fuel pump tube, fuel tube No. 1
port and fuel tank to filler pipe port with vinyl or plas-
tic bags to perform the accurate pressure test.
(7) Apply 4 kPa (41 gf/cm
2, 0.58 psi) of pressure to the
fuel tank vent hose port of the fuel tank.
Page 621 of 969
A86352
Air
A86344
VoltmeterE10 12-8
- EMISSION CONTROLEMISSION CONTROL SYSTEM (3MZ-FE)
2069 Author�: Date�:
2005 LEXUS ES330 REPAIR MANUAL (RM1124U)
(8) Remove the vinyl or plastic bag from the fuel tank
to filler pipe port, then check that the pressure
drops.
If the pressure does not drop, replace the fuel tank.
(9) Drain fuel from the fuel tank.
(10) Reinstall the fuel tank vent hose to the fuel tank (see
page 11-28).
(11) Reinstall the fuel tank (see page 11-28).
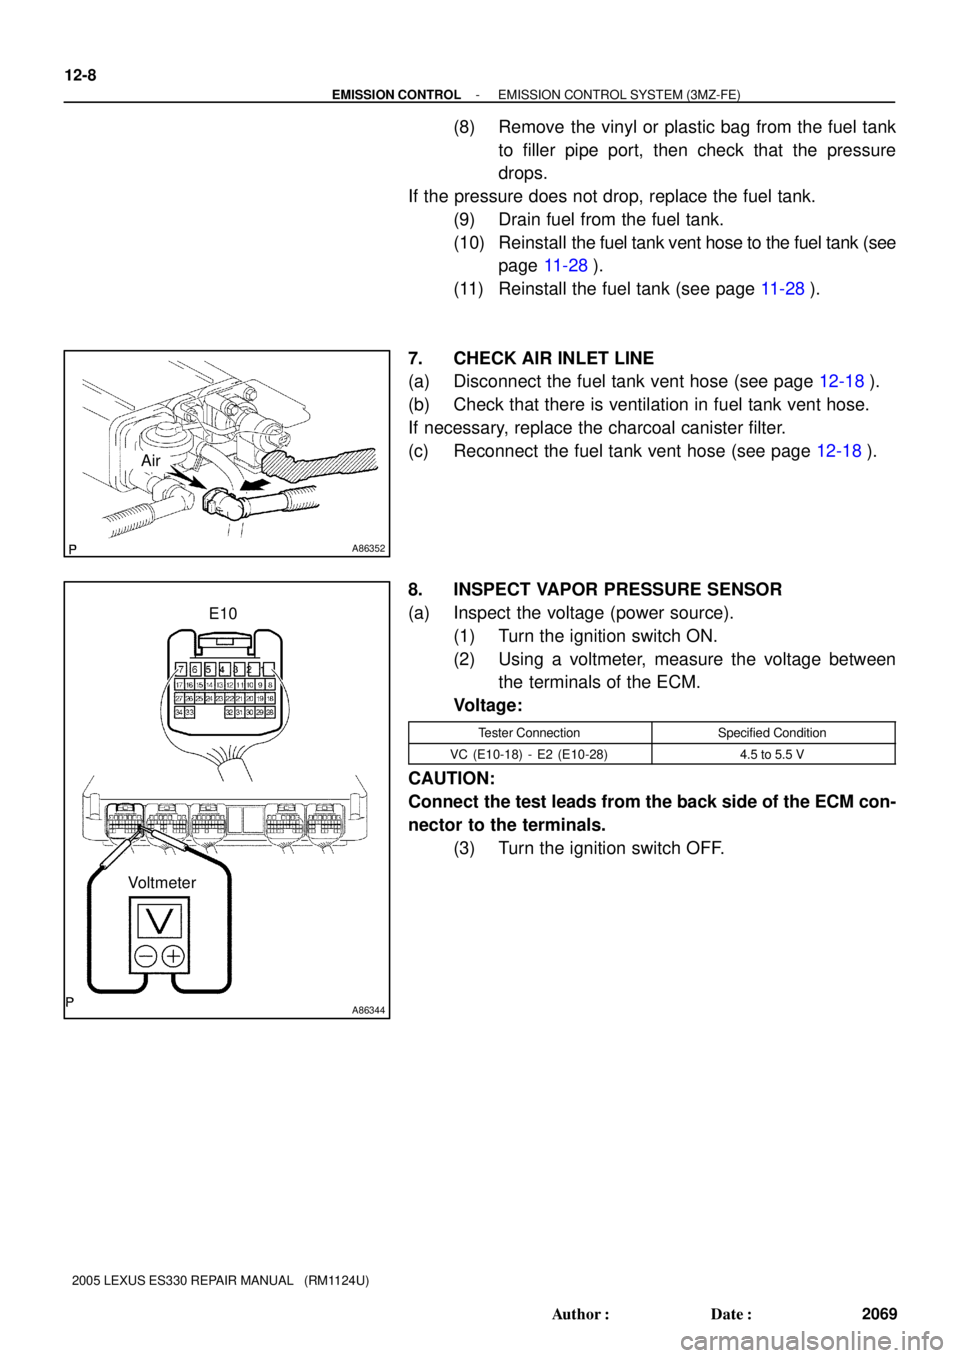
7. CHECK AIR INLET LINE
(a) Disconnect the fuel tank vent hose (see page 12-18).
(b) Check that there is ventilation in fuel tank vent hose.
If necessary, replace the charcoal canister filter.
(c) Reconnect the fuel tank vent hose (see page 12-18).
8. INSPECT VAPOR PRESSURE SENSOR
(a) Inspect the voltage (power source).
(1) Turn the ignition switch ON.
(2) Using a voltmeter, measure the voltage between
the terminals of the ECM.
Voltage:
Tester ConnectionSpecified Condition
VC (E10-18) - E2 (E10-28)4.5 to 5.5 V
CAUTION:
Connect the test leads from the back side of the ECM con-
nector to the terminals.
(3) Turn the ignition switch OFF.
Page 629 of 969
120BT-01
A86270
(a)
(b)
(b)(c)
A86393
A A
PushPinch
Pinch
A86360
(e)
(e)
(f) 12-16
- EMISSION CONTROLCHARCOAL CANISTER ASSY (3MZ-FE)
2077 Author�: Date�:
2005 LEXUS ES330 REPAIR MANUAL (RM1124U)
CHARCOAL CANISTER ASSY (3MZ-FE)
REPLACEMENT
1. DISCHARGE FUEL SYSTEM PRESSURE (See page 11-1)
2. DISCONNECT ENGINE WIRE NO. 3 (BATTERY NEGATIVE TERMINAL)
3. REMOVE REAR SEAT CUSHION ASSY (See page 72-39)
4. REMOVE REAR FLOOR SERVICE HOLE COVER (See page 11-20)
5. REMOVE FUEL SUCTION W/ PUMP & GAUGE TUBE ASSY (See page 11-20)
6. DRAIN FUEL
7. REMOVE FLOOR PANEL BRACE REAR (See page 15-2)
8. REMOVE EXHAUST PIPE ASSY CENTER (See page 11-28)
9. DISCONNECT PARKING BRAKE CABLE ASSY NO.2 (See page 11-28)
10. DISCONNECT PARKING BRAKE CABLE ASSY NO.3 (See page 11-28)
11. REMOVE FUEL TANK PROTECTOR LOWER CENTER (See page 11-28)
12. REMOVE FUEL TANK ASSY (See page 11-28)
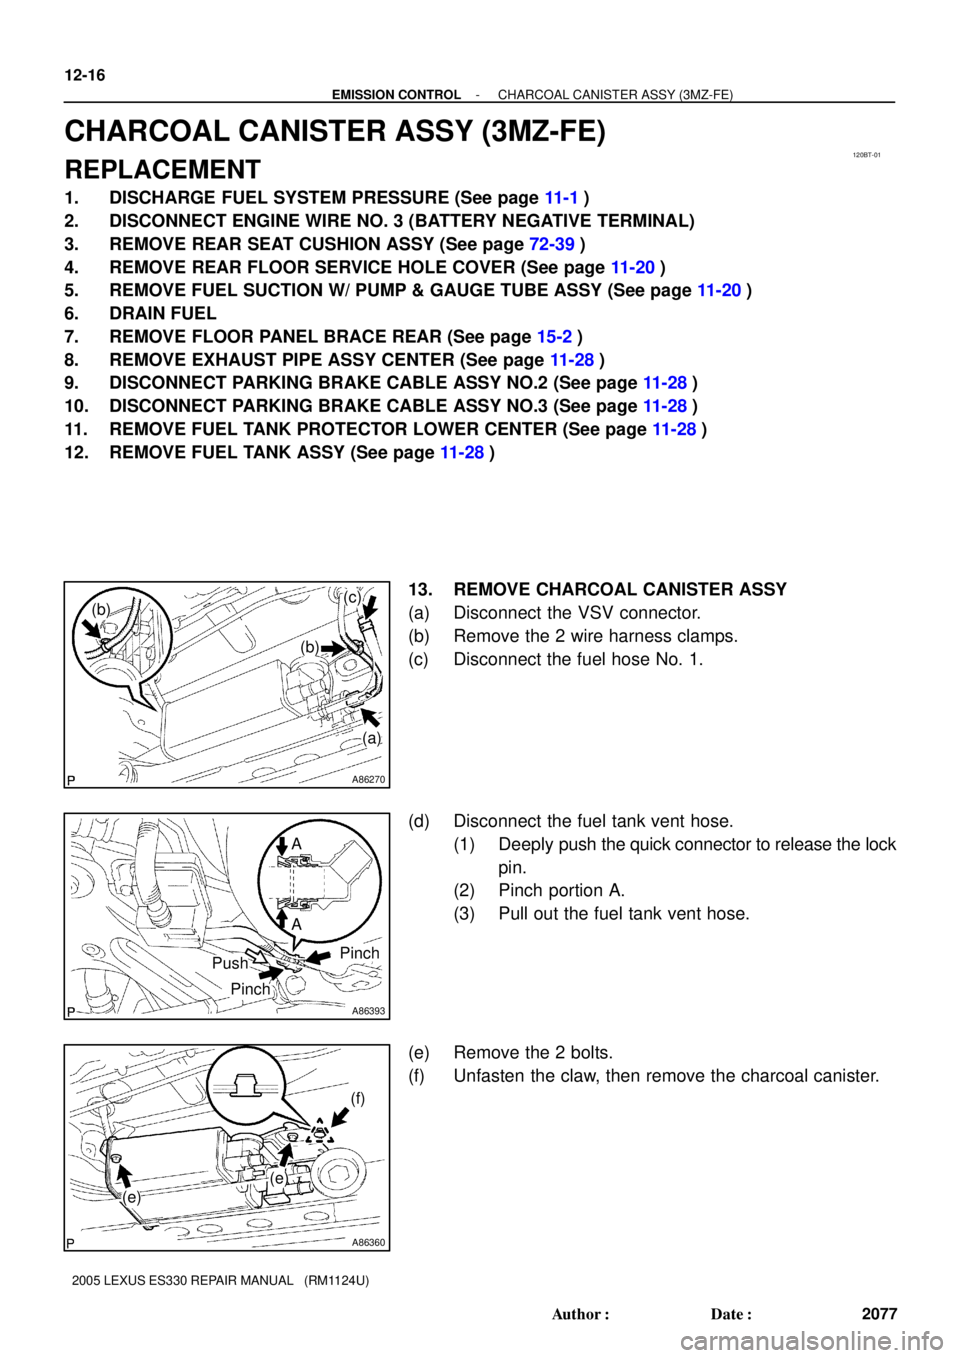
13. REMOVE CHARCOAL CANISTER ASSY
(a) Disconnect the VSV connector.
(b) Remove the 2 wire harness clamps.
(c) Disconnect the fuel hose No. 1.
(d) Disconnect the fuel tank vent hose.
(1) Deeply push the quick connector to release the lock
pin.
(2) Pinch portion A.
(3) Pull out the fuel tank vent hose.
(e) Remove the 2 bolts.
(f) Unfasten the claw, then remove the charcoal canister.
Page 633 of 969
120BV-02
A91017
Nylon Tube Fuel Tube Joint
O-ring
Tube Joint Clip Fuel Suction Plate
A79488
Tube Joint Clip
A79489
A79491
Cover
Tube Joint Clip
12-20
- EMISSION CONTROLVAPOR PRESSURE SENSOR ASSY (3MZ-FE)
2081 Author�: Date�:
2005 LEXUS ES330 REPAIR MANUAL (RM1124U)
VAPOR PRESSURE SENSOR ASSY (3MZ-FE)
REPLACEMENT
1. DISCHARGE FUEL SYSTEM PRESSURE (See page 11-1)
2. DISCONNECT ENGINE WIRE NO. 3 (BATTERY NEGATIVE TERMINAL)
3. REMOVE REAR SEAT CUSHION ASSY (See page 72-39)
4. REMOVE REAR FLOOR SERVICE HOLE COVER (See page 11-20)
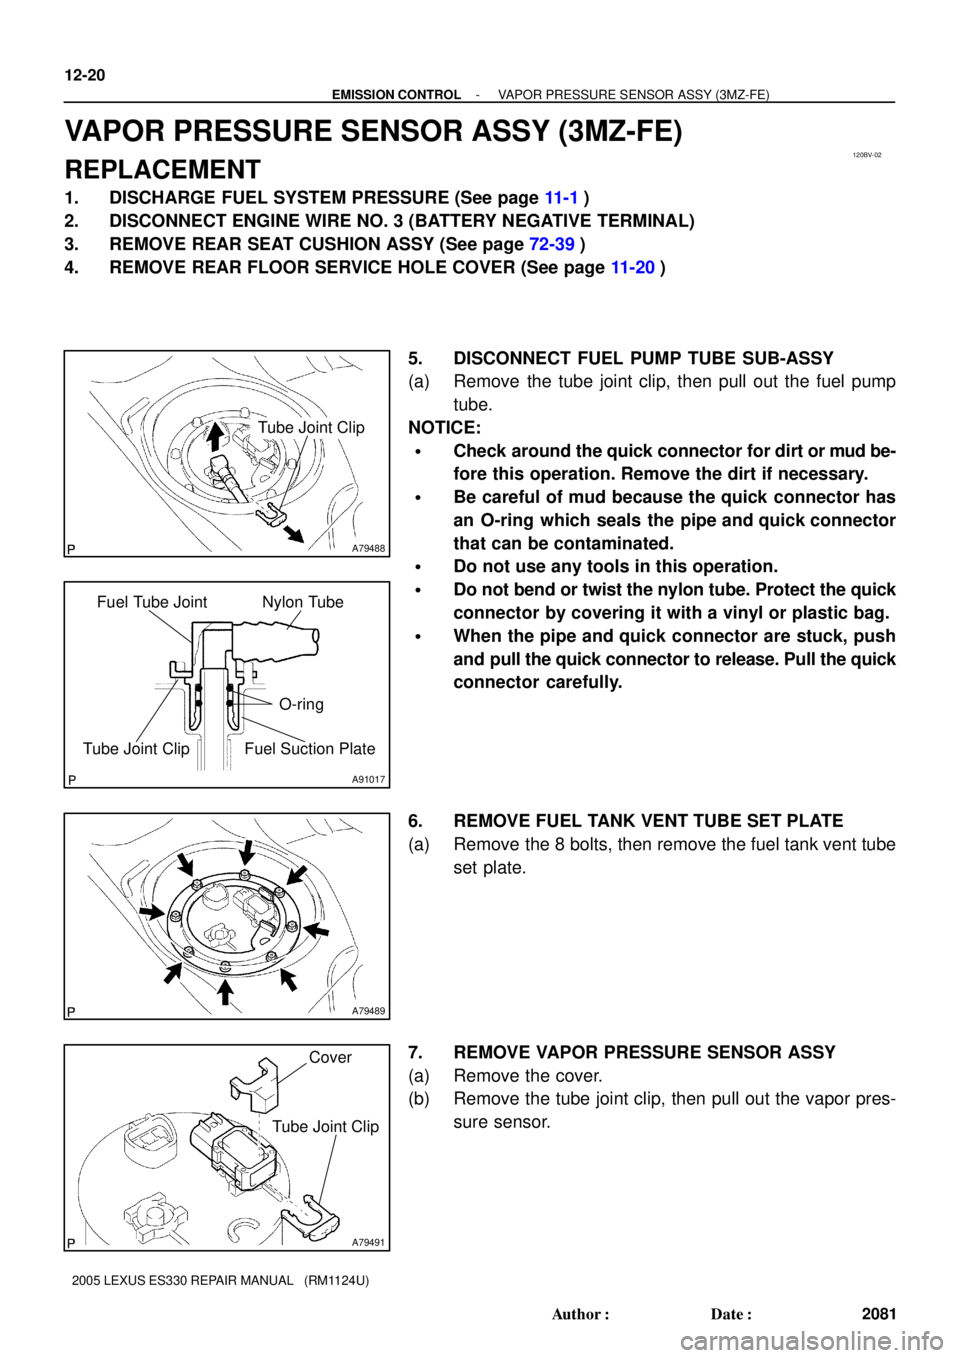
5. DISCONNECT FUEL PUMP TUBE SUB-ASSY
(a) Remove the tube joint clip, then pull out the fuel pump
tube.
NOTICE:
�Check around the quick connector for dirt or mud be-
fore this operation. Remove the dirt if necessary.
�Be careful of mud because the quick connector has
an O-ring which seals the pipe and quick connector
that can be contaminated.
�Do not use any tools in this operation.
�Do not bend or twist the nylon tube. Protect the quick
connector by covering it with a vinyl or plastic bag.
�When the pipe and quick connector are stuck, push
and pull the quick connector to release. Pull the quick
connector carefully.
6. REMOVE FUEL TANK VENT TUBE SET PLATE
(a) Remove the 8 bolts, then remove the fuel tank vent tube
set plate.
7. REMOVE VAPOR PRESSURE SENSOR ASSY
(a) Remove the cover.
(b) Remove the tube joint clip, then pull out the vapor pres-
sure sensor.
Page 634 of 969
A86272
Cover
Tube Joint Clip
A79489Mark
A81595
Tube Joint ClipCollar
- EMISSION CONTROLVAPOR PRESSURE SENSOR ASSY (3MZ-FE)
12-21
2082 Author�: Date�:
2005 LEXUS ES330 REPAIR MANUAL (RM1124U)
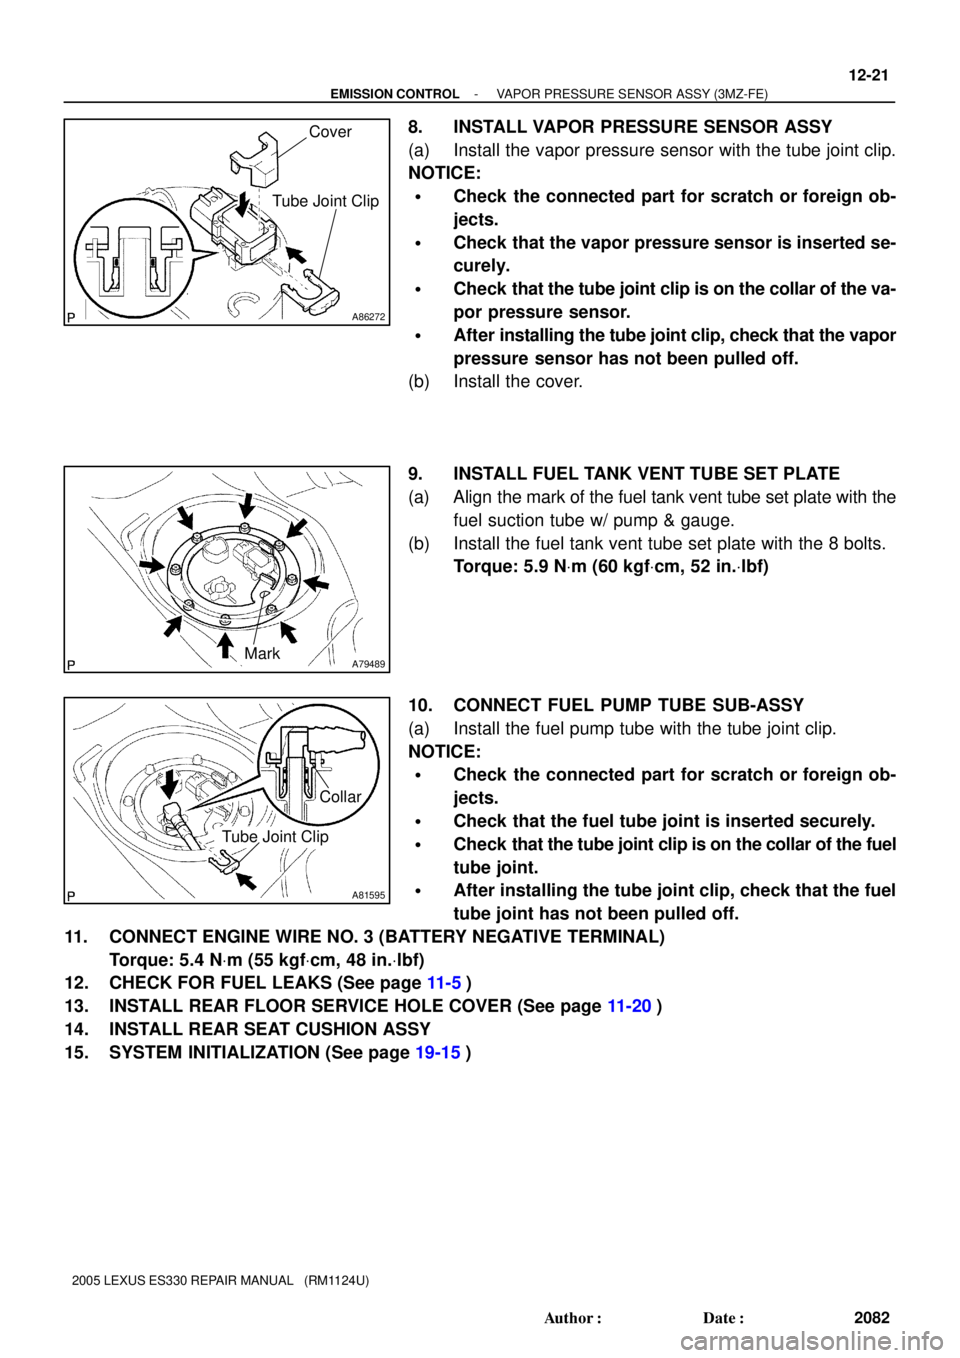
8. INSTALL VAPOR PRESSURE SENSOR ASSY
(a) Install the vapor pressure sensor with the tube joint clip.
NOTICE:
�Check the connected part for scratch or foreign ob-
jects.
�Check that the vapor pressure sensor is inserted se-
curely.
�Check that the tube joint clip is on the collar of the va-
por pressure sensor.
�After installing the tube joint clip, check that the vapor
pressure sensor has not been pulled off.
(b) Install the cover.
9. INSTALL FUEL TANK VENT TUBE SET PLATE
(a) Align the mark of the fuel tank vent tube set plate with the
fuel suction tube w/ pump & gauge.
(b) Install the fuel tank vent tube set plate with the 8 bolts.
Torque: 5.9 NVm (60 kgfVcm, 52 in.Vlbf)
10. CONNECT FUEL PUMP TUBE SUB-ASSY
(a) Install the fuel pump tube with the tube joint clip.
NOTICE:
�Check the connected part for scratch or foreign ob-
jects.
�Check that the fuel tube joint is inserted securely.
�Check that the tube joint clip is on the collar of the fuel
tube joint.
�After installing the tube joint clip, check that the fuel
tube joint has not been pulled off.
11. CONNECT ENGINE WIRE NO. 3 (BATTERY NEGATIVE TERMINAL)
Torque: 5.4 NVm (55 kgfVcm, 48 in.Vlbf)
12. CHECK FOR FUEL LEAKS (See page 11-5)
13. INSTALL REAR FLOOR SERVICE HOLE COVER (See page 11-20)
14. INSTALL REAR SEAT CUSHION ASSY
15. SYSTEM INITIALIZATION (See page 19-15)
Page 677 of 969
170FZ-02
A66623
�C -29 -18 -7 4 16 27 38Recommended Viscosity (SAE)
�F -20 0 20 40 60 80 1005W-30
A90353
Oil Pressure
Switch
A90354
Oil Pressure Gauge
- LUBRICATIONLUBRICATION SYSTEM (3MZ-FE)
17-1
2306 Author�: Date�:
2005 LEXUS ES330 REPAIR MANUAL (RM1124U)
LUBRICATION SYSTEM (3MZ-FE)
ON-VEHICLE INSPECTION
1. CHECK ENGINE OIL LEVEL
(a) Warm up the engine, then stop the engine and wait for 5 minutes.
(b) Check that the engine oil level is between the low and full level marks on the level gage.
If low, check for leakage and add oil up to the full level mark.
NOTICE:
Do not fill with engine oil above the full level mark.
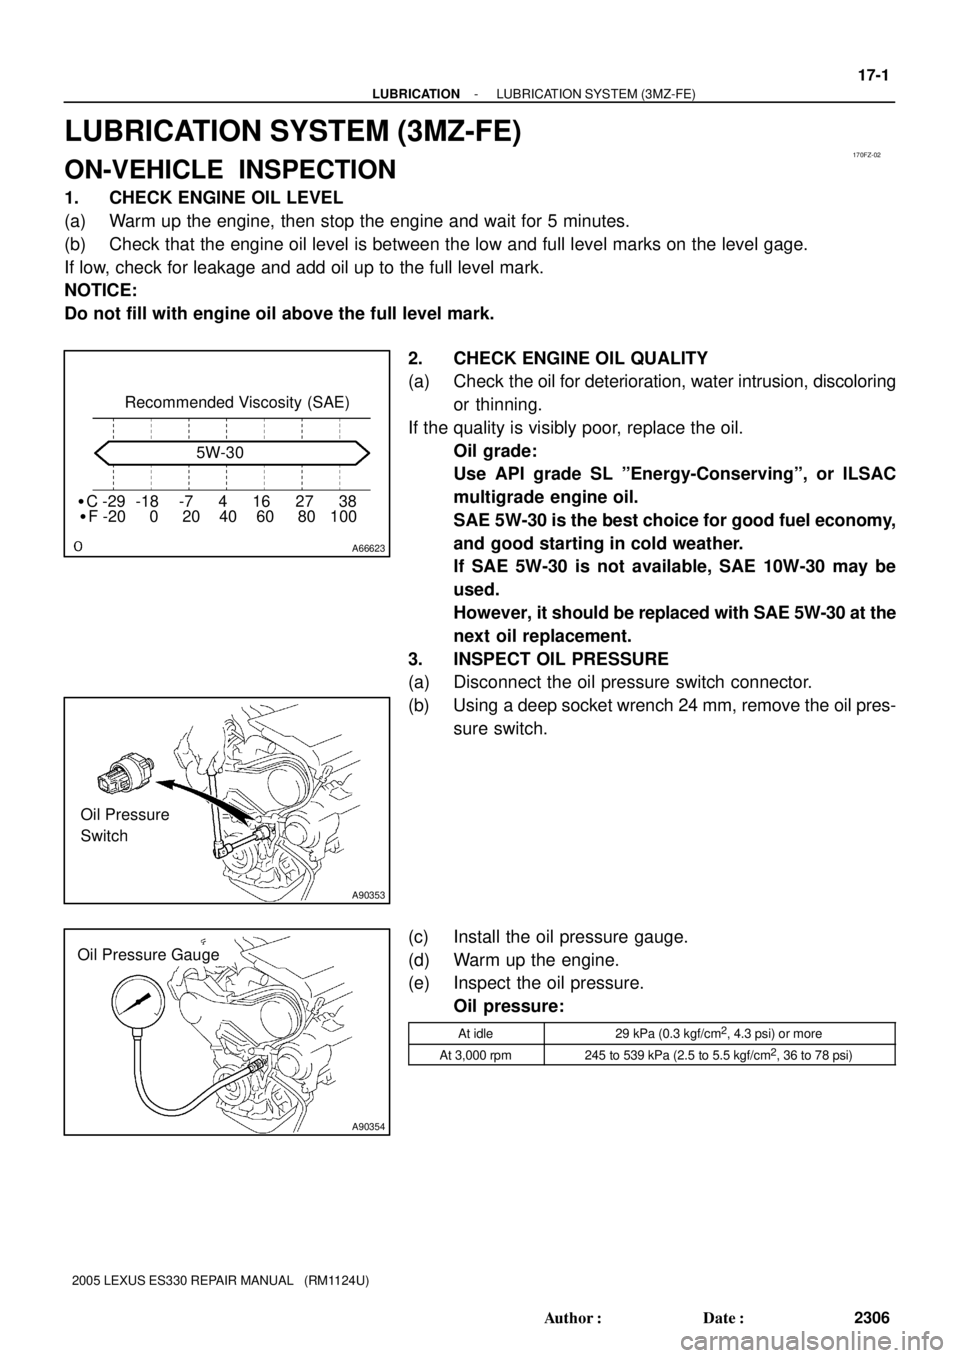
2. CHECK ENGINE OIL QUALITY
(a) Check the oil for deterioration, water intrusion, discoloring
or thinning.
If the quality is visibly poor, replace the oil.
Oil grade:
Use API grade SL ºEnergy-Conservingº, or ILSAC
multigrade engine oil.
SAE 5W-30 is the best choice for good fuel economy,
and good starting in cold weather.
If SAE 5W-30 is not available, SAE 10W-30 may be
used.
However, it should be replaced with SAE 5W-30 at the
next oil replacement.
3. INSPECT OIL PRESSURE
(a) Disconnect the oil pressure switch connector.
(b) Using a deep socket wrench 24 mm, remove the oil pres-
sure switch.
(c) Install the oil pressure gauge.
(d) Warm up the engine.
(e) Inspect the oil pressure.
Oil pressure:
At idle29 kPa (0.3 kgf/cm2, 4.3 psi) or more
At 3,000 rpm245 to 539 kPa (2.5 to 5.5 kgf/cm2, 36 to 78 psi)