Page 602 of 969
A79493
Tape
(a)
A79495
(a)
(b)
(b)
A79496
A79497
A65037
11-22- FUELFUEL SUCTION W/ PUMP & GAUGE TUBE
ASSY (3MZ-FE)
2050 Author�: Date�:
2005 LEXUS ES330 REPAIR MANUAL (RM1124U)
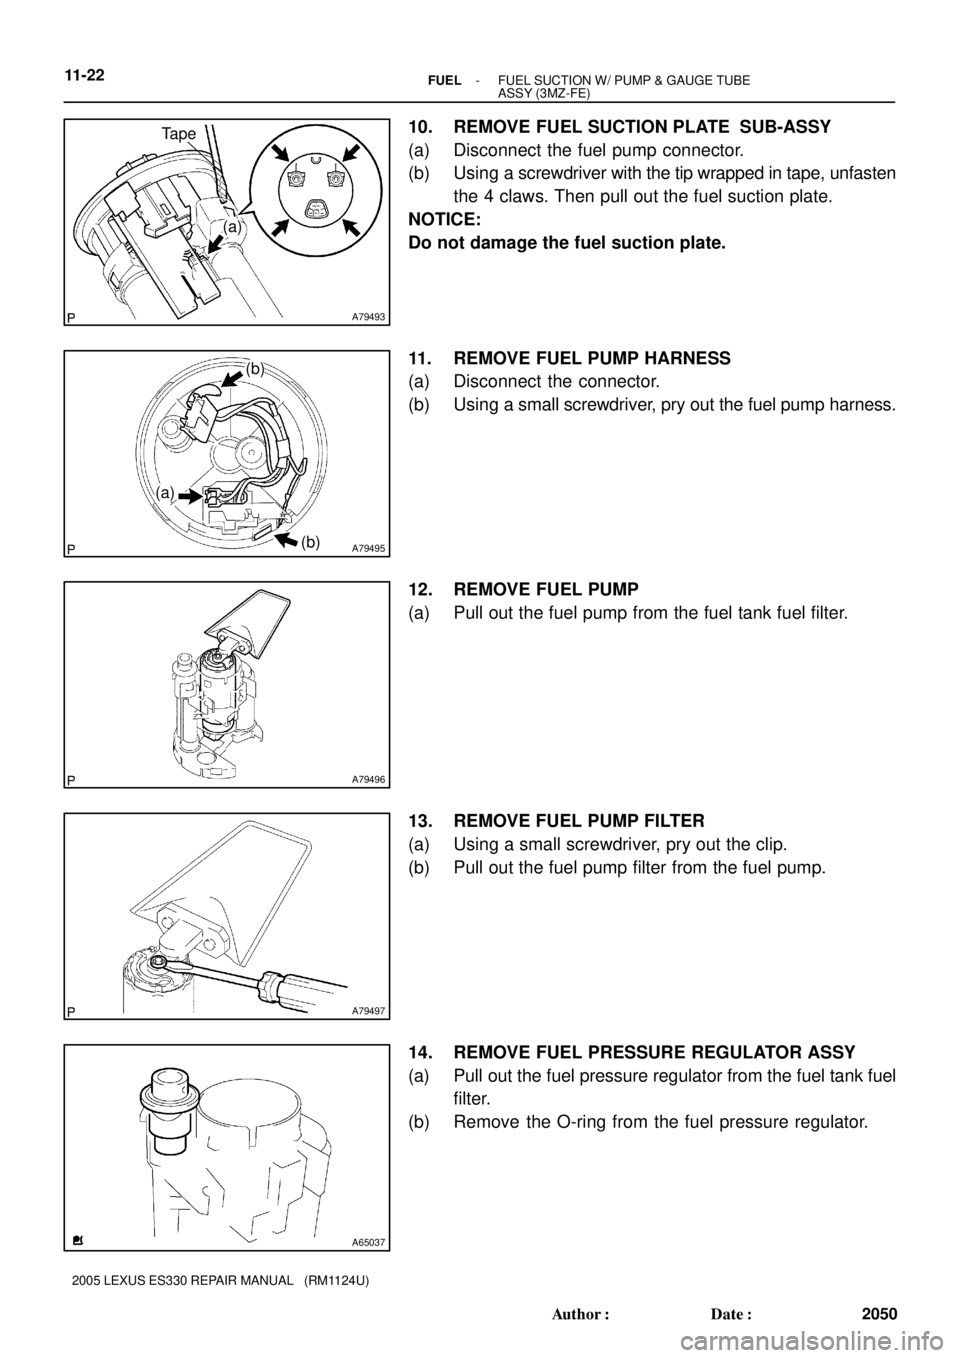
10. REMOVE FUEL SUCTION PLATE SUB-ASSY
(a) Disconnect the fuel pump connector.
(b) Using a screwdriver with the tip wrapped in tape, unfasten
the 4 claws. Then pull out the fuel suction plate.
NOTICE:
Do not damage the fuel suction plate.
11. REMOVE FUEL PUMP HARNESS
(a) Disconnect the connector.
(b) Using a small screwdriver, pry out the fuel pump harness.
12. REMOVE FUEL PUMP
(a) Pull out the fuel pump from the fuel tank fuel filter.
13. REMOVE FUEL PUMP FILTER
(a) Using a small screwdriver, pry out the clip.
(b) Pull out the fuel pump filter from the fuel pump.
14. REMOVE FUEL PRESSURE REGULATOR ASSY
(a) Pull out the fuel pressure regulator from the fuel tank fuel
filter.
(b) Remove the O-ring from the fuel pressure regulator.
Page 603 of 969
11-23
2051 Author�: Date�:
2005 LEXUS ES330 REPAIR MANUAL (RM1124U)
15. INSTALL FUEL")
A65038
New O-ring
A65040
O-ring
A86272
Cover
Tube Joint Clip
- FUELFUEL SUCTION W/ PUMP & GAUGE TUBE
ASSY (3MZ-FE)11-23
2051 Author�: Date�:
2005 LEXUS ES330 REPAIR MANUAL (RM1124U)
15. INSTALL FUEL PRESSURE REGULATOR ASSY
(a) Apply a light coat of spindle oil or gasoline to a new O-
ring, then install it to the fuel pressure regulator.
(b) Push in the fuel pressure regulator to the fuel tank fuel fil-
ter.
16. INSTALL FUEL PUMP FILTER
(a) Install the fuel pump filter with a new clip.
17. INSTALL FUEL PUMP
(a) Apply a light coat of gasoline or spindle oil to the O-ring
on the fuel pump.
(b) Push in the fuel pump to the fuel tank fuel filter.
18. INSTALL FUEL PUMP HARNESS
19. INSTALL FUEL SUCTION PLATE SUB-ASSY
20. INSTALL FUEL SENDER GAUGE ASSY
21. INSTALL FUEL PUMP CUSHION RUBBER
22. INSTALL FUEL SUCTION SUPPORT NO.2
23. INSTALL VAPOR PRESSURE SENSOR ASSY
(a) Install the vapor pressure sensor with the tube joint clip.
NOTICE:
�Check the connected part for scratch or foreign ob-
jects.
�Check that the vapor pressure sensor is inserted se-
curely.
�Check that the tube joint clip is on the collar of the va-
por pressure sensor.
�After installing the tube joint clip, check that the vapor
pressure sensor has not been pulled off.
(b) Install the cover.
Page 604 of 969

2052 Author�: Date�:
2005 LEXUS ES330 REPAIR MANUAL (RM1124U)
24. INSTALL FUE")
A79489Mark
A81595
Tube Joint ClipCollar
A79487
New Butyl Tape
11-24- FUELFUEL SUCTION W/ PUMP & GAUGE TUBE
ASSY (3MZ-FE)
2052 Author�: Date�:
2005 LEXUS ES330 REPAIR MANUAL (RM1124U)
24. INSTALL FUEL SUCTION W/ PUMP & GAUGE TUBE
ASSY
(a) Install a new gasket to the fuel suction tube w/ pump &
gauge.
(b) Install the fuel suction tube w/ pump & gauge to the fuel
tank.
NOTICE:
�Do not damage the fuel pump filter.
�Do not bend the arm of the fuel sender gauge.
(c) Align the mark of the fuel tank vent tube set plate with the
fuel suction tube w/ pump & gauge.
(d) Install the fuel tank bent tube set plate with the 8 bolts.
Torque: 5.9 NVm (60 kgfVcm, 52 in.Vlbf)
(e) Install the fuel pump tube with the tube joint clip.
NOTICE:
�Check the connected part for scratch or foreign ob-
jects.
�Check that the fuel tube joint is inserted securely.
�Check that the tube joint clip is on the collar of the fuel
tube joint.
�After installing the tube joint clip, check that the fuel
tube joint has not been pulled off.
25. CONNECT ENGINE WIRE NO. 3 (BATTERY NEGATIVE TERMINAL)
Torque: 5.4 NVm (55 kgfVcm, 48 in.Vlbf)
26. CHECK FOR FUEL LEAKS (See page 11-5)
27. INSTALL REAR FLOOR SERVICE HOLE COVER
(a) Connect the fuel pump connector.
(b) Connect the vapor pressure sensor connector.
(c) Using new butyl tape, install the rear floor service hole
cover.
28. INSTALL REAR SEAT CUSHION ASSY
29. SYSTEM INITIALIZATION (See page 19-15)
Page 605 of 969
110XY-01
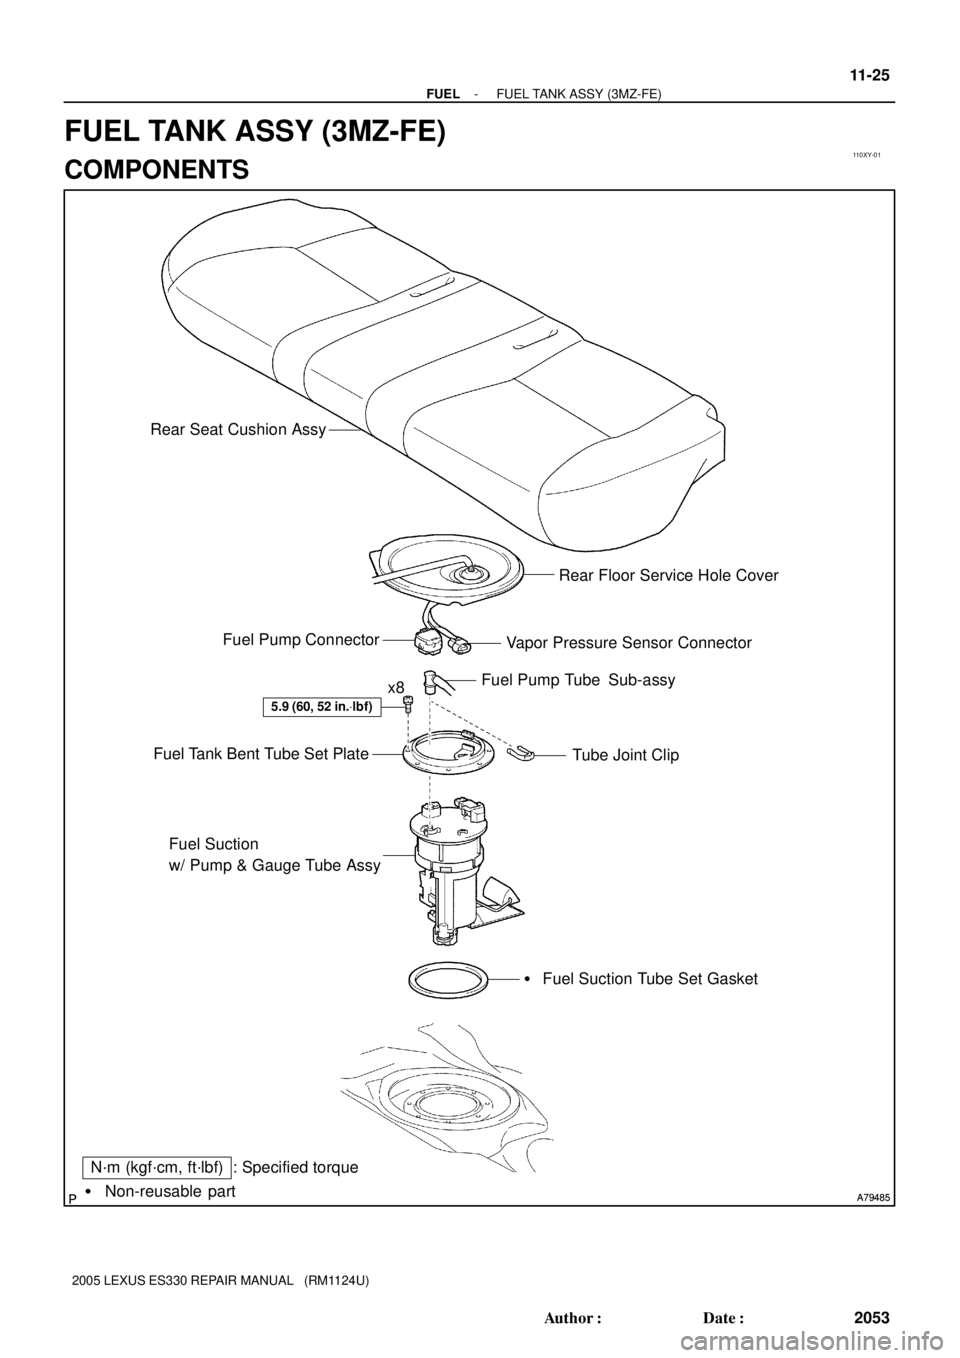
A79485 A79485� Non-reusable part
N´m (kgf´cm, ft´lbf) : Specified torque
5.9 (60, 52 in.Vlbf)
x8Fuel Pump Tube Sub-assy
Tube Joint Clip Fuel Tank Bent Tube Set Plate
Fuel Suction
w/ Pump & Gauge Tube Assy
� Fuel Suction Tube Set Gasket Vapor Pressure Sensor Connector Fuel Pump ConnectorRear Floor Service Hole Cover Rear Seat Cushion Assy
- FUELFUEL TANK ASSY (3MZ-FE)
11-25
2053 Author�: Date�:
2005 LEXUS ES330 REPAIR MANUAL (RM1124U)
FUEL TANK ASSY (3MZ-FE)
COMPONENTS
Page 608 of 969
110XZ-01
A86274
(a)
(b)
(a)
(a)
(a)
(b)
A79472
11-28
- FUELFUEL TANK ASSY (3MZ-FE)
2056 Author�: Date�:
2005 LEXUS ES330 REPAIR MANUAL (RM1124U)
Removal & Installation and Disassembly & Reassembly
1. DISCHARGE FUEL SYSTEM PRESSURE (See page 11-1)
2. DISCONNECT ENGINE WIRE NO. 3 (BATTERY NEGATIVE TERMINAL)
3. REMOVE REAR SEAT CUSHION ASSY (See page 72-39)
4. REMOVE REAR FLOOR SERVICE HOLE COVER (See page 11-20)
5. REMOVE FUEL SUCTION W/ PUMP & GAUGE TUBE ASSY (See page 11-20)
6. DRAIN FUEL
7. REMOVE FLOOR PANEL BRACE REAR (See page 15-2)
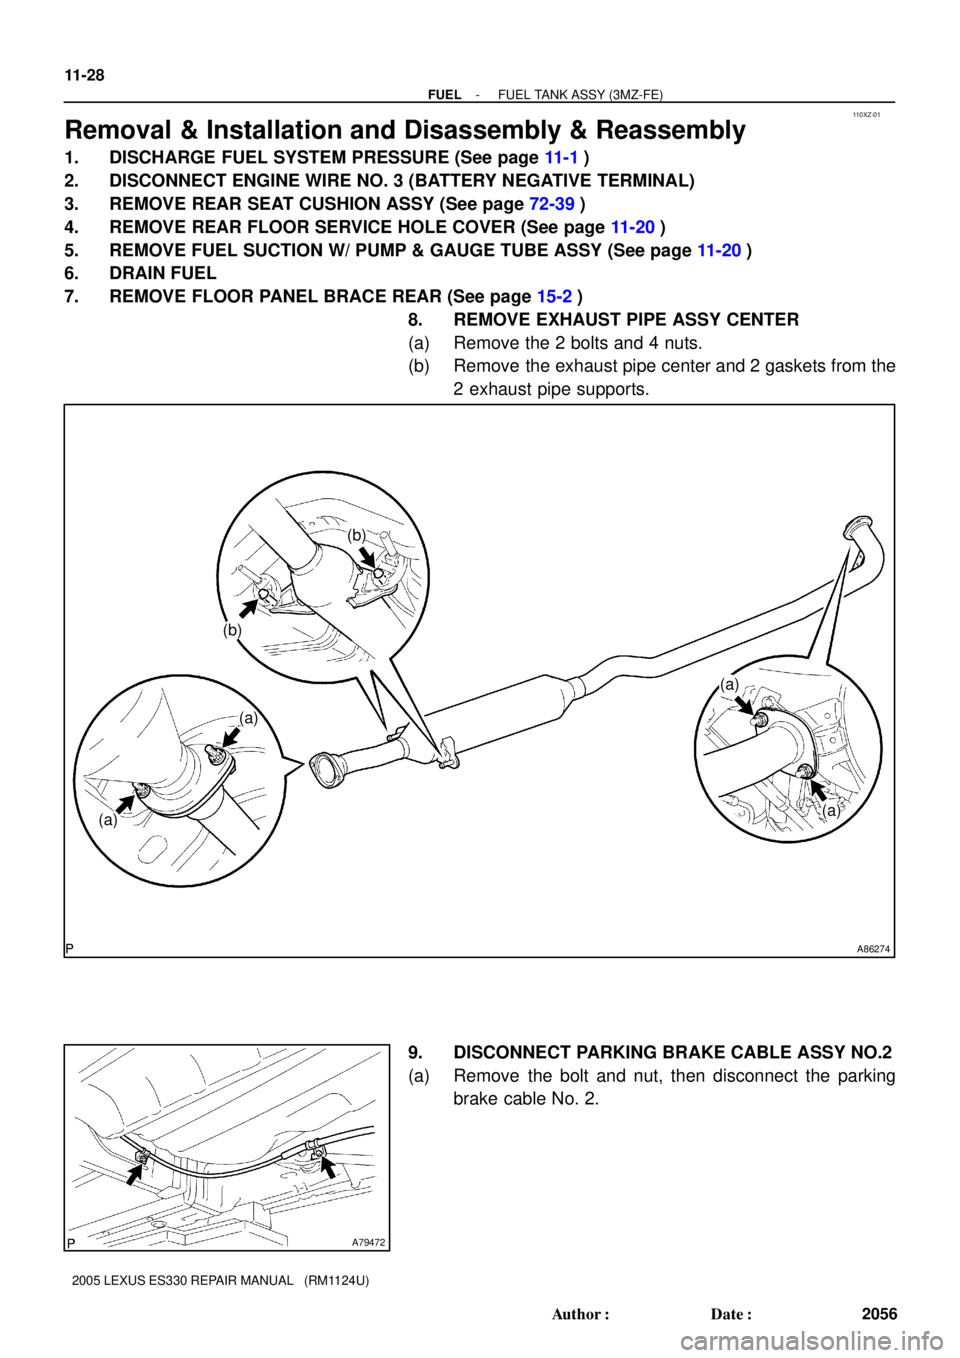
8. REMOVE EXHAUST PIPE ASSY CENTER
(a) Remove the 2 bolts and 4 nuts.
(b) Remove the exhaust pipe center and 2 gaskets from the
2 exhaust pipe supports.
9. DISCONNECT PARKING BRAKE CABLE ASSY NO.2
(a) Remove the bolt and nut, then disconnect the parking
brake cable No. 2.
Page 614 of 969
120C0-01
A86341
Ventilation Valve Sub-assy
EVAP Service Port
Heated Oxygen Sensor
(Bank 1 Sensor 2)
Air Fuel Ratio Sensor
(Bank 1 Sensor 1) Vacuum Surge Tank
VSV for EVAP
Heated Oxygen Sensor
(Bank 2 Sensor 2)
Air Fuel Ratio Sensor
(Bank 2 Sensor 1)
Fuel Tank Cap Assy
Charcoal Canister Filter
Sub-assy Charcoal Canister Assy
Vapor Pressure Sensor Assy
VSV for CCV
- EMISSION CONTROLEMISSION CONTROL SYSTEM (3MZ-FE)
12-1
2062 Author�: Date�:
2005 LEXUS ES330 REPAIR MANUAL (RM1124U)
EMISSION CONTROL SYSTEM (3MZ-FE)
LOCATION
Page 615 of 969
A86342
EVAP
Service Port Vacuum
Surge TankVSV
for EVAP
Fuel Tank Cap
Assy
Vapor Pressure Sensor
Assy
Fuel Tank Assy
Charcoal Canister Assy
VSV for CCVCharcoal Canister Filter
Sub-assyAir Fuel Ratio Sensor
(Bank 1 Sensor 1)
Heated Oxygen Sensor
(Bank 1 Sensor 2)
Heated Oxygen Sensor
(Bank 2 Sensor 2)
Air Fuel Ratio Sensor
(Bank 2 Sensor 1) Air Cleaner Assy
Ventilation Valve Assy
Vent Line
Air Inlet Line Purge Line
12-2
- EMISSION CONTROLEMISSION CONTROL SYSTEM (3MZ-FE)
2063 Author�: Date�:
2005 LEXUS ES330 REPAIR MANUAL (RM1124U)
Page 619 of 969

2067 Author�: Date�:
2005 LEXUS ES3")
A86347DLC3
Hand-held Tester
A86349Battery
A59501
Pressure Gauge
Pressure
A52634
Fuel Tank CapPressure Gauge
12-6
- EMISSION CONTROLEMISSION CONTROL SYSTEM (3MZ-FE)
2067 Author�: Date�:
2005 LEXUS ES330 REPAIR MANUAL (RM1124U)
(j) If you have the hand-held tester:
Force the VSV for CCV to operate.
(1) Connect the hand-held tester to the DLC3.
(2) Turn the ignition switch ON.
(3) Turn the hand-held tester ON.
(4) Use the ACTIVE TEST mode on the hand-held tes-
ter to operate the VSV for CCV.
NOTICE:
Do not start the engine during this operation.
HINT:
If the check is not completed within 10 minutes, the forced close
of the VSV for CCV will be tested.
(k) If you have no hand-held tester:
Force the VSV for CCV to operate.
(1) Disconnect the VSV for CCV connector.
(2) Connect the positive (+) and negative (-) leads of
the battery to the VSV for CCV terminals.
(l) Check the pressure.
(1) Add the pressure (13.5 to 15.5 in.Aq) from the
EVAP service port.
Pressure:
2 minutes after the pressure is added, the gauge
should be over 7.7 to 8.8 in.Aq.
HINT:
If you cannot add the pressure, it can be concluded that the
hose which connects the VSV for EVAP canister fuel tank is
slipped off or the VSV is open.
(2) Check if the pressure decreases when the fuel tank
cap is removed while adding the pressure.
HINT:
If the pressure does not decrease when the filler cap is re-
moved, it can be concluded that the hose which connects the
service port to the fuel tank is blocked, etc.
(m) If you have the hand-held tester:
Return to the normal VSV for CCV operation.
(1) Turn the ignition switch ON.
(2) Disconnect the hand-held tester from the DLC3.
(n) If you have no hand-held tester:
Return to the normal VSV for CCV operation.
(1) Disconnect the positive (+) and negative (-) leads
of the battery to the VSV for CCV terminals.
(2) Reconnect the VSV for CCV connector.

Air Fuel Ratio Sensor
(Bank 1 Sensor 1) Vacuum Surge Tank
VSV for EVAP
Heated Oxygen Sensor
(Ban")
