Page 89 of 133
JAGUARS-TYPEElectrical/Electronic
84
J.418.431
Engine Compartment Fusebox
Luggage Compartment Fusebox
Passenger Compartment Fusebox
Relays
The relays are located in the three fuse boxes.
Some are a smaller: half the standard ISO size.
Key to illustration:
Engine Compartment Fusebox
1. Wiper fast/slow relay
2. Wiper park relay
3. Coils on plugs & HO2 sensor (catalyst) relay
4. Windshield washer relay
5. Auxiliary coolant pump relay (V8 only)
6. Horns relay
7. Fog lamp relay
8. Air conditioning clutch relay
9. Unused10. Blower motor relay
11. LH heated windshield relay and heated wiper
relay
12. RH heated windshield relay
13. Headlamp washer pump relay
14. Powertrain control module relay
15. Starter motor relay
Passenger Compartment Fusebox
1. Cigar lighter/Accessory socket
Luggage Compartment Fusebox
1. Switched system power 1 relay
2. Switched system power 2 relay
3. Rear defroster
4. Switched system power 3 relay RELAYS
213
7
13
510
1211
1514
64
8
213
7
564
1
Page 90 of 133

JAGUARS-TYPEElectrical/Electronic
85 5. Switched system power 4 relay
6. Fuel pump relay
7. Brake shift interlock relay
Transit Relay
The purpose of the Transit Relay is to prevent the
battery from being discharged during transit and
Dealer storage. It automatically isolates the
battery following ignition off.
The transit relay is installed on the Negative line
through a spur from the trunk lighting harness
and is located on the battery Negative post.
If the vehicle is to be handed over to a customer
within a period of 24 hours of completion of the
PDI, the Transit Relay MUST be removed.
If the vehicle is NOT to be handed over to a
customer within a period of 24 hours of
completion of the PDI, a Transit Relay Test Lead
must be fitted to allow the PDI to proceed.
Under no circumstances should any means other
than the test lead be used to bridge the Transit
Relay.
The Transit Relay Test Lead MUST be removed
after the completion of the PDI and stored for
further use. Under no circumstances should the
vehicle be transported with the Transit Relay Test
Lead fitted.
The procedure to fit the Transit Relay Test Lead
and remove the Transit Relay is given in the PDI
Manual.
D.418.417
D.418.418
TRANSIT RELAY
TRANSIT RELAY FITTED
Page 91 of 133

JAGUARS-TYPEElectrical/Electronic
86
Exterior Lighting
The exterior lighting switch located on the fascia,
operates the headlamps, sidelights, fog lamps and
the delay variable timer switch. Each headlamp
assembly consists of two headlamp units, the
main beam lamp unit is the inner and the dipped
beam, front parking (side) lamp and the direction
indicator lamp unit is the outer.
Fog lamps are located in recesses in the front
bumper. The two retaining screws are located
behind the anti-theft cover and splitter vane.
J.418.442
Each rear lamp assembly incorporates a tail/stop
lamp and an auxiliary tail lamp, a fog lamp, a
reversing lamp and a direction indicator lamp.
Access for bulb replacement is from the luggage
compartment. The high mounted stop lamp is
powered via the stoplamp switch, it is clipped to
the rear screen and is replaceable as a unit.
The side repeater lamps (where fitted) are located
within the front fender. The sidemarker lamps are
located with the rear and front bumper and are
EXTERIOR LAMPS
High Mounted Stop Lamp
Number Plate Lamps
Inner Headlamp
Unit
Outer Headlamp
Unit
Front Fog Lamp
Side Marker Lamp
Side Repeater Lamp
(where fitted)
Side Marker Lamp
Rear Lamp Assembly
J.418.441 & 442
Page 92 of 133
JAGUARS-TYPEElectrical/Electronic
87
Bulb renewal
It is important that only Jaguar bulbs of the type
specified are used when renewing bulbs.
Before renewing bulbs, switch off the ignition and
light switches.
Top cover
To gain access to the headlamp units, the top
cover must be removed.
Turn the four fasteners a quarter turn anti-
clockwise and then remove the top cover.
After changing the defective bulb, refit the cover
and turn the fasteners clockwise to retain the
cover.
JOL.073
supplied as part of a high level bumper assembly
(the side markers are located in the bumper by
tangs on one side of the unit and held in position
by a spring clip on the other side).TOP COVER
Page 93 of 133

JAGUARS-TYPEElectrical/Electronic
88
JOL.074
Headlamp - Bulb Renewal
The bulbs are halogen type and will be damaged if
touched by hand or contaminated with oil or
grease. It is important to use clean gloves or cloth
when handling a bulb which is to be used again. A
contaminated bulb may be cleaned with
methylated spirit before refitting.
JOL.116
Dipped Beam (outer) Headlamp
Open the bonnet.
Remove the top cover.
Turn the circular cover (A) anti-clockwise and
remove.
Press the spring clip (B) towards the bulb and
downwards to release the bulb. Remove the
bulb/connector (C) from the headlamp assembly.
Pull the connector from the bulb.
Attach the connector to the new bulb, type H7 for
dipped beam, and fit to the headlamp. The bulb
will only correctly fit in one position.
Engage the spring clips to retain the bulb and then
fit the circular cover.
Refit the top cover and close the bonnet.
Have the headlamp aim checked after bulb
replacement.
Main Beam (inner) Headlamp
Open the bonnet.
Remove the top cover.
Turn the bulb holder a quarter turn anti-clockwise
and remove the bulb and holder from the lamp
unit.
Fit a new bulb to the holder, type HB3 for main
beam.
Fit the holder to the lamp unit, the bulb will only
correctly fit in one position.
Refit the top cover and close the bonnet. HEADLAMP - DIPPED BEAM
HEADLAMP - MAIN BEAM
ABC
Page 94 of 133

JAGUARS-TYPEElectrical/Electronic
89
JOL.078
JOL.079
D.417.108
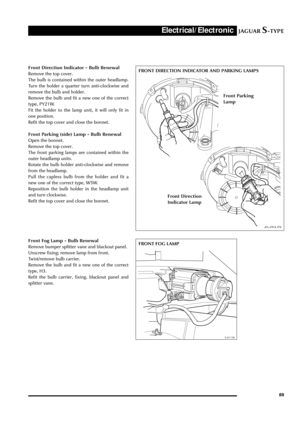
Front Direction Indicator - Bulb Renewal
Remove the top cover.
The bulb is contained within the outer headlamp.
Turn the holder a quarter turn anti-clockwise and
remove the bulb and holder.
Remove the bulb and fit a new one of the correct
type, PY21W.
Fit the holder to the lamp unit, it will only fit in
one position.
Refit the top cover and close the bonnet.
Front Parking (side) Lamp - Bulb Renewal
Open the bonnet.
Remove the top cover.
The front parking lamps are contained within the
outer headlamp units.
Rotate the bulb holder anti-clockwise and remove
from the headlamp.
Pull the capless bulb from the holder and fit a
new one of the correct type, W5W.
Reposition the bulb holder in the headlamp unit
and turn clockwise.
Refit the top cover and close the bonnet.
Front Fog Lamp - Bulb Renewal
Remove bumper splitter vane and blackout panel.
Unscrew fixing; remove lamp from front.
Twist/remove bulb carrier.
Remove the bulb and fit a new one of the correct
type, H3.
Refit the bulb carrier, fixing, blackout panel and
splitter vane.FRONT DIRECTION INDICATOR AND PARKING LAMPS
FRONT FOG LAMP
Front Parking
Lamp
Front Direction
Indicator Lamp
JOL.078 & 079
Page 95 of 133

JAGUARS-TYPEElectrical/Electronic
90Side Repeater Indicator - Bulb Renewal
Remove the lamp unit from the front wing panel
by pressing the unit forwards or rearwards to
compress the spring clip and remove the complete
unit.
Twist the bulb anti-clockwise and remove.
Fit a new bulb of the correct type, W5W.
Press the unit into the recess until it clicks into
place.
JOL.076
JOL.075
Rear Lamp Assembly - Bulb Renewal
The rear lamp assembly has the following bulbs:
¥ Reverse lamp, type P21W.
¥ Stop/tail lamp, type P21/4W.
¥ Fog lamp, type P21W
¥ Tail lamp, type R5W.
¥ Direction indicator, type PY21W.
Ensure that the lamps and ignition switch are OFF
before removing any bulbs.
Open the luggage compartment, loosen the side
carpet and unclip the rear lamp bulb carrier.
Remove the faulty bulb and fit a new one of the
correct type, as illustrated on the bulb holder.
Fitment of the correct type is essential.
Refit the bulb carrier assembly, ensuring that the
clips are correctly secured.
Refit the carpet. SIDE REPEATER INDICATOR
REAR LAMP ASSEMBLY
Direction Indicator
Tail Lamp
Stop/Tail Lamp
Fog Lamp
Reverse Lamp
Page 96 of 133
JAGUARS-TYPEElectrical/Electronic
91
JOL.077
High Mounted Stop Lamp
Remove the rear parcel tray trim panel.
Depress clips to remove from pegs.
Number Plate Lamp - Bulb Renewal
Push the lens clip sideways and remove the lens
from the vehicle.
Remove the bulb and fit a new one of the correct
type, W5W.
Refit the lens by pressing it firmly into the recess
until it clicks into place.NUMBER PLATE LAMP
J.418.447
EXTERIOR LIGHTING CONTROLS
Exterior Lighting
Switch
LH Column
Switchgear
Lighting Stalk
Hazard Switch
Autolamp
Sensor
Instrument
Pack
To
General Electronic
Control Module
To
Rear Electronic
Control Module