Page 105 of 133

E. Headlamps
F. Rear fog lamps
G. Front fog lamps (where fitted)
Autolamps Delayed Exit (")
JAGUARS-TYPEElectrical/Electronic
100
Exterior Lighting Switch
A. Timer
B. Auto
C. Off
D. Side (parking lamps)
E. Headlamps
F. Rear fog lamps
G. Front fog lamps (where fitted)
Autolamps Delayed Exit (A)
This feature leaves the headlamps turned on after
the ignition has been switched off, allowing the
driver and passengers increased visability on
leaving the vehicle. The switch has seven positions
and varies the time from three seconds up to
three minutes. After adjustment, the newly set
delay time will be displayed on the message
center.
Auto (B)
A light sensor on top of the instrument panel,
monitors exterior light levels and automatically
switches the side lamps and dipped headlamps on
or off. When light fades to the non-adjustable
preset level, the sidelamps and headlamps switch
on automatically. As light increases to the preset
level, the sidelights and headlamps switch off
automatically.Rear Fog Lamps (F)
Turn the switch to headlamps on, pull the switch
and then turn to position (F). Turning on the rear
fog lamps will also turn on the front headlamps.
Front Fog Lamps (G)
Pull the switch in positions (A), (B), (D) or (E) to
switch on the front fog lamps. Push to turn off. If
the rotary switch is turned off (C) the switch will
be retracted to its normal position and the fog
lamps will be turned off.
Daylight Running Lamps
In certain countries it is a legal requirement for
the lamps to be on during the hours of daylight.
With the rotary switch in the off position (C),
dipped headlamps, sidelights and tail and number
plate lamps will switch on automatically when the
ignition is turned to position II, the vehicle is out
of park (automatic transmission only) and the
parking brake is released.
Battery Saver
If the dipped or main beam headlamps are
switched on and the ignition is turned to OFF or
the key is removed, the lamps will automatically
turn OFF after 10 minutes. The sidelights will
remain ON.
Bulb Failure Monitoring
The tail and brake lamp bulbs are monitored for
failure and a corresponding message is shown in
the message center, e.g ÔLEFT TAIL LAMP FAILEDÕ.
There are two tail lamp bulbs in each tail lamp.
The message that a tail lamp has failed indicates
that both bulbs in that cluster have failed. The
message will be shown, even after a bulb is
replaced, until the next time the bulb is switched
on.
JOL.069
EXTERIOR LIGHTING SWITCH
A
F E D C
B
G
Page 106 of 133

JAGUARS-TYPEElectrical/Electronic
101
Dimmer Switch
Rotate the knob to adjust the illumination of the
instruments, door switch packs, audio system
panel and the climate control panel.
JOL.063
Front Seat Heater Switches
The driver and front passenger have a heater. The
seat heater switches (when fitted) are located on
the center console directly below the climate
control unit. The heaters are in the seat squab
and the seat cushion. The heater will
automatically switch OFF after it has been on for
10 minutes. The heater will maintain a pre-set
temperature while it is switched on. Storage of
the vehicle in a heated garage, body heat, or
warm ambient temperatures may prevent
operation of the seat heater.
JOL.013
Center Tunnel Switchpack
Sport Mode (automatic transmission only)
The switch marked ÔSÕ on the ÔJÕ gate surround
enables the driver to select either normal or sport
mode. To select sport, press the switch. The
switch lights up to indicate that sport mode has
been selected.
Traction Control
Traction control is fitted to all vehicles. Traction
control is always switched on when the engine is
started. If the system is operating, the warning
light in the instrument pack will flash. The
traction control (and direction stability control,
when fitted) can be switched OFF by pressing the
switch on the gear selector surround. The warning
light in the instrument pack will remain on and a
message will be shown to indicate that the system
has been switched off. If the switch is pressed
again, the system will switch on.
A system malfunction is indicated by a message:DIMMER SWITCH
FRONT SEAT HEATER SWITCHES
CENTER TUNNEL SWITCHPACK
Sport Mode
SwitchTraction Control or
Dynamic Stability
Control Switch
JOL.012
JOL.013
Page 107 of 133

JAGUARS-TYPEElectrical/Electronic
102
Door Switchpacks, Front & Rear
Door Mirrors
Both door mirrors are adjusted from the driverÕs
switchpack. The four-way adjustment button
moves the mirrors to the required position. The
selector switch selects the mirror to be moved, left
for the left side mirror and right for the right side
mirror. When the selector is in the center
position, adjustment to either mirror is inhibited.
Where power fold-back mirrors are fitted, the
switch is located in the driverÕs door map pocket.
Note:Do not attempt to reposition power fold-
back mirrors manually. Always use the switch.
Should a door mirror be knocked out of position
the mirror head will be loose. To re-engage the
mechanism, power the mirror to the fold-back
position then outward to the driving position.
Door Windows
These switches normally operate when the
ignition switch is in position ÔIÕ or ÔIIÕ. If the key is
removed from the ignition switch and all doors
remain closed, the windows can be operated for
up to 10 minutes or until a front door is opened.
The rear windows isolation button when pressed
down immobilizes the rear door window switches.
A second press allows the button to raise and the
rear seat passengers can then operate the rear
door windows.
The switch for the driverÕs window only has a Ôone
touchÕ operation facility enabling the driver to
fully open the window in one quick movement.
Press the rear of the switch fully downwards and
release to open the window. Window travel can be
stopped by pressing the switch again. TRACTION CONTROL FAULT. Warning light
(adjacent to message) amber and the instrument
pack warning light will be lit.
Dynamic Stability Control (DSC) (when fitted)
DSC is operational whenever the engine is
running, unless it has been switched off. The DSC
system controls the anti-lock braking system,
traction control and yaw control of the vehicle.
Yaw control determines the vehicleÕs direction
relative to the driverÕs inputs (sideslip and
understeer/oversteer). It applies braking pressure
to individual wheels if excessive variation is
detected. This ensues that the vehicle follows the
driverÕs intended direction of travel. The DSC can
be switched OFF by pressing the switch on the
gear selector surround. The warning light in the
instrument pack will remain on and a message
will be shown indicate that the system has been
switched off. If the switch is pressed again, the
system will switch on.
A system malfunction is indicated by a message:
DSC SYSTEM FAULT. Warning light (adjacent to
message) amber and the instrument pack warning
light will be lit.
JOL.019
1. Electric mirror adjustment
2. Left/right mirror selector
3. Electric windows4. Rear windows isolation
5. Memory store button
6. Memory settings DRIVERÕS DOOR SWITCHPACK
1
2
6543
JOL.056
FOLD-BACK MIRROR SWITCH
Page 108 of 133

JAGUARS-TYPEElectrical/Electronic
103 Note: If the switches are held for longer than six
seconds, e.g. when attempting to overcome frozen
or jammed windows, the window drive will be
switched off for a few seconds to protect the
window drive motors.
Memory Setting (where fitted)
The position of the driverÕs seat, steering column
and exterior rear view mirrors can be memorized
and recalled. Two different driving position
profiles can be entered In the memory. The
switches for seat, mirror, steering column
adjustment and memory setting can be operated
with or without the key being in the ignition.
To store a driving position in the memory:
1. Adjust the seat, steering column an exterior
rear view mirrors to the desired position.
2. Push the memory button and the light in the
switch will illuminate
3. Within five seconds, push button Ô1Õ orÕ2Õ to
memorize the configuration. The memory
button light will go out and a chime will
indicate that the setting procedure is
complete. Additionally, if the ignition is on,
the message center will display a message
that the settings have been saved.
To recall a memorized position, the gear selector
lever must be in ÔPÕ or ÔNÕ on automatic
transmission vehicles and the park brake must be
applied on manual transmission vehicles. Press
and release the appropriate memory button (Ô1Õ or
Ô2Õ). The seat, steering column and door mirrors
will move automatically to the memorized
position.
The key ring transmitter can also be set to
memorize the position of the driverÕs seat,
steering column and exterior rear view mirrors.
Memory Recall Using a Key-ring Transmitter
The key-ring transmitter will recall a memory
position when the unlock button is pressed when
set as follows:
Adjust the seat, steering column and exterior rear
view mirrors to the desired position.
Press ÔmemoryÕ button.
Within five seconds, press any button on the key-
ring transmitter.
Press button Ô1Õ or Ô2Õ.
Repeat for the other transmitter, pressing the
remaining memory button.
To cancel key-ring transmitter memory recall:
Front Seat Adjustment Switchpacks
A key does not have to be in the ignition switch
for seat adjustment
A. Switch forward/rearward: moves seat cushion
forward or rearward
Switch up/down: raises/lowers front/rear of
cushion
B. Switch forward/rearward: raises/reclines angle
of seat squab
C. Switch front/rear: increases/reduces lumbar
support.
JOL.017
FRONT SEAT ADJUSTMENT SWITCHPACK
A
C B Press the ÔmemoryÕ button.
While the memory set light is ON, press any
button on the key-ring transmitter, (except the
panic button, if fitted), then press the ÔmemoryÕ
button again.
Page 109 of 133

JAGUARS-TYPEElectrical/Electronic
104
Overhead Console
Interior Lighting Switches
Two combined map/reading/courtesy lamps are
fitted in the front overhead console. A
map/reading/courtesy lamp is fitted above each
rear passenger grab handle. Press the master
interior light switch in the overhead console, i.e
the center switch, to turn all interior lamps from
automatic to on. When the switch is in the ON
position, if any doors are open, none of the
individual interior lamps can be turned OFF. In
the automatic position, when the interior lamps
have faded off, each lamp can be switched on or
off by pressing the associated individual switch.
Also in this position, if a door is open when the
vehicle is driven, the interior lighting will fade off
and then fade on again when the vehicle slows
down. The message center will alert the driver
that the door is open. When the ignition switch is
at position Ô0Õ and the lamps are on, they will
remain on for 40 minutes.
Sliding Roof Switch
The ignition switch must be in position ÔIÕ or ÔIIÕ.
The switch allows slide or tilt adjustment of the
sliding roof.
JOL.172
OVERHEAD CONSOLEReverse Park Control Switch (when fitted)
This parking aid, when reverse gear is selected and
ignition is on, automatically provides an audible
proximity warning when reversing the vehicle. If
an object is detected by one of the four sensors in
the rear bumper, a beep tone will be heard, which
increases in rate as the vehicle approaches the
object. At approximately 20 cm the beep will
become continuous for three seconds and is then
automatically turned off. If the object is not high
enough or close enough to cause damage to the
vehicle, the beep will not be heard.
Reverse park control can be switched off at any
time by pressing the switch in the overhead
console. A red indicator light in the switch
illuminates when the system is switched off. The
system will be reset every time the vehicle is
started.
Note:The audio system volume will be reduced
whilst reverse park control is sounding.
Rear Sun Blind Switch (where fitted)
The rear sun blind is fitted to the rear parcel shelf.
Push the switch to raise the sun blind. A second
push will lower the sun blind.
1. Interior lighting switches
2. Reverse park control switch
3. Rear sun blind switch
4. Sliding roof switch
12
1 1
4 3
Page 110 of 133

JAGUARS-TYPEElectrical/Electronic
105
Interior Rear View Mirror
There are five derivatives of interior rear view
mirror.
1. Base, non-electric
2. Electrochromic
3. Electrochromic with rain sensing
4. Electrochromic with compass
5. Electrochromic with rain sensing and
compass
Electrochromic Interior Rear View Mirror -
(where fitted)
Push the switch in and the rear view mirror
darkens automatically to prevent glare from the
following vehicleÕs headlamps. The mirror clears
when the light levels return to normal. The mirror
also clears when reverse gear is selected. Where
fitted, an LED is lit when mirror dimming is active.
Push the switch again and the glare-reducing
effect of the mirror is switched off so that a clear
reflection is given.
Electrochromic Interior Rear View Mirror
with Rain Sensing - (where fitted)
The moisture sensor for the wipers is fitted to the
windshield and covered by the mirror pod.
Note:The auto headlamp sensor is not fitted to
the mirror as on the XJ8 but is fitted to the fascia
for the S-TYPE.
Ensure that the windshield in front of the mirror
pod and the autoheadlamp sensor is kept clean
since any dirt may affect the operation of these
sensors.
Electrochromic Interior Rear View Mirror
with Compass (USA market only)
The compass direction is given in a digital display
(eight compass points) in the corner of the mirror.
The brightness of the compass display dims as the
ambient light level falls. The compass must be
calibrated by the Dealer at PDI to compensate for
the difference between magnetic north and true
north in the part of the world where the car is
driven. For best results, the calibration procedure
should take place in an open area free from
overhead power lines or large metal structures.
On the underside of the mirror pod there are two
small holes. Insert a small screwdriver or other
pointed tool into the RH hole. Press the button in
JOL.059
JOL.150
ELECTROCHROMIC MIRROR
ELECTROCHROMIC MIRROR WITH
COMPASS
D.418.435
COMPASS CALIBRATING AND ZONE SETTING
Calibrating Button
Zone Button
Calibrating
ButtonZone
Button
Rain Sensing
Mirror
Page 111 of 133

JAGUARS-TYPEElectrical/Electronic
106the hole until the word ÔZONEÕ appears in the
display. Continue to press to select a number
corresponding to the zone shown in the diagram
for the area in the world where the vehicle is
driven.
Press the button in the LH hole until the ÔCALÕ
indicator appears in the display. Slowly drive the
vehicle in a circle until the ÔCALÕ indicator
disappears. This should happen after two to three
revolutions. The compass is now adjusted to
compensate for the vehicleÕs magnetic field.
Note:Using the vehicle in the vicinity of CB
radios or an airport may cause the display to
extinguish for a few seconds.
D.418.436
JOL.061
STEERING COLUMN ADJUSTMENT
SWITCH NAS COMPASS ZONESSteering Column Adjustment Switch
The steering column can be adjusted for tilt and
reach by operating the four-way control switch on
the steering column. Moving the switch forwards
and backwards controls steering column reach.
Moving the switch up and down controls tilt. The
selected position is recorded by the memory
feature (where fitted).
Entry/Exit Mode (where fitted)
Entry/exit mode is selected by setting the steering
column adjustment switch to the ÔAutoÕ position.
When the key is removed from the ignition switch,
the steering column will move to the tilt away
position, which is its uppermost tilt and innermost
reach position. The seat will move rearwards. This
gives the driver maximum room entering and
exiting the vehicle. The steering column position,
before Ôtilt awayÕ, is memorized. When the
ignition key is next inserted in the ignition switch,
the steering column and seat will move back to
their programmed position.
Page 112 of 133

The valet switch is located in the glove box and
the owner should lock the glove box with the
black-headed key. The green-headed k")
JAGUARS-TYPEElectrical/Electronic
107
Valet Switch (NAS markets only)
The valet switch is located in the glove box and
the owner should lock the glove box with the
black-headed key. The green-headed key should
the be handed to the parking attendant who can
then lock the car after parking, but will be unable
to open the glove box or the luggage
compartment.
JOL.049
VALET SWITCH
JOL.172
GARAGE DOOR OPENER SWITCHESGarage Door Opener (GDO)
(NAS markets only)
The garage door opening electronic module is
fitted in the driverÕs sunvisor. This module can be
programmed to transmit the radio frequencies of
up to three of the ownerÕs current hand-held
transmitters, for the operation of garage doors,
gates, lighting or security systems, and other radio
frequency operated services.
WARNING:
1. This GDO must not be used with
installations that do not have a sensor
that will automatically ÔstopÕ and
ÔreverseÕ a closing garage door if an
object is detected in its path.
2. When programming a channel, the
system that you are programming will
be activated if it is within signal range,
therefore, make sure that people or
objects are clear of the garage doors or
gates being opened or closed.
The procedure for programming the GDO is given
in the OwnerÕs Handbook.
To operate: Simply press the appropriate button
on the sunvisor. The red light on the sunvisor
comes on when the signal is being transmitted.
JOL.172
 1
1 2
2 3
3 4
4 5
5 6
6 7
7 8
8 9
9 10
10 11
11 12
12 13
13 14
14 15
15 16
16 17
17 18
18 19
19 20
20 21
21 22
22 23
23 24
24 25
25 26
26 27
27 28
28 29
29 30
30 31
31 32
32 33
33 34
34 35
35 36
36 37
37 38
38 39
39 40
40 41
41 42
42 43
43 44
44 45
45 46
46 47
47 48
48 49
49 50
50 51
51 52
52 53
53 54
54 55
55 56
56 57
57 58
58 59
59 60
60 61
61 62
62 63
63 64
64 65
65 66
66 67
67 68
68 69
69 70
70 71
71 72
72 73
73 74
74 75
75 76
76 77
77 78
78 79
79 80
80 81
81 82
82 83
83 84
84 85
85 86
86 87
87 88
88 89
89 90
90 91
91 92
92 93
93 94
94 95
95 96
96 97
97 98
98 99
99 100
100 101
101 102
102 103
103 104
104 105
105 106
106 107
107 108
108 109
109 110
110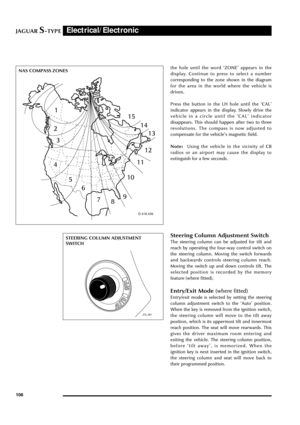 111
111 112
112 113
113 114
114 115
115 116
116 117
117 118
118 119
119 120
120 121
121 122
122 123
123 124
124 125
125 126
126 127
127 128
128 129
129 130
130 131
131 132
132