2005 BMW 645CI COUPE&CONVERTIBLE navigation
[x] Cancel search: navigationPage 64 of 217
Controls
63Reference
At a glance
Driving tips
Communications
Navigation
Entertainment
Mobility
cially on longer trips, the system can reduce
fatigue and tension, while increasing your
enjoyment of driving. Please use it safely and
responsibly.
In addition to holding a steady cruising speed, if
you encounter slower vehicles ahead, active
cruise control will, within the scope of given
possibilities, adjust your vehicle's speed auto-
matically so that one can flow with the traffic
without having to make constant adjustments.
If, for example, while cruising at the selected
speed, you begin to approach a slower vehicle
ahead of you in the same lane, the system will
reduce your vehicle's speed to the same as that
of the vehicle ahead to maintain your selected
distance setting between your vehicle and the
vehicle ahead. There are four settings for dis-
tance, which are additionally speed-dependent.
Based on your selected distance setting, the
system automatically decreases the throttle
setting and lightly applies the brakes if neces-
sary. The vehicle brake lamps will automatically
illuminate to signal a following driver to take
action. In addition, it may be necessary for the
vehicle or the driver to downshift, depending on
the kind of transmission your vehicle is
equipped with, to maintain the distance setting
selected. If the vehicle ahead speeds up or
when the lane ahead becomes clear, your vehi-
cle will accelerate to the speed you have
selected by increasing the throttle setting and
shifting gears automatically or by the driver as
needed.
Active cruise control is not and must not
be used as a collision avoidance/warning
system.<
Since this active cruise control system is
a new technology and operates differ-
ently from conventional cruise control systems
which you may be accustomed to, you are
strongly urged to read all of the pages relating
to this system before use. Pay special attention
to the information contained in the Things to
know about active cruise control section in this
manual beginning on page66.
within a normal engine speed range and also
change gears. Continuous operation at very
high or very low engine speeds is not possible.
In this case the driver is asked to shift or the
system deactivates itself.
Vehicles with SMG
Continuous operation at very high engine
speeds is not possible in the Sequential mode.
In this case the driver is asked to shift or the
system deactivates itself.
In the Drive mode the SMG acts similarly to the
automatic transmission in the D position.
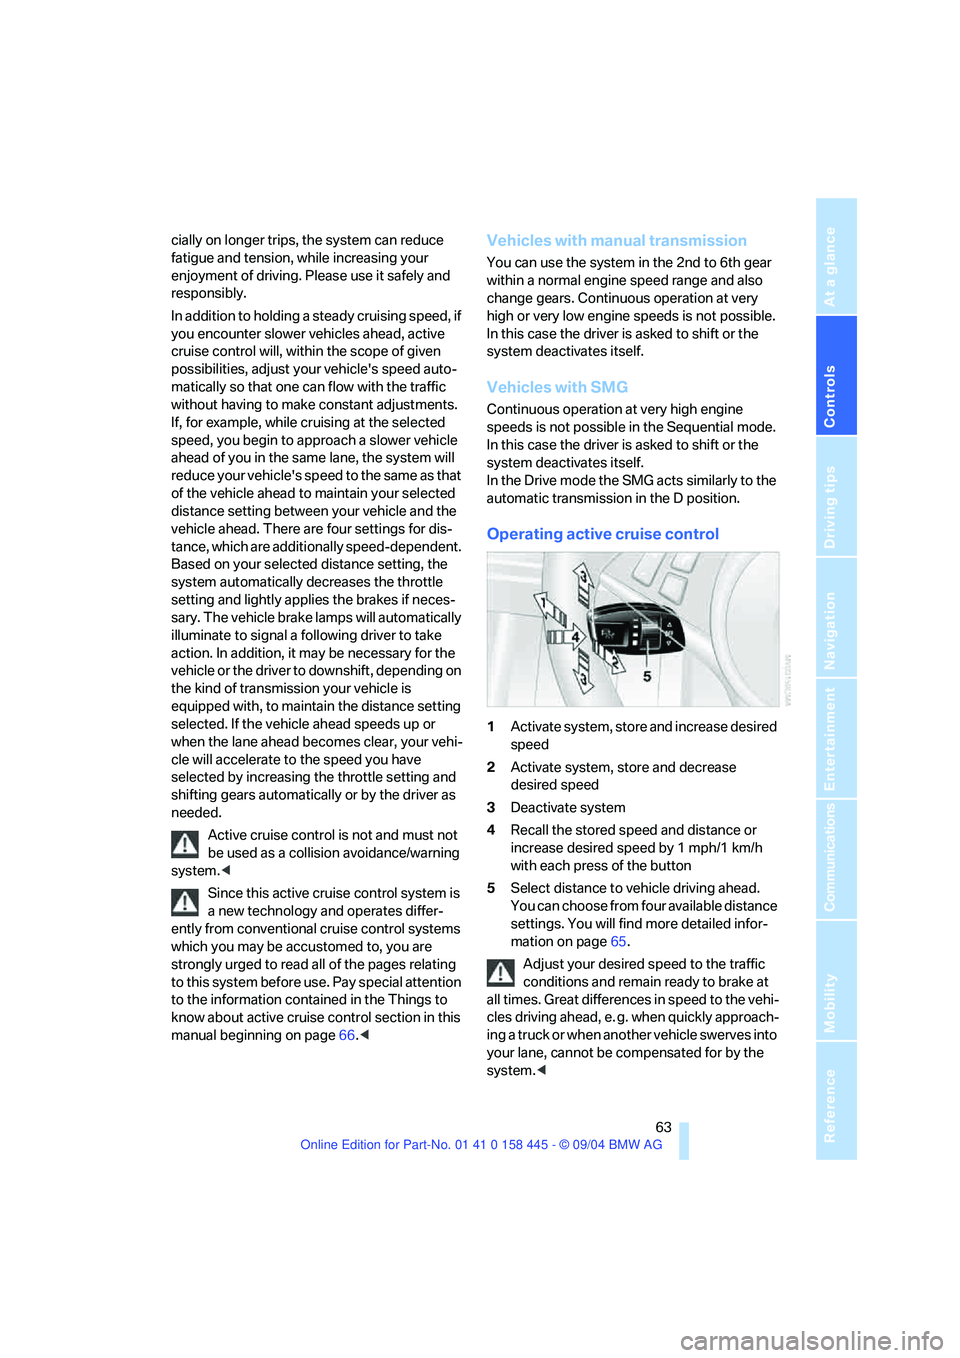
Operating active cruise control
1Activate system, store and increase desired
speed
2Activate system, store and decrease
desired speed
3Deactivate system
4Recall the stored speed and distance or
increase desired speed by 1 mph/1 km/h
with each press of the button
5Select distance to vehicle driving ahead.
You can choose from four available distance
settings. You will find more detailed infor-
mation on page65.
Adjust your desired speed to the traffic
conditions and remain ready to brake at
all times. Great differences in speed to the vehi-
cles driving ahead, e. g. when quickly approach-
ing a truck or when another vehicle swerves into
your lane, cannot be compensated for by the
system.<
Page 66 of 217
Controls
65Reference
At a glance
Driving tips
Communications
Navigation
Entertainment
Mobility
Deactivate system
Press the lever up or down while the system is
active3. The displays in the instrument cluster
disappear. You can use the system again as
required.
In addition, the system is deactivated automati-
cally:
>When you apply pressure to the brake pedal
>When you select the automatic transmis-
sion's/SMG neutral position N
>When the manual transmission is in neutral
>When you deactivate the DSC Dynamic
Stability Control
>When you actuate the parking brake during
driving
>When the system reduces the speed to
below 20 mph/30 km/h due to a traffic situ-
ation
The system deactivates automatically
when the speed is set to below 20 mph/
30 km/h. An acoustic signal sounds and a mes-
sage appears on the Control Display. The active
intervention of the driver is required.<
When you switch off the ignition, the stored
desired speed is deleted.
Resume to stored desired speed and
distance setting
Press button4 when the system is deactivated.
The displays appear in the instrument cluster.
The system is reactivated and uses the last
stored desired speed and distance setting.
Fine adjustment of desired speed
In the activated state, the desired speed
increases by 1 mph/1 km/h each time button4
is pressed briefly.
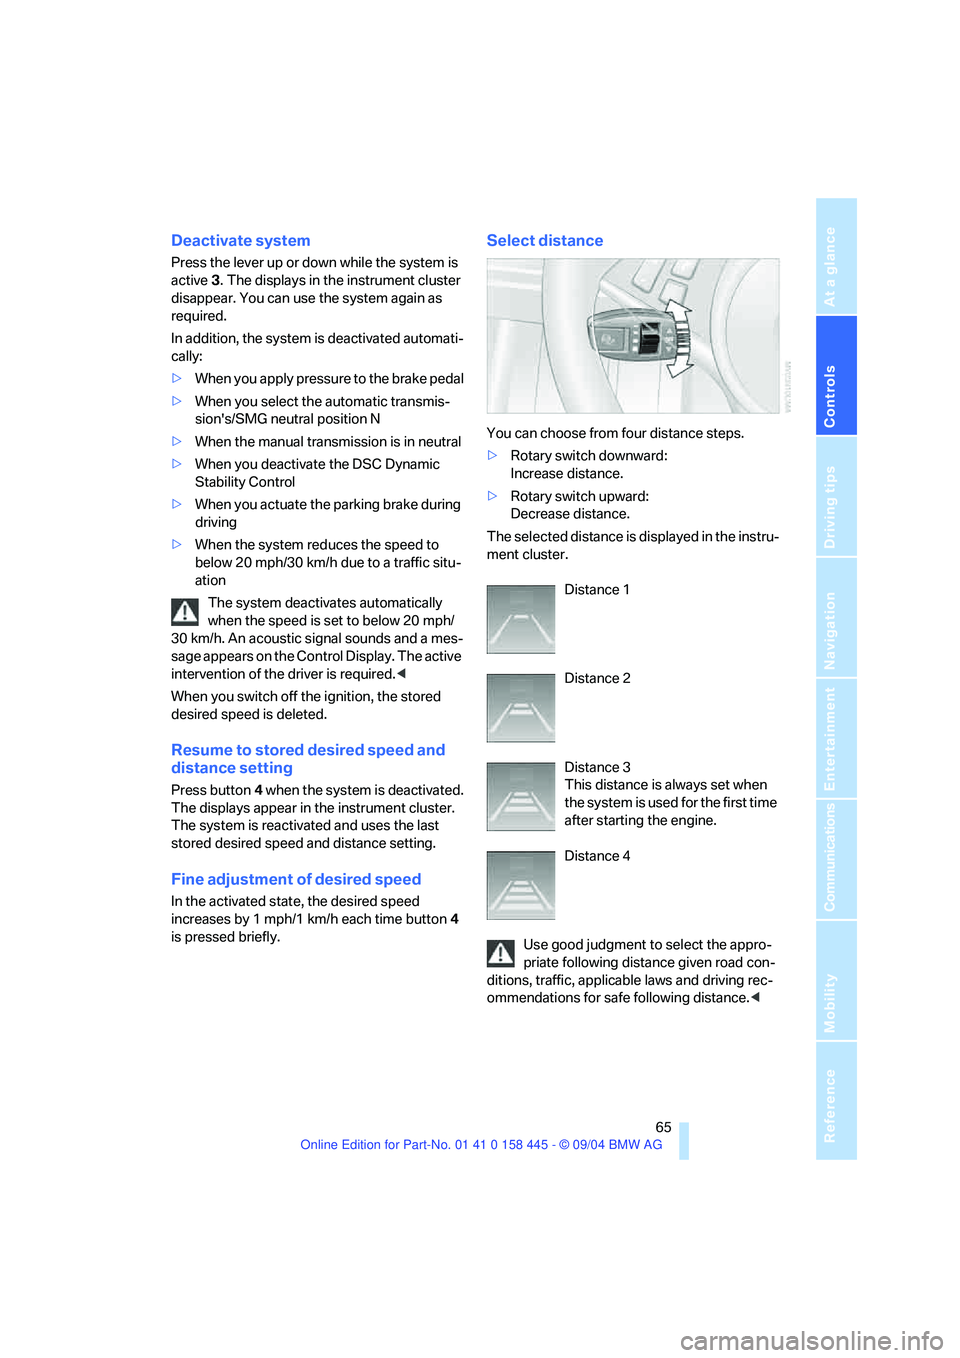
Select distance
You can choose from four distance steps.
>Rotary switch downward:
Increase distance.
>Rotary switch upward:
Decrease distance.
The selected distance is displayed in the instru-
ment cluster.
Distance 1
Distance 2
Distance 3
This distance is always set when
the system is used for the first time
after starting the engine.
Distance 4
Use good judgment to select the appro-
priate following distance given road con-
ditions, traffic, applicable laws and driving rec-
ommendations for safe following distance.<
Page 68 of 217
Controls
67Reference
At a glance
Driving tips
Communications
Navigation
Entertainment
Mobility
Active cruise control may brake when you
reduce the stored desired speed; however, the
driver must constantly monitor traffic and inter-
vene if necessary.
When you switch off the engine or ignition,
active cruise control is fully switched off, too,
and any settings you have selected are can-
celed.
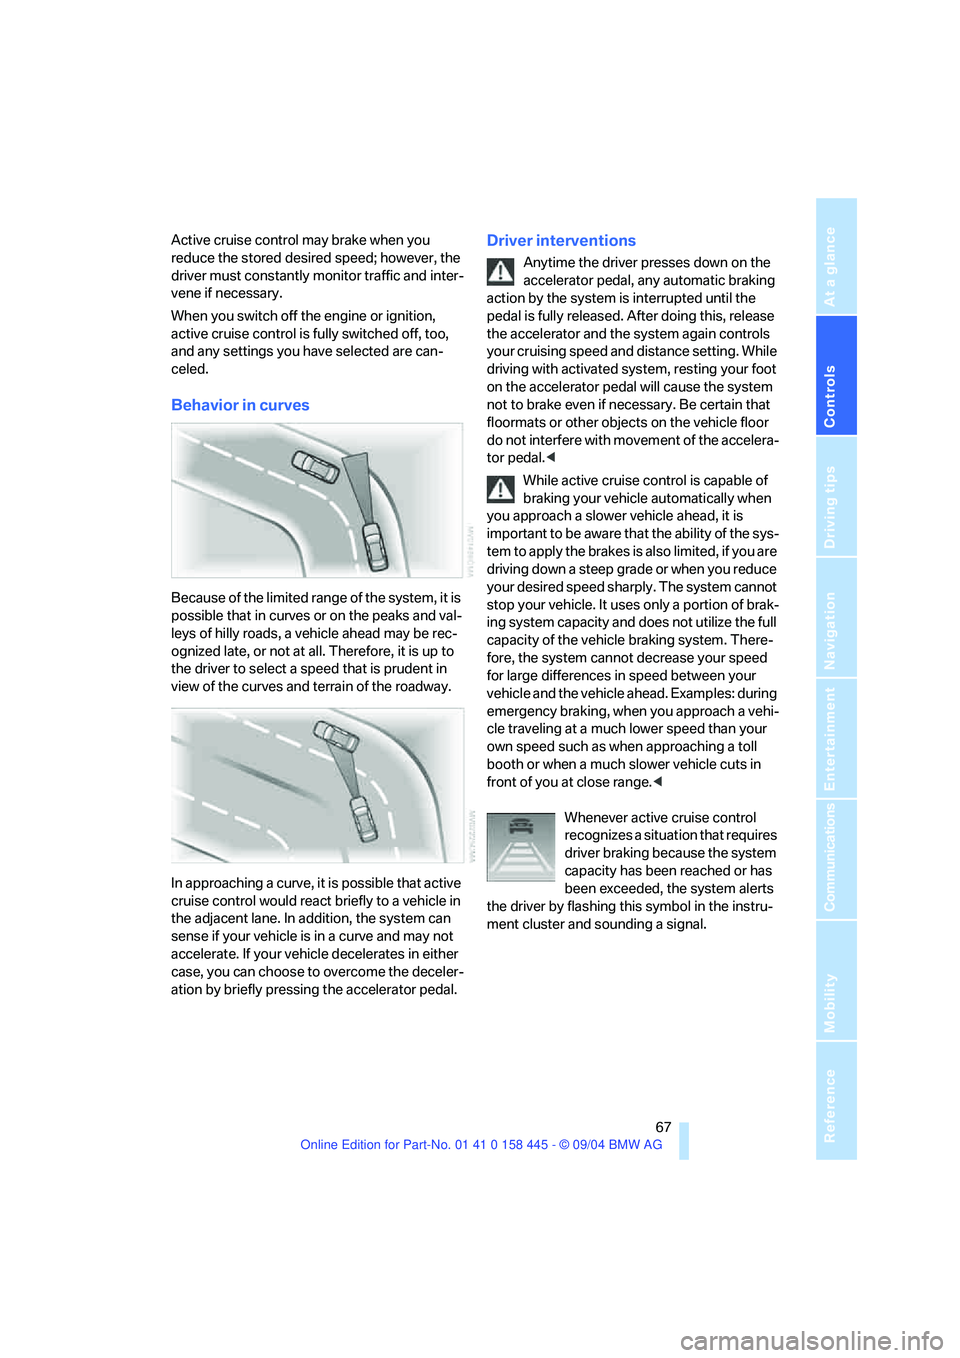
Behavior in curves
Because of the limited range of the system, it is
possible that in curves or on the peaks and val-
leys of hilly roads, a vehicle ahead may be rec-
ognized late, or not at all. Therefore, it is up to
the driver to select a speed that is prudent in
view of the curves and terrain of the roadway.
In approaching a curve, it is possible that active
cruise control would react briefly to a vehicle in
the adjacent lane. In addition, the system can
sense if your vehicle is in a curve and may not
accelerate. If your vehicle decelerates in either
case, you can choose to overcome the deceler-
ation by briefly pressing the accelerator pedal.
Driver interventions
Anytime the driver presses down on the
accelerator pedal, any automatic braking
action by the system is interrupted until the
pedal is fully released. After doing this, release
the accelerator and the system again controls
your cruising speed and distance setting. While
driving with activated system, resting your foot
on the accelerator pedal will cause the system
not to brake even if necessary. Be certain that
floormats or other objects on the vehicle floor
do not interfere with movement of the accelera-
tor pedal.<
While active cruise control is capable of
braking your vehicle automatically when
you approach a slower vehicle ahead, it is
important to be aware that the ability of the sys-
tem to apply the brakes is also limited, if you are
driving down a steep grade or when you reduce
your desired speed sharply. The system cannot
stop your vehicle. It uses only a portion of brak-
ing system capacity and does not utilize the full
capacity of the vehicle braking system. There-
fore, the system cannot decrease your speed
for large differences in speed between your
vehicle and the vehicle ahead. Examples: during
emergency braking, when you approach a vehi-
cle traveling at a much lower speed than your
own speed such as when approaching a toll
booth or when a much slower vehicle cuts in
front of you at close range.<
Whenever active cruise control
recognizes a situation that requires
driver braking because the system
capacity has been reached or has
been exceeded, the system alerts
the driver by flashing this symbol in the instru-
ment cluster and sounding a signal.
Page 70 of 217

Controls
69Reference
At a glance
Driving tips
Communications
Navigation
Entertainment
Mobility
Everything under control
Odometer, outside
temperature display, clock
When the ignition is off you can briefly activate
the time, outside temperature and odometer
displays by pressing the knob3 at the lower left
of the instrument cluster.
1 Outside temperature display, clock,
date
The outside temperature and the time are dis-
played from ignition key position 1 onwards.
To call up the date:
Press the CHECK button on the turn signal
lever, refer to page74.
Setting time and date, refer to page78.
You can set the measurement unit 7 or 6 on
the Control Display, refer to Measurement units
on page77.
Ice warning
A signal sounds when the outside temperature
falls to roughly +37.57/+36; this is accompa-
nied by a message.
Please bear in mind that the ice warning
does nothing to alter the fact that black
ice may be present on roads at temperatures
higher than +37.57/+36, e.g. on bridges and
shaded roads.<
2 Odometer and trip odometer
To reset the trip odometer to zero:
Press button3 in the instrument cluster.
Tachometer
The white-striped advance warning field,
arrow1, changes depending on the engine
temperature. The segments disappear in
sequence as the engine warms to its normal
operating temperature.
Avoid allowing the engine speed to rise as far as
the advance warning field whenever possible.
Engine speeds in the red warning field, arrow2,
must absolutely be avoided.
In this range, the fuel supply is interrupted to
protect the engine.
Page 72 of 217
Controls
71Reference
At a glance
Driving tips
Communications
Navigation
Entertainment
Mobility
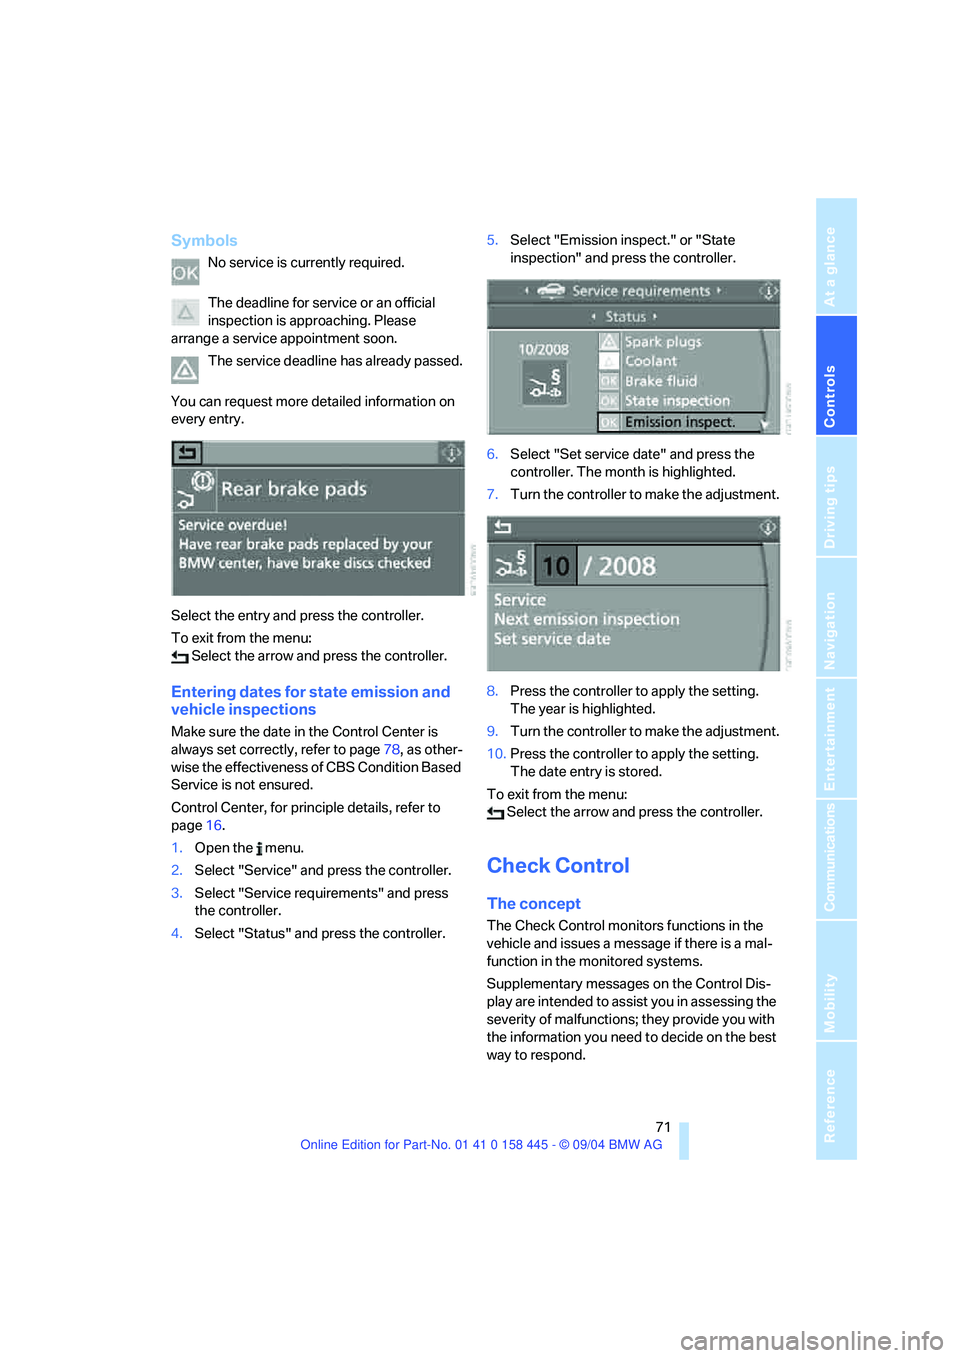
Symbols
No service is currently required.
The deadline for service or an official
inspection is approaching. Please
arrange a service appointment soon.
The service deadline has already passed.
You can request more detailed information on
every entry.
Select the entry and press the controller.
To exit from the menu:
Select the arrow and press the controller.
Entering dates for state emission and
vehicle inspections
Make sure the date in the Control Center is
always set correctly, refer to page78, as other-
wise the effectiveness of CBS Condition Based
Service is not ensured.
Control Center, for principle details, refer to
page16.
1.Open the menu.
2.Select "Service" and press the controller.
3.Select "Service requirements" and press
the controller.
4.Select "Status" and press the controller.5.Select "Emission inspect." or "State
inspection" and press the controller.
6.Select "Set service date" and press the
controller. The month is highlighted.
7.Turn the controller to make the adjustment.
8.Press the controller to apply the setting.
The year is highlighted.
9.Turn the controller to make the adjustment.
10.Press the controller to apply the setting.
The date entry is stored.
To exit from the menu:
Select the arrow and press the controller.
Check Control
The concept
The Check Control monitors functions in the
vehicle and issues a message if there is a mal-
function in the monitored systems.
Supplementary messages on the Control Dis-
play are intended to assist you in assessing the
severity of malfunctions; they provide you with
the information you need to decide on the best
way to respond.
Page 74 of 217
Controls
73Reference
At a glance
Driving tips
Communications
Navigation
Entertainment
Mobility
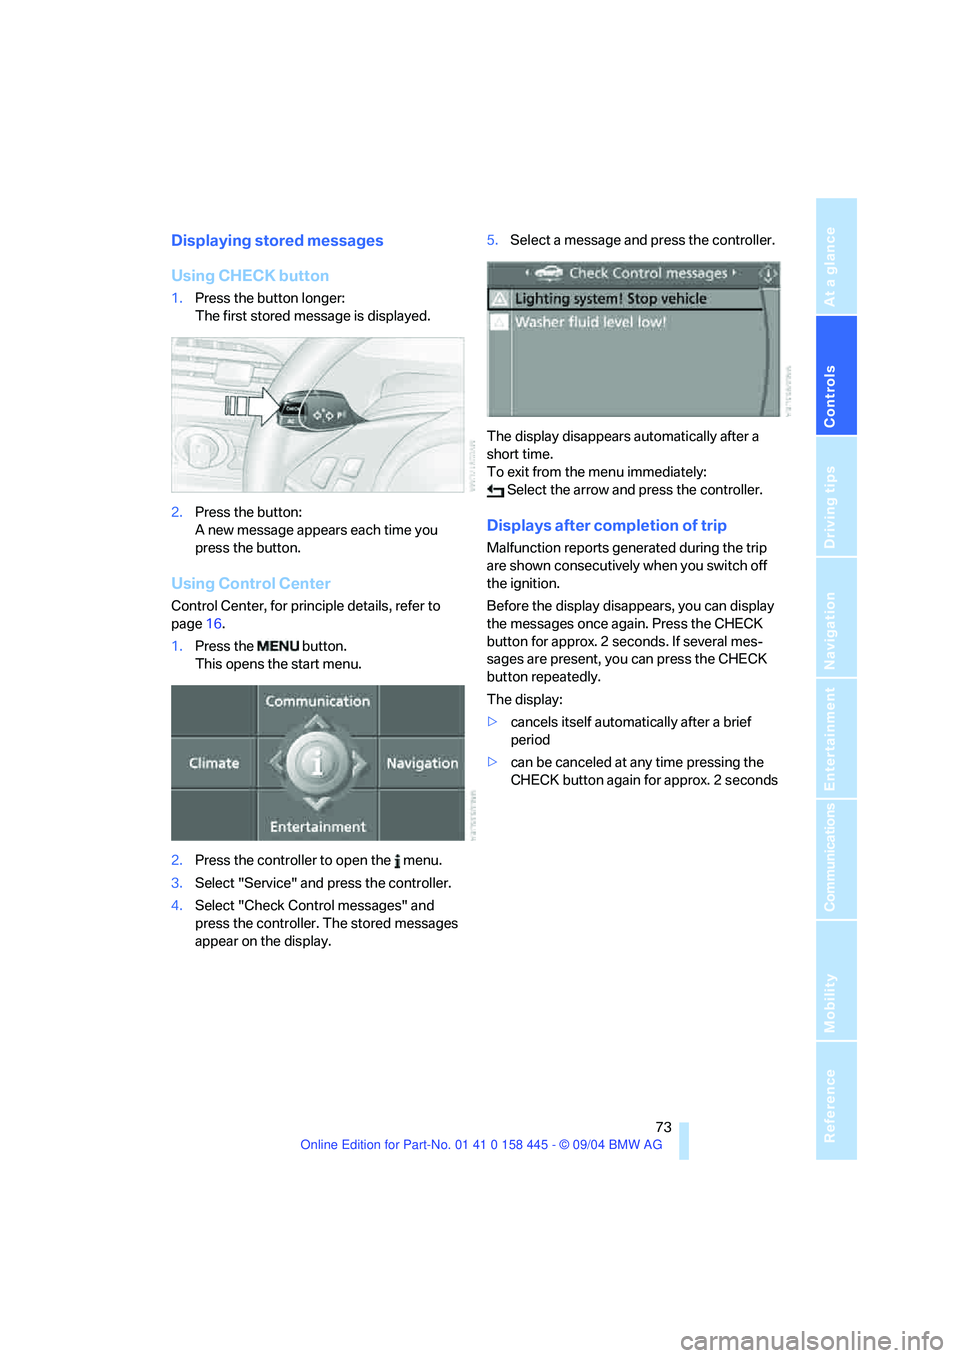
Displaying stored messages
Using CHECK button
1.Press the button longer:
The first stored message is displayed.
2.Press the button:
A new message appears each time you
press the button.
Using Control Center
Control Center, for principle details, refer to
page16.
1.Press the button.
This opens the start menu.
2.Press the controller to open the menu.
3.Select "Service" and press the controller.
4.Select "Check Control messages" and
press the controller. The stored messages
appear on the display.5.Select a message and press the controller.
The display disappears automatically after a
short time.
To exit from the menu immediately:
Select the arrow and press the controller.
Displays after completion of trip
Malfunction reports generated during the trip
are shown consecutively when you switch off
the ignition.
Before the display disappears, you can display
the messages once again. Press the CHECK
button for approx. 2 seconds. If several mes-
sages are present, you can press the CHECK
button repeatedly.
The display:
>cancels itself automatically after a brief
period
>can be canceled at any time pressing the
CHECK button again for approx. 2 seconds
Page 75 of 217
Everything under control
74
Computer
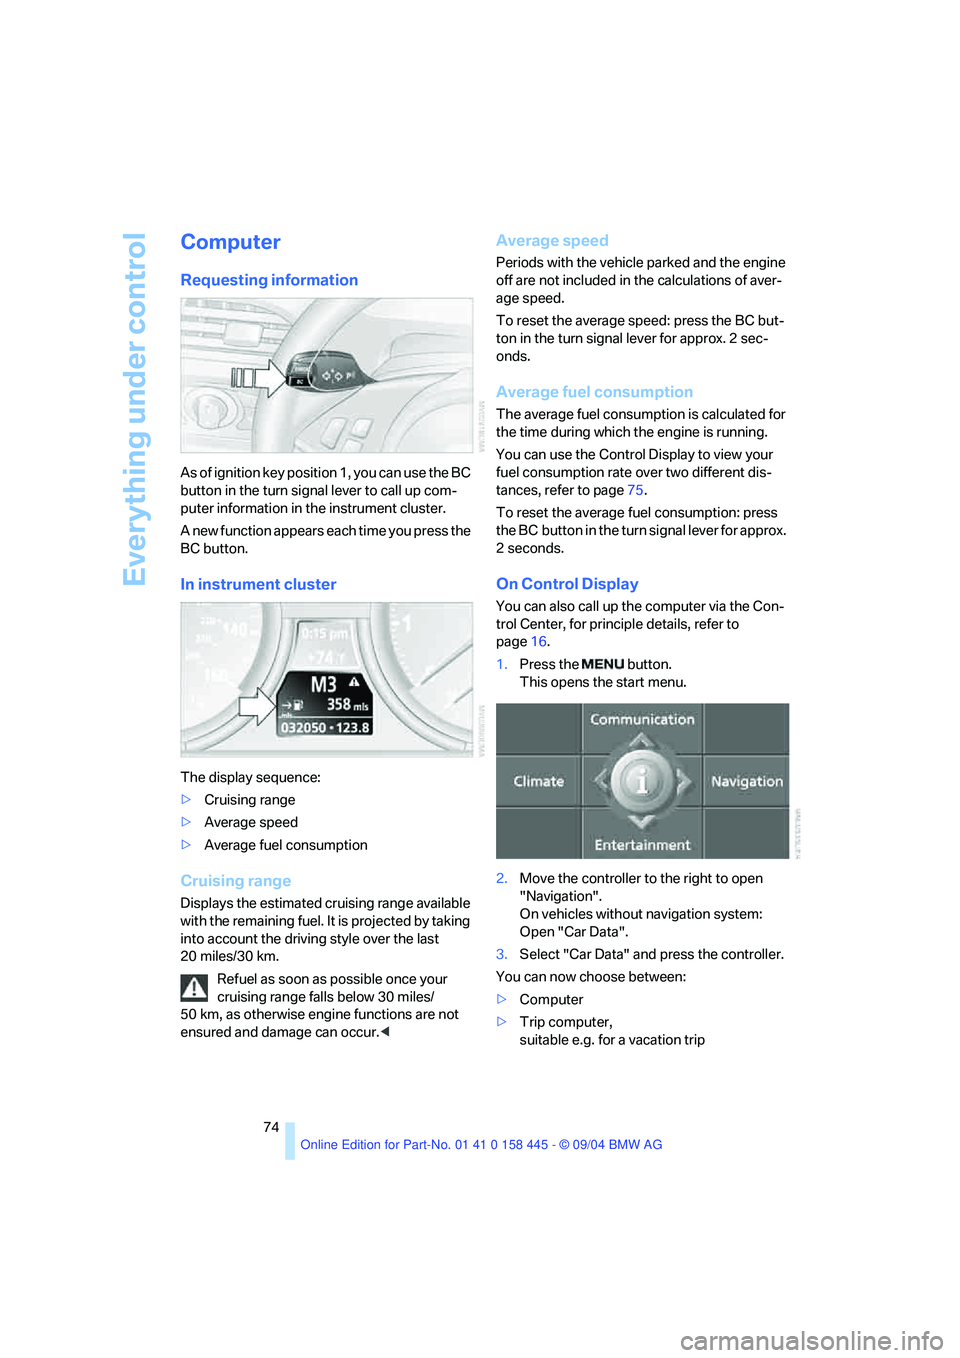
Requesting information
As of ignition key position 1, you can use the BC
button in the turn signal lever to call up com-
puter information in the instrument cluster.
A new function appears each time you press the
BC button.
In instrument cluster
The display sequence:
>Cruising range
>Average speed
>Average fuel consumption
Cruising range
Displays the estimated cruising range available
with the remaining fuel. It is projected by taking
into account the driving style over the last
20 miles/30 km.
Refuel as soon as possible once your
cruising range falls below 30 miles/
50 km, as otherwise engine functions are not
ensured and damage can occur.<
Average speed
Periods with the vehicle parked and the engine
off are not included in the calculations of aver-
age speed.
To reset the average speed: press the BC but-
ton in the turn signal lever for approx. 2 sec-
onds.
Average fuel consumption
The average fuel consumption is calculated for
the time during which the engine is running.
You can use the Control Display to view your
fuel consumption rate over two different dis-
tances, refer to page75.
To reset the average fuel consumption: press
the BC button in the turn signal lever for approx.
2seconds.
On Control Display
You can also call up the computer via the Con-
trol Center, for principle details, refer to
page16.
1.Press the button.
This opens the start menu.
2.Move the controller to the right to open
"Navigation".
On vehicles without navigation system:
Open "Car Data".
3.Select "Car Data" and press the controller.
You can now choose between:
>Computer
>Trip computer,
suitable e.g. for a vacation trip
Page 76 of 217

Controls
75Reference
At a glance
Driving tips
Communications
Navigation
Entertainment
Mobility
Computer
Select "Onboard info" and press the controller.
>Estimated time of arrival at destination:
>Entering a distance manually in the com-
puter, see below.
>Entering a destination in the navigation
system
*, refer to page115.
>Cruising range
>Distance to destination:
>Entering a distance manually in the com-
puter, see below.
>Entering a destination in the navigation
system
*, refer to page115.
>Average speed
>Average fuel consumption
Trip computer
Select "Trip computer" and press the control-
ler.
>Departure time
>Driving time
>Distance traveled
>Average speed
>Average fuel consumptionStart or stop trip computer, or reset all values:
1.Select "Set" and press the controller.
2.Select the desired menu item.
3.Press the controller.
Entering a distance manually
Control Center, for principle details, refer to
page16.
1.Open "Navigation".
On vehicles without navigation system:
Open "Car Data".
2.Select "Car Data" and press the controller.
3.Select "Onboard info" and press the con-
troller.
4.Select "Distance to dest." and press the
controller.
5.Turn the controller to select the distance
to your destination. If necessary, hold it
against a slight resistance to enter a greater
difference.
6.Press the controller to apply the setting.
The distance is automatically predetermined
during the destination guidance of the naviga-
tion system
*.
Display options
You can display the computer or the trip com-
puter in the assistance window.
Control Center, for principle details, refer to
page16.