2005 BMW 645CI COUPE&CONVERTIBLE navigation
[x] Cancel search: navigationPage 90 of 217
Controls
89Reference
At a glance
Driving tips
Communications
Navigation
Entertainment
Mobility
Selecting displays
Control Center, for principle details, refer to
page16.
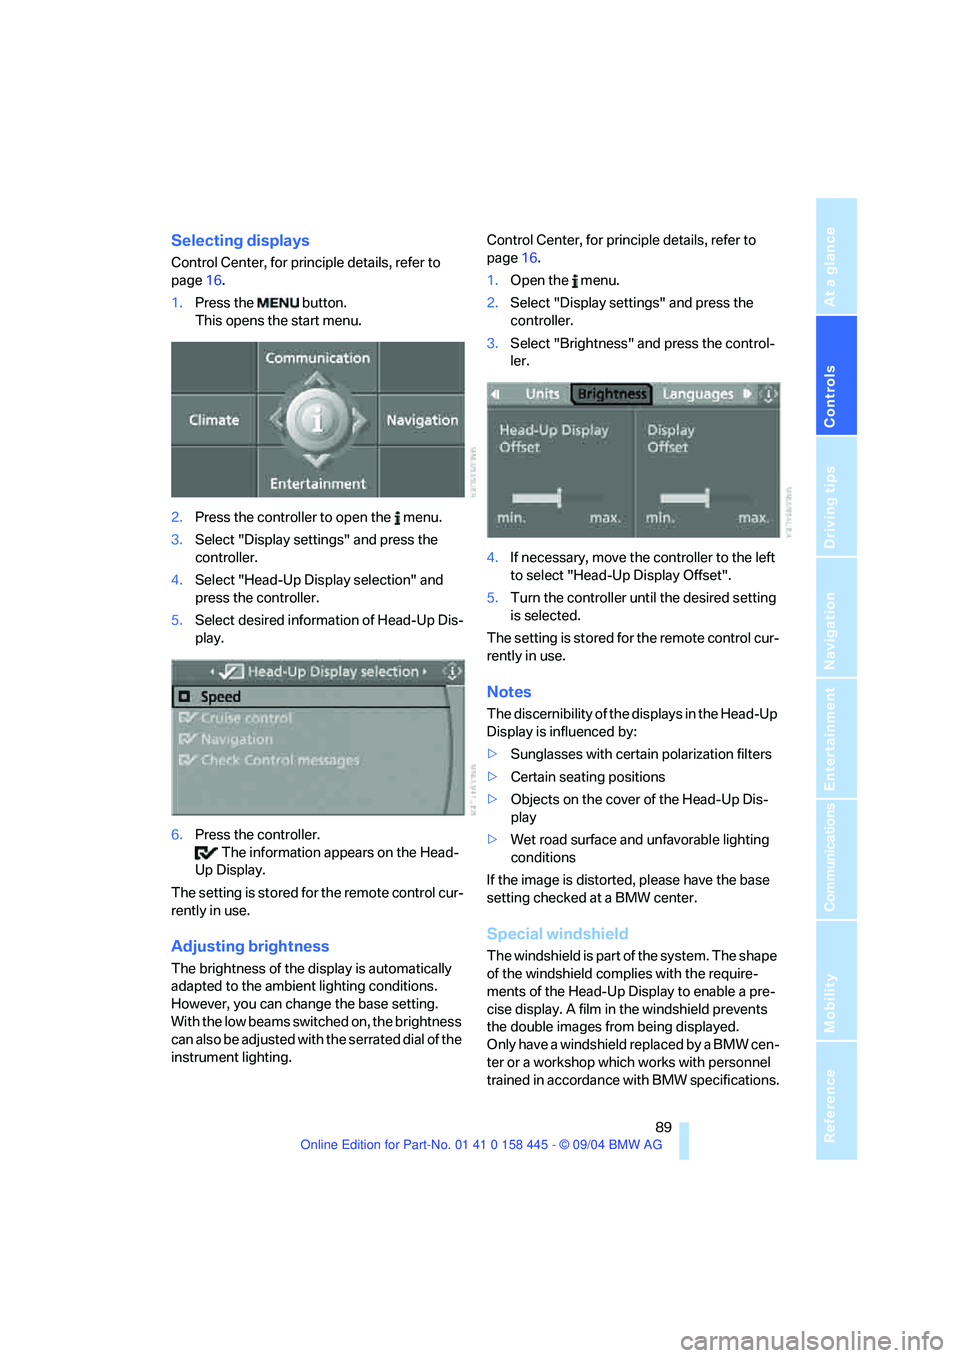
1.Press the button.
This opens the start menu.
2.Press the controller to open the menu.
3.Select "Display settings" and press the
controller.
4.Select "Head-Up Display selection" and
press the controller.
5.Select desired information of Head-Up Dis-
play.
6.Press the controller.
The information appears on the Head-
Up Display.
The setting is stored for the remote control cur-
rently in use.
Adjusting brightness
The brightness of the display is automatically
adapted to the ambient lighting conditions.
However, you can change the base setting.
With the low beams switched on, the brightness
can also be adjusted with the serrated dial of the
instrument lighting.Control Center, for principle details, refer to
page16.
1.Open the menu.
2.Select "Display settings" and press the
controller.
3.Select "Brightness" and press the control-
ler.
4.If necessary, move the controller to the left
to select "Head-Up Display Offset".
5.Turn the controller until the desired setting
is selected.
The setting is stored for the remote control cur-
rently in use.
Notes
The discernibility of the displays in the Head-Up
Display is influenced by:
>Sunglasses with certain polarization filters
>Certain seating positions
>Objects on the cover of the Head-Up Dis-
play
>Wet road surface and unfavorable lighting
conditions
If the image is distorted, please have the base
setting checked at a BMW center.
Special windshield
The windshield is part of the system. The shape
of the windshield complies with the require-
ments of the Head-Up Display to enable a pre-
cise display. A film in the windshield prevents
the double images from being displayed.
Only have a windshield replaced by a BMW cen-
ter or a workshop which works with personnel
trained in accordance with BMW specifications.
Page 92 of 217
Controls
91Reference
At a glance
Driving tips
Communications
Navigation
Entertainment
Mobility
Lamps
Parking lamps/low beams
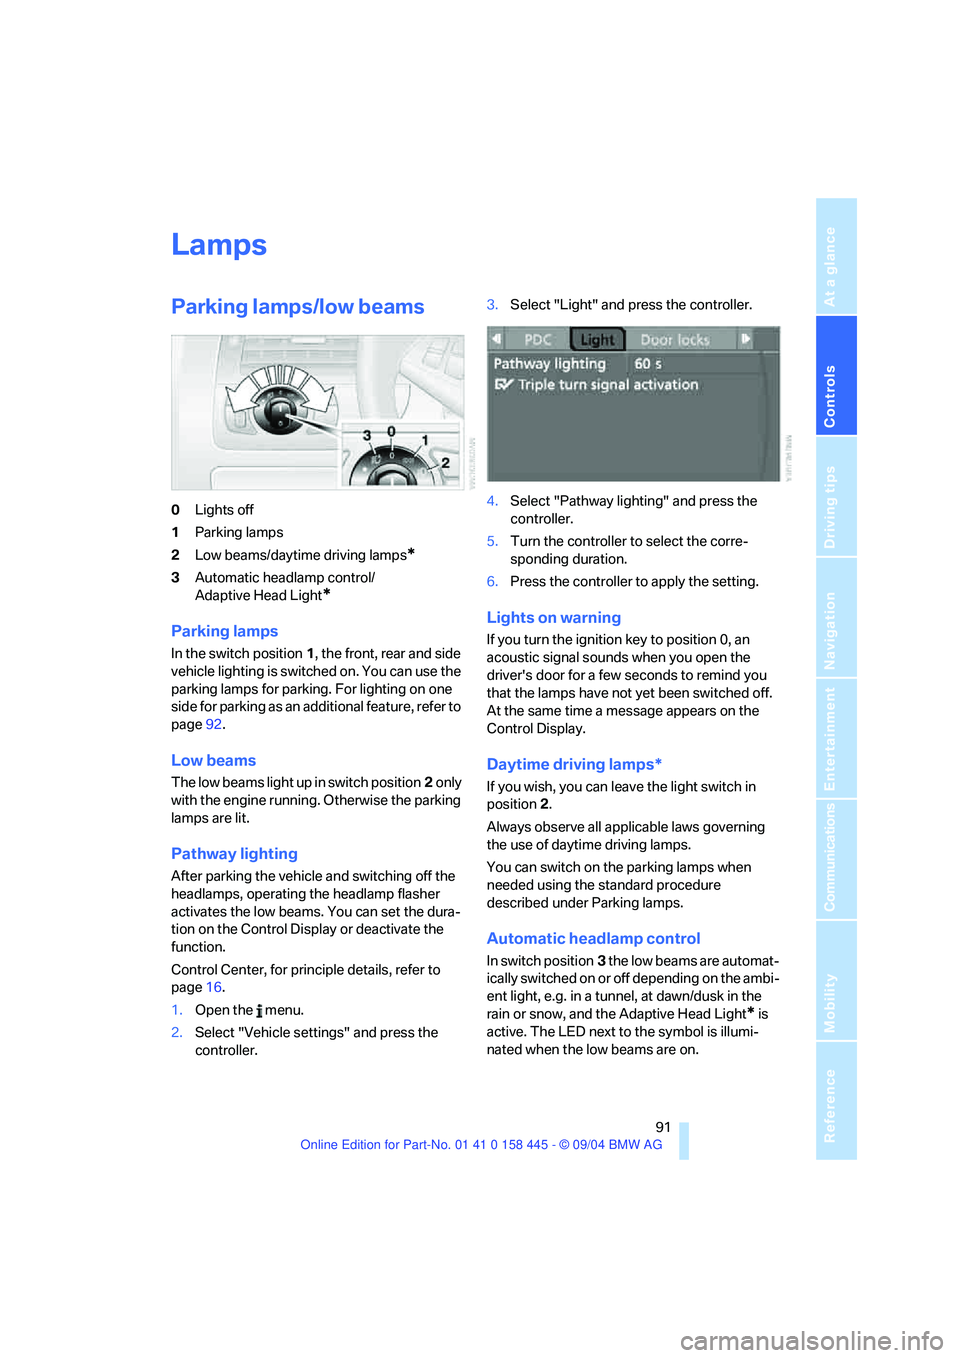
0Lights off
1Parking lamps
2Low beams/daytime driving lamps
*
3Automatic headlamp control/
Adaptive Head Light
*
Parking lamps
In the switch position1, the front, rear and side
vehicle lighting is switched on. You can use the
parking lamps for parking. For lighting on one
side for parking as an additional feature, refer to
page92.
Low beams
The low beams light up in switch position2 only
with the engine running. Otherwise the parking
lamps are lit.
Pathway lighting
After parking the vehicle and switching off the
headlamps, operating the headlamp flasher
activates the low beams. You can set the dura-
tion on the Control Display or deactivate the
function.
Control Center, for principle details, refer to
page16.
1.Open the menu.
2.Select "Vehicle settings" and press the
controller.3.Select "Light" and press the controller.
4.Select "Pathway lighting" and press the
controller.
5.Turn the controller to select the corre-
sponding duration.
6.Press the controller to apply the setting.
Lights on warning
If you turn the ignition key to position 0, an
acoustic signal sounds when you open the
driver's door for a few seconds to remind you
that the lamps have not yet been switched off.
At the same time a message appears on the
Control Display.
Daytime driving lamps*
If you wish, you can leave the light switch in
position2.
Always observe all applicable laws governing
the use of daytime driving lamps.
You can switch on the parking lamps when
needed using the standard procedure
described under Parking lamps.
Automatic headlamp control
In switch position3 the low beams are automat-
ically switched on or off depending on the ambi-
ent light, e.g. in a tunnel, at dawn/dusk in the
rain or snow, and the Adaptive Head Light
* is
active. The LED next to the symbol is illumi-
nated when the low beams are on.
Page 94 of 217
Controls
93Reference
At a glance
Driving tips
Communications
Navigation
Entertainment
Mobility
The fog lamps are switched off whenever the
high beams are switched on.
If the automatic headlamp control is acti-
vated, the low beams will come on auto-
matically when you switch on the fog lamps.<
Instrument lighting
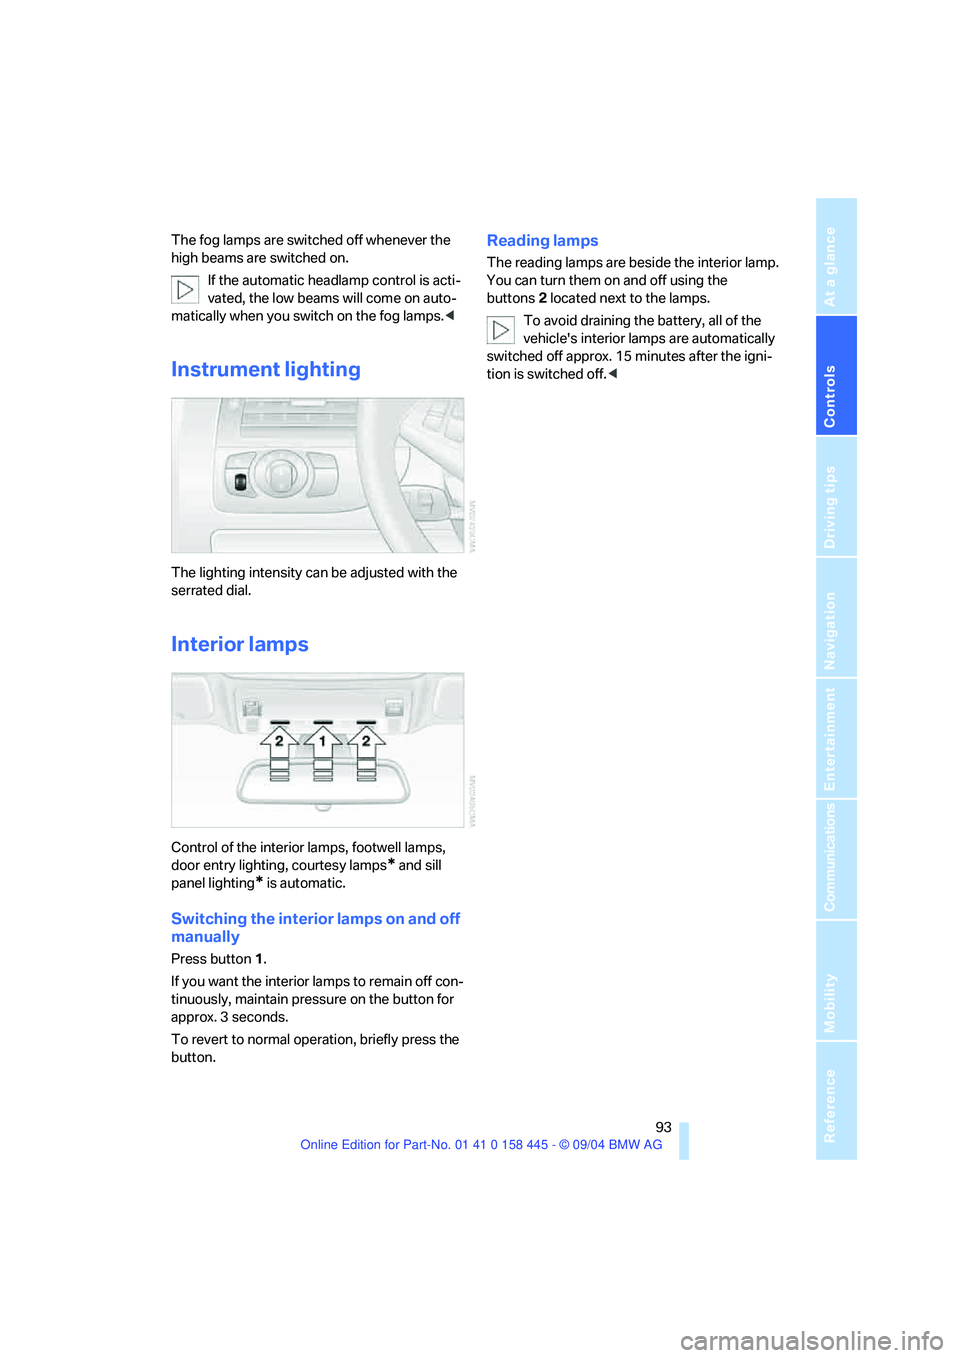
The lighting intensity can be adjusted with the
serrated dial.
Interior lamps
Control of the interior lamps, footwell lamps,
door entry lighting, courtesy lamps
* and sill
panel lighting
* is automatic.
Switching the interior lamps on and off
manually
Press button 1.
If you want the interior lamps to remain off con-
tinuously, maintain pressure on the button for
approx. 3 seconds.
To revert to normal operation, briefly press the
button.
Reading lamps
The reading lamps are beside the interior lamp.
You can turn them on and off using the
buttons2 located next to the lamps.
To avoid draining the battery, all of the
vehicle's interior lamps are automatically
switched off approx. 15 minutes after the igni-
tion is switched off.<
Page 96 of 217
Controls
95Reference
At a glance
Driving tips
Communications
Navigation
Entertainment
Mobility
The current setting for air distribution is dis-
played on the Control Display.
A congenial climate
For almost all conditions, the AUTO program
offers the optimal air distribution and air vol-
ume. Select an interior temperature you find
pleasant.
The following section contains more detailed
information on the available setting options.
AUTO program
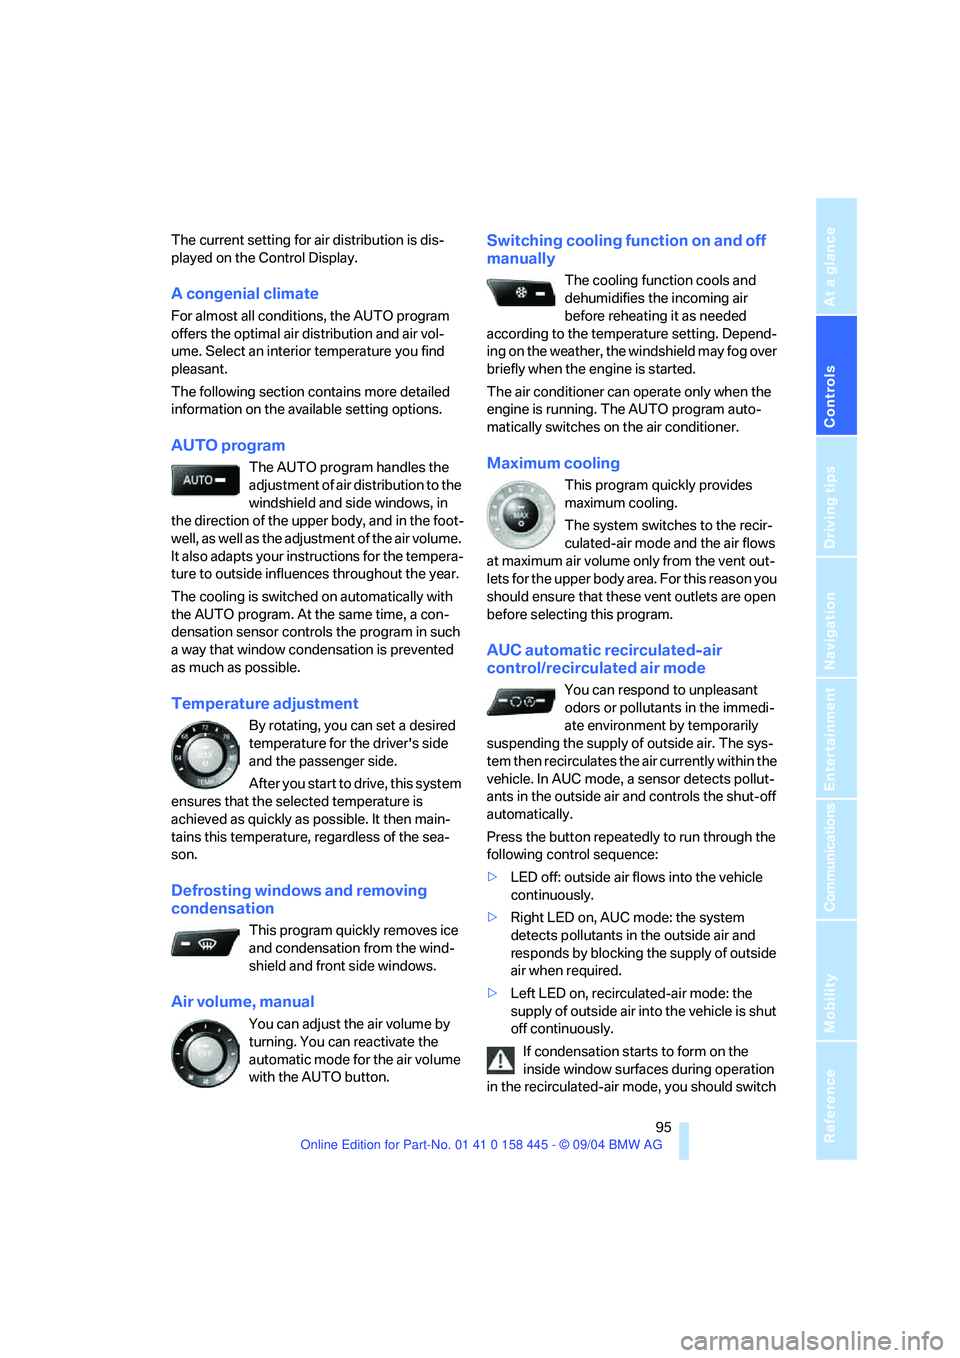
The AUTO program handles the
adjustment of air distribution to the
windshield and side windows, in
the direction of the upper body, and in the foot-
well, as well as the adjustment of the air volume.
It also adapts your instructions for the tempera-
ture to outside influences throughout the year.
The cooling is switched on automatically with
the AUTO program. At the same time, a con-
densation sensor controls the program in such
a way that window condensation is prevented
as much as possible.
Temperature adjustment
By rotating, you can set a desired
temperature for the driver's side
and the passenger side.
After you start to drive, this system
ensures that the selected temperature is
achieved as quickly as possible. It then main-
tains this temperature, regardless of the sea-
son.
Defrosting windows and removing
condensation
This program quickly removes ice
and condensation from the wind-
shield and front side windows.
Air volume, manual
You can adjust the air volume by
turning. You can reactivate the
automatic mode for the air volume
with the AUTO button.
Switching cooling function on and off
manually
The cooling function cools and
dehumidifies the incoming air
before reheating it as needed
according to the temperature setting. Depend-
ing on the weather, the windshield may fog over
briefly when the engine is started.
The air conditioner can operate only when the
engine is running. The AUTO program auto-
matically switches on the air conditioner.
Maximum cooling
This program quickly provides
maximum cooling.
The system switches to the recir-
culated-air mode and the air flows
at maximum air volume only from the vent out-
lets for the upper body area. For this reason you
should ensure that these vent outlets are open
before selecting this program.
AUC automatic recirculated-air
control/recirculated air mode
You can respond to unpleasant
odors or pollutants in the immedi-
ate environment by temporarily
suspending the supply of outside air. The sys-
tem then recirculates the air currently within the
vehicle. In AUC mode, a sensor detects pollut-
ants in the outside air and controls the shut-off
automatically.
Press the button repeatedly to run through the
following control sequence:
>LED off: outside air flows into the vehicle
continuously.
>Right LED on, AUC mode: the system
detects pollutants in the outside air and
responds by blocking the supply of outside
air when required.
>Left LED on, recirculated-air mode: the
supply of outside air into the vehicle is shut
off continuously.
If condensation starts to form on the
inside window surfaces during operation
in the recirculated-air mode, you should switch
Page 97 of 217
A congenial climate
96 it off while also increasing the air volume as
required.
The recirculated-air mode should not be used
over a longer period of time, as the air quality
inside the vehicle deteriorates continuously.<
Residual heat mode
Press the button when the motor is
switched off and warm.
The heat stored in the engine is
used to heat the passenger com-
partment, e.g. when stopped at a school to pick
up a child.
You can adjust the automatic climate control
settings as of ignition key position 1.
Provided that the engine has warmed to its nor-
mal operating temperature and the battery is
charged, you can use this function for up to
15 minutes after switching off the ignition. The
LED in the button lights up to confirm compli-
ance with both of these conditions.
Switching off automatic climate control
The air volume, the heater and the
cooling function are all switched
off.
You can restart the automatic cli-
mate control by pressing any of its buttons
except the REST button.
Settings using Control Center
Ignition key:
>In vehicles with separate drives for audio
CDs and navigation DVDs, ignition key in
position 2.
>In vehicles with one drive for audio CDs,
ignition key in position 1.
Control Center, for principle details, refer to
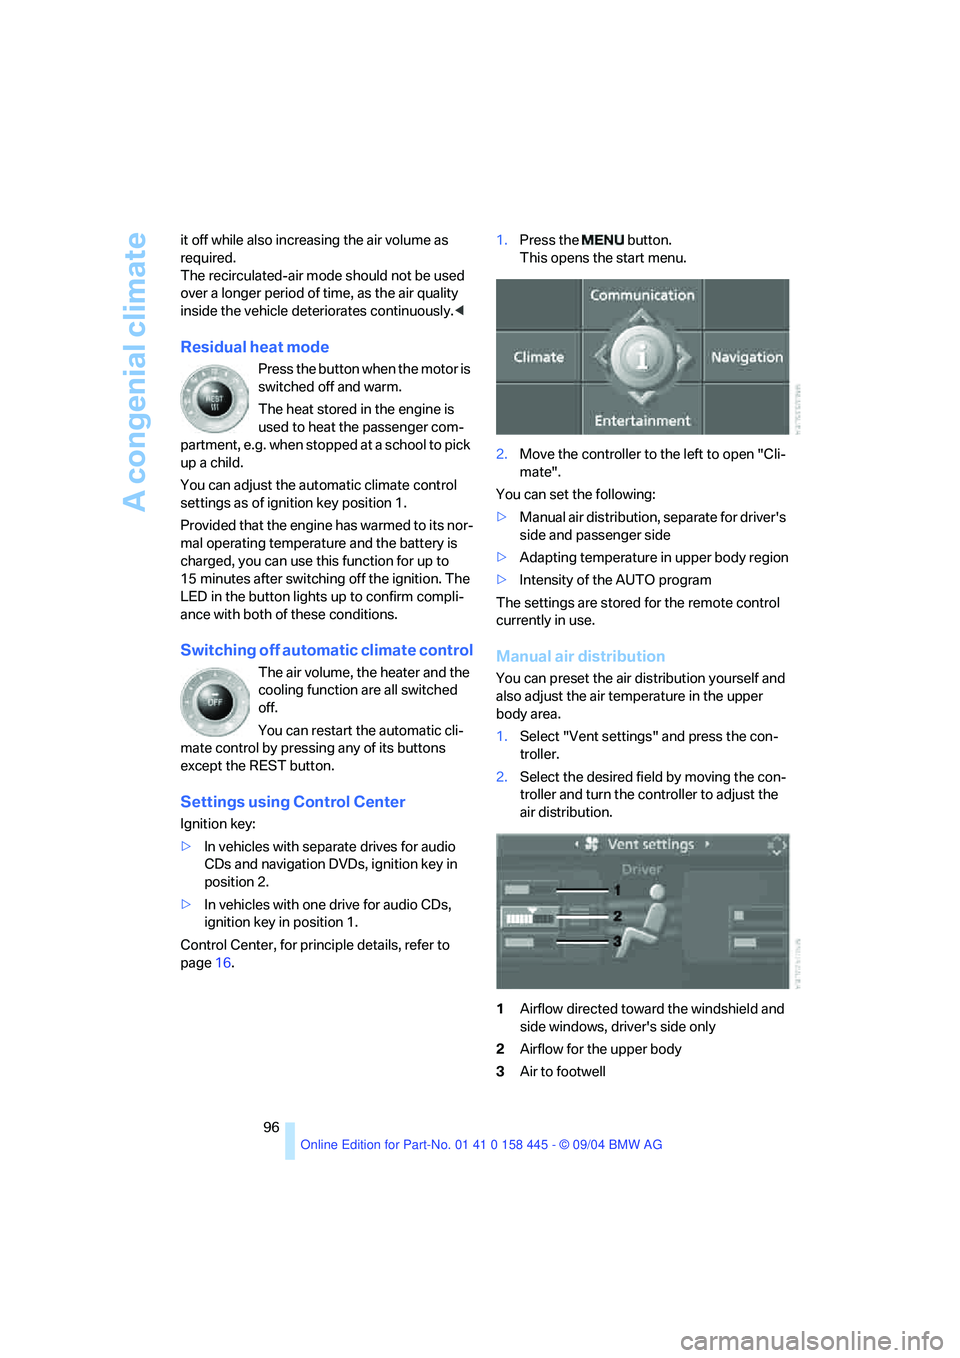
page16.1.Press the button.
This opens the start menu.
2.Move the controller to the left to open "Cli-
mate".
You can set the following:
>Manual air distribution, separate for driver's
side and passenger side
>Adapting temperature in upper body region
>Intensity of the AUTO program
The settings are stored for the remote control
currently in use.
Manual air distribution
You can preset the air distribution yourself and
also adjust the air temperature in the upper
body area.
1.Select "Vent settings" and press the con-
troller.
2.Select the desired field by moving the con-
troller and turn the controller to adjust the
air distribution.
1Airflow directed toward the windshield and
side windows, driver's side only
2Airflow for the upper body
3Air to footwell
Page 98 of 217
Controls
97Reference
At a glance
Driving tips
Communications
Navigation
Entertainment
Mobility
To select the front passenger area:
Move the controller to the right.
Pressing the AUTO button raises and
lowers the air distribution settings on the
Control Display.<
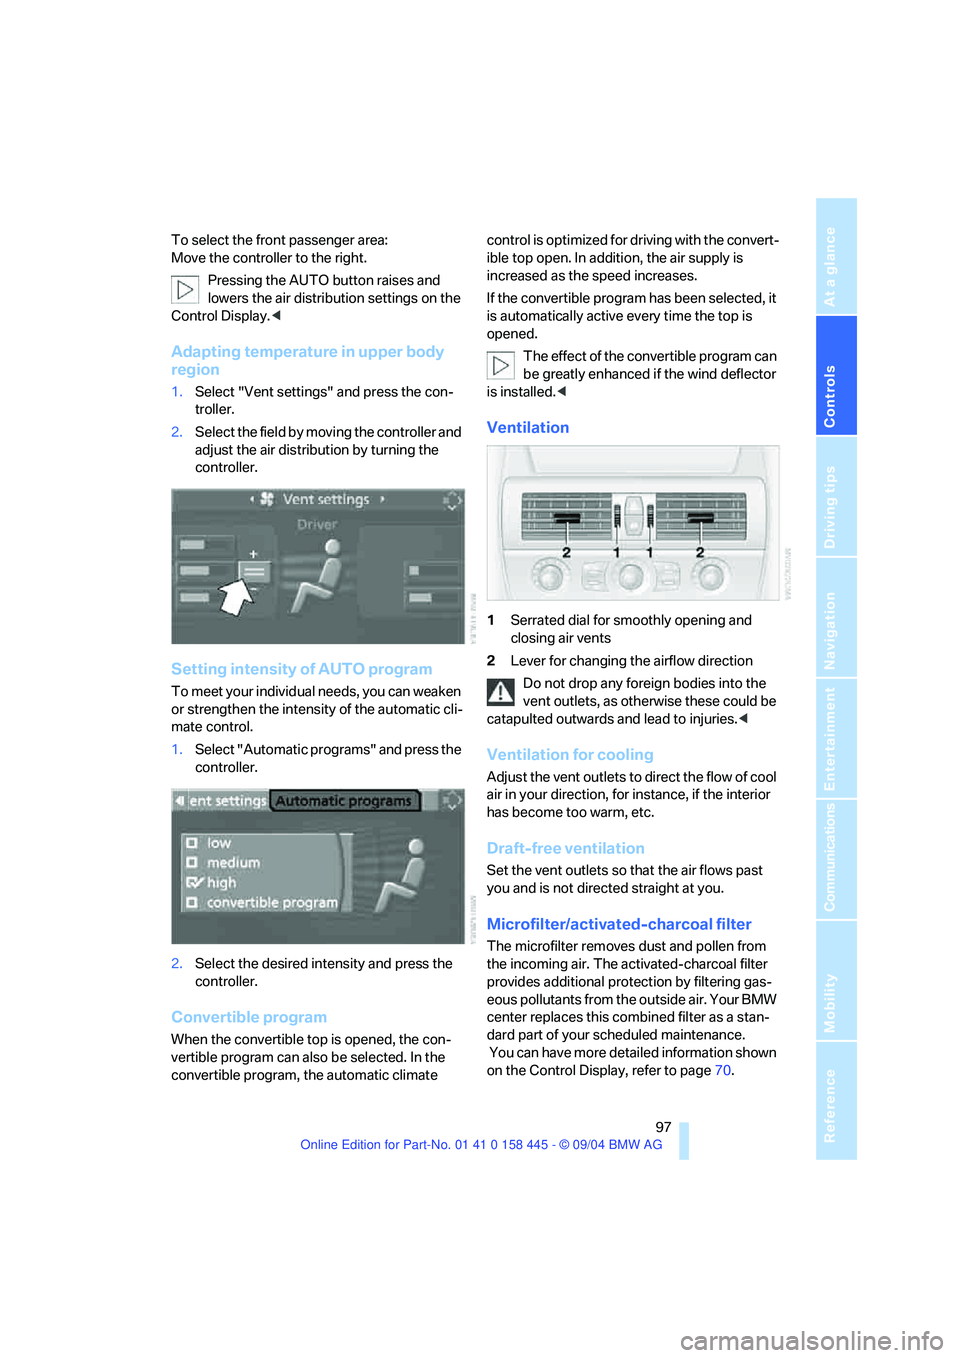
Adapting temperature in upper body
region
1.Select "Vent settings" and press the con-
troller.
2.Select the field by moving the controller and
adjust the air distribution by turning the
controller.
Setting intensity of AUTO program
To meet your individual needs, you can weaken
or strengthen the intensity of the automatic cli-
mate control.
1.Select "Automatic programs" and press the
controller.
2.Select the desired intensity and press the
controller.
Convertible program
When the convertible top is opened, the con-
vertible program can also be selected. In the
convertible program, the automatic climate control is optimized for driving with the convert-
ible top open. In addition, the air supply is
increased as the speed increases.
If the convertible program has been selected, it
is automatically active every time the top is
opened.
The effect of the convertible program can
be greatly enhanced if the wind deflector
is installed.<
Ventilation
1Serrated dial for smoothly opening and
closing air vents
2Lever for changing the airflow direction
Do not drop any foreign bodies into the
vent outlets, as otherwise these could be
catapulted outwards and lead to injuries.<
Ventilation for cooling
Adjust the vent outlets to direct the flow of cool
air in your direction, for instance, if the interior
has become too warm, etc.
Draft-free ventilation
Set the vent outlets so that the air flows past
you and is not directed straight at you.
Microfilter/activated-charcoal filter
The microfilter removes dust and pollen from
the incoming air. The activated-charcoal filter
provides additional protection by filtering gas-
eous pollutants from the outside air. Your BMW
center replaces this combined filter as a stan-
dard part of your scheduled maintenance.
You can have more detailed information shown
on the Control Display, refer to page70.
Page 100 of 217
Controls
99Reference
At a glance
Driving tips
Communications
Navigation
Entertainment
Mobility
The activation time is activated and the
LED lights up.
The independent ventilation is only avail-
able for activation within the subsequent
24 hours. After that, the time must be reacti-
vated.<
Page 102 of 217
Controls
101Reference
At a glance
Driving tips
Communications
Navigation
Entertainment
Mobility
You can operate the system when the ignition
key is in position 2.
If the device cannot be used after
repeated programming, check whether
the original hand-held transmitter uses an alter-
nating-code system. To do so, either read the
instructions for the original hand-held transmit-
ter or press the programmed memory button1
of the integrated universal remote control
longer. If the LED 2 on the integrated universal
remote control flashes rapidly for a short time
then lights up for approx. 2 seconds, this indi-
cates that the original hand-held transmitter
uses an alternating-code system. In the case of
an alternating-code system, program the mem-
ory buttons1 as described at Alternating-code
hand-held transmitters.<
Alternating-code hand-held
transmitters
To program the integrated universal remote
control, consult the operating instructions for
the equipment to be set. You will find informa-
tion there on the possibilities for synchroniza-
tion.
When programming hand-held transmitters
that employ an alternating code, please observe
the following supplementary instructions:
P r o g ra m m in g w i ll b e ea s i er w it h t h e a i d o f
a second person.<
1.Park your vehicle within the range of the
remote-controlled equipment.
2.Program the integrated universal remote
control as described above at Fixed-code
hand-held transmitters.
3.Locate the button at the receiver of the
equipment to be set, e.g. on the drive.
4.Press the button on the receiver of the
equipment to be set. After step 4, you have
approx. 30 seconds for step 5.
5.Press the programmed memory button1 of
the integrated universal remote control
three times.
The corresponding memory button1 is now
programmed with the signal of the original
hand-held transmitter.
Clearing memory buttons
Press both outer buttons 1 for approx. 20 sec-
onds, maintaining pressure until the LED 2
starts to flash: All of the memory buttons are
cleared.
The memory of individual memory buttons1
cannot be cleared.
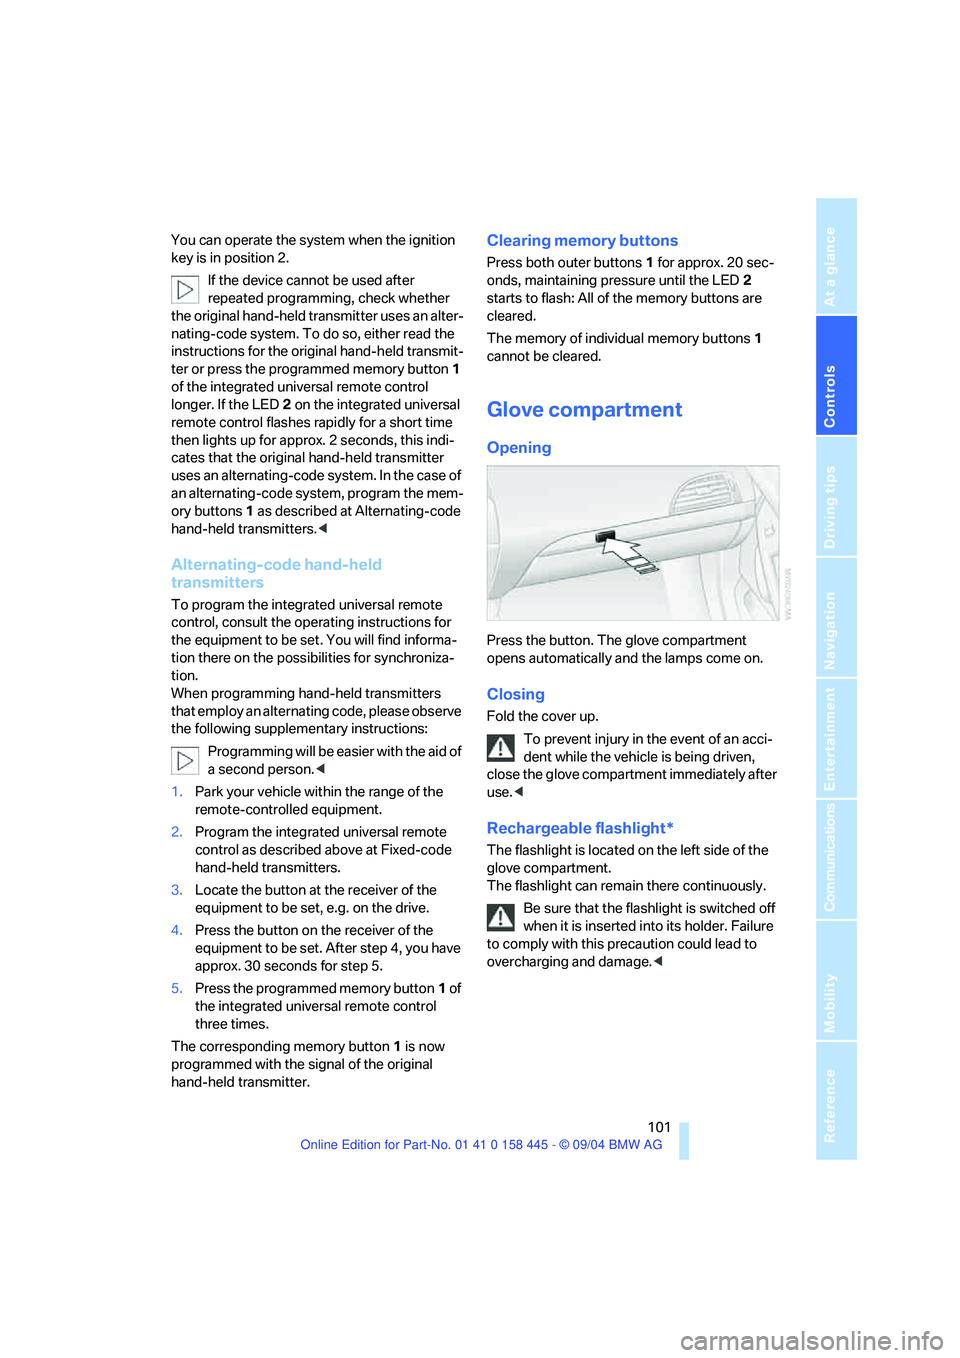
Glove compartment
Opening
Press the button. The glove compartment
opens automatically and the lamps come on.
Closing
Fold the cover up.
To prevent injury in the event of an acci-
dent while the vehicle is being driven,
close the glove compartment immediately after
use.<
Rechargeable flashlight*
The flashlight is located on the left side of the
glove compartment.
The flashlight can remain there continuously.
Be sure that the flashlight is switched off
when it is inserted into its holder. Failure
to comply with this precaution could lead to
overcharging and damage.<