2005 BMW 645CI COUPE&CONVERTIBLE navigation
[x] Cancel search: navigationPage 32 of 217

Controls
31Reference
At a glance
Driving tips
Communications
Navigation
Entertainment
Mobility
this remote control during an extended drive;
this will recharge the battery, refer to page28.
For US owners only
The transmitter and receiver units comply with
part 15 of the FCC/Federal Communication
Commission regulations. Operation is gov-
erned by the following:
FCC ID:
LX8766S
LX8766E
LX8CAS
Compliance statement:
This device complies with part 15 of the FCC
Rules. Operation is subject to the following two
conditions:
>This device may not cause harmful interfer-
ence, and
>this device must accept any interference
received, including interference that may
cause undesired operation.
Any unauthorized modifications or
changes to these devices could void the
user's authority to operate this equipment.<
Using door lock
One turn of the key in the driver's door lock
unlocks the driver's door only.
Turning the key a second time unlocks all of the
remaining doors, the luggage compartment lid
and the fuel filler door.
Convenience operation
You can also use the door lock to operate the
windows and the glass sunroof
* in the Coupe
or to operate the windows and the top in the
convertible.>To open:
With the door closed, turn the key to the
Unlock position and hold it there.
>To close:
With the door closed, turn the key to the
Lock position and hold it there.
Keep a close eye on the closing process
and also on the opening process of the
convertible top to be sure that no one is injured.
Releasing the key stops the operation.<
Manual operation
In the event of an electrical malfunction, you can
turn the key all the way to the right or left in the
door lock to lock or unlock the driver's door.
Opening and closing: from
inside
This button serves to unlock or lock doors and
the luggage compartment lid, but does not acti-
vate the anti-theft system. The fuel filler door
remains unlocked.
You can also make the following settings:
>The central locking system automatically
locks the vehicle after a short time when no
door has been opened.
>The central locking system automatically
locks the vehicle as soon as you start to
drive.
Control Center, for principle details, refer to
page16.
1.Open the menu.
2.Select "Vehicle settings" and press the
controller.
Page 34 of 217
Controls
33Reference
At a glance
Driving tips
Communications
Navigation
Entertainment
Mobility
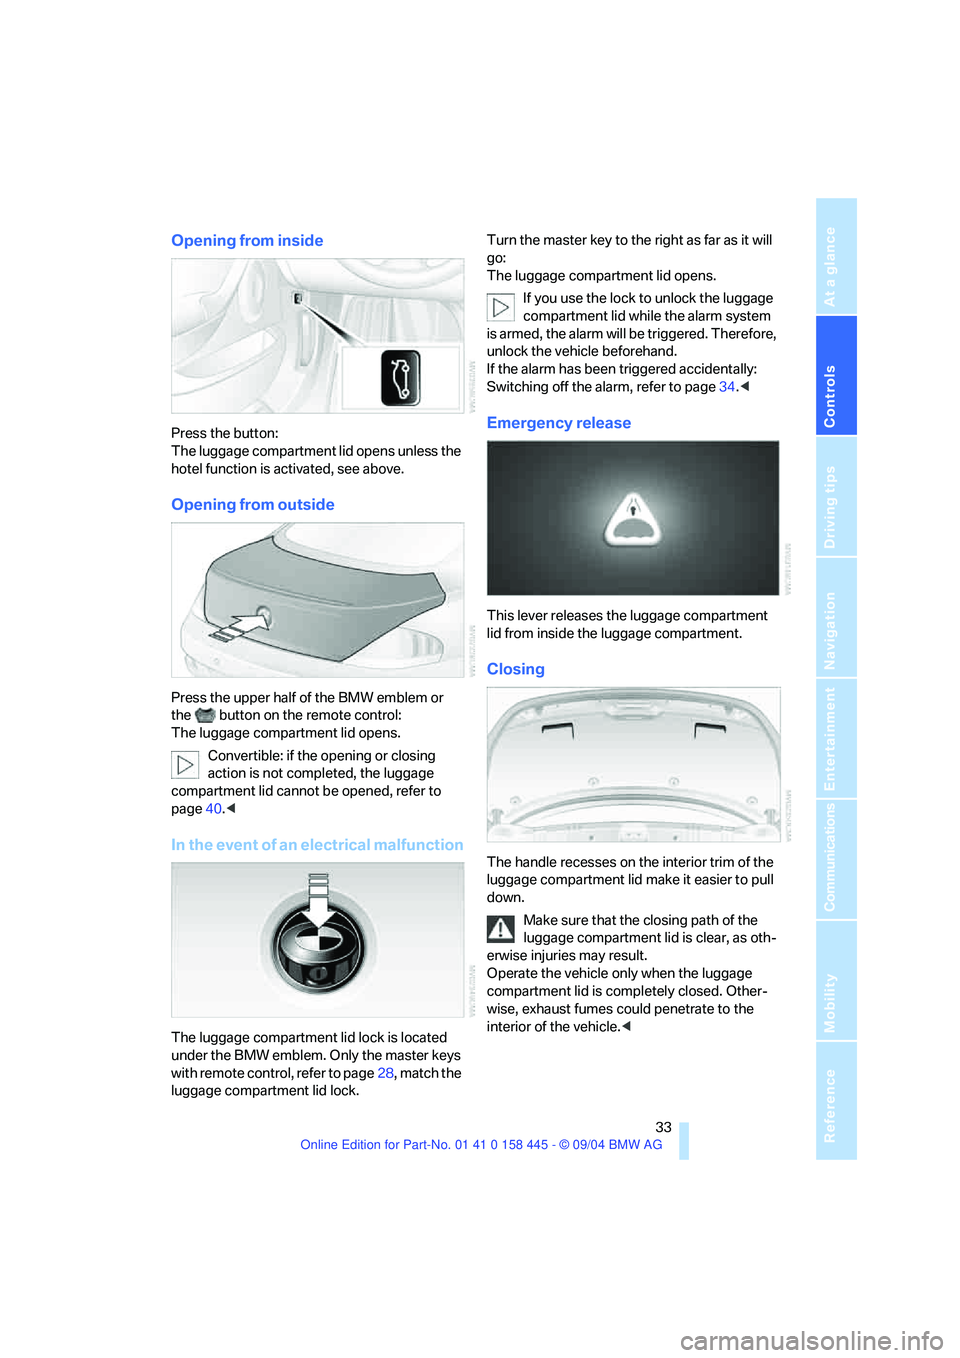
Opening from inside
Press the button:
The luggage compartment lid opens unless the
hotel function is activated, see above.
Opening from outside
Press the upper half of the BMW emblem or
the button on the remote control:
The luggage compartment lid opens.
Convertible: if the opening or closing
action is not completed, the luggage
compartment lid cannot be opened, refer to
page40.<
In the event of an electrical malfunction
The luggage compartment lid lock is located
under the BMW emblem. Only the master keys
with remote control, refer to page28, match the
luggage compartment lid lock.Turn the master key to the right as far as it will
go:
The luggage compartment lid opens.
If you use the lock to unlock the luggage
compartment lid while the alarm system
is armed, the alarm will be triggered. Therefore,
unlock the vehicle beforehand.
If the alarm has been triggered accidentally:
Switching off the alarm, refer to page34.<
Emergency release
This lever releases the luggage compartment
lid from inside the luggage compartment.
Closing
The handle recesses on the interior trim of the
luggage compartment lid make it easier to pull
down.
Make sure that the closing path of the
luggage compartment lid is clear, as oth-
erwise injuries may result.
Operate the vehicle only when the luggage
compartment lid is completely closed. Other-
wise, exhaust fumes could penetrate to the
interior of the vehicle.<
Page 36 of 217
Controls
35Reference
At a glance
Driving tips
Communications
Navigation
Entertainment
Mobility
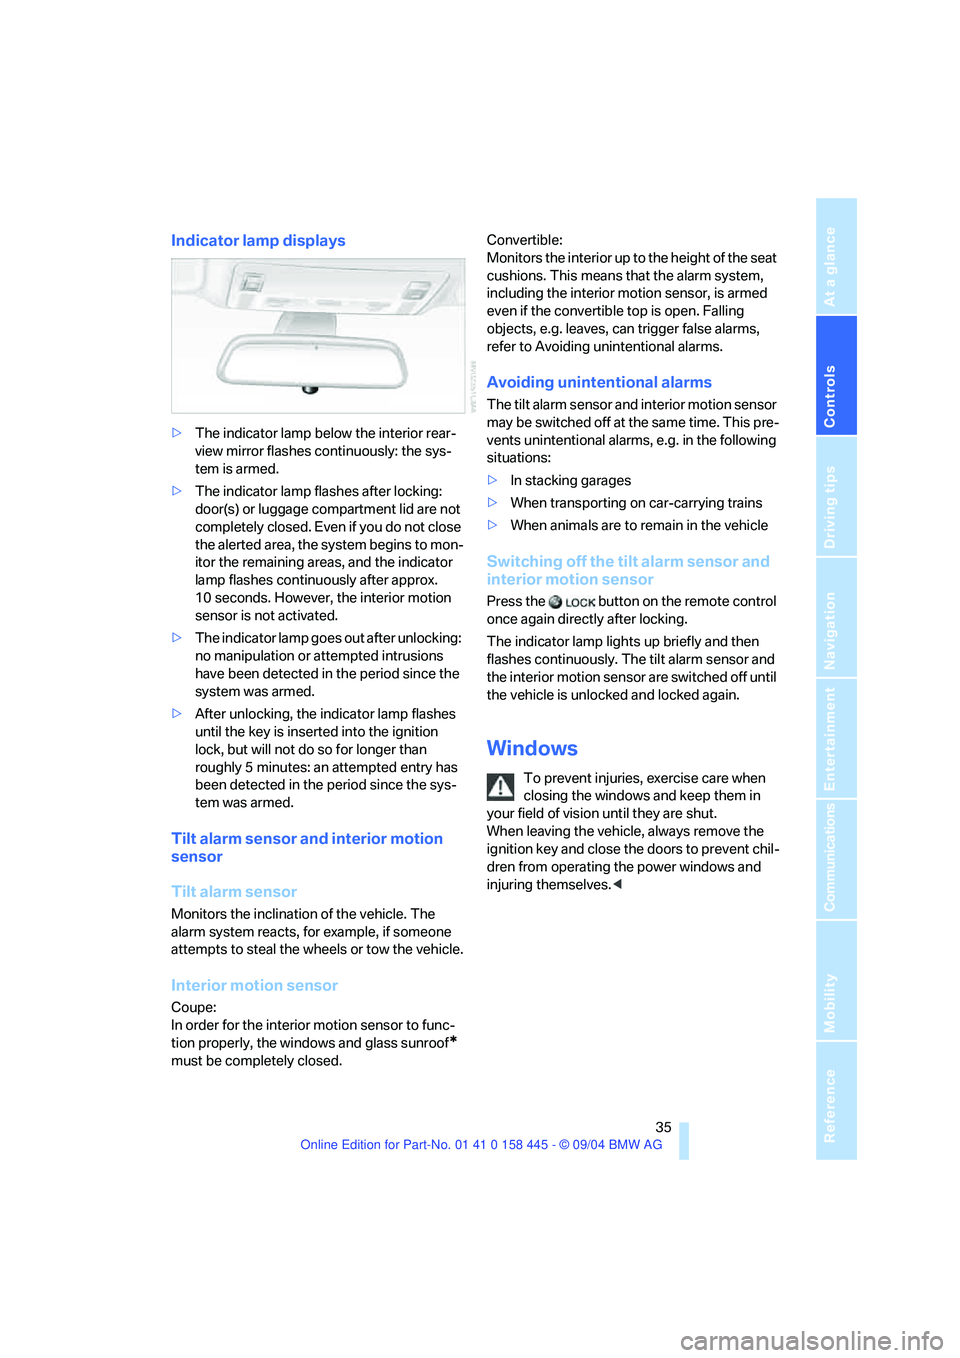
Indicator lamp displays
>The indicator lamp below the interior rear-
view mirror flashes continuously: the sys-
tem is armed.
>The indicator lamp flashes after locking:
door(s) or luggage compartment lid are not
completely closed. Even if you do not close
the alerted area, the system begins to mon-
itor the remaining areas, and the indicator
lamp flashes continuously after approx.
10 seconds. However, the interior motion
sensor is not activated.
>The indicator lamp goes out after unlocking:
no manipulation or attempted intrusions
have been detected in the period since the
system was armed.
>After unlocking, the indicator lamp flashes
until the key is inserted into the ignition
lock, but will not do so for longer than
roughly 5 minutes: an attempted entry has
been detected in the period since the sys-
tem was armed.
Tilt alarm sensor and interior motion
sensor
Tilt alarm sensor
Monitors the inclination of the vehicle. The
alarm system reacts, for example, if someone
attempts to steal the wheels or tow the vehicle.
Interior motion sensor
Coupe:
In order for the interior motion sensor to func-
tion properly, the windows and glass sunroof
*
must be completely closed.Convertible:
Monitors the interior up to the height of the seat
cushions. This means that the alarm system,
including the interior motion sensor, is armed
even if the convertible top is open. Falling
objects, e.g. leaves, can trigger false alarms,
refer to Avoiding unintentional alarms.
Avoiding unintentional alarms
The tilt alarm sensor and interior motion sensor
may be switched off at the same time. This pre-
vents unintentional alarms, e.g. in the following
situations:
>In stacking garages
>When transporting on car-carrying trains
>When animals are to remain in the vehicle
Switching off the tilt alarm sensor and
interior motion sensor
Press the button on the remote control
once again directly after locking.
The indicator lamp lights up briefly and then
flashes continuously. The tilt alarm sensor and
the interior motion sensor are switched off until
the vehicle is unlocked and locked again.
Windows
To prevent injuries, exercise care when
closing the windows and keep them in
your field of vision until they are shut.
When leaving the vehicle, always remove the
ignition key and close the doors to prevent chil-
dren from operating the power windows and
injuring themselves.<
Page 38 of 217
Controls
37Reference
At a glance
Driving tips
Communications
Navigation
Entertainment
Mobility
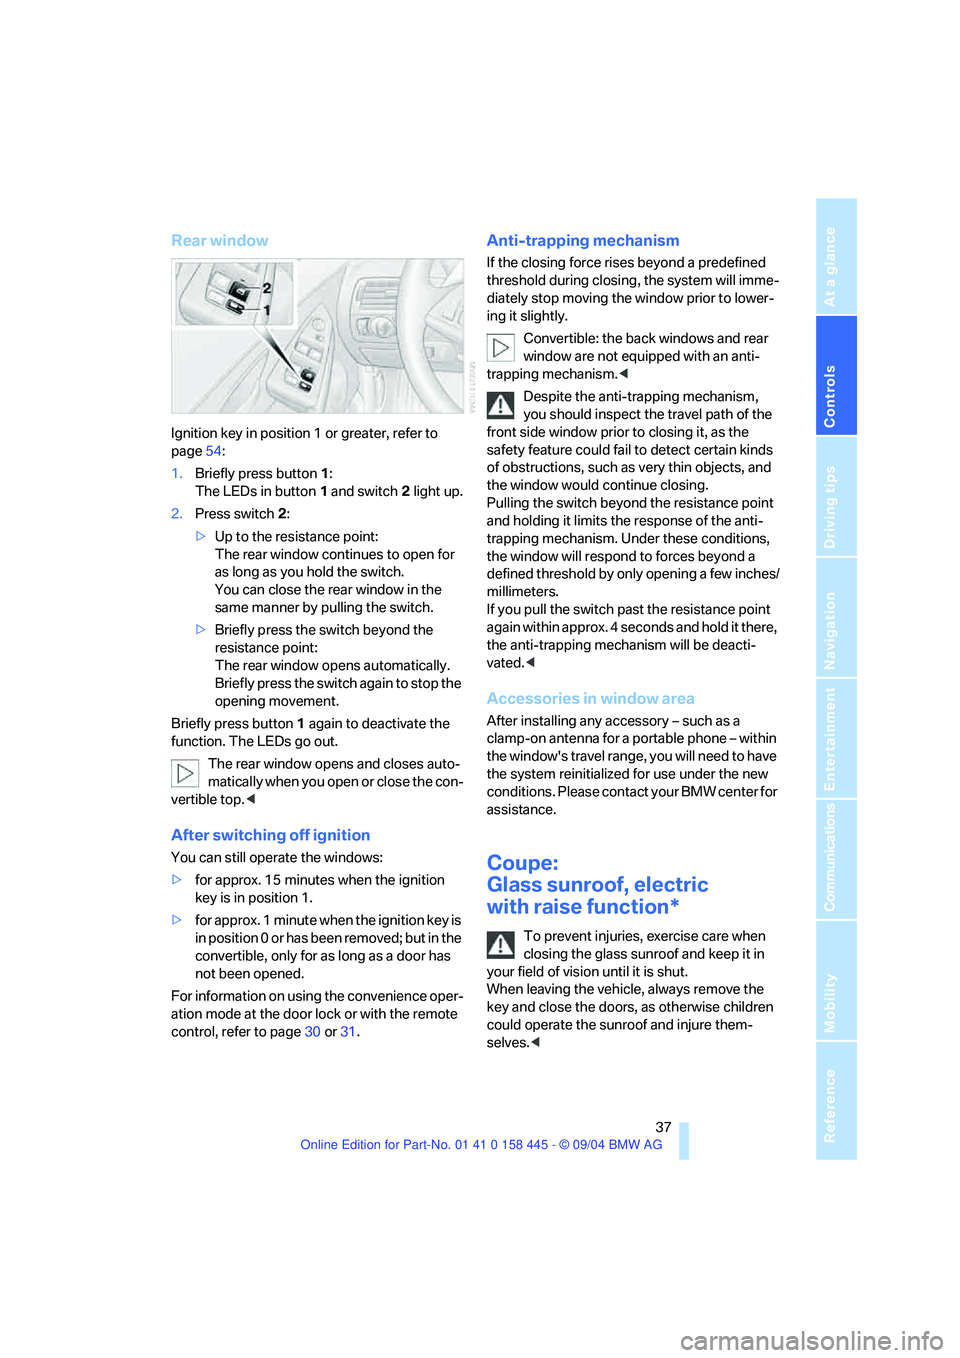
Rear window
Ignition key in position 1 or greater, refer to
page54:
1.Briefly press button1:
The LEDs in button 1 and switch 2 light up.
2.Press switch 2:
>Up to the resistance point:
The rear window continues to open for
as long as you hold the switch.
You can close the rear window in the
same manner by pulling the switch.
>Briefly press the switch beyond the
resistance point:
The rear window opens automatically.
Briefly press the switch again to stop the
opening movement.
Briefly press button 1 again to deactivate the
function. The LEDs go out.
The rear window opens and closes auto-
matically when you open or close the con-
vertible top.<
After switching off ignition
You can still operate the windows:
>for approx. 15 minutes when the ignition
key is in position 1.
>for approx. 1 minute when the ignition key is
in position 0 or has been removed; but in the
convertible, only for as long as a door has
not been opened.
For information on using the convenience oper-
ation mode at the door lock or with the remote
control, refer to page30 or31.
Anti-trapping mechanism
If the closing force rises beyond a predefined
threshold during closing, the system will imme-
diately stop moving the window prior to lower-
ing it slightly.
Convertible: the back windows and rear
window are not equipped with an anti-
trapping mechanism.<
Despite the anti-trapping mechanism,
you should inspect the travel path of the
front side window prior to closing it, as the
safety feature could fail to detect certain kinds
of obstructions, such as very thin objects, and
the window would continue closing.
Pulling the switch beyond the resistance point
and holding it limits the response of the anti-
trapping mechanism. Under these conditions,
the window will respond to forces beyond a
defined threshold by only opening a few inches/
millimeters.
If you pull the switch past the resistance point
again within approx. 4 seconds and hold it there,
the anti-trapping mechanism will be deacti-
vated.<
Accessories in window area
After installing any accessory – such as a
clamp-on antenna for a portable phone – within
the window's travel range, you will need to have
the system reinitialized for use under the new
conditions. Please contact your BMW center for
assistance.
Coupe:
Glass sunroof, electric
with raise function*
To prevent injuries, exercise care when
closing the glass sunroof and keep it in
your field of vision until it is shut.
When leaving the vehicle, always remove the
key and close the doors, as otherwise children
could operate the sunroof and injure them-
selves.<
Page 40 of 217
Controls
39Reference
At a glance
Driving tips
Communications
Navigation
Entertainment
Mobility
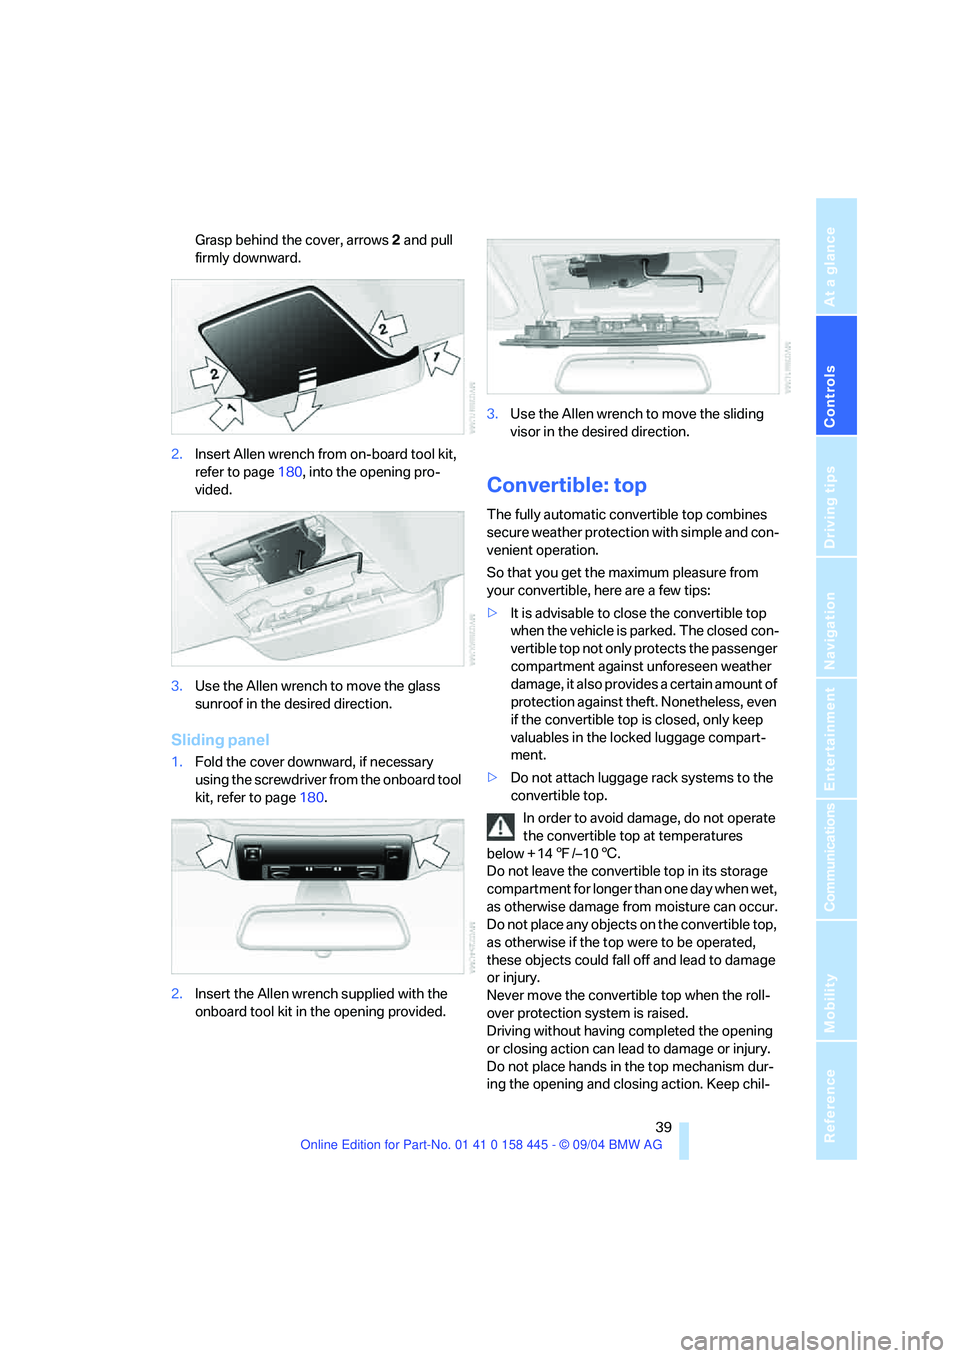
Grasp behind the cover, arrows2 and pull
firmly downward.
2.Insert Allen wrench from on-board tool kit,
refer to page180, into the opening pro-
vided.
3.Use the Allen wrench to move the glass
sunroof in the desired direction.
Sliding panel
1.Fold the cover downward, if necessary
using the screwdriver from the onboard tool
kit, refer to page180.
2.Insert the Allen wrench supplied with the
onboard tool kit in the opening provided.3.Use the Allen wrench to move the sliding
visor in the desired direction.
Convertible: top
The fully automatic convertible top combines
secure weather protection with simple and con-
venient operation.
So that you get the maximum pleasure from
your convertible, here are a few tips:
>It is advisable to close the convertible top
when the vehicle is parked. The closed con-
vertible top not only protects the passenger
compartment against unforeseen weather
damage, it also provides a certain amount of
protection against theft. Nonetheless, even
if the convertible top is closed, only keep
valuables in the locked luggage compart-
ment.
>Do not attach luggage rack systems to the
convertible top.
In order to avoid damage, do not operate
the convertible top at temperatures
below + 147/–106.
Do not leave the convertible top in its storage
compartment for longer than one day when wet,
as otherwise damage from moisture can occur.
Do not place any objects on the convertible top,
as otherwise if the top were to be operated,
these objects could fall off and lead to damage
or injury.
Never move the convertible top when the roll-
over protection system is raised.
Driving without having completed the opening
or closing action can lead to damage or injury.
Do not place hands in the top mechanism dur-
ing the opening and closing action. Keep chil-
Page 42 of 217
Controls
41Reference
At a glance
Driving tips
Communications
Navigation
Entertainment
Mobility
If the opening or closing action is not
completed, the luggage compartment lid
cannot be opened.<
Convenience operation with the
remote control and via the door lock
Refer to pages30 and31.
Manual closing in the event of an
electrical malfunction
Only close the convertible top manually if
absolutely necessary; never open it man-
ually. The convertible top compartment lid can-
not be locked in the event of an electrical mal-
function and would open while the vehicle is
being driven.
Improper handling can lead to damage.<
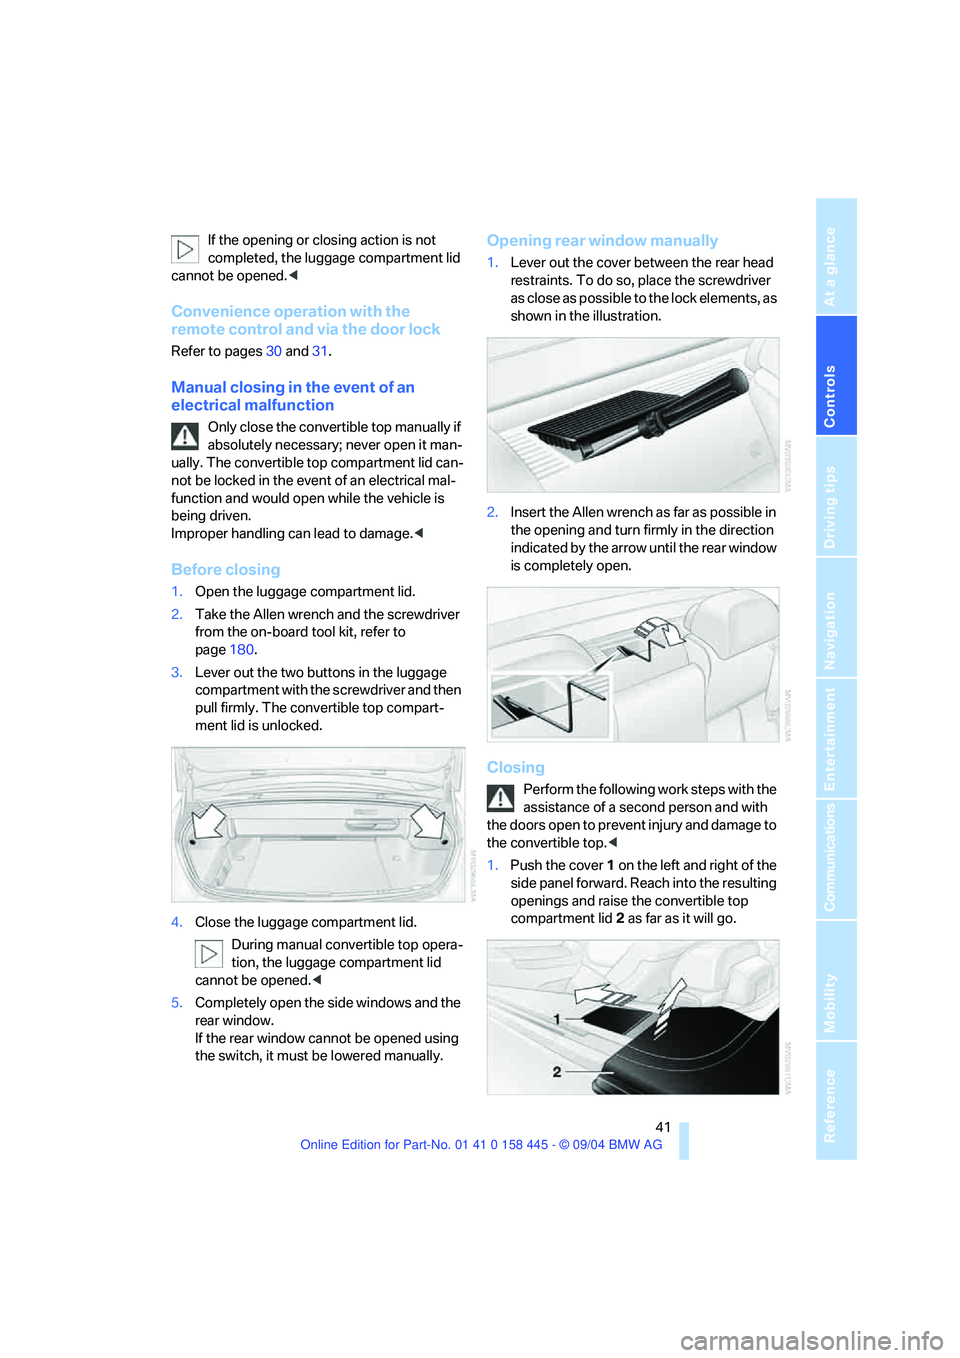
Before closing
1.Open the luggage compartment lid.
2.Take the Allen wrench and the screwdriver
from the on-board tool kit, refer to
page180.
3.Lever out the two buttons in the luggage
compartment with the screwdriver and then
pull firmly. The convertible top compart-
ment lid is unlocked.
4.Close the luggage compartment lid.
During manual convertible top opera-
tion, the luggage compartment lid
cannot be opened.<
5.Completely open the side windows and the
rear window.
If the rear window cannot be opened using
the switch, it must be lowered manually.
Opening rear window manually
1.Lever out the cover between the rear head
restraints. To do so, place the screwdriver
as close as possible to the lock elements, as
shown in the illustration.
2.Insert the Allen wrench as far as possible in
the opening and turn firmly in the direction
indicated by the arrow until the rear window
is completely open.
Closing
Perform the following work steps with the
assistance of a second person and with
the doors open to prevent injury and damage to
the convertible top.<
1.Push the cover 1 on the left and right of the
side panel forward. Reach into the resulting
openings and raise the convertible top
compartment lid2 as far as it will go.
Page 44 of 217
Controls
43Reference
At a glance
Driving tips
Communications
Navigation
Entertainment
Mobility
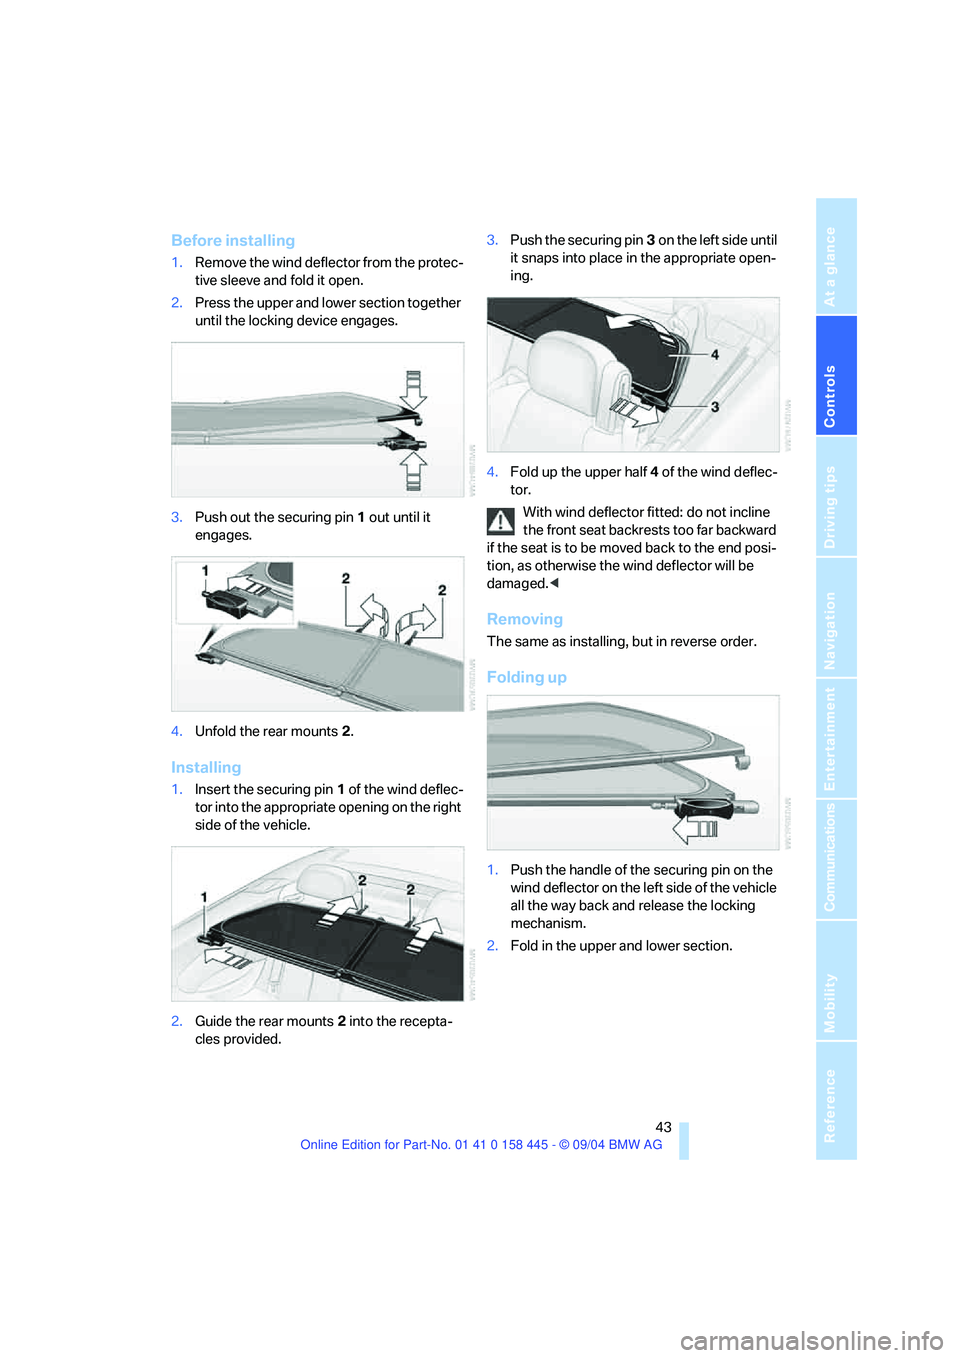
Before installing
1.Remove the wind deflector from the protec-
tive sleeve and fold it open.
2.Press the upper and lower section together
until the locking device engages.
3.Push out the securing pin1 out until it
engages.
4.Unfold the rear mounts2.
Installing
1.Insert the securing pin 1 of the wind deflec-
tor into the appropriate opening on the right
side of the vehicle.
2.Guide the rear mounts2 into the recepta-
cles provided.3.Push the securing pin3 o n t he l ef t s id e u n t il
it snaps into place in the appropriate open-
ing.
4.Fold up the upper half4 of the wind deflec-
tor.
With wind deflector fitted: do not incline
the front seat backrests too far backward
if the seat is to be moved back to the end posi-
tion, as otherwise the wind deflector will be
damaged.<
Removing
The same as installing, but in reverse order.
Folding up
1.Push the handle of the securing pin on the
wind deflector on the left side of the vehicle
all the way back and release the locking
mechanism.
2.Fold in the upper and lower section.
Page 46 of 217
Controls
45Reference
At a glance
Driving tips
Communications
Navigation
Entertainment
Mobility
On the front passenger side as well, do not tilt
the backrest too far toward the rear. Failure to
observe this precaution can prevent the belt
from providing effective protection against
injury, as the passenger could slide under the
belt in an accident.
Make sure that the footwell behind the driver's
and front passenger's seat is empty and unob-
structed. If you fail to do so, any persons or
objects behind the seat could be injured or
damaged by a rearward movement of the
seat.<
Also observe the instructions regarding dam-
age to the safety belt on page49.
Convertible: with the wind deflector fitted,
do not incline the front seat backrests too
far backward if the seat is to be moved back to
the end position, as otherwise the wind deflec-
tor will be damaged.<
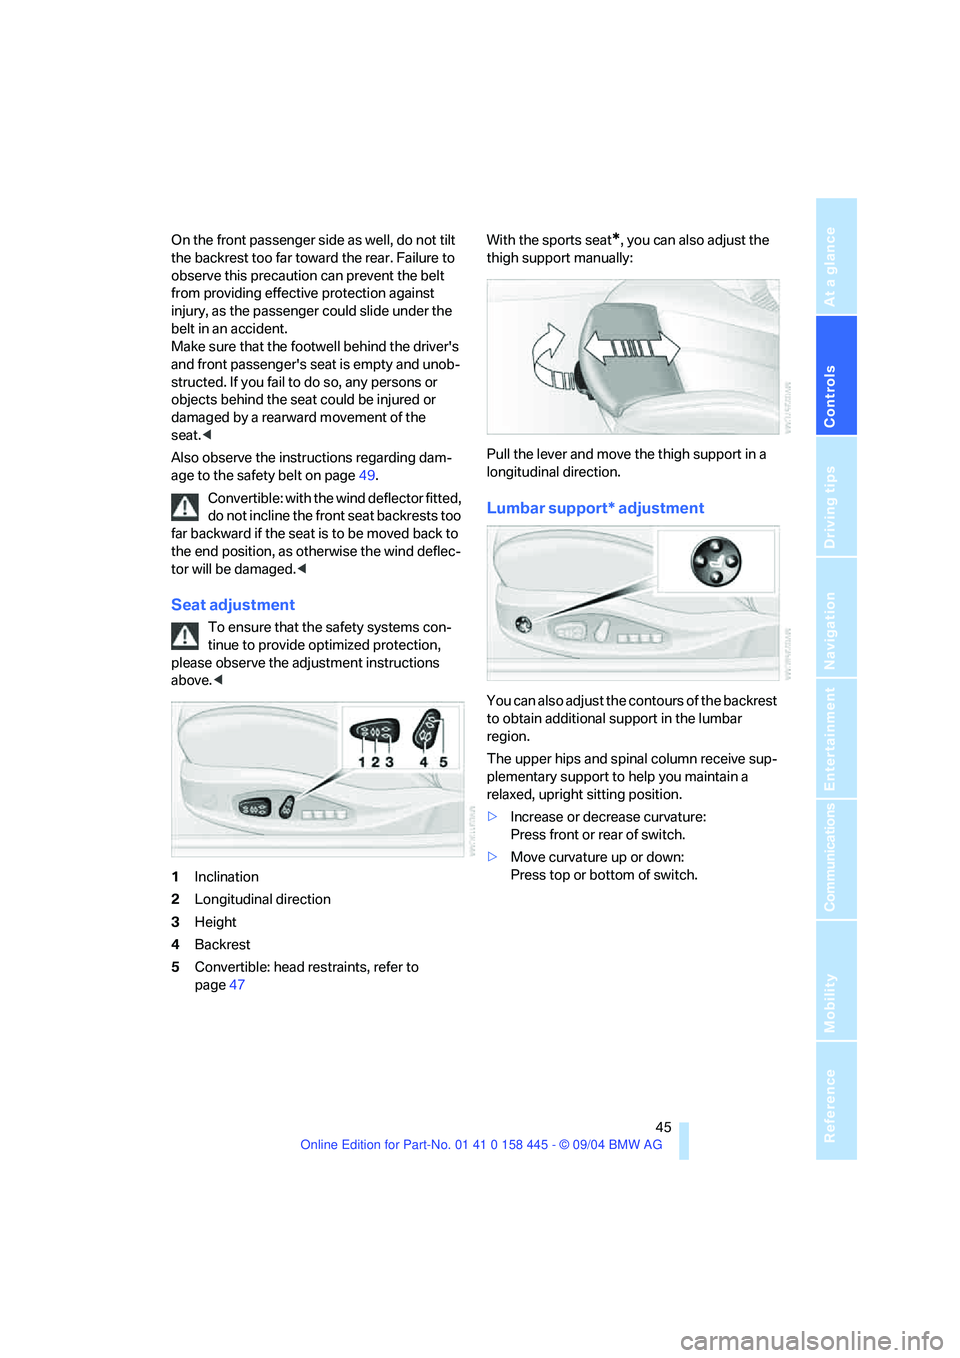
Seat adjustment
To ensure that the safety systems con-
tinue to provide optimized protection,
please observe the adjustment instructions
above.<
1Inclination
2Longitudinal direction
3Height
4Backrest
5Convertible: head restraints, refer to
page47With the sports seat
*, you can also adjust the
thigh support manually:
Pull the lever and move the thigh support in a
longitudinal direction.
Lumbar support* adjustment
You can also adjust the contours of the backrest
to obtain additional support in the lumbar
region.
The upper hips and spinal column receive sup-
plementary support to help you maintain a
relaxed, upright sitting position.
>Increase or decrease curvature:
Press front or rear of switch.
>Move curvature up or down:
Press top or bottom of switch.