Page 19 of 217
Control Center
18 5A symbol indicates the last selected menu
item of the start menu:
Communication
Navigation or onboard information
Entertainment
Climate
menu
Page 20 of 217
At a glance
19Reference
Controls
Driving tips
Communications
Navigation
Entertainment
Mobility
Selecting menu items and making adjustments
1Selecting individual menu items: turn the
controller. The highlight moves. Menu
items shown in white can be selected.
2Activating highlighted menu items: press
the controller. New menu items are dis-
played or a functions is carried out.
3Changing the current field: move the con-
troller to the left, right, forward or backward
and let go.
4Selecting menu items: such as1.
5Making adjustments: turn the controller.
A graphical display, numerical values or text
displays change. The setting is applied if
you change to another field or into another
menu.Changing directly to the last menu
Move the controller in the corresponding direc-
tion and hold it for longer than approx. 2 sec-
onds. The menu in the selected direction is
opened and the last menu item selected is dis-
played.
Page 21 of 217

Control Center
20
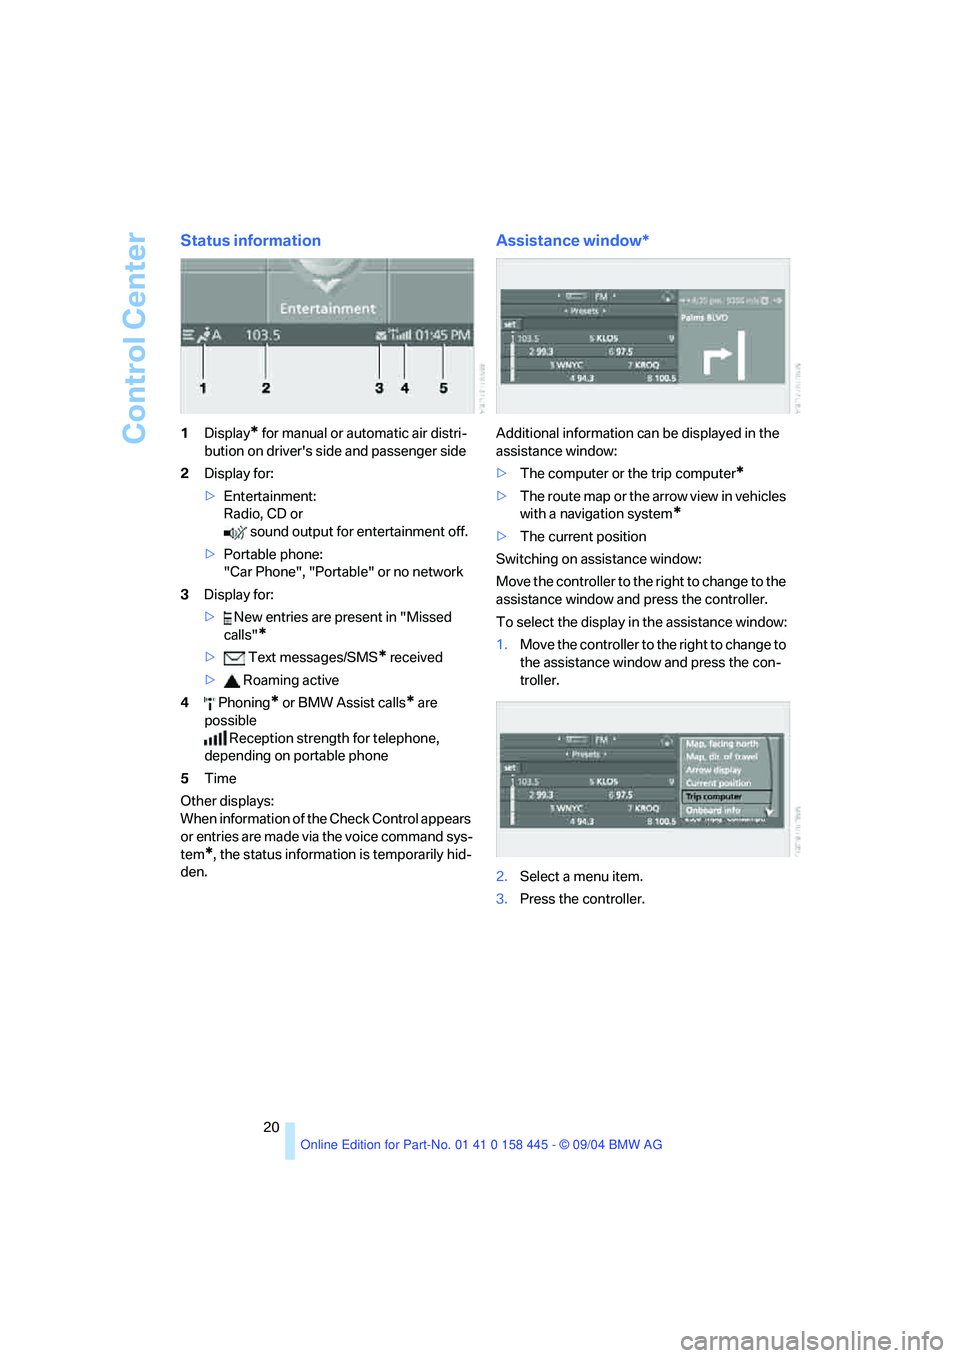
Status information
1Display* for manual or automatic air distri-
bution on driver's side and passenger side
2Display for:
>Entertainment:
Radio, CD or
sound output for entertainment off.
>Portable phone:
"Car Phone", "Portable" or no network
3Display for:
> New entries are present in "Missed
calls"
*
> Text messages/SMS* received
> Roaming active
4 Phoning
* or BMW Assist calls* are
possible
Reception strength for telephone,
depending on portable phone
5Time
Other displays:
When information of the Check Control appears
or entries are made via the voice command sys-
tem
*, the status information is temporarily hid-
den.
Assistance window*
Additional information can be displayed in the
assistance window:
>The computer or the trip computer
*
>The route map or the arrow view in vehicles
with a navigation system
*
>The current position
Switching on assistance window:
Move the controller to the right to change to the
assistance window and press the controller.
To select the display in the assistance window:
1.Move the controller to the right to change to
the assistance window and press the con-
troller.
2.Select a menu item.
3.Press the controller.
Page 22 of 217
At a glance
21Reference
Controls
Driving tips
Communications
Navigation
Entertainment
Mobility
Closing assistance window:
1.Move the controller to the right to change to
the assistance window and press the con-
troller.
2.Select "Assist. window off" and press the
controller.
Switching Control Display on/off
To switch off the Control Display:
1.Press the button.
This opens the start menu.
2.Press the controller to open the menu .
3.Select "Display off" and press the control-
ler.
To switch on the Control Display:
Press the controller.
Page 24 of 217

At a glance
23Reference
Controls
Driving tips
Communications
Navigation
Entertainment
Mobility
This symbol appears on the Control Display
when you can input additional voice com-
mands.
If no further voice commands are possible,
operate the equipment using the Control Cen-
ter.
Terminating or canceling voice
command system
Press the button on the steering wheel or
on the center console
or
Voice commands
Having the possible voice commands
read aloud
You can have the system read aloud the possi-
ble voice commands related to the selected
menu item on the Control Display.
For example, if you have selected "CD", the
system will read aloud possible voice com-
mands for operating the CD player and the
CD changer
*:
Opening help
Using alternative voice commands
There are often a number of commands to run a
function, e.g.:
Calling up functions directly
With short commands you can carry out certain
functions directly, regardless of which menu
item is selected, refer to page196.
Opening the start menu
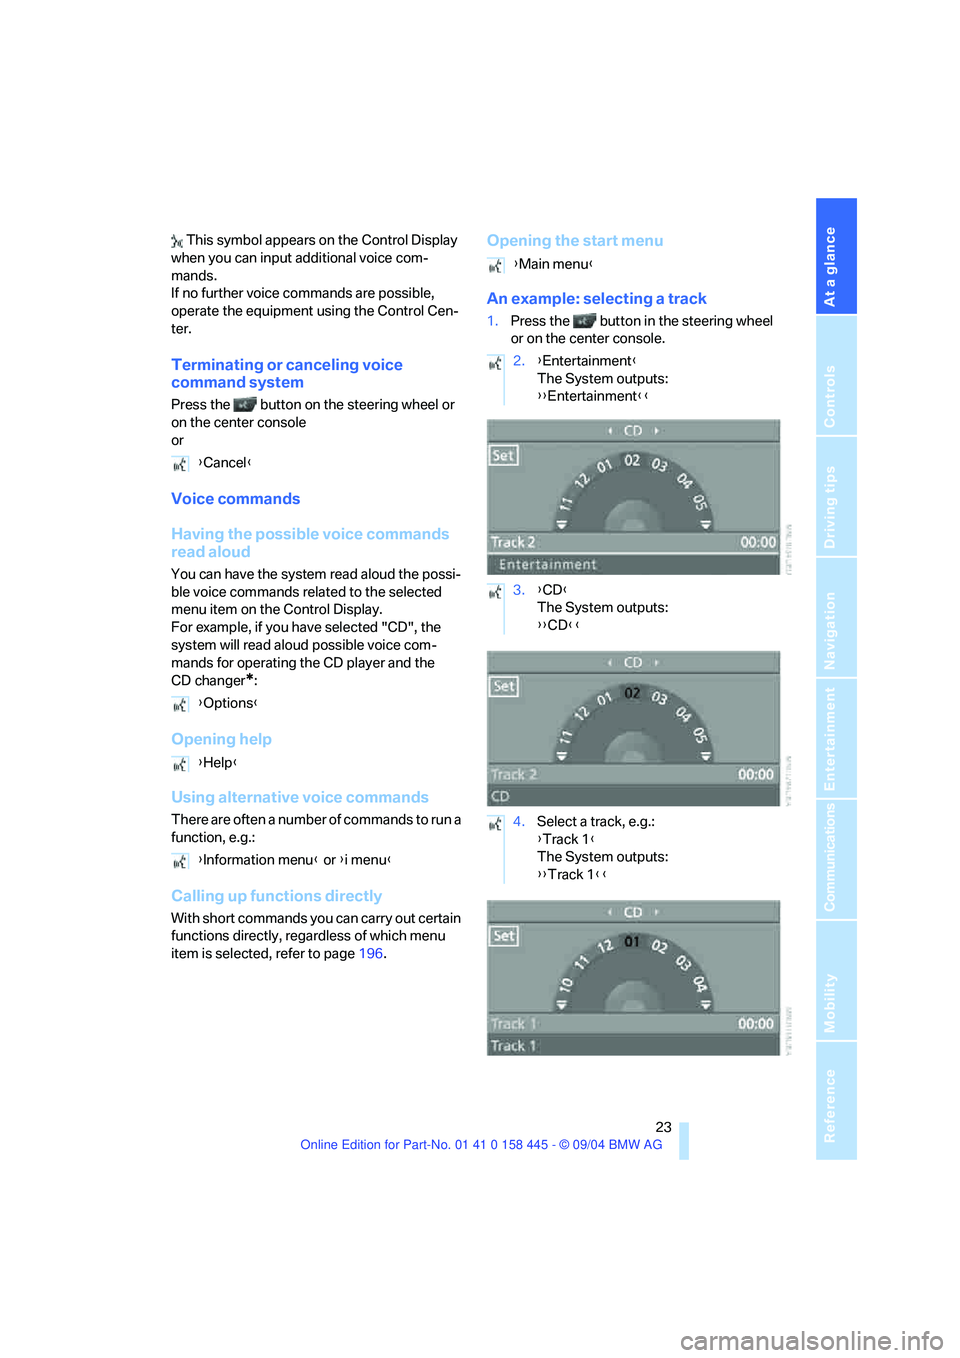
An example: selecting a track
1.Press the button in the steering wheel
or on the center console.
{Cancel}
{Options}
{Help}
{Information menu} or {i menu}
{Main menu}
2.{Entertainment}
The System outputs:
{{Entertainment}}
3.{CD}
The System outputs:
{{CD}}
4.Select a track, e.g.:
{Track 1}
The System outputs:
{{Track 1}}
Page 26 of 217
At a glance
25Reference
Controls
Driving tips
Communications
Navigation
Entertainment
Mobility
Page 29 of 217

Opening and closing
28
Opening and closing
The key set
1Every master key with remote control con-
tains an extended-life battery as a power
supply, which is charged automatically in
the ignition lock as you drive. You should
use each master key at least twice a year in
order to maintain the charge condition.
Depending on which master key is detected
by the vehicle during unlocking, different
settings in the vehicle are requested and
executed, refer to Key Memory below.
2Spare key for storage in a safe place, such
as in your wallet.
This key does not fit in the locks of the lug-
gage compartment lid and the hotel func-
tion, refer to page32. This is an advantage
when valet parking at a hotel, for example.
The key is not intended for constant use.
New keys
New, additional or replacement keys are avail-
able at your BMW center.
Key Memory
How the system functions
Doubtless you have often reflected on how
great it would be if you could configure your
vehicle's various adjustment settings to meet
your own personal requirements. BMW has
designed several freely selectable options into
the vehicle during its development. You can set
these as desired via the Control Center.You can have up to four different basic settings
adjusted for four different persons for the spe-
cific keys. The only requirement is that each
person uses his or her own master key with
remote control.
When your vehicle is unlocked with the remote
control, the vehicle recognizes the individual
key by means of a data exchange and makes
adjustments accordingly.
Scope of Key Memory
>When unlocking with the remote control,
either unlock only the driver's door or the
entire vehicle, refer to page29.
>Locking the vehicle after a short time or
after starting to drive, refer to page31
>Assigning the programmable function but-
tons on the steering wheel, refer to page51.
>Settings for the display on the Control Dis-
play:
>Brightness of the Control Display, refer
to page77
>Units of measure for consumption,
route/distances, temperature and pres-
sure, refer to page77
>Language on the Control Display, refer
to page78
>12h/24h clock mode, refer to page78
>Date format, refer to page79.
>Displaying optical warning for the PDC Park
Distance Control
*, refer to page80.
>Selection and brightness of the display for
the Head-Up Display
*, refer to page89.
>Air distribution, temperature and intensity
for the automatic climate control, refer to
page96.
>Setting the language information for the
destination guidance of the navigation sys-
tem
*, refer to page126.
Page 30 of 217

Controls
29Reference
At a glance
Driving tips
Communications
Navigation
Entertainment
Mobility
The following settings mentioned last are also
called up during unlocking:
>Driver's seat, exterior-mirror and steering-
wheel position, refer to page46
>The volume and tone settings for audio and
video sources, refer to page133
>The volume setting for the telephone, refer
to page151
>The display of the stored stations for the
radio, refer to page138
Central locking system
The concept
The central locking system is ready for opera-
tion whenever the driver's door is closed. This
simultaneously engages and releases the locks
on the following:
>Doors
>Compartment in the front center console
>Luggage compartment lid
>Fuel filler door
The central locking system can be operated
from the outside
>via the remote control
>via the door lock
and from inside via the button for the central
locking system.
If operated from the inside, the fuel filler door
and the compartment in the front center con-
sole are not locked, refer to page31.
The anti-theft system is automatically activated
whenever you activate the central locking sys-
tem from outside the vehicle. It prevents the
doors from being unlocked using the lock but-
tons or door handles. The alarm system is
armed/disarmed at the same time. The dome
light is also switched on and off with the remote
control.
You can find more detailed information on the
alarm system on page34.In the event of a serious accident, the central
locking system unlocks automatically. The haz-
ard warning flashers and interior lamps also
switch on.
Opening and closing: from
outside
Using the remote control
Protect the remote control against unau-
thorized use by handing over only the
spare key, for example when using hotel valet
parking.<
Because any persons or animals left unat-
tended in a parked vehicle could lock the
doors from the inside, you should always keep
the remote control with you; this precaution
ensures that you will remain able to unlock the
vehicle from the outside at all times.<
Unlocking
Use the button to unlock the vehicle
depending on the setting.
Control Center, for principle details, refer to
page16.
1.Open the menu.
2.Select "Vehicle settings" and press the
controller.
3.Select "Door locks" and press the control-
ler.
4.Select "Central locking" and press the con-
troller.
5.Select "Unlock button" and press the con-
troller.
6.Select a menu item:
>"All doors"
Press the button once to unlock the
entire vehicle.
>"Driver's door only"
Press the button once to unlock only
the driver's door and the fuel filler door.