2005 BMW 645CI COUPE&CONVERTIBLE low beam
[x] Cancel search: low beamPage 12 of 217
At a glance
11Reference
Controls
Driving tips
Communications
Navigation
Entertainment
Mobility
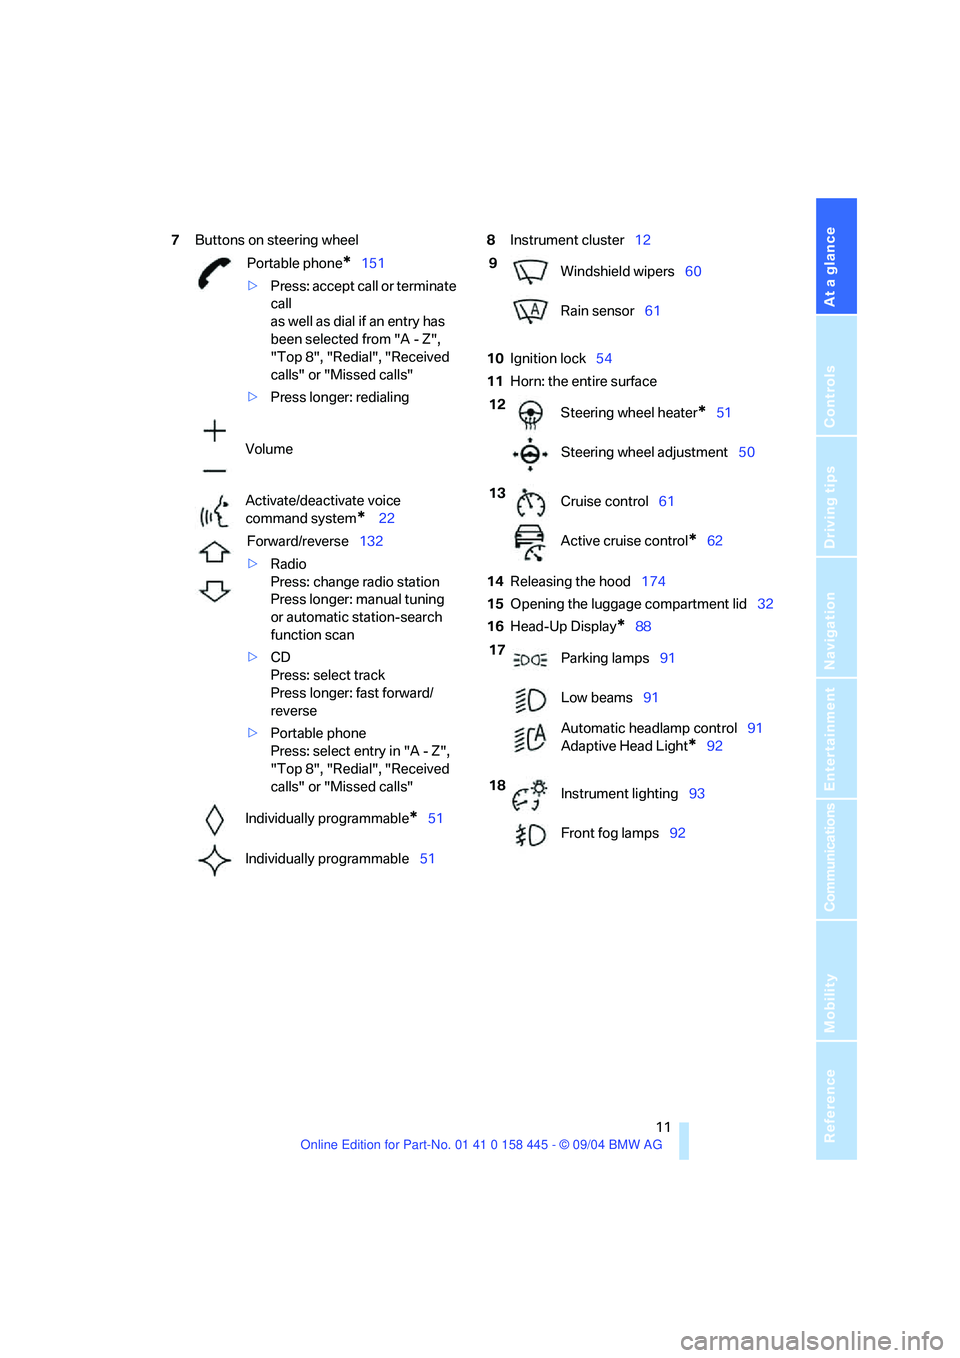
7Buttons on steering wheel8Instrument cluster12
10Ignition lock54
11Horn: the entire surface
14Releasing the hood174
15Opening the luggage compartment lid32
16Head-Up Display
*88 Portable phone
*151
>Press: accept call or terminate
call
as well as dial if an entry has
been selected from "A - Z",
"Top 8", "Redial", "Received
calls" or "Missed calls"
>Press longer: redialing
Volume
Activate/deactivate voice
command system
* 22
Forward/reverse132
>Radio
Press: change radio station
Press longer: manual tuning
or automatic station-search
function scan
>CD
Press: select track
Press longer: fast forward/
reverse
>Portable phone
Press: select entry in "A - Z",
"Top 8", "Redial", "Received
calls" or "Missed calls"
Individually programmable
*51
Individually programmable51
9
Windshield wipers60
Rain sensor61
12
Steering wheel heater
*51
Steering wheel adjustment50
13
Cruise control61
Active cruise control
*62
17
Parking lamps91
Low beams91
Automatic headlamp control91
Adaptive Head Light
*92
18
Instrument lighting93
Front fog lamps92
Page 14 of 217

At a glance
13Reference
Controls
Driving tips
Communications
Navigation
Entertainment
Mobility
Indicator and warning lamps
The concept
Indicator and warning lamps and their combina-
tions appear in the indicator area1 and in the
display2. For better differentiation of malfunc-
tions, different symbols can appear in the dis-
play 2.
Some lamps in the indicator area1 are checked
for proper operation when the engine is started
or the ignition is switched on and light up briefly
in the process.
Confirmation of active functions
The following indicator lamps in the indicator
area1 indicate that certain functions are active:
Required action in case of a
malfunction
All warning lamps and indicator lamps not pre-
viously listed are also accompanied by text
messages at the bottom of the Control Display.
These may contain detailed information on the
cause of a malfunction and the corresponding
action required.
Sometimes warning lamps are also accompa-
nied by additional text messages on the Control
Display which are displayed immediately. Text
messages which do not appear immediately are
stored and can be displayed at a later time. For
details on displaying these messages later,
refer to Check Control on page71. Turn signals60
Handbrake set55
Handbrake for Canadian models
Front fog lamps92
DTC Dynamic Traction Control83
High beams/headlamp flasher92
DSC Dynamic Stability Control83
Page 35 of 217
Opening and closing
34 If special circumstances should make it abso-
lutely necessary to operate the vehicle with the
luggage compartment lid open:
1.Coupe: close both windows and the glass
sunroof
*.
Convertible: with closed top, close all win-
dows.
2.Increase the air volume of the automatic
climate control to a high level, refer to
page95.
Luggage compartment
There are four lashing eyes on the inner corners
of the luggage compartment for securing lug-
gage nets
* or securing straps to fix luggage in
position.
Also refer to Securing cargo, page111.
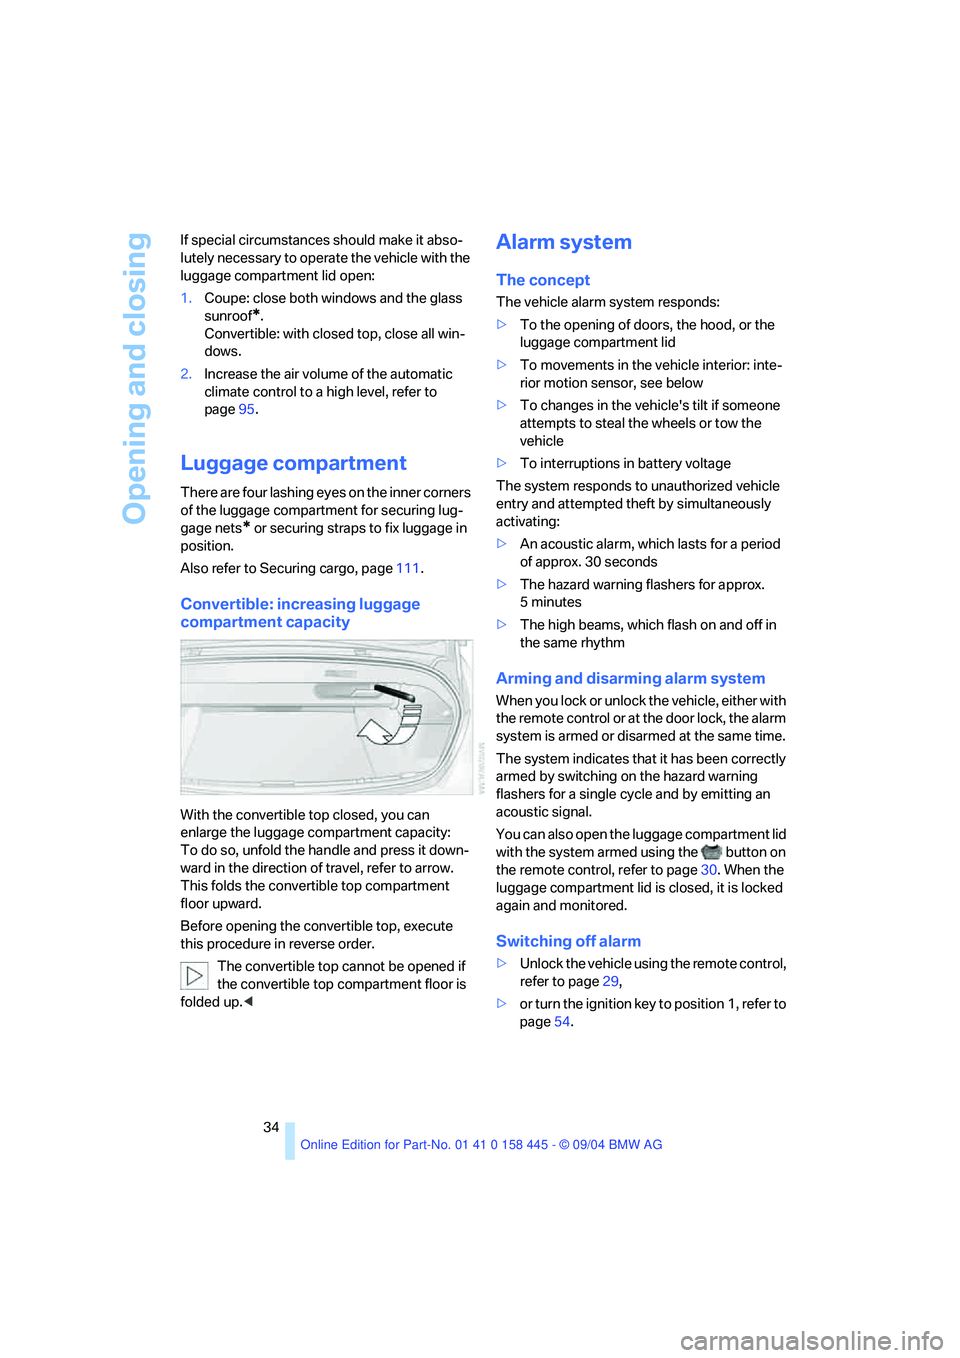
Convertible: increasing luggage
compartment capacity
With the convertible top closed, you can
enlarge the luggage compartment capacity:
To do so, unfold the handle and press it down-
ward in the direction of travel, refer to arrow.
This folds the convertible top compartment
floor upward.
Before opening the convertible top, execute
this procedure in reverse order.
The convertible top cannot be opened if
the convertible top compartment floor is
folded up.<
Alarm system
The concept
The vehicle alarm system responds:
>To the opening of doors, the hood, or the
luggage compartment lid
>To movements in the vehicle interior: inte-
rior motion sensor, see below
>To changes in the vehicle's tilt if someone
attempts to steal the wheels or tow the
vehicle
>To interruptions in battery voltage
The system responds to unauthorized vehicle
entry and attempted theft by simultaneously
activating:
>An acoustic alarm, which lasts for a period
of approx. 30 seconds
>The hazard warning flashers for approx.
5minutes
>The high beams, which flash on and off in
the same rhythm
Arming and disarming alarm system
When you lock or unlock the vehicle, either with
the remote control or at the door lock, the alarm
system is armed or disarmed at the same time.
The system indicates that it has been correctly
armed by switching on the hazard warning
flashers for a single cycle and by emitting an
acoustic signal.
You can also open the luggage compartment lid
with the system armed using the button on
the remote control, refer to page30. When the
luggage compartment lid is closed, it is locked
again and monitored.
Switching off alarm
>Unlock the vehicle using the remote control,
refer to page29,
>or turn the ignition key to position 1, refer to
page54.
Page 90 of 217
Controls
89Reference
At a glance
Driving tips
Communications
Navigation
Entertainment
Mobility
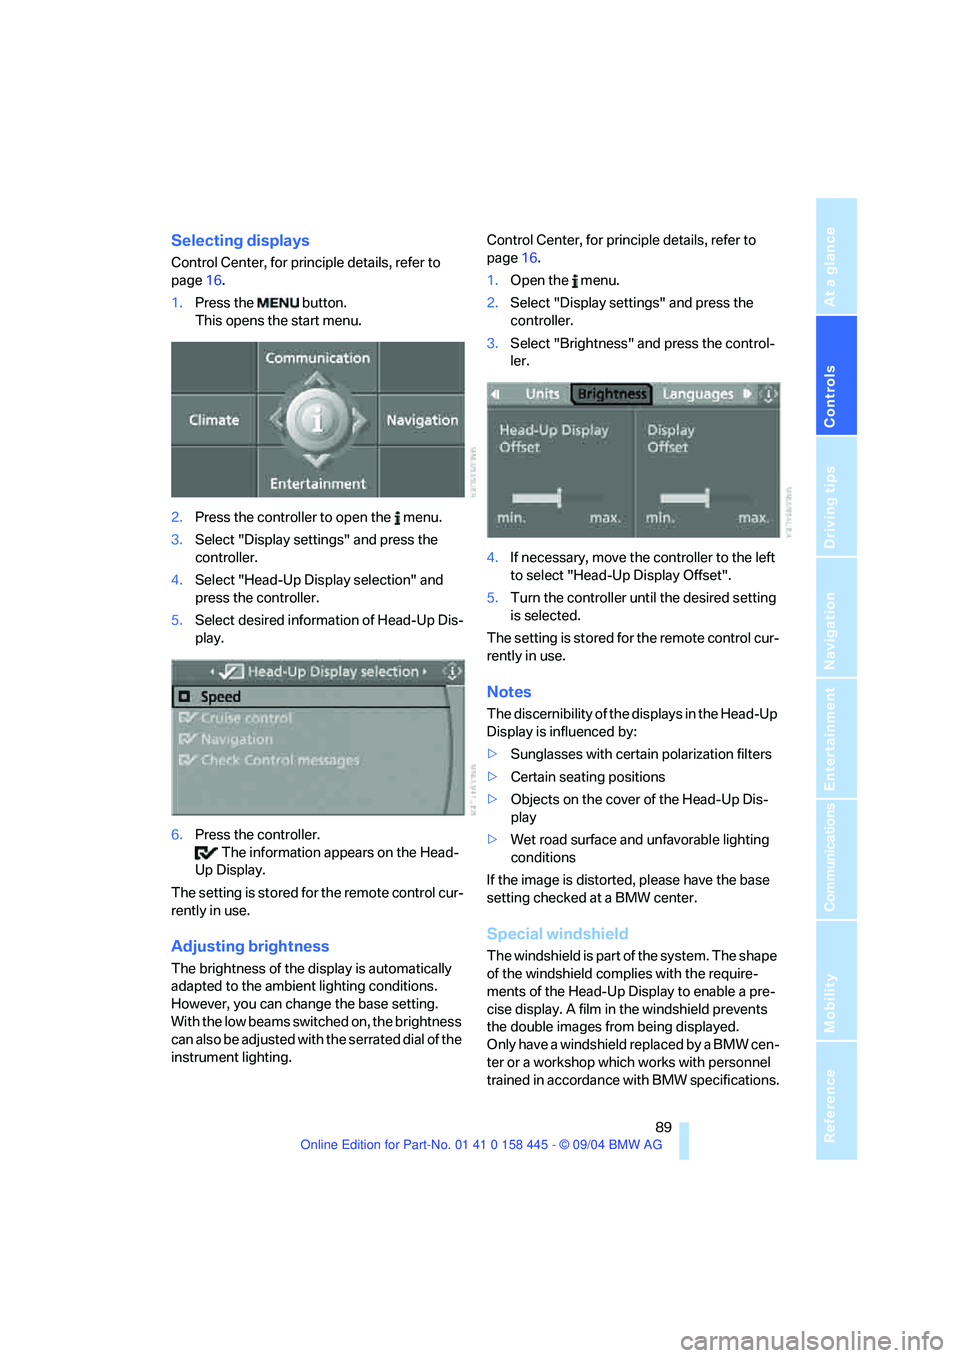
Selecting displays
Control Center, for principle details, refer to
page16.
1.Press the button.
This opens the start menu.
2.Press the controller to open the menu.
3.Select "Display settings" and press the
controller.
4.Select "Head-Up Display selection" and
press the controller.
5.Select desired information of Head-Up Dis-
play.
6.Press the controller.
The information appears on the Head-
Up Display.
The setting is stored for the remote control cur-
rently in use.
Adjusting brightness
The brightness of the display is automatically
adapted to the ambient lighting conditions.
However, you can change the base setting.
With the low beams switched on, the brightness
can also be adjusted with the serrated dial of the
instrument lighting.Control Center, for principle details, refer to
page16.
1.Open the menu.
2.Select "Display settings" and press the
controller.
3.Select "Brightness" and press the control-
ler.
4.If necessary, move the controller to the left
to select "Head-Up Display Offset".
5.Turn the controller until the desired setting
is selected.
The setting is stored for the remote control cur-
rently in use.
Notes
The discernibility of the displays in the Head-Up
Display is influenced by:
>Sunglasses with certain polarization filters
>Certain seating positions
>Objects on the cover of the Head-Up Dis-
play
>Wet road surface and unfavorable lighting
conditions
If the image is distorted, please have the base
setting checked at a BMW center.
Special windshield
The windshield is part of the system. The shape
of the windshield complies with the require-
ments of the Head-Up Display to enable a pre-
cise display. A film in the windshield prevents
the double images from being displayed.
Only have a windshield replaced by a BMW cen-
ter or a workshop which works with personnel
trained in accordance with BMW specifications.
Page 92 of 217
Controls
91Reference
At a glance
Driving tips
Communications
Navigation
Entertainment
Mobility
Lamps
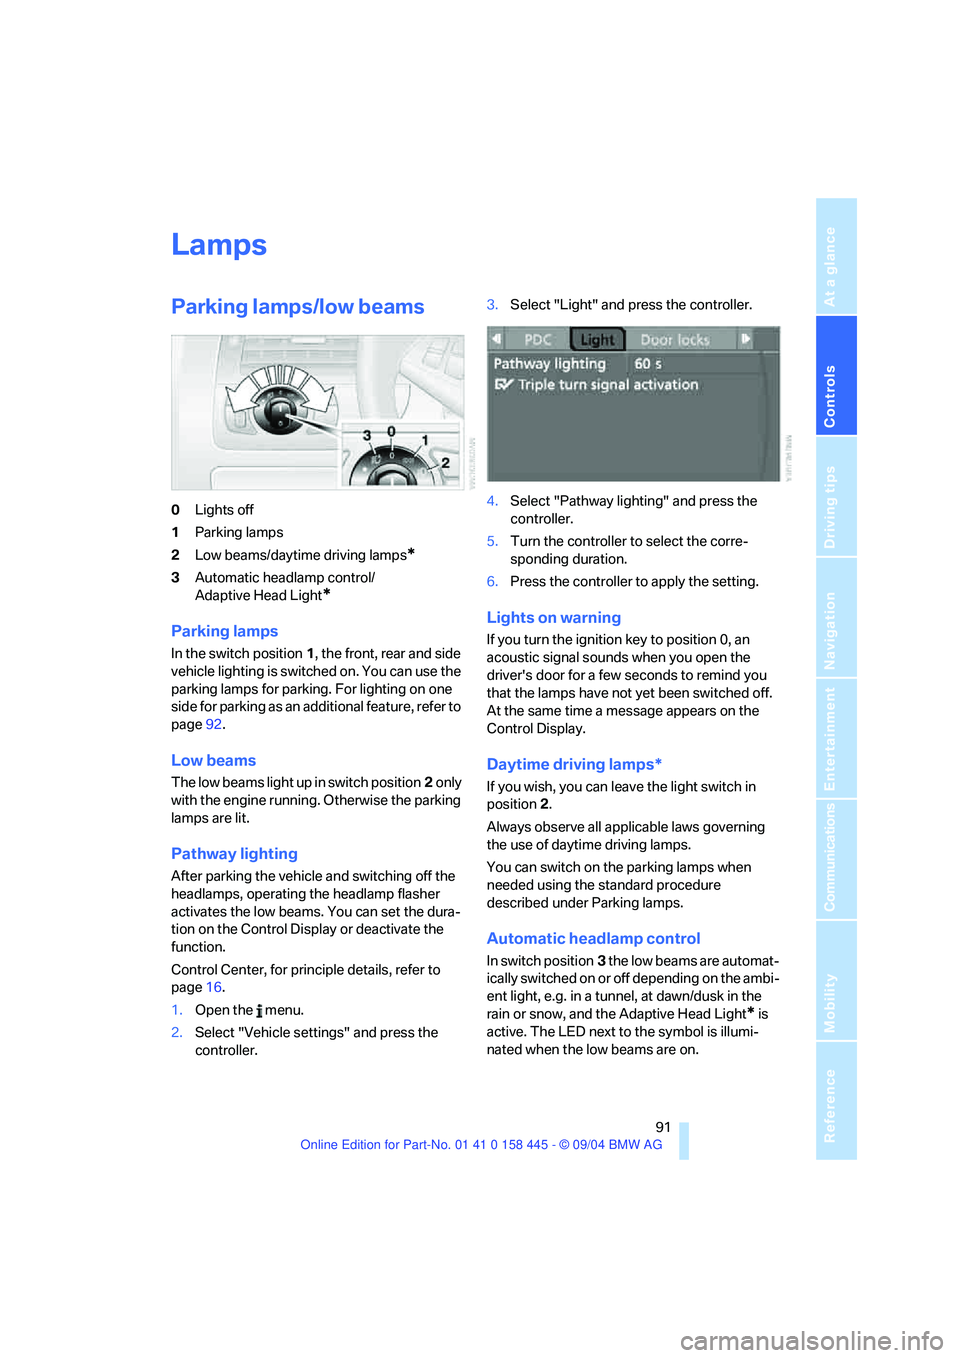
Parking lamps/low beams
0Lights off
1Parking lamps
2Low beams/daytime driving lamps
*
3Automatic headlamp control/
Adaptive Head Light
*
Parking lamps
In the switch position1, the front, rear and side
vehicle lighting is switched on. You can use the
parking lamps for parking. For lighting on one
side for parking as an additional feature, refer to
page92.
Low beams
The low beams light up in switch position2 only
with the engine running. Otherwise the parking
lamps are lit.
Pathway lighting
After parking the vehicle and switching off the
headlamps, operating the headlamp flasher
activates the low beams. You can set the dura-
tion on the Control Display or deactivate the
function.
Control Center, for principle details, refer to
page16.
1.Open the menu.
2.Select "Vehicle settings" and press the
controller.3.Select "Light" and press the controller.
4.Select "Pathway lighting" and press the
controller.
5.Turn the controller to select the corre-
sponding duration.
6.Press the controller to apply the setting.
Lights on warning
If you turn the ignition key to position 0, an
acoustic signal sounds when you open the
driver's door for a few seconds to remind you
that the lamps have not yet been switched off.
At the same time a message appears on the
Control Display.
Daytime driving lamps*
If you wish, you can leave the light switch in
position2.
Always observe all applicable laws governing
the use of daytime driving lamps.
You can switch on the parking lamps when
needed using the standard procedure
described under Parking lamps.
Automatic headlamp control
In switch position3 the low beams are automat-
ically switched on or off depending on the ambi-
ent light, e.g. in a tunnel, at dawn/dusk in the
rain or snow, and the Adaptive Head Light
* is
active. The LED next to the symbol is illumi-
nated when the low beams are on.
Page 93 of 217

Lamps
92 The low beams remain on independent of
the ambient lighting conditions when you
switch on the fog lamps.
With the daytime driving lamps activated, the
low beams are always switched on in this switch
position with the ignition key in position 2.<
The automatic headlamp control cannot
serve as a substitute for your personal
judgment in determining when the lamps
should be switched on in response to ambient
lighting conditions. For example, the system
cannot detect fog. To avoid safety risks, you
should always switch on the lamps manually
under these conditions.<
Adaptive Head Light*
The concept
Adaptive Head Light is a variable headlamp
control system that enables better illumination
of the road surface. Depending on the steering
angle and other assumptions, the light from the
headlamp follows the course of the road.
Activating Adaptive Head Light
In switch position3 the Adaptive Head Light is
active and the automatic headlamp control is
switched on.
To avoid blinding oncoming traffic, the Adaptive
Head Light
>is not active when driving in reverse
>i s o n l y a c t i v e t o w a r d p a s s e n g e r ' s s i d e w h e n
stationary
Malfunction
The LED beside the symbol for automatic head-
lamp control flashes. The Adaptive Head Light
is malfunctioning or has failed. Have the system
checked as soon as possible.
High beams/
roadside parking lamps
1High beams
2Headlamp flasher
3Roadside parking lamps
Roadside parking lamps, left or right*
You also enjoy the option of lighting up just one
side of your vehicle when parking. When using
this function, comply with national regulations:
With the ignition switched off, press the lever in
the desired direction3, past the resistance
point.
The roadside parking lamps drain the bat-
tery. Avoid using for longer periods, as
otherwise it may not be possible to start the
engine.<
Fog lamps
The parking lamps or low beams must
be switched on for the fog lamps to
operate. The green indicator lamp in
the instrument cluster lights up when the fog
lamps are switched on.
Page 94 of 217
Controls
93Reference
At a glance
Driving tips
Communications
Navigation
Entertainment
Mobility
The fog lamps are switched off whenever the
high beams are switched on.
If the automatic headlamp control is acti-
vated, the low beams will come on auto-
matically when you switch on the fog lamps.<
Instrument lighting
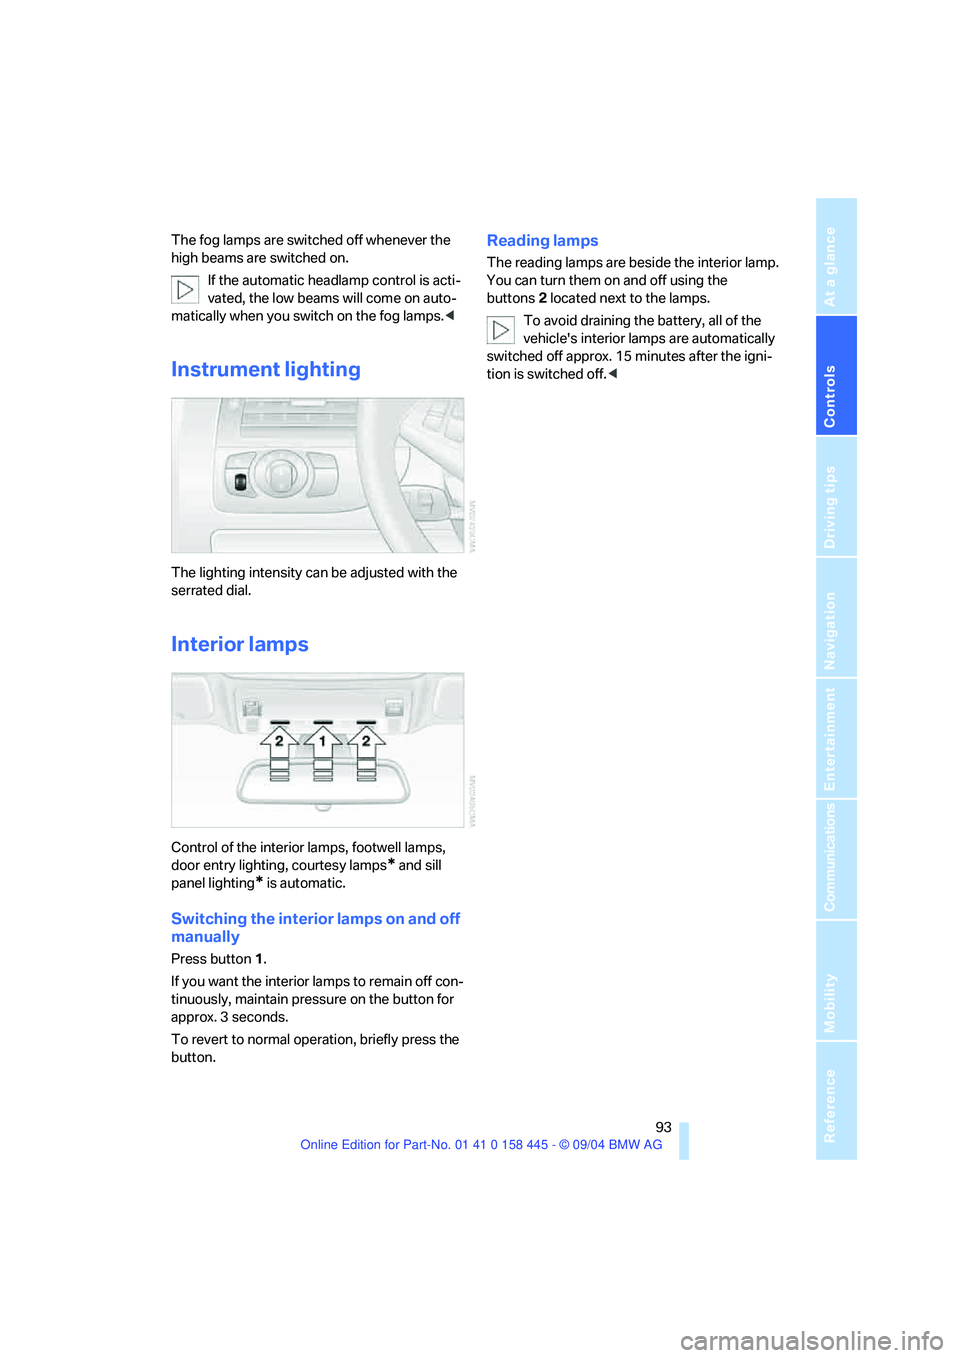
The lighting intensity can be adjusted with the
serrated dial.
Interior lamps
Control of the interior lamps, footwell lamps,
door entry lighting, courtesy lamps
* and sill
panel lighting
* is automatic.
Switching the interior lamps on and off
manually
Press button 1.
If you want the interior lamps to remain off con-
tinuously, maintain pressure on the button for
approx. 3 seconds.
To revert to normal operation, briefly press the
button.
Reading lamps
The reading lamps are beside the interior lamp.
You can turn them on and off using the
buttons2 located next to the lamps.
To avoid draining the battery, all of the
vehicle's interior lamps are automatically
switched off approx. 15 minutes after the igni-
tion is switched off.<
Page 204 of 217

Reference 203
At a glance
Controls
Driving tips
Communications
Navigation
Entertainment
Mobility
Destination for navigation
– destination list119
– entry115
– home address122
– selecting from address
book120
– selecting using
information118
– storing120
Destination guidance124
– bypassing route
sections128
– canceling voice
instructions51
– changing specified
route122
– displaying route127
– distance and arrival124
– interrupting125
– starting124
– terminating/continuing125
– voice instructions126
– volume of voice
instructions126
Destination list119
Destinations recently driven
to119
"Dial" for portable phone152
"Dial number"152
"Diamond button"51
Digital clock69
Dimensions
– Convertible194
– Coupe193
Dipstick for engine oil175
Directional indicators, refer to
Turn signals60
Direction announcements,
refer to Voice
instructions126
Direction instructions, refer to
Voice instructions126
Directory, refer to Phone
book153
Directory for navigation, refer
to Address book120
Disc brakes109Displacement, refer to Engine
data192
Display, refer to Control
Center16
"Display off"21
Displays, refer to Instrument
cluster12
"Display settings"77
Displays on the windshield,
refer to Head-Up Display88
Disposal, vehicle battery183
Distance, refer to
Computer75
Distance control, refer to
Active cruise control62
"Distance to dest."75
Distance to destination, refer
to Computer75
Distance warning, refer to
PDC Park Distance
Control80
Door entry lighting93
Door keys28
Door lock31
"Door locks"29
Doors
– manual operation31
– remote control30
DOT Quality Grades170
Draft-free ventilation97
"Driver's door only"29
Driving lamps, refer to Parking
lamps/low beams91
Driving notes108
Driving route, refer to
Displaying the route127
Driving stability control
systems82
Driving through water109
Driving tips, refer to Driving
notes108
Drying the air, refer to Cooling
function95
DSC Dynamic Stability
Control82
– indicator lamp13,83
– malfunction83DTC Dynamic Traction
Control82
– activating82
– indicator lamp13,82
DVD for navigation114
Dynamic Brake Control
DBC81
Dynamic Driving Control59
"Dynamic route" for
navigation122
Dynamic Stability Control
DSC82
– indicator lamp13,83
Dynamic Traction Control
DTC82
– indicator lamp13
E
Easy entry, refer to Entry to
the rear48
Easy entry/exit50
EBV, refer to Electronic brake-
force distribution81
"Edit address" for
navigation121
Eject button, refer to Buttons
on CD player132
Electrical malfunction
– convertible top41
– door lock31
– driver's door31
– fuel filler door166
– glass sunroof38
– luggage compartment lid33
– storage compartment, hotel
function32
Electric steering wheel
adjustment50
Electronic brake-force
distribution81
Emergency Assistance, refer
to Roadside Assistance186
Emergency call185