Page 748 of 2870

PM-11
PERIODIC MAINTENANCE SERVICE
V-belt
6. V-belt
A: INSPECTION
1) Replace the belts, if cracks, fraying or wear is
found.
2) Check the V-belt tension and adjust it if neces-
sary by changing the generator installing position
or idler pulley installing position.
REPLACEMENT, V-belt.>
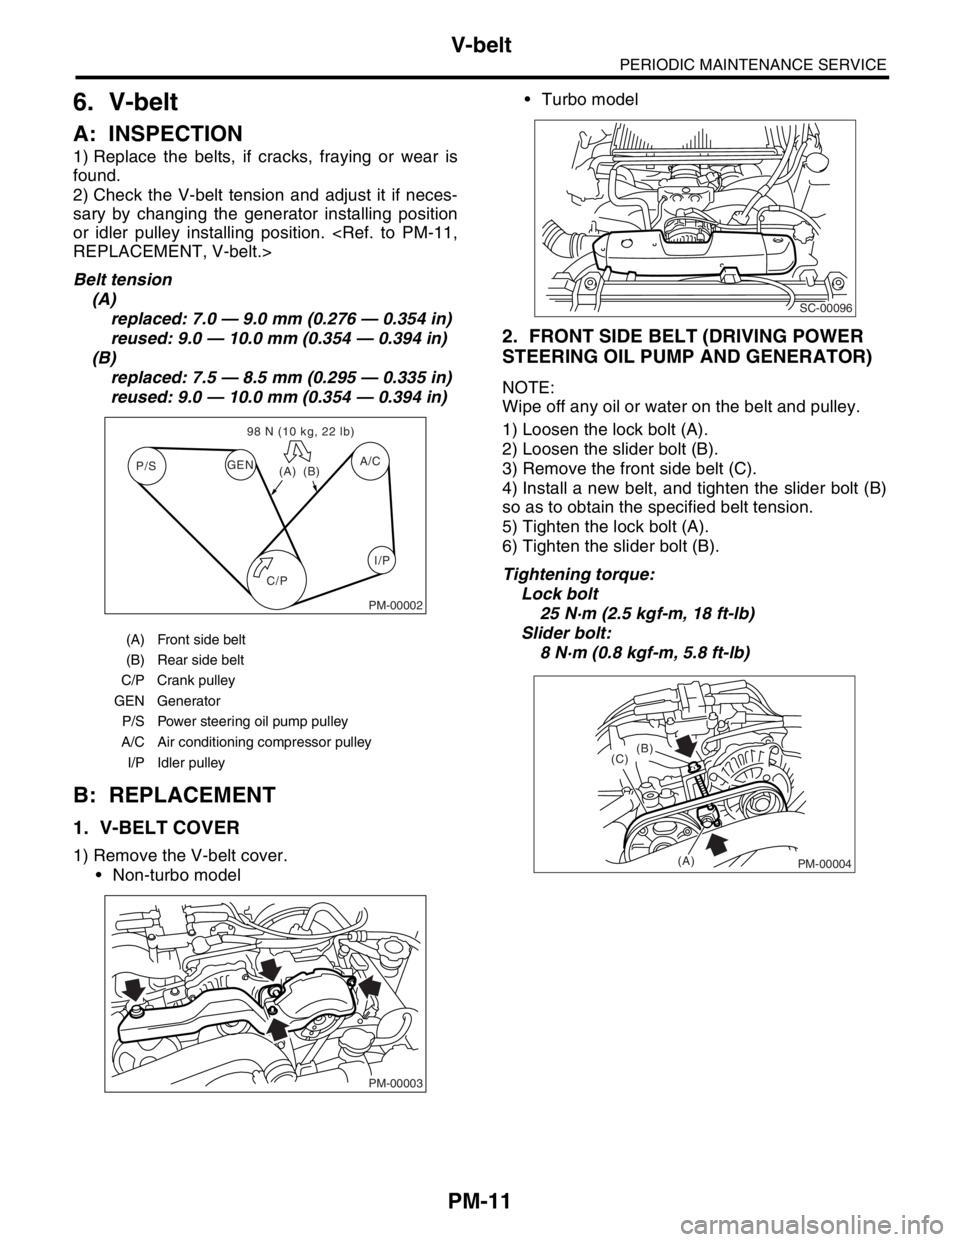
Belt tension
(A)
replaced: 7.0 — 9.0 mm (0.276 — 0.354 in)
reused: 9.0 — 10.0 mm (0.354 — 0.394 in)
(B)
replaced: 7.5 — 8.5 mm (0.295 — 0.335 in)
reused: 9.0 — 10.0 mm (0.354 — 0.394 in)
B: REPLACEMENT
1. V-BELT COVER
1) Remove the V-belt cover.
Non-turbo model Turbo model
2. FRONT SIDE BELT (DRIVING POWER
STEERING OIL PUMP AND GENERATOR)
NOTE:
Wipe off any oil or water on the belt and pulley.
1) Loosen the lock bolt (A).
2) Loosen the slider bolt (B).
3) Remove the front side belt (C).
4) Install a new belt, and tighten the slider bolt (B)
so as to obtain the specified belt tension.
5) Tighten the lock bolt (A).
6) Tighten the slider bolt (B).
Tightening torque:
Lock bolt
25 N·m (2.5 kgf-m, 18 ft-lb)
Slider bolt:
8 N·m (0.8 kgf-m, 5.8 ft-lb)
(A) Front side belt
(B) Rear side belt
C/P Crank pulley
GEN Generator
P/S Power steering oil pump pulley
A/C Air conditioning compressor pulley
I/P Idler pulley
C/P P/SA/C
GEN
(A)(B) 98 N (10 kg, 22 lb)
I/P
PM-00002
PM-00003
SC-00096
PM-00004
(B)
(C)
(A)
Page 749 of 2870
PM-12
PERIODIC MAINTENANCE SERVICE
V-belt
3. REAR SIDE BELT (DRIVING AIR CONDI-
TIONER)
NOTE:
Wipe off any oil or water on the belt and pulley.
1) Remove the front side belt.
2) Loosen the lock nut (A).
3) Loosen the slider bolt (B).
4) Remove the rear side belt.
5) Install a new belt, and tighten the slider bolt (B)
so as to obtain the specified belt tension.
6) Tighten the lock nut (A).
7) Install the front side belt.
REAR SIDE BELT, INSTALLATION, V-belt.>
Tightening torque:
23 N·m (2.3 kgf-m, 17.0 ft-lb)
(A) (B)
PM-00005
Page 750 of 2870

PM-13
PERIODIC MAINTENANCE SERVICE
Timing Belt
7. Timing Belt
A: REPLACEMENT
1. NON-TURBO MODEL
1) Remove the radiator fan and air conditioner fan.
Fan Motor.>
Fan and Fan Motor.>
2) Shield the radiator from any damage using card-
board and blanket.
3) Remove the V-belt cover.
4) Remove the V-belts.
belt.>
5) Remove the air conditioning compressor V-belt
tensioner.
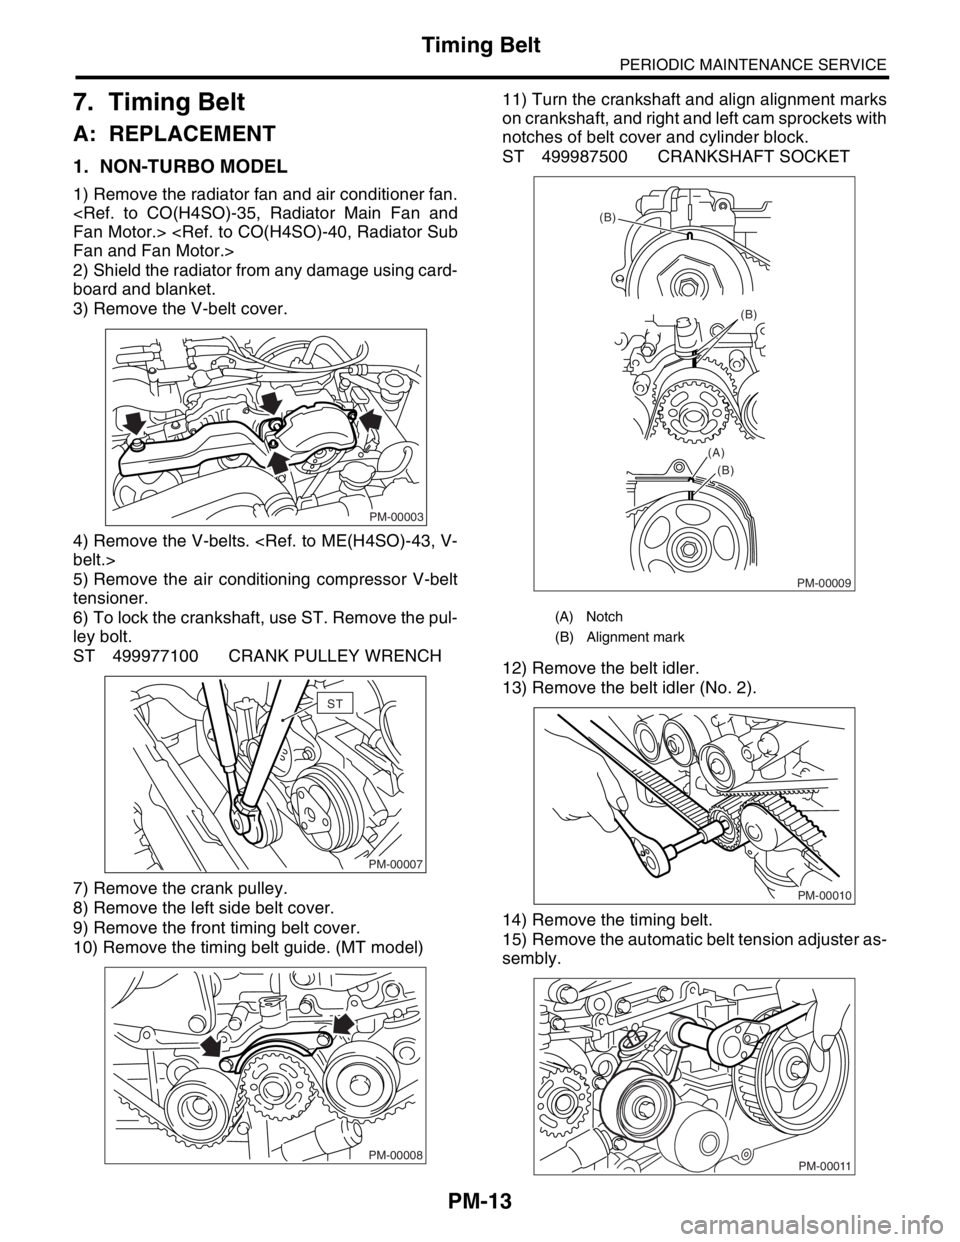
6) To lock the crankshaft, use ST. Remove the pul-
ley bolt.
ST 499977100 CRANK PULLEY WRENCH
7) Remove the crank pulley.
8) Remove the left side belt cover.
9) Remove the front timing belt cover.
10) Remove the timing belt guide. (MT model)11) Turn the crankshaft and align alignment marks
on crankshaft, and right and left cam sprockets with
notches of belt cover and cylinder block.
ST 499987500 CRANKSHAFT SOCKET
12) Remove the belt idler.
13) Remove the belt idler (No. 2).
14) Remove the timing belt.
15) Remove the automatic belt tension adjuster as-
sembly.
PM-00003
PM-00007
ST
PM-00008
(A) Notch
(B) Alignment mark
PM-00009
(B)
(B)
(B) (A)
PM-00010
PM-00011
Page 751 of 2870
PM-14
PERIODIC MAINTENANCE SERVICE
Timing Belt
16) Install in the reverse order of removal.
ME(H4SO)-49, INSTALLATION, Timing Belt.>
2. TURBO MODEL
1) Remove the radiator fan and air conditioner fan.
Fan Motor.>
Fan and Fan Motor.>
2) Protect the radiator with cardboard and blanket.
3) Remove the V-belts.
belt.>
4) Remove the air conditioning compressor drive
belt tensioner.
5) To lock the crankshaft use ST. Remove the pul-
ley bolt.
ST 499977300 CRANK PULLEY WRENCH
6) Remove the crank pulley.
7) Remove the air conditioning compressor drive
belt tensioner.
8) Remove the belt cover (LH).
9) Remove the belt cover (RH).
10) Remove the front belt cover.11) Remove the timing belt guide. (MT model)
12) Turn the crankshaft and align alignment marks
on crankshaft, and right and left cam sprockets with
notches of belt cover and cylinder block. To turn the
crankshaft, use ST.
STPM-00093
PM-00008
ME-00727
ME-00728
ME-00729
Page 752 of 2870

PM-15
PERIODIC MAINTENANCE SERVICE
Timing Belt
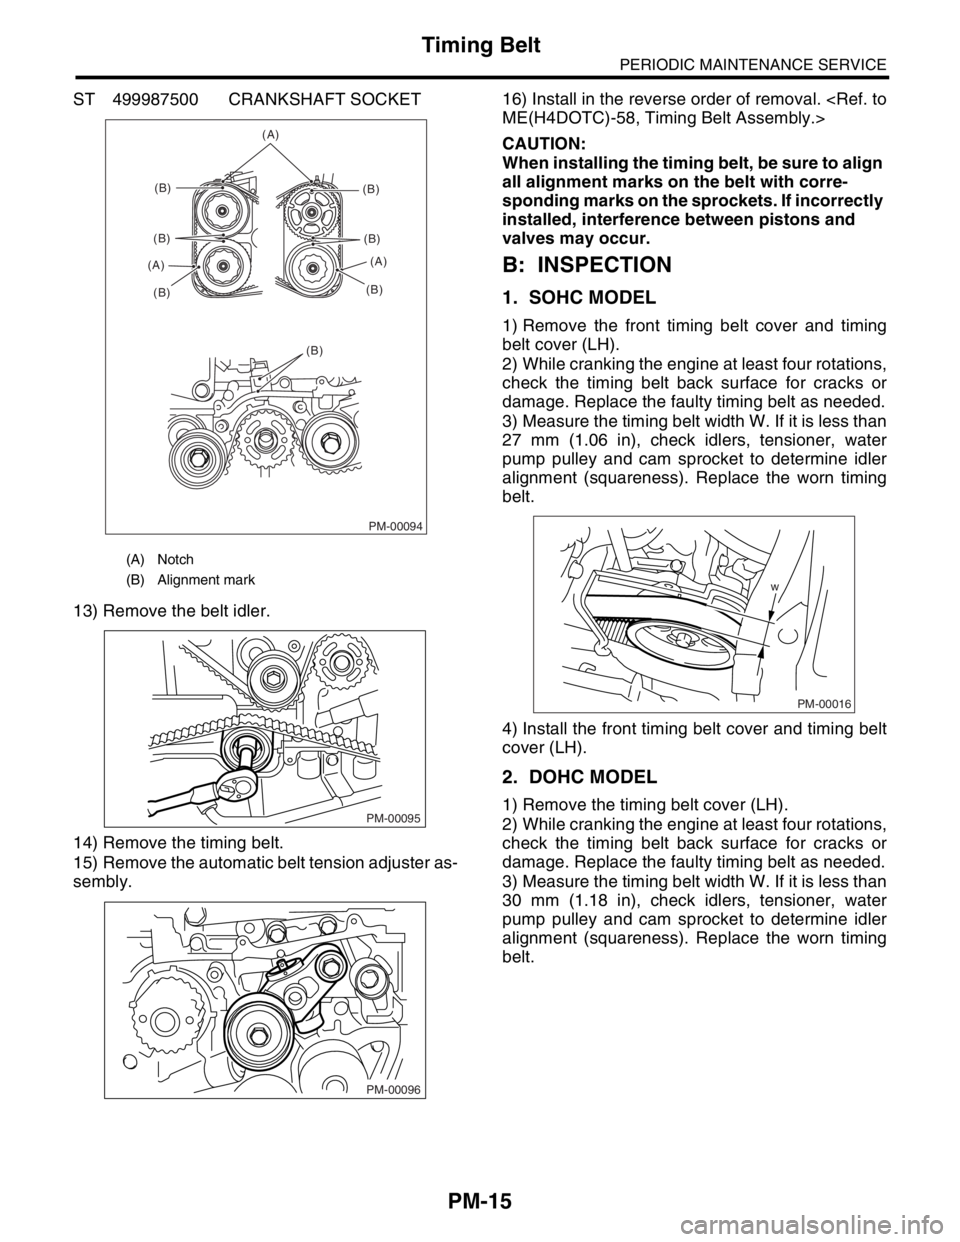
ST 499987500 CRANKSHAFT SOCKET
13) Remove the belt idler.
14) Remove the timing belt.
15) Remove the automatic belt tension adjuster as-
sembly.16) Install in the reverse order of removal.
ME(H4DOTC)-58, Timing Belt Assembly.>
CAUTION:
When installing the timing belt, be sure to align
all alignment marks on the belt with corre-
sponding marks on the sprockets. If incorrectly
installed, interference between pistons and
valves may occur.
B: INSPECTION
1. SOHC MODEL
1) Remove the front timing belt cover and timing
belt cover (LH).
2) While cranking the engine at least four rotations,
check the timing belt back surface for cracks or
damage. Replace the faulty timing belt as needed.
3) Measure the timing belt width W. If it is less than
27 mm (1.06 in), check idlers, tensioner, water
pump pulley and cam sprocket to determine idler
alignment (squareness). Replace the worn timing
belt.
4) Install the front timing belt cover and timing belt
cover (LH).
2. DOHC MODEL
1) Remove the timing belt cover (LH).
2) While cranking the engine at least four rotations,
check the timing belt back surface for cracks or
damage. Replace the faulty timing belt as needed.
3) Measure the timing belt width W. If it is less than
30 mm (1.18 in), check idlers, tensioner, water
pump pulley and cam sprocket to determine idler
alignment (squareness). Replace the worn timing
belt.
(A) Notch
(B) Alignment mark
PM-00094
(A)
(B)
(B)
(B) (A)(B)
(B)
(B)(A)
(B)
PM-00095
PM-00096
w
PM-00016
Page 753 of 2870
PM-16
PERIODIC MAINTENANCE SERVICE
Timing Belt
4) Install the timing belt cover (LH).
W
PM-00097
Page 754 of 2870
PM-17
PERIODIC MAINTENANCE SERVICE
Fuel Line
8. Fuel Line
A: INSPECTION
Check pipes and areas near pipes for rust, hose
damage, loose bands, etc. If faulty parts are found,
repair or replace them.
Fuel Delivery, Return and Evaporation Lines.>
Page 755 of 2870
PM-18
PERIODIC MAINTENANCE SERVICE
Fuel Filter
9. Fuel Filter
A: REPLACEMENT
For fuel filter replacement procedures, refer to “FU”
section.
B: INSPECTION
1) If fuel filter is clogged, or if replacement interval
has been reached, replace it.
2) If water is found in it, shake and expel the water
from inlet port.