2004 SUBARU FORESTER relay
[x] Cancel search: relayPage 1166 of 2870

EN(H4SO)-68
ENGINE (DIAGNOSTIC)
Diagnostics for Engine Starting Failure
Step Check Yes No
1 CHECK OPERATING SOUND OF FUEL
PUMP.
Check that the fuel pump is in operation for two
seconds when turning the ignition switch to
ON.
N
OTE:
Fuel pump operation can also be executed us-
ing Subaru Select Monitor.
Refer to “Compulsory Valve Operation Check
Mode” for procedures.
operating sound?Check the fuel
injector circuit.
FUEL INJECTOR
CIRCUIT, Diag-
nostics for Engine
Starting Failure.>Go to step 2.
2 CHECK GROUND CIRCUIT OF FUEL PUMP.
1) Turn the ignition switch to OFF.
2) Remove the fuel pump access hole lid.
3) Disconnect the connector from fuel pump.
4) Measure the resistance of harness connec-
tor between fuel pump and chassis ground.
Connector & terminal
(R58) No. 4 — Chassis ground:Is the resistance less than 5
Ω?Go to step 3.Repair harness
and connector.
N
OTE:
In this case repair
the following:
Open circuit in
harness between
fuel pump connec-
tor and chassis
grounding terminal
Poor contact in
coupling connector
3 CHECK POWER SUPPLY TO FUEL PUMP.
1) Turn the ignition switch to ON.
2) Measure the voltage of power supply circuit
between fuel pump connector and chassis
ground.
Connector & terminal
(R58) No. 1 (+) — Chassis ground (
−):Is the voltage more than 10 V? Replace the fuel
pump.
Fuel Pump.>Go to step 4.
4 CHECK HARNESS BETWEEN FUEL PUMP
AND FUEL PUMP RELAY CONNECTOR.
1) Turn the ignition switch to OFF.
2) Measure the resistance of harness connec-
tor between fuel pump and fuel pump relay.
Connector & terminal
(R58) No. 1 — (B46) No. 4:Is the resistance less than 1
Ω?Go to step 5.Repair harness
and connector.
N
OTE:
In this case repair
the following:
Open circuit in
harness between
fuel pump connec-
tor and chassis
grounding terminal
Poor contact in
coupling connector
5 CHECK HARNESS BETWEEN FUEL PUMP
AND FUEL PUMP RELAY CONNECTOR.
Measure the resistance of harness between
fuel pump and fuel pump relay connector.
Connector & terminal
(R58) No. 1 — Chassis ground:Is the resistance more than 1
MΩ?Go to step 6.Repair short circuit
in harness
between fuel pump
and fuel pump
relay connector.
6 CHECK FUEL PUMP RELAY.
1) Disconnect the connectors from fuel pump
relay and main relay.
2) Remove the fuel pump relay and main relay
with bracket.
3) Connect the battery to fuel pump relay con-
nector terminals No. 1 and No. 3.
4) Measure the resistance between connector
terminals of fuel pump relay.
Te r m i n a l s
No. 2 — No. 4:Is the resistance less than 10
Ω?Go to step 7.Replace the fuel
pump relay.
Fuel Pump.>
Page 1167 of 2870

EN(H4SO)-69
ENGINE (DIAGNOSTIC)
Diagnostics for Engine Starting Failure
7 CHECK HARNESS BETWEEN ECM AND
FUEL PUMP RELAY CONNECTOR.
1) Disconnect the connector from ECM.
2) Measure the resistance of harness
between ECM and fuel pump relay connector.
Connector & terminal
(B134) No. 26 — (B46) No. 3:Is the resistance less than 1
Ω?Go to step 8.Repair open circuit
in harness
between ECM and
fuel pump relay
connector.
8 CHECK POOR CONTACT.
Check poor contact in ECM connector.Is there poor contact in ECM
connector?Repair the poor
contact in ECM
connector.Check the fuel
injector circuit.
FUEL INJECTOR
CIRCUIT, Diag-
nostics for Engine
Starting Failure.> Step Check Yes No
Page 1168 of 2870

EN(H4SO)-70
ENGINE (DIAGNOSTIC)
Diagnostics for Engine Starting Failure
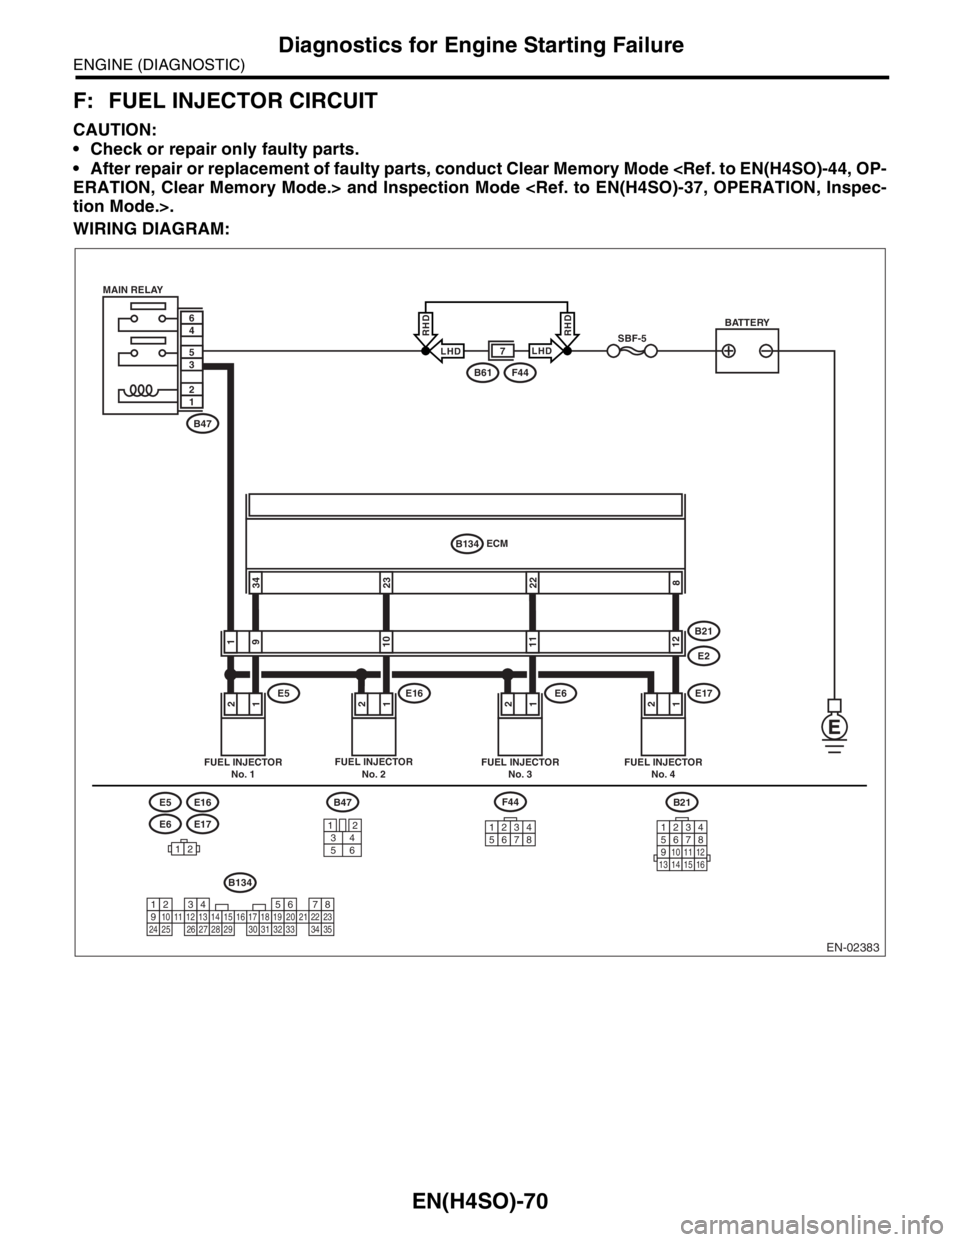
F: FUEL INJECTOR CIRCUIT
CAUTION:
Check or repair only faulty parts.
After repair or replacement of faulty parts, conduct Clear Memory Mode
WIRING DIAGRAM:
EN-02383
B21
12345678910111213141516
E6E17
E5E16
12
12121212
2223348
91101112
ECM
B134
E5E16E6E17
B21
E2
FUEL INJECTOR
No. 1FUEL INJECTOR
No. 2FUEL INJECTOR
No. 3FUEL INJECTOR
No. 4
BATTERY
F44B61
SBF-5
B47 MAIN RELAY
12
35
46
B47
34
12
56
F44
12345678
B134
1234567891011121314151617181920212223242526272829303132333435
LHDLHD
RHDRHD
7
Page 1169 of 2870

EN(H4SO)-71
ENGINE (DIAGNOSTIC)
Diagnostics for Engine Starting Failure
Step Check Yes No
1 CHECK OPERATION OF EACH FUEL INJEC-
TOR.
While cranking the engine, check that each
fuel injector emits operating sound. Use a
sound scope or apply a screwdriver to the
injector for this check.Does the fuel pump emit oper-
ating sound?Check the fuel
pressure.
INSPECTION,
Fuel Pressure.>Go to step 2.
2 CHECK POWER SUPPLY TO EACH FUEL
INJECTOR.
1) Turn the ignition switch to OFF.
2) Disconnect the connector from fuel injector.
3) Turn the ignition switch to ON.
4) Measure the power supply voltage between
fuel injector terminal and engine ground.
Connector & terminal
#1 (E5) No. 2 (+) — Engine ground (
−):
#2 (E16) No. 2 (+) — Engine ground (
−):
#3 (E6) No. 2 (+) — Engine ground (
−):
#4 (E17) No. 2 (+) — Engine ground (
−):Is the voltage more than 10 V? Go to step 3.Repair harness
and connector.
N
OTE:
In this case repair
the following:
Open circuit in
harness between
main relay and fuel
injector connector
Poor contact in
main relay connec-
tor
Poor contact in
coupling connector
Poor contact in
fuel injector con-
nector
3 CHECK HARNESS BETWEEN ECM AND
FUEL INJECTOR CONNECTOR.
1) Disconnect the connector from ECM.
2) Measure the resistance of harness
between ECM and fuel injector connector.
Connector & terminal
#1 (B134) No. 34 — (E5) No. 1:
#2 (B134) No. 23 — (E16) No. 1:
#3 (B134) No. 22 — (E6) No. 1:
#4 (B134) No. 8 — (E17) No. 1:Is the resistance less than 1
Ω?Go to step 4.Repair harness
and connector.
N
OTE:
In this case repair
the following:
Open circuit in
harness between
ECM and fuel
injector connector
Poor contact in
coupling connector
4 CHECK HARNESS BETWEEN ECM AND
FUEL INJECTOR CONNECTOR.
Measure the resistance of harness between
ECM and fuel injector connector.
Connector & terminal
#1 (B134) No. 34 — Chassis ground:
#2 (B134) No. 23 — Chassis ground:
#3 (B134) No. 22 — Chassis ground:
#4 (B134) No. 8 — Chassis ground:Is the resistance more than 1
MΩ?Go to step 5.Repair ground
short circuit in har-
ness between
ECM and fuel
injector connector.
5 CHECK EACH FUEL INJECTOR.
1) Turn the ignition switch to OFF.
2) Measure the resistance between each fuel
injector terminals.
Te r m i n a l s
No. 1 — No. 2:Is the resistance 5 — 20 Ω? Go to step 6.Replace the faulty
fuel injector.
6 CHECK POOR CONTACT.
Check poor contact in ECM connector.Is there poor contact in ECM
connector?Repair the poor
contact in ECM
connector.Inspection using
“General Diagnos-
tic Table”
INSPECTION,
General Diagnos-
tic Table.>
Page 1176 of 2870

EN(H4SO)-78
ENGINE (DIAGNOSTIC)
Diagnostic Procedure with Diagnostic Trouble Code (DTC)
19.Diagnostic Procedure with Diagnostic Trouble Code (DTC)
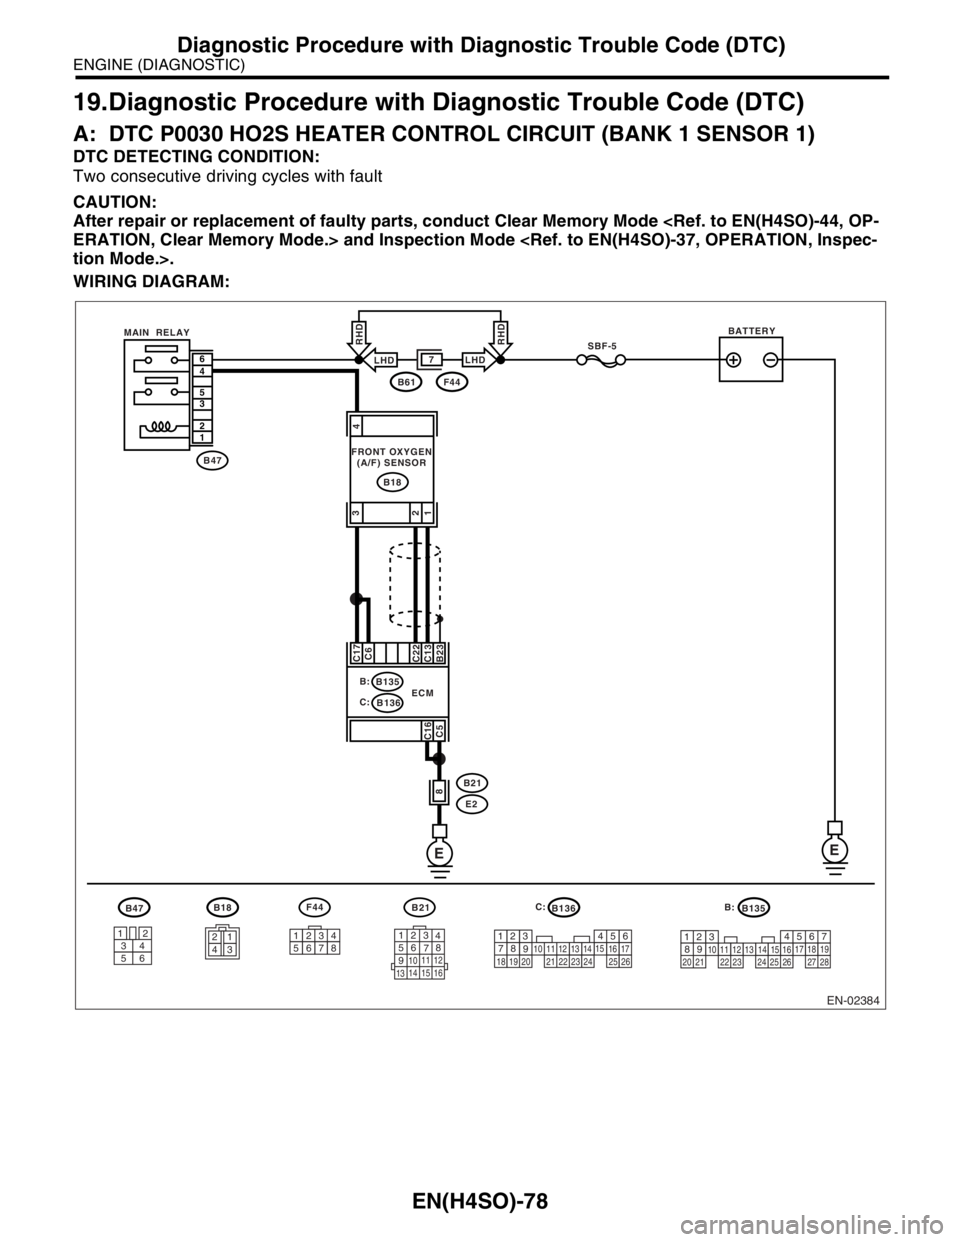
A: DTC P0030 HO2S HEATER CONTROL CIRCUIT (BANK 1 SENSOR 1)
DTC DETECTING CONDITION:
Two consecutive driving cycles with fault
CAUTION:
After repair or replacement of faulty parts, conduct Clear Memory Mode
WIRING DIAGRAM:
EN-02384
B18
3412
56
B47F44
12345678
B136B135
1234
B21
123
4
56
78
9
1011 12
1314 15 16
SBF-5
EE
B47
B18
6
4
5
3
2
1
B23 C13
C22C6 C17
C16
C5
8
B:
C:B135
B136
B21
E2 ECMBATTERY
B61F44
7
FRONT OXYGEN
(A/F) SENSOR MAIN RELAY
567
82 1
94
310
24
22 23251112131415
26 27
281617181920 21
5
2
84
3923 20 211011
221617
24
2512136
261915
14
1
7
18
LHDLHD
RHDRHD
4
3
1 2
B: C:
Page 1177 of 2870

EN(H4SO)-79
ENGINE (DIAGNOSTIC)
Diagnostic Procedure with Diagnostic Trouble Code (DTC)
Step Check Yes No
1 CHECK HARNESS BETWEEN ECM AND
FRONT OXYGEN (A/F) SENSOR CONNEC-
TOR.
1) Start the engine, and warm-up the engine.
2) Turn the ignition switch to OFF.
3) Disconnect the connector from ECM and
front oxygen (A/F) sensor.
4) Measure the resistance of harness
between ECM and front oxygen (A/F) sensor
connector.
Connector & terminal
(B136) No. 6 — (B18) No. 3:
(B136) No. 17 — (B18) No. 3:Is the resistance less than 1
Ω?Go to step 2.Repair open circuit
in harness
between ECM and
front oxygen (A/F)
sensor connector.
2 CHECK HARNESS BETWEEN ECM AND
FRONT OXYGEN (A/F) SENSOR CONNEC-
TOR.
Measure the resistance of harness between
ECM and front oxygen (A/F) sensor connector.
Connector & terminal
(B136) No. 13 — (B18) No. 1:
(B136) No. 22 — (B18) No. 2:Is the resistance less than 1
Ω?Go to step 3.Repair open circuit
in harness
between ECM and
front oxygen (A/F)
sensor connector.
3 CHECK HARNESS BETWEEN MAIN RELAY
AND FRONT OXYGEN (A/F) SENSOR CON-
NECTOR.
Measure the resistance of harness between
main relay and front oxygen (A/F) sensor con-
nector.
Connector & terminal
(B47) No. 4 — (B18) No. 4:Is the resistance less than 1
Ω?Go to step 4.Repair open circuit
in harness
between ECM and
front oxygen (A/F)
sensor connector.
4 CHECK FRONT OXYGEN (A/F) SENSOR.
Measure the resistance between front oxygen
(A/F) sensor connector terminals.
Te r m i n a l s
No. 3 — No. 4:Is the resistance less than 5
Ω?Go to step 5.Replace the front
oxygen (A/F) sen-
sor.
Front Oxygen (A/
F) Sensor.>
5 CHECK POOR CONTACT.
Check poor contact in ECM and front oxygen
(A/F) sensor connector. Is there poor contact in ECM or
front oxygen (A/F) sensor con-
nector?Repair poor con-
tact in ECM or
front oxygen (A/F)
sensor connector.Replace the front
oxygen (A/F) sen-
sor.
Front Oxygen (A/
F) Sensor.>
Page 1178 of 2870

EN(H4SO)-80
ENGINE (DIAGNOSTIC)
Diagnostic Procedure with Diagnostic Trouble Code (DTC)
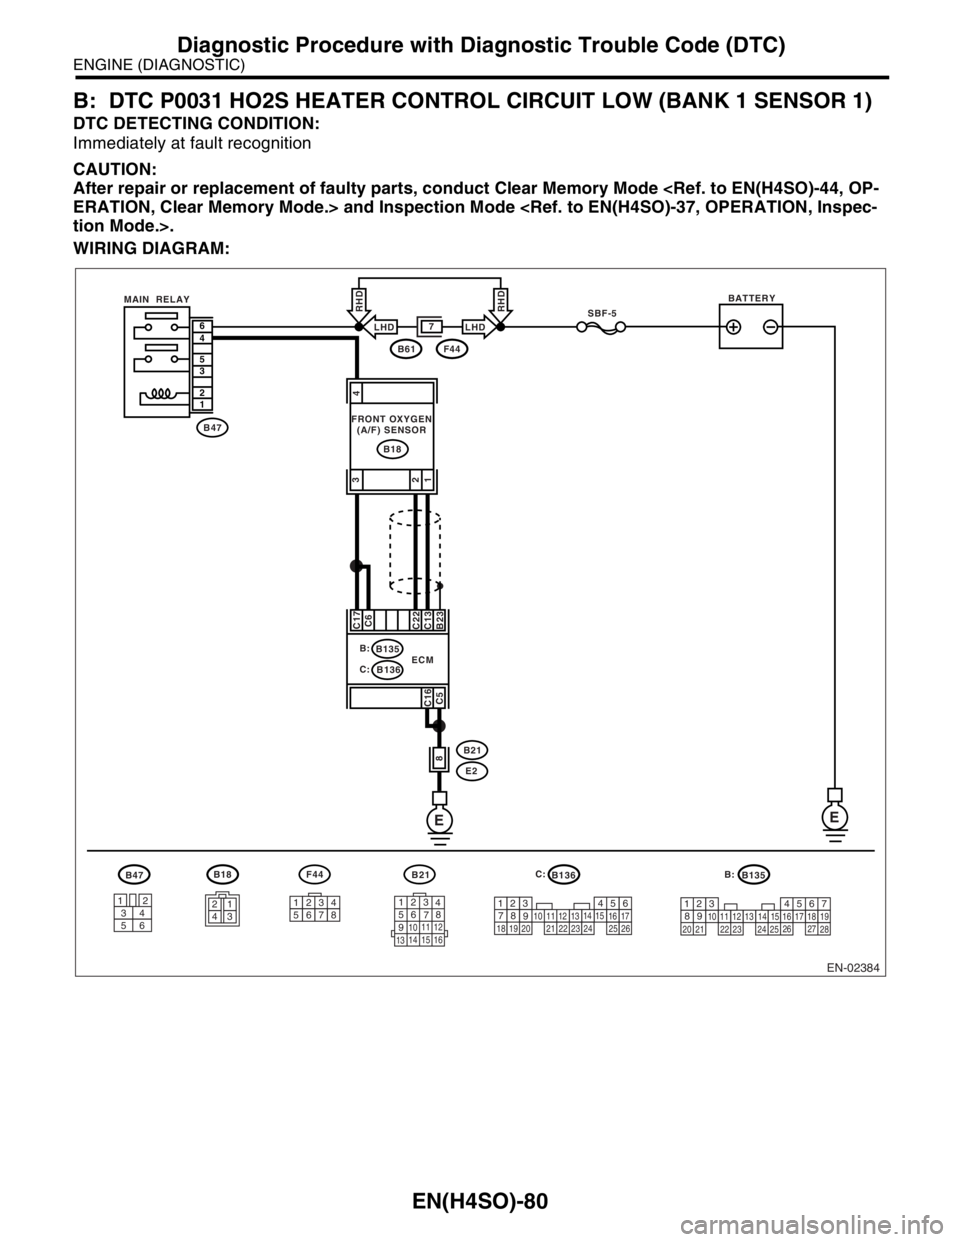
B: DTC P0031 HO2S HEATER CONTROL CIRCUIT LOW (BANK 1 SENSOR 1)
DTC DETECTING CONDITION:
Immediately at fault recognition
CAUTION:
After repair or replacement of faulty parts, conduct Clear Memory Mode
WIRING DIAGRAM:
EN-02384
B18
3412
56
B47F44
12345678
B136B135
1234
B21
123
4
56
78
9
1011 12
1314 15 16
SBF-5
EE
B47
B18
6
4
5
3
2
1
B23 C13
C22C6 C17
C16
C5
8
B:
C:B135
B136
B21
E2 ECMBATTERY
B61F44
7
FRONT OXYGEN
(A/F) SENSOR MAIN RELAY
567
82 1
94
310
24
22 23251112131415
26 27
281617181920 21
5
2
84
3923 20 211011
221617
24
2512136
261915
14
1
7
18
LHDLHD
RHDRHD
4
3
1 2
B: C:
Page 1179 of 2870

EN(H4SO)-81
ENGINE (DIAGNOSTIC)
Diagnostic Procedure with Diagnostic Trouble Code (DTC)
Step Check Yes No
1 CHECK ANY OTHER DTC ON DISPLAY.Does the Subaru Select Moni-
tor or OBD-II general scan tool
indicate DTC P0031 and
P0037 at the same time?Go to step 2.Go to step 5.
2 CHECK POWER SUPPLY TO FRONT OXY-
GEN (A/F) SENSOR.
1) Turn the ignition switch to OFF.
2) Disconnect the connector from front oxygen
(A/F) sensor.
3) Turn the ignition switch to ON.
4) Measure the voltage between front oxygen
(A/F) sensor connector and engine ground.
Connector & terminal
(B18) No. 4 (+) — Engine ground (
−):Is the voltage more than 10 V? Go to step 3.Repair the power
supply line.
N
OTE:
In this case repair
the following:
Open circuit in
harness between
main relay and
front oxygen (A/F)
sensor connector
Poor contact in
front oxygen (A/F)
sensor connector
Poor contact in
main relay connec-
tor
3 CHECK GROUND CIRCUIT FOR ECM.
Measure the resistance of harness between
ECM connector and chassis ground.
Connector & terminal
(B136) No. 5 — Chassis ground:
(B136) No. 16 — Chassis ground:Is the resistance less than 5
Ω?Go to step 4.Repair harness
and connector.
N
OTE:
In this case repair
the following:
Open circuit in
harness between
ECM and engine
ground terminal
Poor contact in
ECM connector.
Poor contact in
coupling connector
4 CHECK CURRENT DATA.
1) Start the engine.
2) Read the data of front oxygen (A/F) sensor
heater current using Subaru Select Monitor or
OBD-II general scan tool.
N
OTE:
Subaru Select Monitor
For detailed operation procedure, refer to the
“READ CURRENT DATA FOR ENGINE”.
OBD-II general scan tool
For detailed operation procedures, refer to the
OBD-II General Scan Tool Operation Manual.Is the current more than 0.2 A? Repair poor con-
tact connector.
N
OTE:
In this case repair
the following:
Poor contact in
front oxygen (A/F)
sensor connector
Poor contact in
ECM connector.Go to step 5.
5 CHECK INPUT SIGNAL FROM ECM.
1) Start and idle the engine.
2) Measure the voltage between ECM con-
nector and chassis ground.
Connector & terminal
(B136) No. 6 (+) — Chassis ground (
−):
(B136) No. 17 (+) — Chassis ground (
−):Is the voltage less than 1 V? Go to step 7.Go to step 6.
6 CHECK OUTPUT SIGNAL FROM ECM.
Measure the voltage between ECM connector
and chassis ground.
Connector & terminal
(B136) No. 6 (+) — Chassis ground (
−):
(B136) No. 17 (+) — Chassis ground (
−):Is the voltage less than 1 V by
shaking the ECM harness and
connector while monitoring the
value of voltage meter?Repair the poor
contact in ECM
connector.Go to step 7.