2004 SUBARU FORESTER check oil
[x] Cancel search: check oilPage 1491 of 2870
ME(H4DOTC)-35
MECHANICAL
Engine Oil Pressure
6. Engine Oil Pressure
A: INSPECTION
1) Remove the oil pressure switch from engine cyl-
inder block.
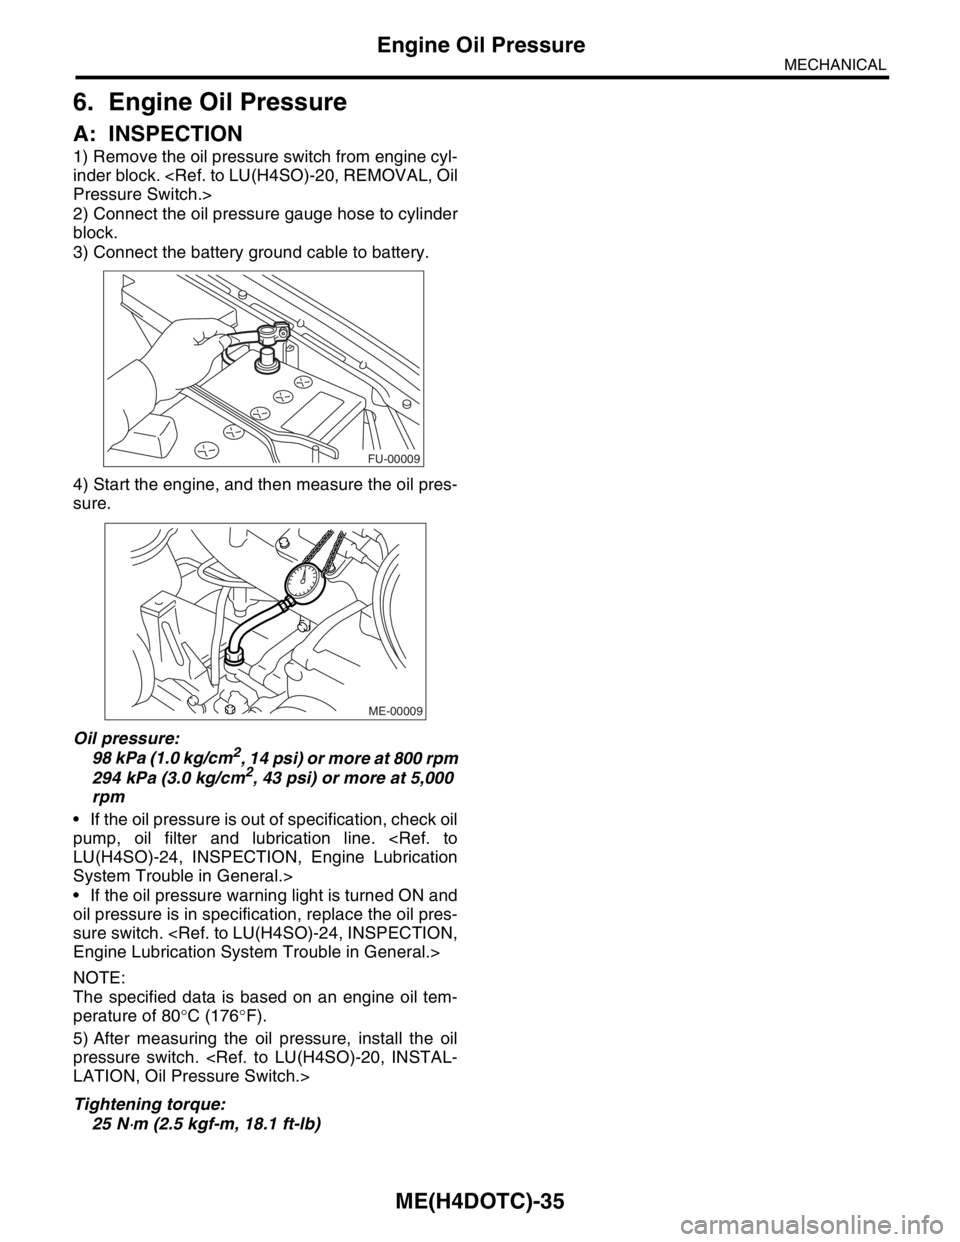
2) Connect the oil pressure gauge hose to cylinder
block.
3) Connect the battery ground cable to battery.
4) Start the engine, and then measure the oil pres-
sure.
Oil pressure:
98 kPa (1.0 kg/cm
2, 14 psi) or more at 800 rpm
294 kPa (3.0 kg/cm2, 43 psi) or more at 5,000
rpm
If the oil pressure is out of specification, check oil
pump, oil filter and lubrication line.
System Trouble in General.>
If the oil pressure warning light is turned ON and
oil pressure is in specification, replace the oil pres-
sure switch.
NOTE:
The specified data is based on an engine oil tem-
perature of 80°C (176°F).
5) After measuring the oil pressure, install the oil
pressure switch.
Tightening torque:
25 N
⋅m (2.5 kgf-m, 18.1 ft-lb)
FU-00009
ME-00009
Page 1503 of 2870
ME(H4DOTC)-45
MECHANICAL
Engine Assembly
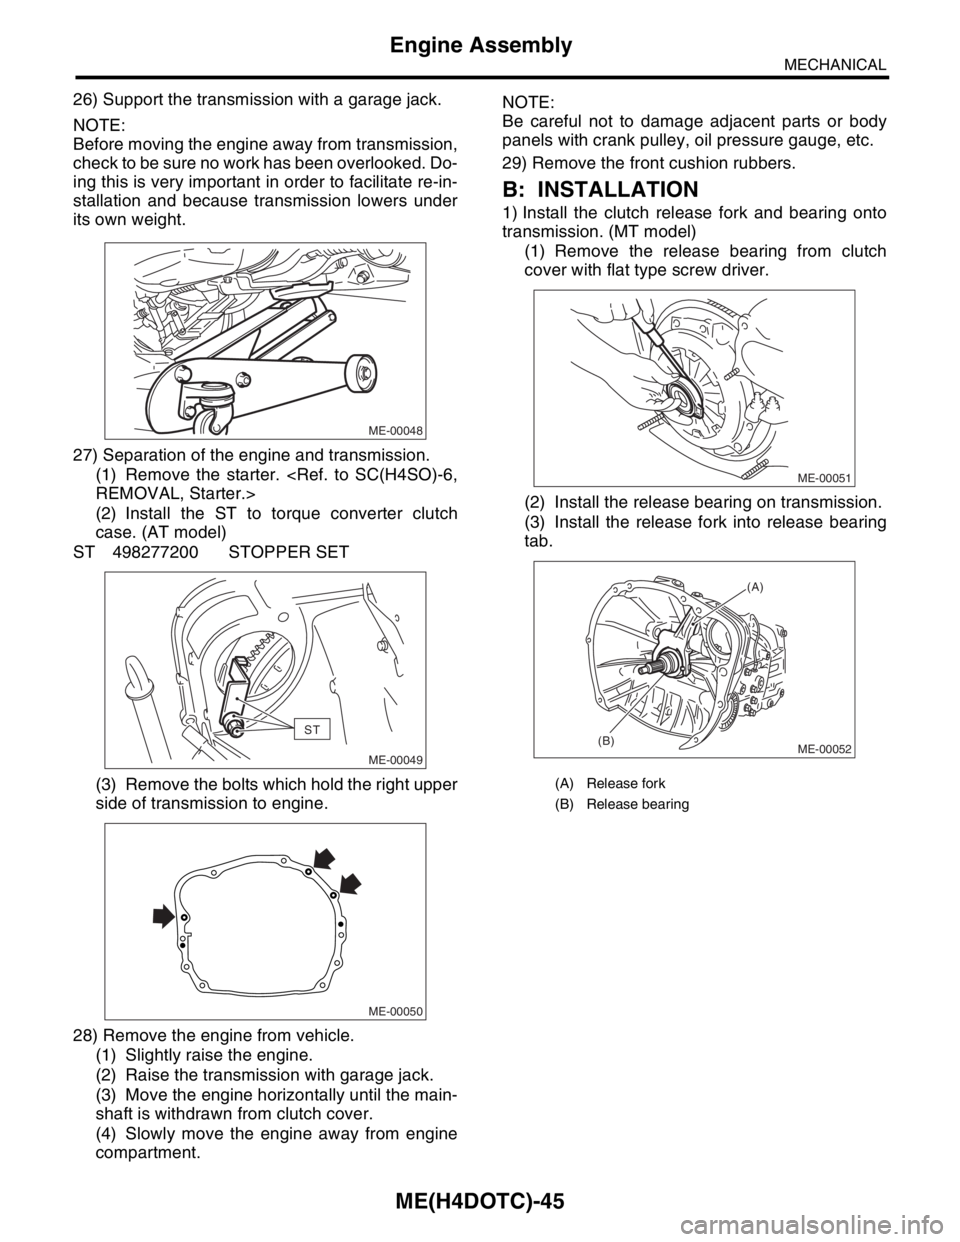
26) Support the transmission with a garage jack.
NOTE:
Before moving the engine away from transmission,
check to be sure no work has been overlooked. Do-
ing this is very important in order to facilitate re-in-
stallation and because transmission lowers under
its own weight.
27) Separation of the engine and transmission.
(1) Remove the starter.
(2) Install the ST to torque converter clutch
case. (AT model)
ST 498277200 STOPPER SET
(3) Remove the bolts which hold the right upper
side of transmission to engine.
28) Remove the engine from vehicle.
(1) Slightly raise the engine.
(2) Raise the transmission with garage jack.
(3) Move the engine horizontally until the main-
shaft is withdrawn from clutch cover.
(4) Slowly move the engine away from engine
compartment.NOTE:
Be careful not to damage adjacent parts or body
panels with crank pulley, oil pressure gauge, etc.
29) Remove the front cushion rubbers.
B: INSTALLATION
1) Install the clutch release fork and bearing onto
transmission. (MT model)
(1) Remove the release bearing from clutch
cover with flat type screw driver.
(2) Install the release bearing on transmission.
(3) Install the release fork into release bearing
tab.
ME-00048
ST
ME-00049
ME-00050
(A) Release fork
(B) Release bearing
ME-00051
ME-00052
(A)
(B)
Page 1511 of 2870
ME(H4DOTC)-53
MECHANICAL
V-belt
2. REAR SIDE BELT
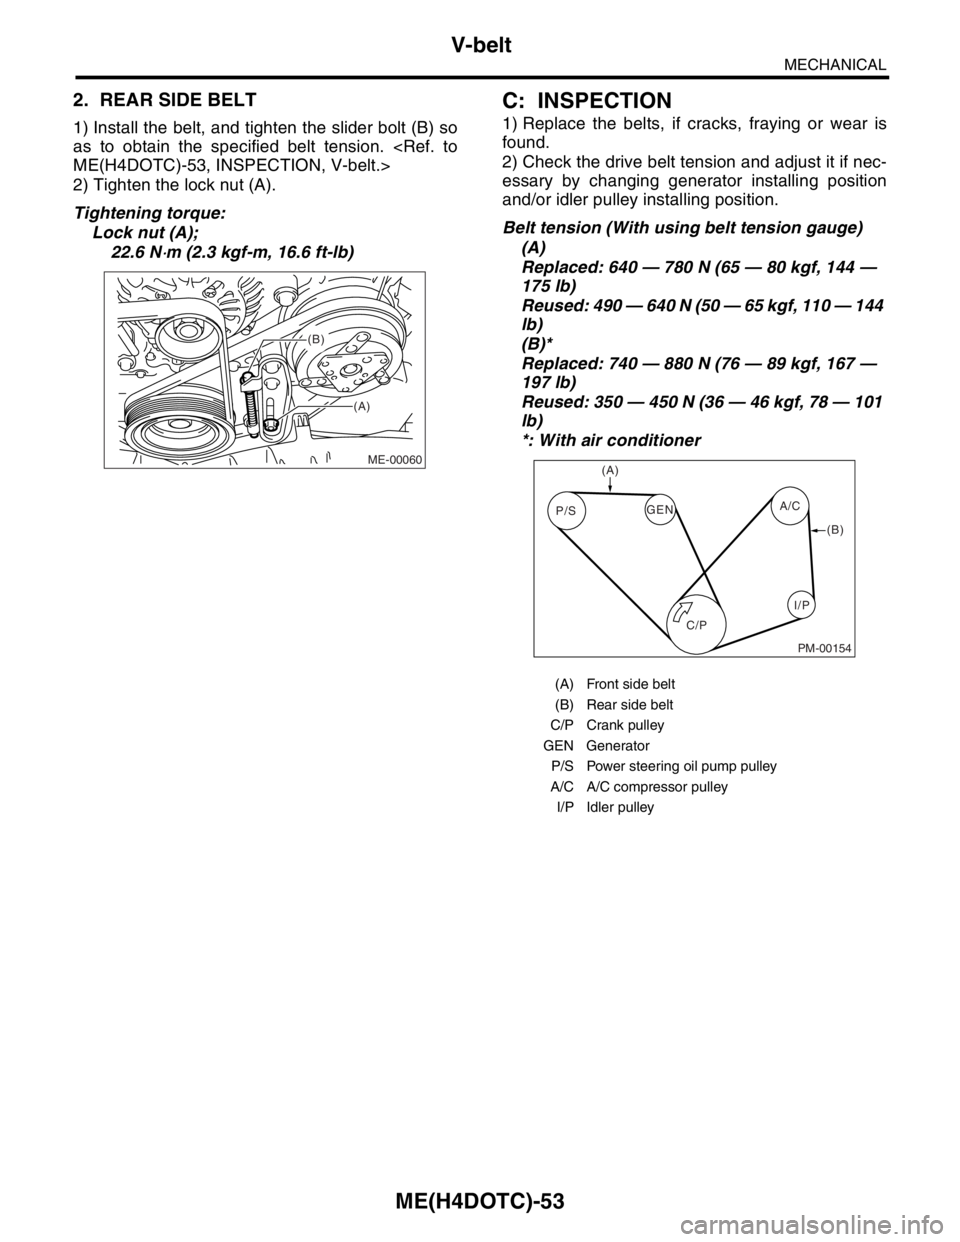
1) Install the belt, and tighten the slider bolt (B) so
as to obtain the specified belt tension.
2) Tighten the lock nut (A).
Tightening torque:
Lock nut (A);
22.6 N
⋅m (2.3 kgf-m, 16.6 ft-lb)
C: INSPECTION
1) Replace the belts, if cracks, fraying or wear is
found.
2) Check the drive belt tension and adjust it if nec-
essary by changing generator installing position
and/or idler pulley installing position.
Belt tension (With using belt tension gauge)
(A)
Replaced: 640 — 780 N (65 — 80 kgf, 144 —
175 lb)
Reused: 490 — 640 N (50 — 65 kgf, 110 — 144
lb)
(B)*
Replaced: 740 — 880 N (76 — 89 kgf, 167 —
197 lb)
Reused: 350 — 450 N (36 — 46 kgf, 78 — 101
lb)
*: With air conditioner
(A)
(B)
ME-00060
(A) Front side belt
(B) Rear side belt
C/P Crank pulley
GEN Generator
P/S Power steering oil pump pulley
A/C A/C compressor pulley
I/P Idler pulley
C/P P/SA/C
GEN
(A)
(B)
I/P
PM-00154
Page 1514 of 2870
ME(H4DOTC)-56
MECHANICAL
Crank Pulley
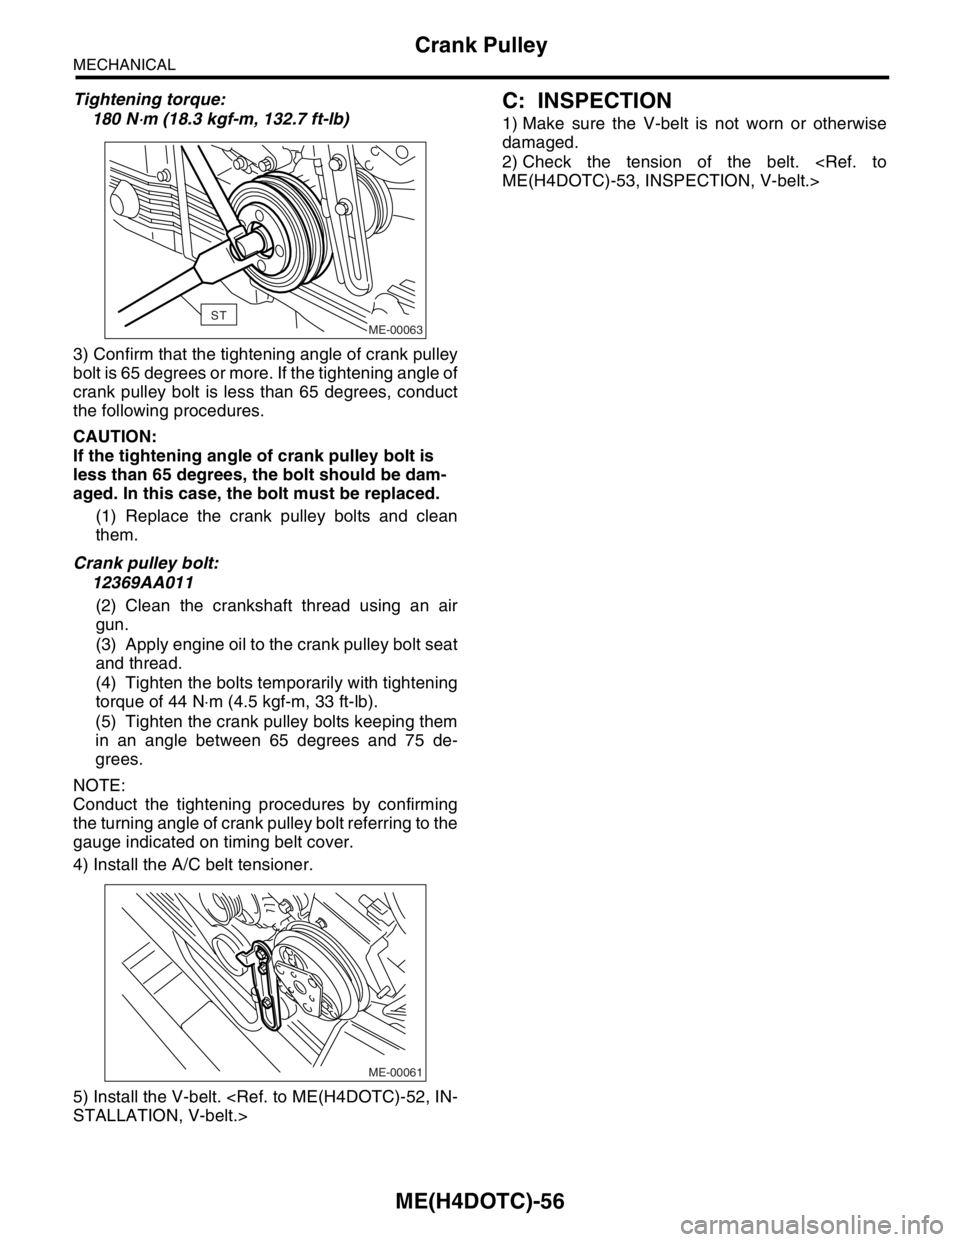
Tightening torque:
180 N
⋅m (18.3 kgf-m, 132.7 ft-lb)
3) Confirm that the tightening angle of crank pulley
bolt is 65 degrees or more. If the tightening angle of
crank pulley bolt is less than 65 degrees, conduct
the following procedures.
CAUTION:
If the tightening angle of crank pulley bolt is
less than 65 degrees, the bolt should be dam-
aged. In this case, the bolt must be replaced.
(1) Replace the crank pulley bolts and clean
them.
Crank pulley bolt:
12369AA011
(2) Clean the crankshaft thread using an air
gun.
(3) Apply engine oil to the crank pulley bolt seat
and thread.
(4) Tighten the bolts temporarily with tightening
torque of 44 N⋅m (4.5 kgf-m, 33 ft-lb).
(5) Tighten the crank pulley bolts keeping them
in an angle between 65 degrees and 75 de-
grees.
NOTE:
Conduct the tightening procedures by confirming
the turning angle of crank pulley bolt referring to the
gauge indicated on timing belt cover.
4) Install the A/C belt tensioner.
5) Install the V-belt.
C: INSPECTION
1) Make sure the V-belt is not worn or otherwise
damaged.
2) Check the tension of the belt.
ME-00063ST
ME-00061
Page 1523 of 2870
ME(H4DOTC)-65
MECHANICAL
Timing Belt Assembly
7) Install the timing belt cover.
Cover.>
8) Install the crank pulley.
9) Install the V-belt.
C: INSPECTION
1. TIMING BELT
1) Check the timing belt teeth for breaks, cracks,
and wear. If any fault is found, replace the belt.
2) Check the condition of back side of belt; if any
crack is found, replace the belt.
NOTE:
Be careful not to let oil, grease or coolant contact
the belt. Remove quickly and thoroughly if this hap-
pens.
Do not bend the belt sharply.
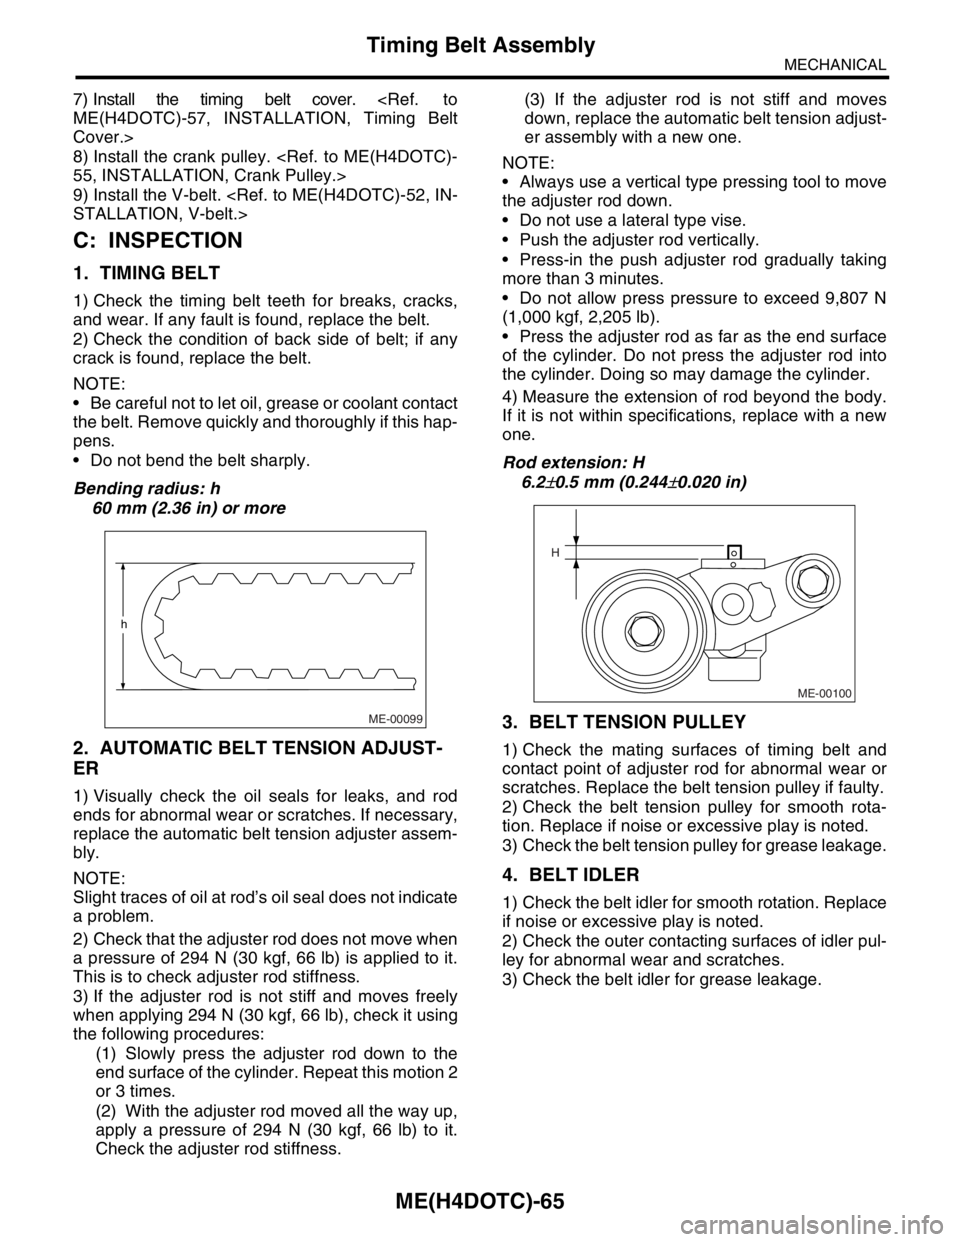
Bending radius: h
60 mm (2.36 in) or more
2. AUTOMATIC BELT TENSION ADJUST-
ER
1) Visually check the oil seals for leaks, and rod
ends for abnormal wear or scratches. If necessary,
replace the automatic belt tension adjuster assem-
bly.
NOTE:
Slight traces of oil at rod’s oil seal does not indicate
a problem.
2) Check that the adjuster rod does not move when
a pressure of 294 N (30 kgf, 66 lb) is applied to it.
This is to check adjuster rod stiffness.
3) If the adjuster rod is not stiff and moves freely
when applying 294 N (30 kgf, 66 lb), check it using
the following procedures:
(1) Slowly press the adjuster rod down to the
end surface of the cylinder. Repeat this motion 2
or 3 times.
(2) With the adjuster rod moved all the way up,
apply a pressure of 294 N (30 kgf, 66 lb) to it.
Check the adjuster rod stiffness.(3) If the adjuster rod is not stiff and moves
down, replace the automatic belt tension adjust-
er assembly with a new one.
NOTE:
Always use a vertical type pressing tool to move
the adjuster rod down.
Do not use a lateral type vise.
Push the adjuster rod vertically.
Press-in the push adjuster rod gradually taking
more than 3 minutes.
Do not allow press pressure to exceed 9,807 N
(1,000 kgf, 2,205 lb).
Press the adjuster rod as far as the end surface
of the cylinder. Do not press the adjuster rod into
the cylinder. Doing so may damage the cylinder.
4) Measure the extension of rod beyond the body.
If it is not within specifications, replace with a new
one.
Rod extension: H
6.2
±0.5 mm (0.244±0.020 in)
3. BELT TENSION PULLEY
1) Check the mating surfaces of timing belt and
contact point of adjuster rod for abnormal wear or
scratches. Replace the belt tension pulley if faulty.
2) Check the belt tension pulley for smooth rota-
tion. Replace if noise or excessive play is noted.
3) Check the belt tension pulley for grease leakage.
4. BELT IDLER
1) Check the belt idler for smooth rotation. Replace
if noise or excessive play is noted.
2) Check the outer contacting surfaces of idler pul-
ley for abnormal wear and scratches.
3) Check the belt idler for grease leakage.
ME-00099
h
ME-00100
H
Page 1531 of 2870
ME(H4DOTC)-73
MECHANICAL
Camshaft
C: INSPECTION
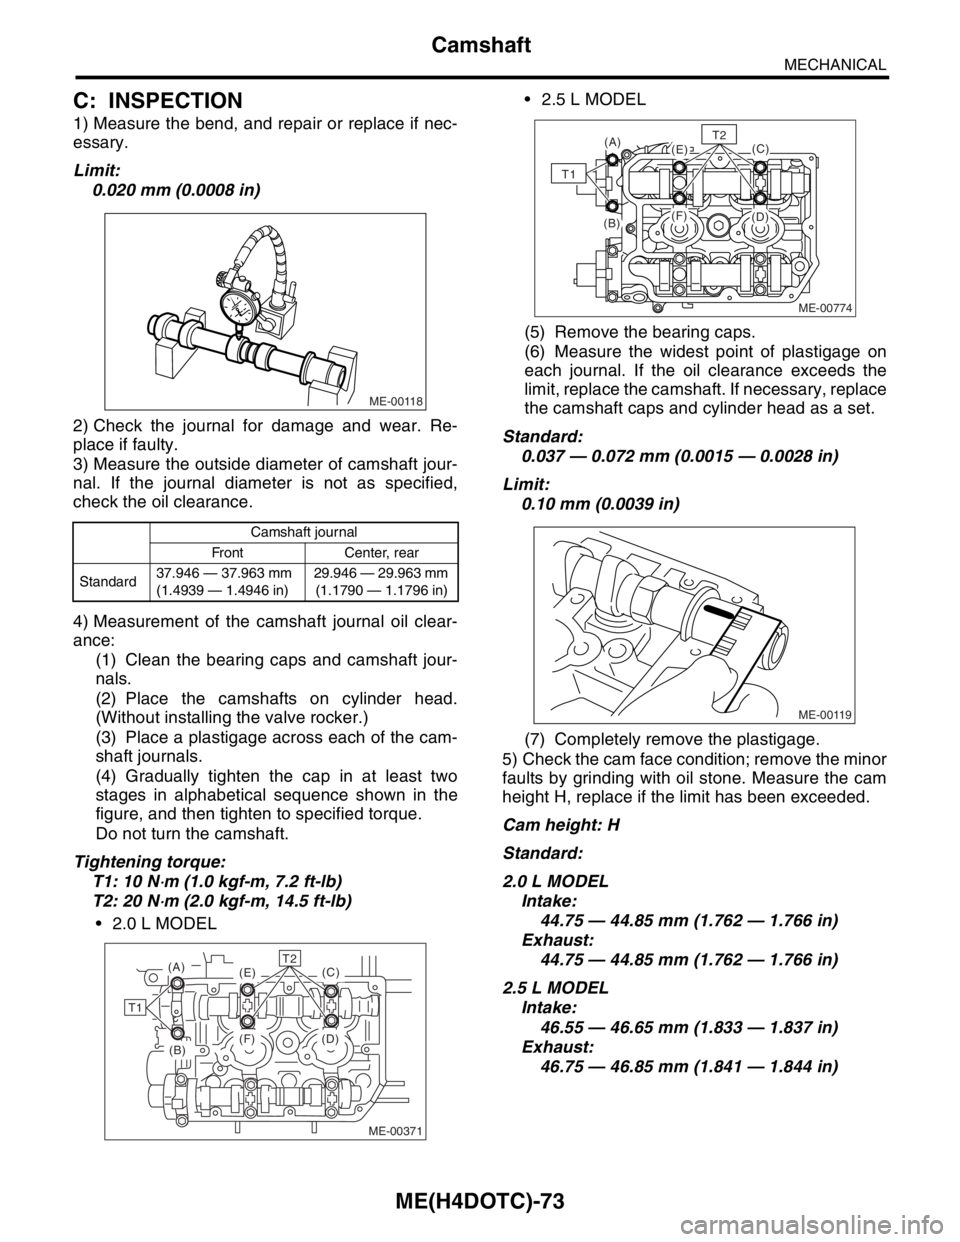
1) Measure the bend, and repair or replace if nec-
essary.
Limit:
0.020 mm (0.0008 in)
2) Check the journal for damage and wear. Re-
place if faulty.
3) Measure the outside diameter of camshaft jour-
nal. If the journal diameter is not as specified,
check the oil clearance.
4) Measurement of the camshaft journal oil clear-
ance:
(1) Clean the bearing caps and camshaft jour-
nals.
(2) Place the camshafts on cylinder head.
(Without installing the valve rocker.)
(3) Place a plastigage across each of the cam-
shaft journals.
(4) Gradually tighten the cap in at least two
stages in alphabetical sequence shown in the
figure, and then tighten to specified torque.
Do not turn the camshaft.
Tightening torque:
T1: 10 N
⋅m (1.0 kgf-m, 7.2 ft-lb)
T2: 20 N
⋅m (2.0 kgf-m, 14.5 ft-lb)
2.0 L MODEL 2.5 L MODEL
(5) Remove the bearing caps.
(6) Measure the widest point of plastigage on
each journal. If the oil clearance exceeds the
limit, replace the camshaft. If necessary, replace
the camshaft caps and cylinder head as a set.
Standard:
0.037 — 0.072 mm (0.0015 — 0.0028 in)
Limit:
0.10 mm (0.0039 in)
(7) Completely remove the plastigage.
5) Check the cam face condition; remove the minor
faults by grinding with oil stone. Measure the cam
height H, replace if the limit has been exceeded.
Cam height: H
Standard:
2.0 L MODEL
Intake:
44.75 — 44.85 mm (1.762 — 1.766 in)
Exhaust:
44.75 — 44.85 mm (1.762 — 1.766 in)
2.5 L MODEL
Intake:
46.55 — 46.65 mm (1.833 — 1.837 in)
Exhaust:
46.75 — 46.85 mm (1.841 — 1.844 in)
Camshaft journal
Front Center, rear
Standard37.946 — 37.963 mm
(1.4939 — 1.4946 in)29.946 — 29.963 mm
(1.1790 — 1.1796 in)
ME-00118
ME-00371
(F) (D)(C)
T1
T2(A)(E)
(B)
ME-00774
(A)(E)
(F)(B)(D)
(C)T2
T1
ME-00119
Page 1536 of 2870
ME(H4DOTC)-78
MECHANICAL
Cylinder Head Assembly
1) Installation of valve spring and valve.
(1) Coat the stem of each valve with engine oil
and insert the valve into valve guide.
NOTE:
When inserting the valve into valve guide, use spe-
cial care not to damage the oil seal lip.
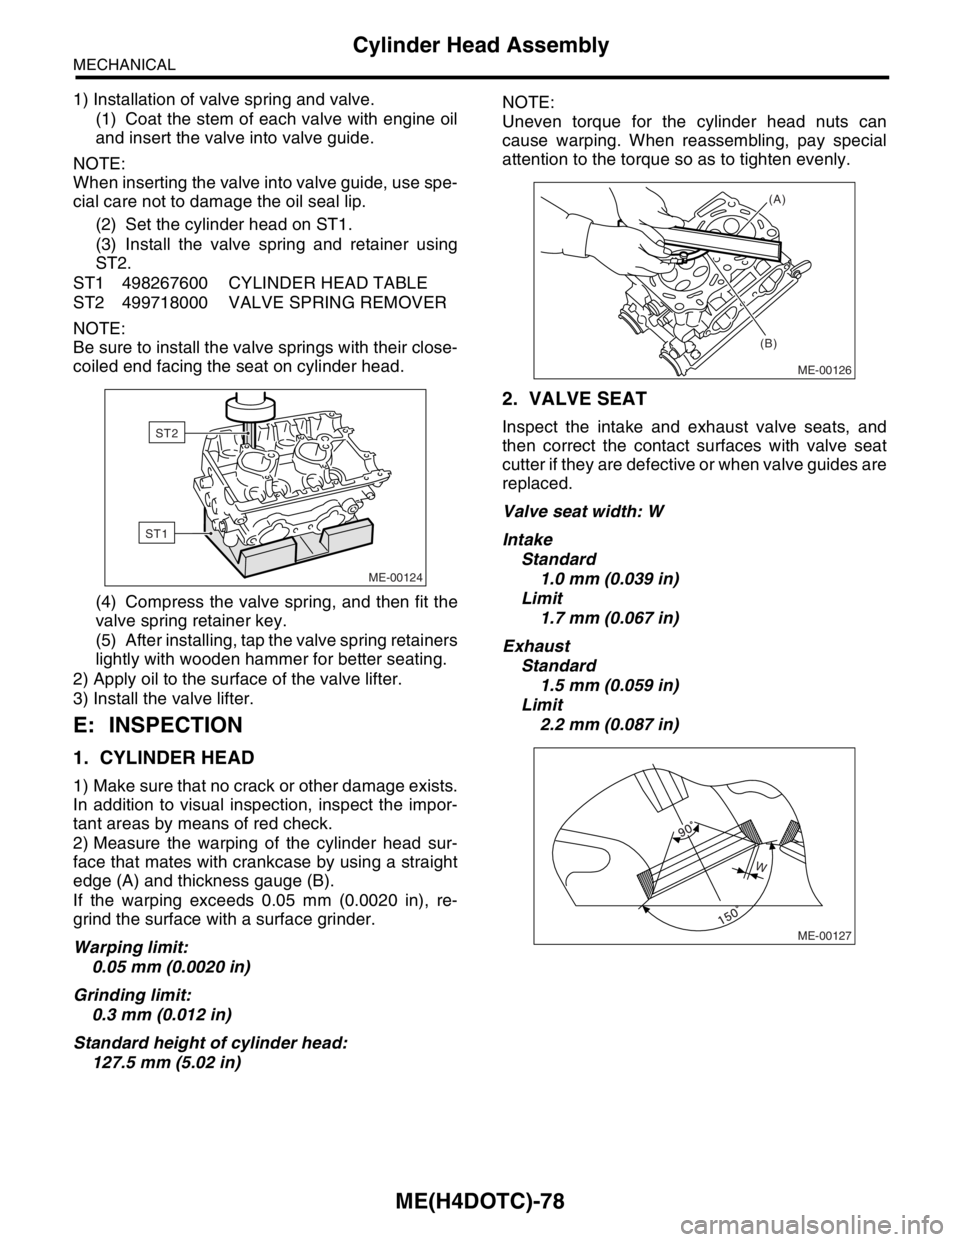
(2) Set the cylinder head on ST1.
(3) Install the valve spring and retainer using
ST2.
ST1 498267600 CYLINDER HEAD TABLE
ST2 499718000 VALVE SPRING REMOVER
NOTE:
Be sure to install the valve springs with their close-
coiled end facing the seat on cylinder head.
(4) Compress the valve spring, and then fit the
valve spring retainer key.
(5) After installing, tap the valve spring retainers
lightly with wooden hammer for better seating.
2) Apply oil to the surface of the valve lifter.
3) Install the valve lifter.
E: INSPECTION
1. CYLINDER HEAD
1) Make sure that no crack or other damage exists.
In addition to visual inspection, inspect the impor-
tant areas by means of red check.
2) Measure the warping of the cylinder head sur-
face that mates with crankcase by using a straight
edge (A) and thickness gauge (B).
If the warping exceeds 0.05 mm (0.0020 in), re-
grind the surface with a surface grinder.
Warping limit:
0.05 mm (0.0020 in)
Grinding limit:
0.3 mm (0.012 in)
Standard height of cylinder head:
127.5 mm (5.02 in)NOTE:
Uneven torque for the cylinder head nuts can
cause warping. When reassembling, pay special
attention to the torque so as to tighten evenly.
2. VALVE SEAT
Inspect the intake and exhaust valve seats, and
then correct the contact surfaces with valve seat
cutter if they are defective or when valve guides are
replaced.
Valve seat width: W
Intake
Standard
1.0 mm (0.039 in)
Limit
1.7 mm (0.067 in)
Exhaust
Standard
1.5 mm (0.059 in)
Limit
2.2 mm (0.087 in)
ME-00124
ST1
ST2
ME-00126
(A)
(B)
ME-00127
W
Page 1537 of 2870
ME(H4DOTC)-79
MECHANICAL
Cylinder Head Assembly
3. VALVE GUIDE
1) Check the clearance between valve guide and
stem. The clearance can be checked by measuring
the outside diameter of valve stem and the inside
diameter of valve guide with outside and inside mi-
crometers respectively.
Clearance between the valve guide and valve
stem:
Standard
Intake
0.030 — 0.057 mm (0.0012 — 0.0022 in)
Exhaust
0.040 — 0.067 mm (0.0016 — 0.0026 in)
Limit
0.15 mm (0.0059 in)
2) If the clearance between valve guide and stem
exceeds the limit, replace the valve guide or valve
itself whichever shows greater amount of wear.
See the following procedure for valve guide re-
placement.
Valve guide inner diameter:
6.000 — 6.012 mm (0.2362 — 0.2367 in)
Valve stem outer diameters:
Intake
5.955 — 5.970 mm (0.2344 — 0.2350 in)
Exhaust
5.945 — 5.960 mm (0.2341 — 0.2346 in)
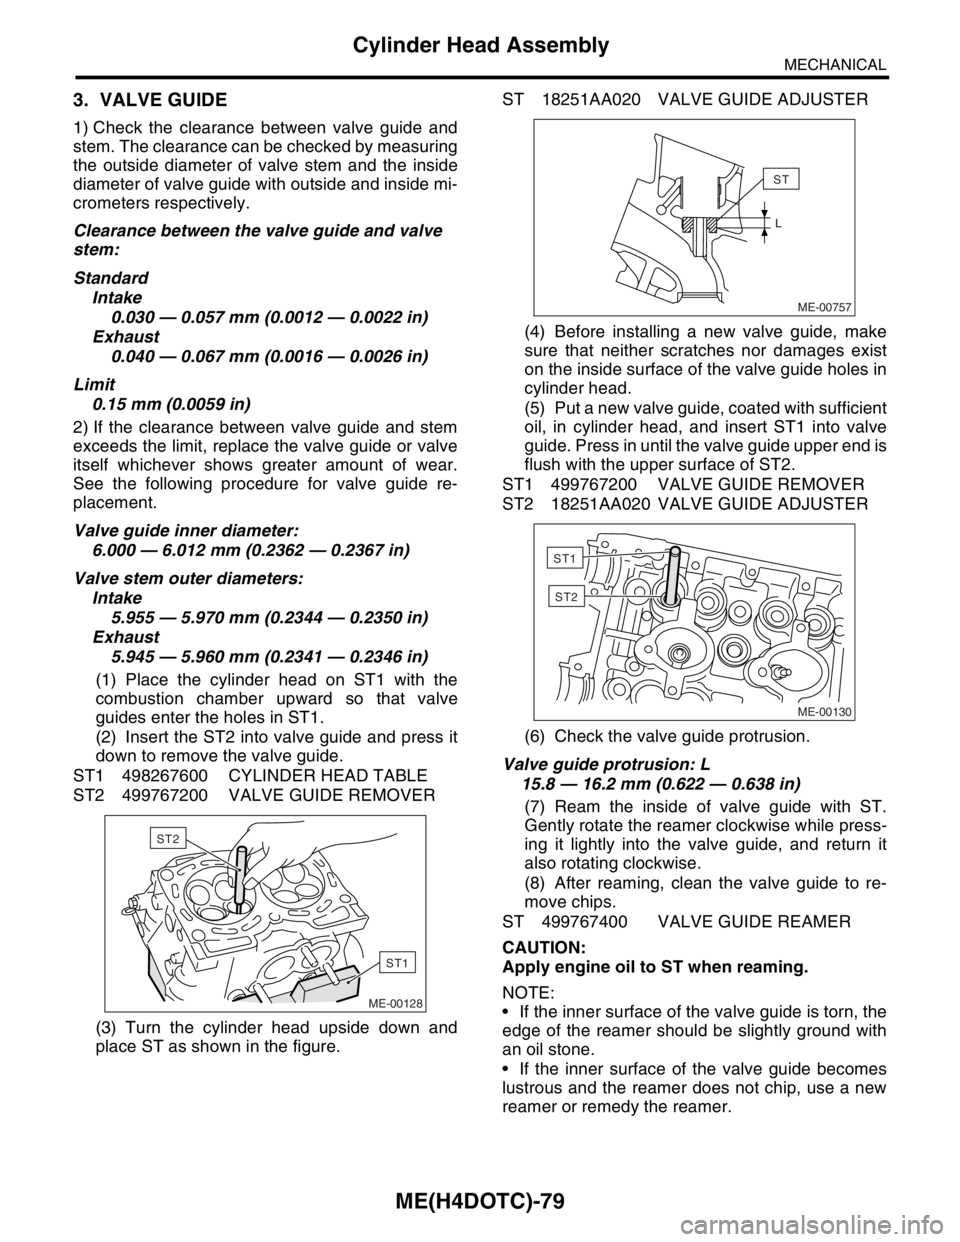
(1) Place the cylinder head on ST1 with the
combustion chamber upward so that valve
guides enter the holes in ST1.
(2) Insert the ST2 into valve guide and press it
down to remove the valve guide.
ST1 498267600 CYLINDER HEAD TABLE
ST2 499767200 VALVE GUIDE REMOVER
(3) Turn the cylinder head upside down and
place ST as shown in the figure.ST 18251AA020 VALVE GUIDE ADJUSTER
(4) Before installing a new valve guide, make
sure that neither scratches nor damages exist
on the inside surface of the valve guide holes in
cylinder head.
(5) Put a new valve guide, coated with sufficient
oil, in cylinder head, and insert ST1 into valve
guide. Press in until the valve guide upper end is
flush with the upper surface of ST2.
ST1 499767200 VALVE GUIDE REMOVER
ST2 18251AA020 VALVE GUIDE ADJUSTER
(6) Check the valve guide protrusion.
Valve guide protrusion: L
15.8 — 16.2 mm (0.622 — 0.638 in)
(7) Ream the inside of valve guide with ST.
Gently rotate the reamer clockwise while press-
ing it lightly into the valve guide, and return it
also rotating clockwise.
(8) After reaming, clean the valve guide to re-
move chips.
ST 499767400 VALVE GUIDE REAMER
CAUTION:
Apply engine oil to ST when reaming.
NOTE:
If the inner surface of the valve guide is torn, the
edge of the reamer should be slightly ground with
an oil stone.
If the inner surface of the valve guide becomes
lustrous and the reamer does not chip, use a new
reamer or remedy the reamer.
ME-00128
ST1
ST2ME-00757
ST
L
ME-00130
ST1
ST2