2004 SUBARU FORESTER check oil
[x] Cancel search: check oilPage 932 of 2870
ME(H4SO)-61
MECHANICAL
Camshaft
C: INSPECTION
1. CAMSHAFT
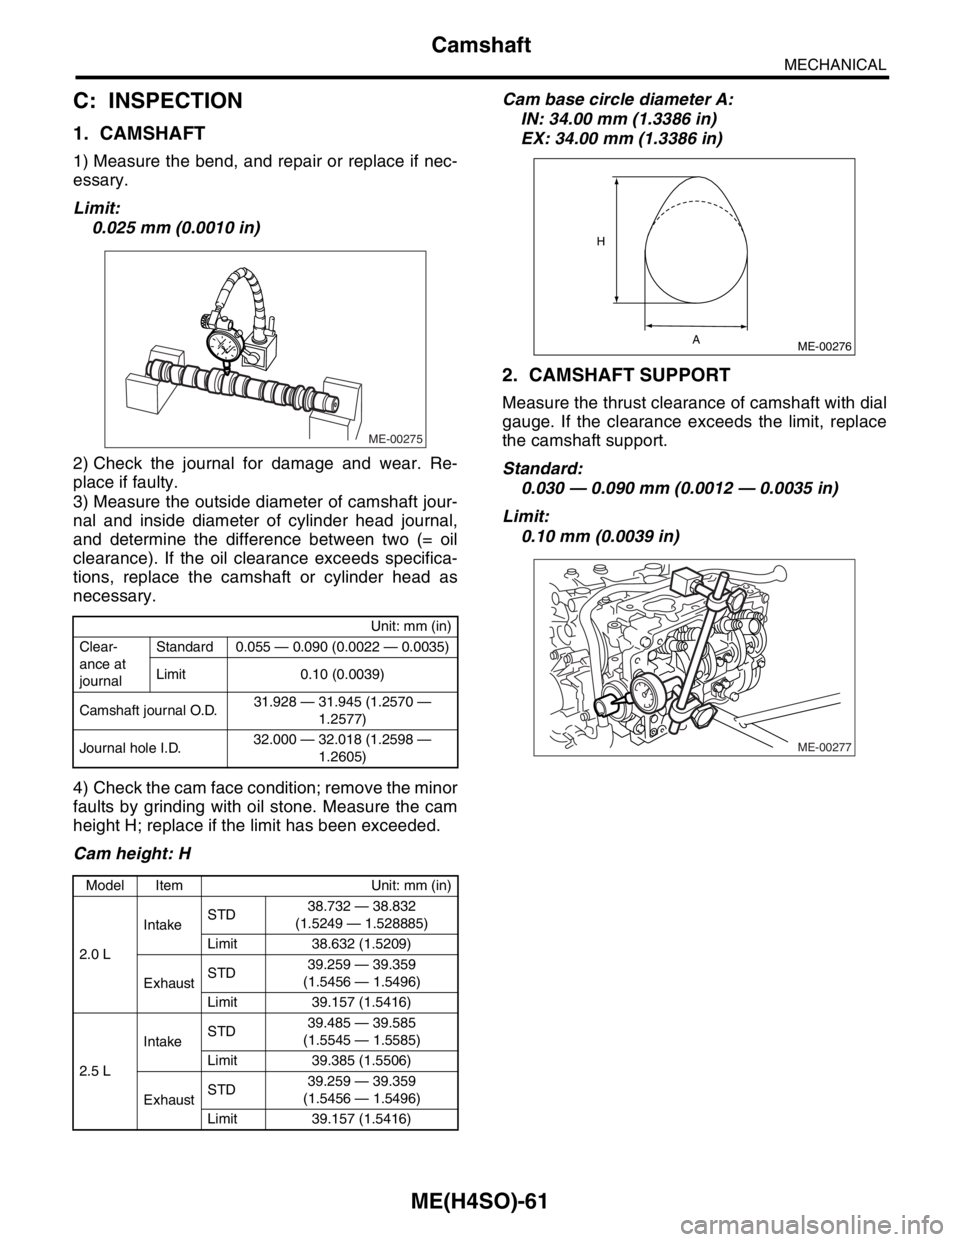
1) Measure the bend, and repair or replace if nec-
essary.
Limit:
0.025 mm (0.0010 in)
2) Check the journal for damage and wear. Re-
place if faulty.
3) Measure the outside diameter of camshaft jour-
nal and inside diameter of cylinder head journal,
and determine the difference between two (= oil
clearance). If the oil clearance exceeds specifica-
tions, replace the camshaft or cylinder head as
necessary.
4) Check the cam face condition; remove the minor
faults by grinding with oil stone. Measure the cam
height H; replace if the limit has been exceeded.
Cam height: HCam base circle diameter A:
IN: 34.00 mm (1.3386 in)
EX: 34.00 mm (1.3386 in)
2. CAMSHAFT SUPPORT
Measure the thrust clearance of camshaft with dial
gauge. If the clearance exceeds the limit, replace
the camshaft support.
Standard:
0.030 — 0.090 mm (0.0012 — 0.0035 in)
Limit:
0.10 mm (0.0039 in)
Unit: mm (in)
Clear-
ance at
journalStandard 0.055 — 0.090 (0.0022 — 0.0035)
Limit 0.10 (0.0039)
Camshaft journal O.D.31.928 — 31.945 (1.2570 —
1.2577)
Journal hole I.D.32.000 — 32.018 (1.2598 —
1.2605)
Model Item Unit: mm (in)
2.0 LIntakeSTD38.732 — 38.832
(1.5249 — 1.528885)
Limit 38.632 (1.5209)
ExhaustSTD39.259 — 39.359
(1.5456 — 1.5496)
Limit 39.157 (1.5416)
2.5 LIntakeSTD39.485 — 39.585
(1.5545 — 1.5585)
Limit 39.385 (1.5506)
ExhaustSTD39.259 — 39.359
(1.5456 — 1.5496)
Limit 39.157 (1.5416)
ME-00275
ME-00276
H
A
ME-00277
Page 936 of 2870
ME(H4SO)-65
MECHANICAL
Cylinder Head
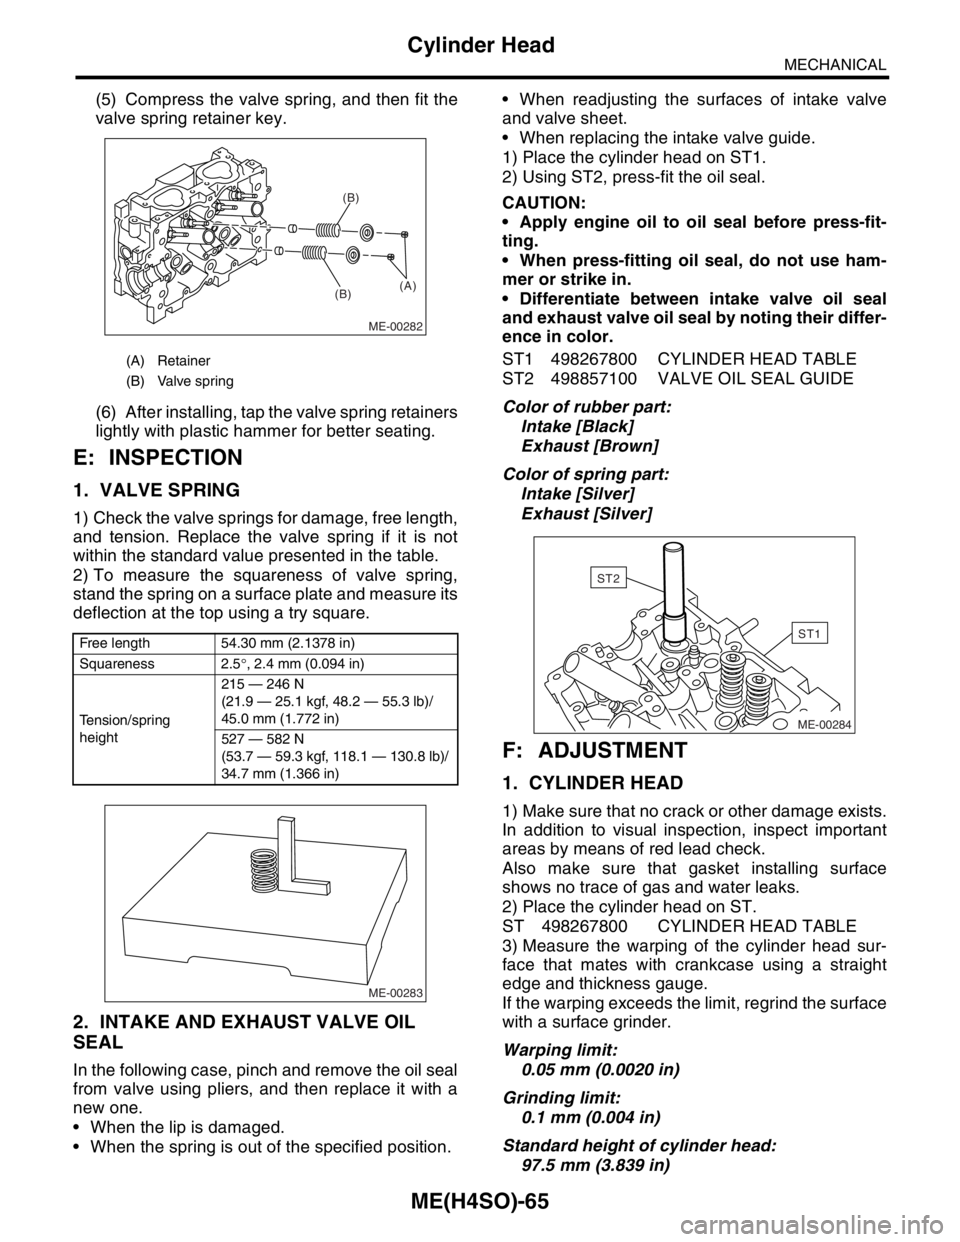
(5) Compress the valve spring, and then fit the
valve spring retainer key.
(6) After installing, tap the valve spring retainers
lightly with plastic hammer for better seating.
E: INSPECTION
1. VALVE SPRING
1) Check the valve springs for damage, free length,
and tension. Replace the valve spring if it is not
within the standard value presented in the table.
2) To measure the squareness of valve spring,
stand the spring on a surface plate and measure its
deflection at the top using a try square.
2. INTAKE AND EXHAUST VALVE OIL
SEAL
In the following case, pinch and remove the oil seal
from valve using pliers, and then replace it with a
new one.
When the lip is damaged.
When the spring is out of the specified position. When readjusting the surfaces of intake valve
and valve sheet.
When replacing the intake valve guide.
1) Place the cylinder head on ST1.
2) Using ST2, press-fit the oil seal.
CAUTION:
Apply engine oil to oil seal before press-fit-
ting.
When press-fitting oil seal, do not use ham-
mer or strike in.
Differentiate between intake valve oil seal
and exhaust valve oil seal by noting their differ-
ence in color.
ST1 498267800 CYLINDER HEAD TABLE
ST2 498857100 VALVE OIL SEAL GUIDE
Color of rubber part:
Intake [Black]
Exhaust [Brown]
Color of spring part:
Intake [Silver]
Exhaust [Silver]
F: ADJUSTMENT
1. CYLINDER HEAD
1) Make sure that no crack or other damage exists.
In addition to visual inspection, inspect important
areas by means of red lead check.
Also make sure that gasket installing surface
shows no trace of gas and water leaks.
2) Place the cylinder head on ST.
ST 498267800 CYLINDER HEAD TABLE
3) Measure the warping of the cylinder head sur-
face that mates with crankcase using a straight
edge and thickness gauge.
If the warping exceeds the limit, regrind the surface
with a surface grinder.
Warping limit:
0.05 mm (0.0020 in)
Grinding limit:
0.1 mm (0.004 in)
Standard height of cylinder head:
97.5 mm (3.839 in)
(A) Retainer
(B) Valve spring
Free length 54.30 mm (2.1378 in)
Squareness 2.5°, 2.4 mm (0.094 in)
Tension/spring
height215 — 246 N
(21.9 — 25.1 kgf, 48.2 — 55.3 lb)/
45.0 mm (1.772 in)
527 — 582 N
(53.7 — 59.3 kgf, 118.1 — 130.8 lb)/
34.7 mm (1.366 in)
ME-00282
(B)(B)
(A)
ME-00283
ME-00284
ST1
ST2
Page 938 of 2870
ME(H4SO)-67
MECHANICAL
Cylinder Head
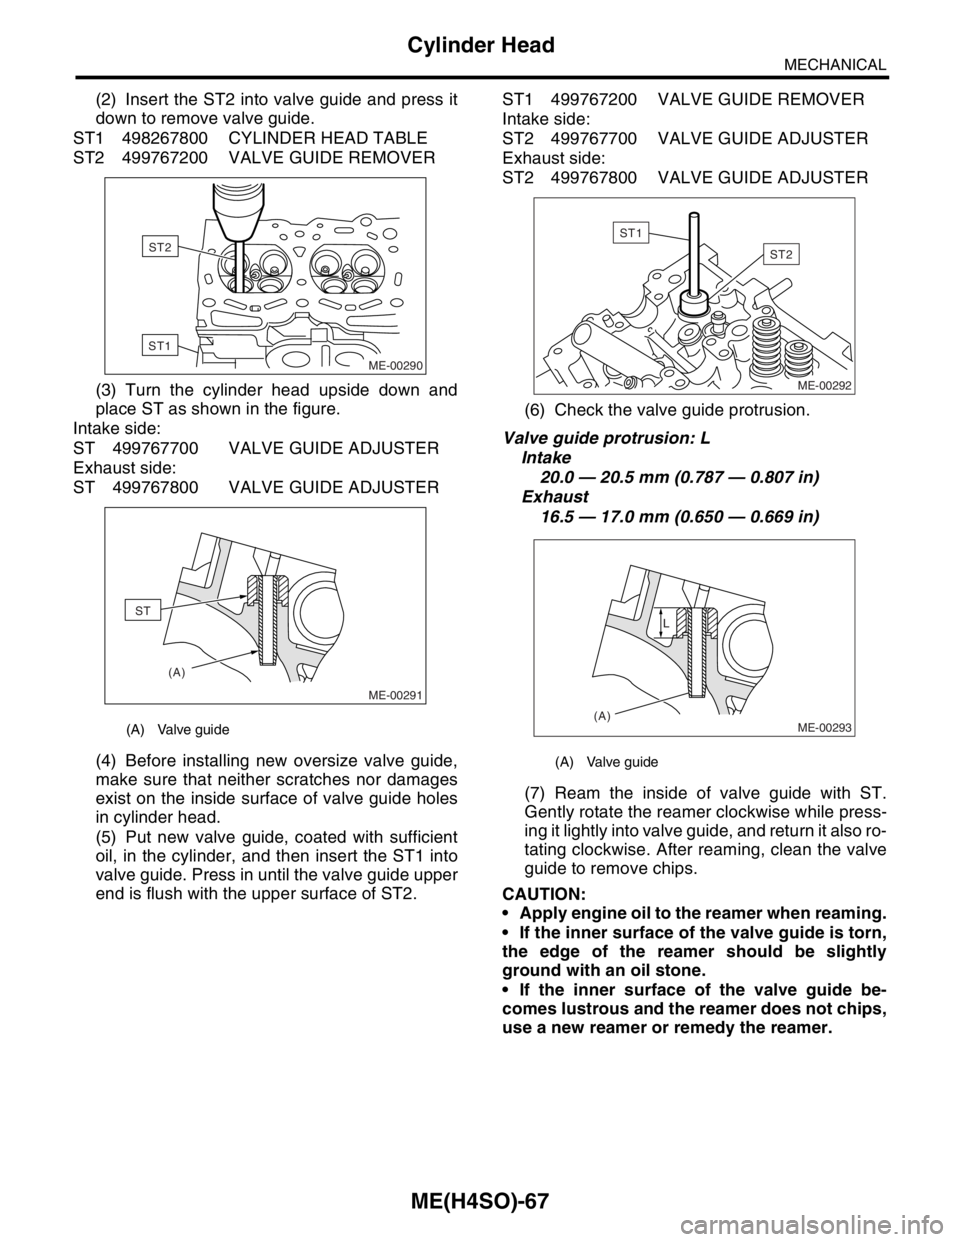
(2) Insert the ST2 into valve guide and press it
down to remove valve guide.
ST1 498267800 CYLINDER HEAD TABLE
ST2 499767200 VALVE GUIDE REMOVER
(3) Turn the cylinder head upside down and
place ST as shown in the figure.
Intake side:
ST 499767700 VALVE GUIDE ADJUSTER
Exhaust side:
ST 499767800 VALVE GUIDE ADJUSTER
(4) Before installing new oversize valve guide,
make sure that neither scratches nor damages
exist on the inside surface of valve guide holes
in cylinder head.
(5) Put new valve guide, coated with sufficient
oil, in the cylinder, and then insert the ST1 into
valve guide. Press in until the valve guide upper
end is flush with the upper surface of ST2.ST1 499767200 VALVE GUIDE REMOVER
Intake side:
ST2 499767700 VALVE GUIDE ADJUSTER
Exhaust side:
ST2 499767800 VALVE GUIDE ADJUSTER
(6) Check the valve guide protrusion.
Valve guide protrusion: L
Intake
20.0 — 20.5 mm (0.787 — 0.807 in)
Exhaust
16.5 — 17.0 mm (0.650 — 0.669 in)
(7) Ream the inside of valve guide with ST.
Gently rotate the reamer clockwise while press-
ing it lightly into valve guide, and return it also ro-
tating clockwise. After reaming, clean the valve
guide to remove chips.
CAUTION:
Apply engine oil to the reamer when reaming.
If the inner surface of the valve guide is torn,
the edge of the reamer should be slightly
ground with an oil stone.
If the inner surface of the valve guide be-
comes lustrous and the reamer does not chips,
use a new reamer or remedy the reamer.
(A) Valve guide
ME-00290
ST2
ST1
(A)
ME-00291
ST
(A) Valve guide
ST2
ME-00292
ST1
ME-00293(A)L
Page 939 of 2870
ME(H4SO)-68
MECHANICAL
Cylinder Head
ST 499767400 VALVE GUIDE REAMER
(8) Recheck the contact condition between
valve and valve seat after replacing valve guide.
4. INTAKE AND EXHAUST VALVE
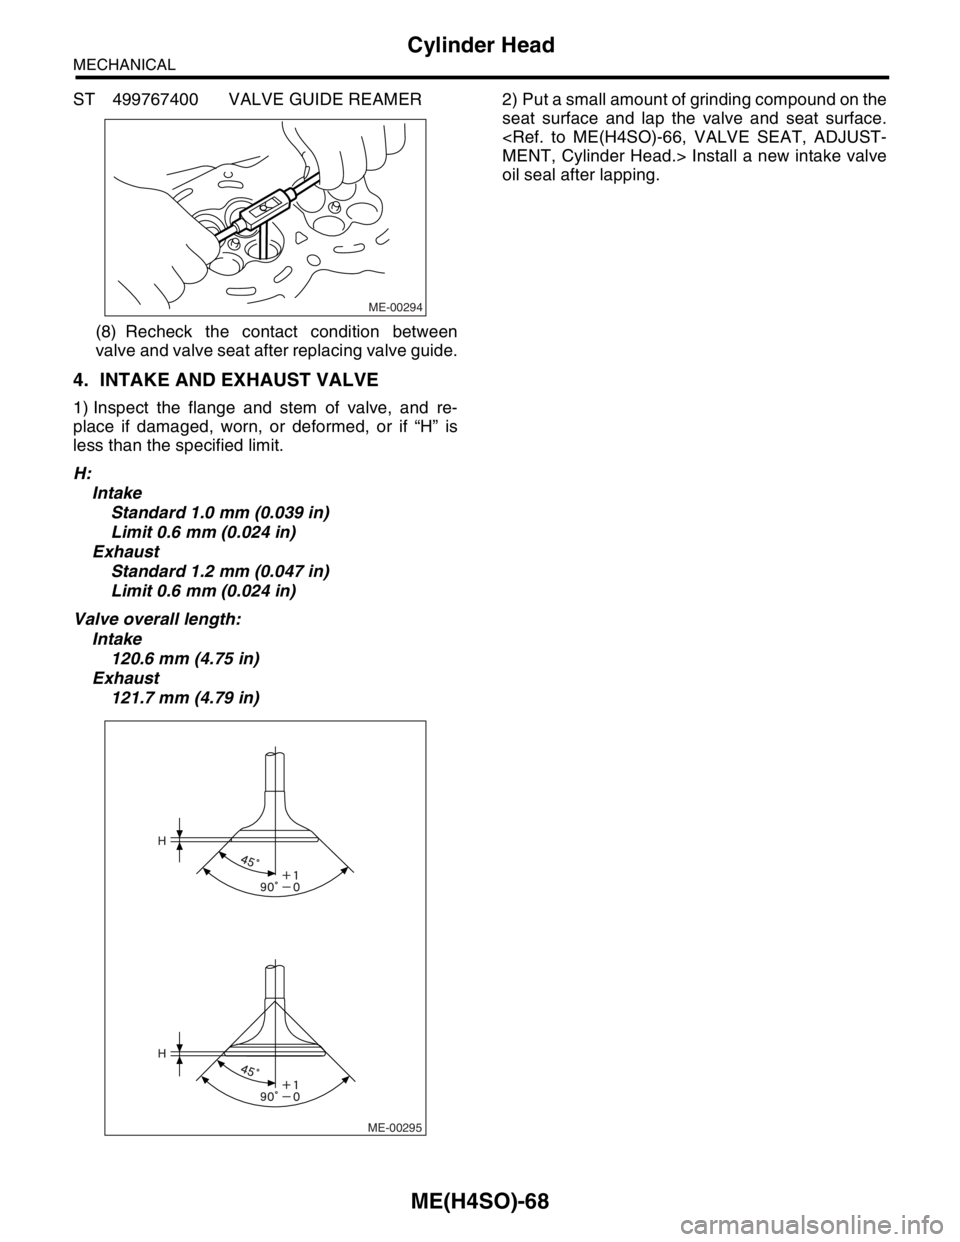
1) Inspect the flange and stem of valve, and re-
place if damaged, worn, or deformed, or if “H” is
less than the specified limit.
H:
Intake
Standard 1.0 mm (0.039 in)
Limit 0.6 mm (0.024 in)
Exhaust
Standard 1.2 mm (0.047 in)
Limit 0.6 mm (0.024 in)
Valve overall length:
Intake
120.6 mm (4.75 in)
Exhaust
121.7 mm (4.79 in)2) Put a small amount of grinding compound on the
seat surface and lap the valve and seat surface.
oil seal after lapping.
ME-00294
ME-00295
H
H
Page 954 of 2870
ME(H4SO)-83
MECHANICAL
Cylinder Block
D: ASSEMBLY
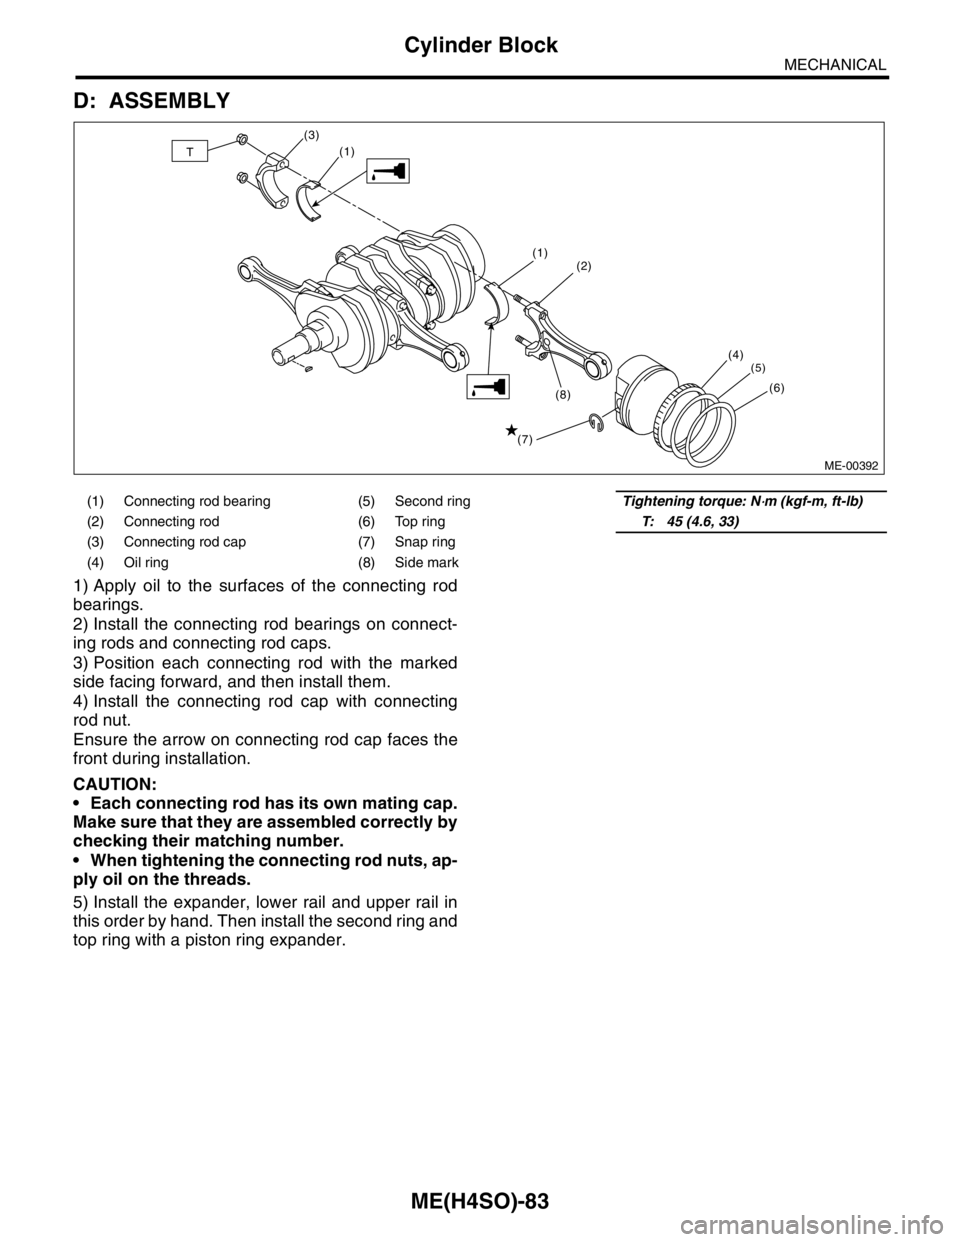
1) Apply oil to the surfaces of the connecting rod
bearings.
2) Install the connecting rod bearings on connect-
ing rods and connecting rod caps.
3) Position each connecting rod with the marked
side facing forward, and then install them.
4) Install the connecting rod cap with connecting
rod nut.
Ensure the arrow on connecting rod cap faces the
front during installation.
CAUTION:
Each connecting rod has its own mating cap.
Make sure that they are assembled correctly by
checking their matching number.
When tightening the connecting rod nuts, ap-
ply oil on the threads.
5) Install the expander, lower rail and upper rail in
this order by hand. Then install the second ring and
top ring with a piston ring expander.
(1) Connecting rod bearing (5) Second ringTightening torque: N⋅m (kgf-m, ft-lb)
(2) Connecting rod (6) Top ringT: 45 (4.6, 33)
(3) Connecting rod cap (7) Snap ring
(4) Oil ring (8) Side mark
ME-00392
(2)
(4)
(5)
(6)
(1)
(1)
(7)(8) (3)T
Page 955 of 2870
ME(H4SO)-84
MECHANICAL
Cylinder Block
E: INSPECTION
1. CYLINDER BLOCK
1) Visually check for cracks and damage. Especial-
ly, inspect the important parts by means of red lead
check.
2) Check the oil passages for clogging.
3) Inspect the crankcase surface that mates with
cylinder head for warping by using a straight edge,
and correct by grinding if necessary.
Warping limit:
0.05 mm (0.0020 in)
Grinding limit:
0.1 mm (0.004 in)
Standard height of cylinder block:
201.0 mm (7.91 in)
2. CYLINDER AND PISTON
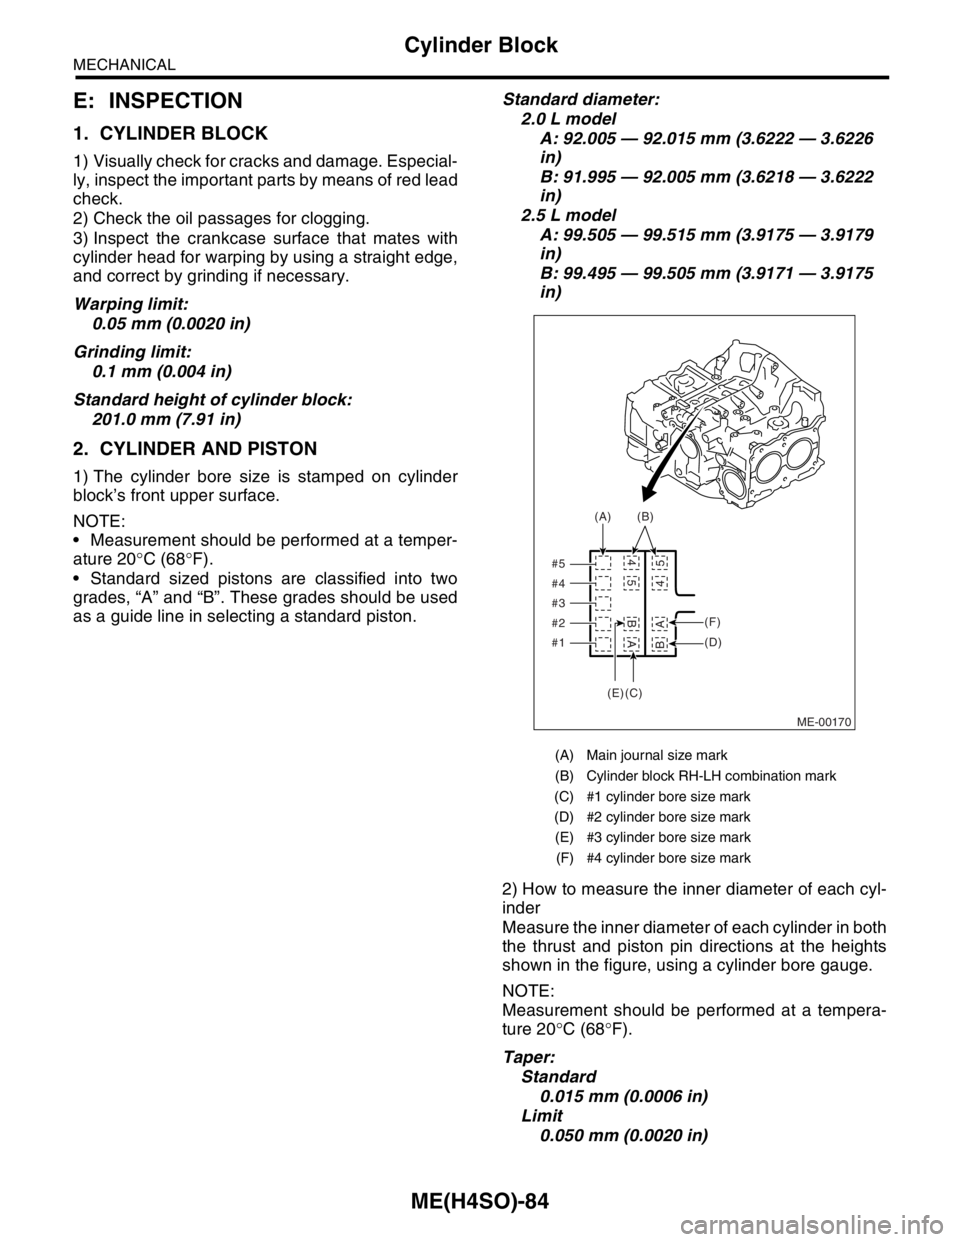
1) The cylinder bore size is stamped on cylinder
block’s front upper surface.
NOTE:
Measurement should be performed at a temper-
ature 20°C (68°F).
Standard sized pistons are classified into two
grades, “A” and “B”. These grades should be used
as a guide line in selecting a standard piston.Standard diameter:
2.0 L model
A: 92.005 — 92.015 mm (3.6222 — 3.6226
in)
B: 91.995 — 92.005 mm (3.6218 — 3.6222
in)
2.5 L model
A: 99.505 — 99.515 mm (3.9175 — 3.9179
in)
B: 99.495 — 99.505 mm (3.9171 — 3.9175
in)
2) How to measure the inner diameter of each cyl-
inder
Measure the inner diameter of each cylinder in both
the thrust and piston pin directions at the heights
shown in the figure, using a cylinder bore gauge.
NOTE:
Measurement should be performed at a tempera-
ture 20°C (68°F).
Taper:
Standard
0.015 mm (0.0006 in)
Limit
0.050 mm (0.0020 in)
(A) Main journal size mark
(B) Cylinder block RH-LH combination mark
(C) #1 cylinder bore size mark
(D) #2 cylinder bore size mark
(E) #3 cylinder bore size mark
(F) #4 cylinder bore size mark
ME-00170 #5
#4
#3
#2
#1(A)(B)
(F)
(D)
A BA B
5 45 4
(C) (E)
Page 957 of 2870
ME(H4SO)-86
MECHANICAL
Cylinder Block
NOTE:
Immediately after reboring, the cylinder diameter
may differ from its real diameter due to temperature
rise. Thus, pay attention to this when measuring
the cylinder diameter.
Limit of cylinder enlarging (boring):
0.5 mm (0.020 in)
3. PISTON AND PISTON PIN
1) Check the pistons and piston pins for damage,
cracks, and wear and the piston ring grooves for
wear and damage. Replace if defective.
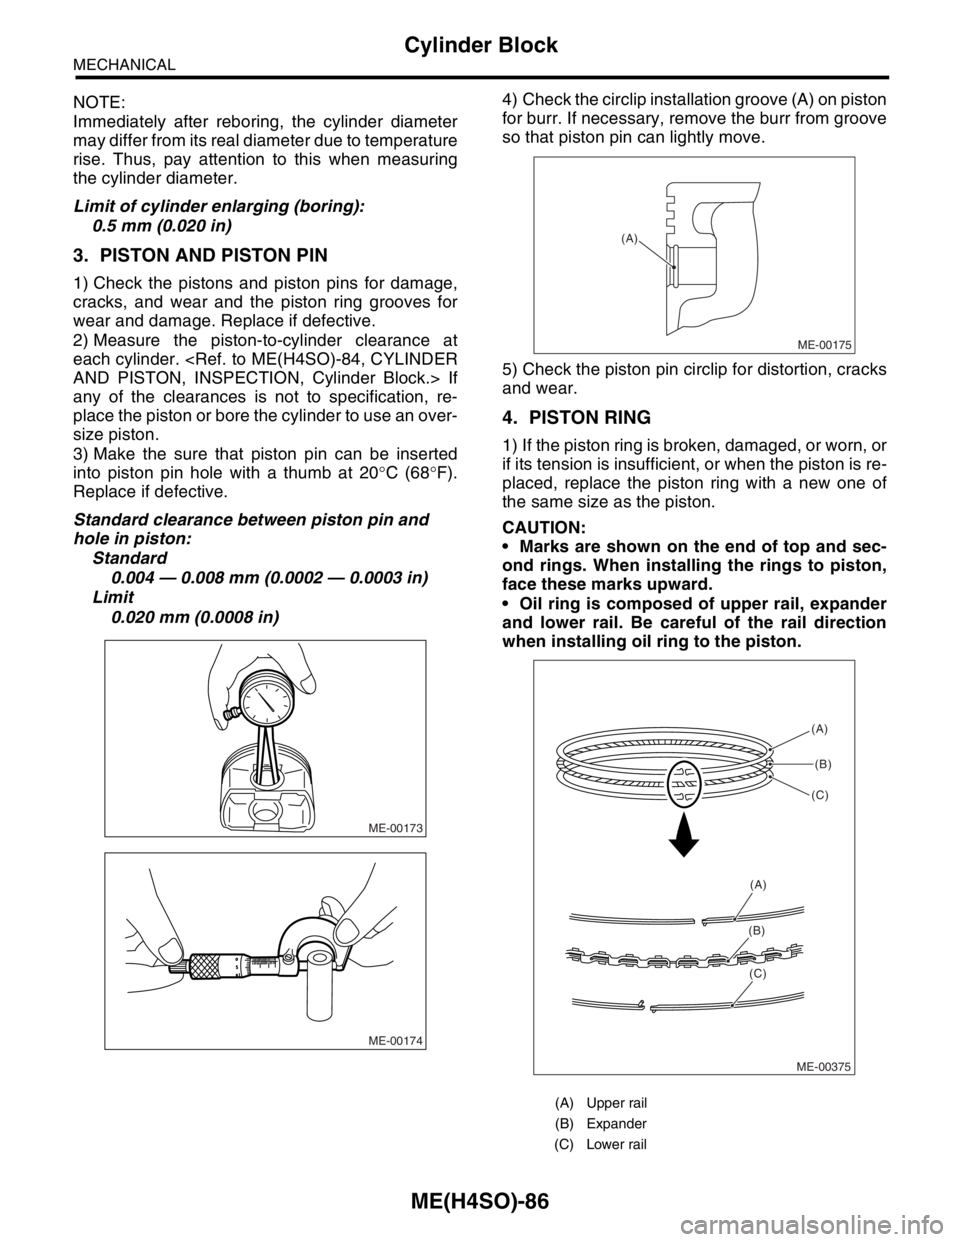
2) Measure the piston-to-cylinder clearance at
each cylinder.
any of the clearances is not to specification, re-
place the piston or bore the cylinder to use an over-
size piston.
3) Make the sure that piston pin can be inserted
into piston pin hole with a thumb at 20°C (68°F).
Replace if defective.
Standard clearance between piston pin and
hole in piston:
Standard
0.004 — 0.008 mm (0.0002 — 0.0003 in)
Limit
0.020 mm (0.0008 in)4) Check the circlip installation groove (A) on piston
for burr. If necessary, remove the burr from groove
so that piston pin can lightly move.
5) Check the piston pin circlip for distortion, cracks
and wear.
4. PISTON RING
1) If the piston ring is broken, damaged, or worn, or
if its tension is insufficient, or when the piston is re-
placed, replace the piston ring with a new one of
the same size as the piston.
CAUTION:
Marks are shown on the end of top and sec-
ond rings. When installing the rings to piston,
face these marks upward.
Oil ring is composed of upper rail, expander
and lower rail. Be careful of the rail direction
when installing oil ring to the piston.
ME-00173
ME-00174
(A) Upper rail
(B) Expander
(C) Lower rail
ME-00175
(A)
ME-00375(A)
(B)
(C)
(A)
(B)
(C)
Page 958 of 2870
ME(H4SO)-87
MECHANICAL
Cylinder Block
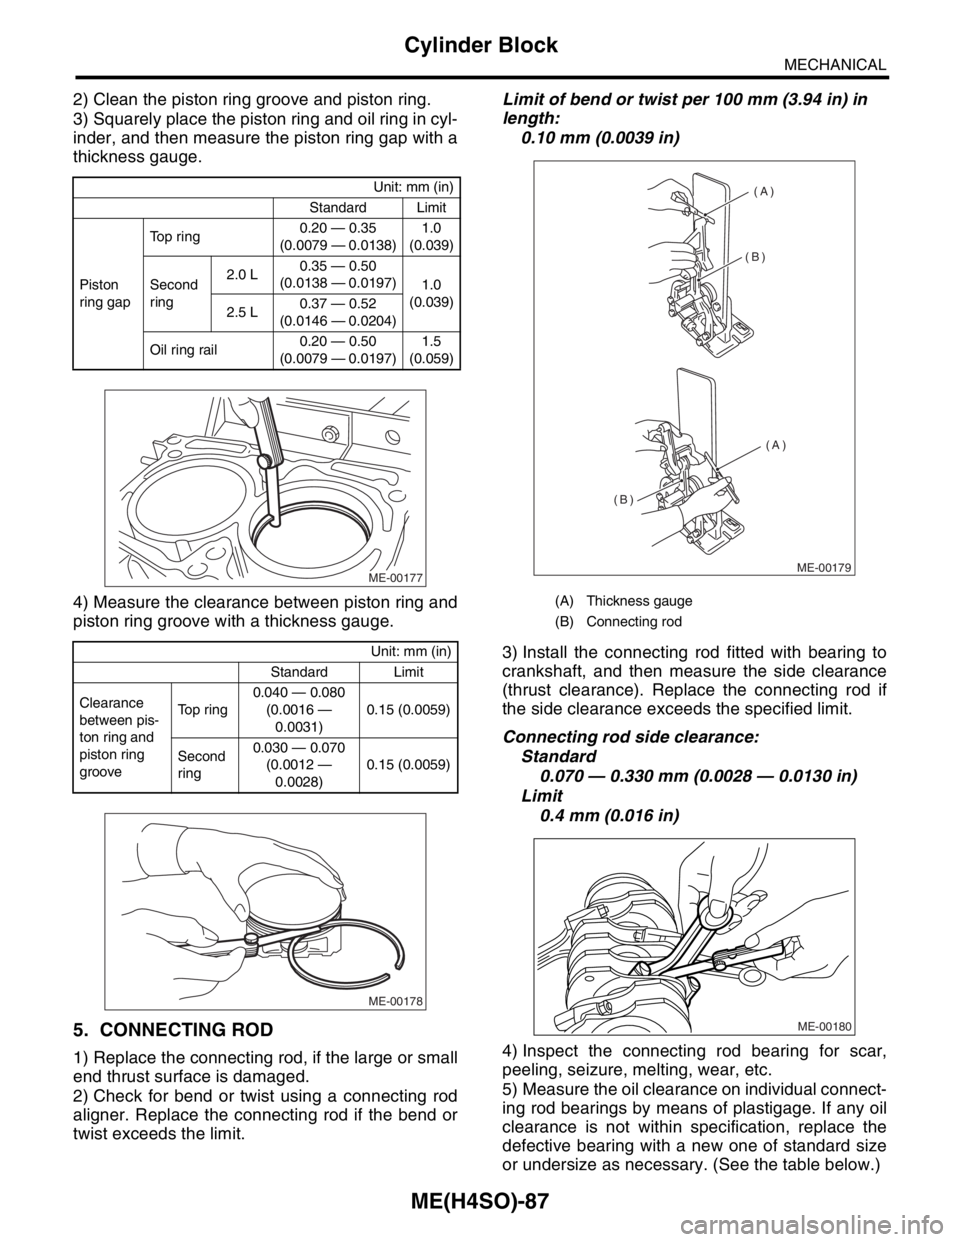
2) Clean the piston ring groove and piston ring.
3) Squarely place the piston ring and oil ring in cyl-
inder, and then measure the piston ring gap with a
thickness gauge.
4) Measure the clearance between piston ring and
piston ring groove with a thickness gauge.
5. CONNECTING ROD
1) Replace the connecting rod, if the large or small
end thrust surface is damaged.
2) Check for bend or twist using a connecting rod
aligner. Replace the connecting rod if the bend or
twist exceeds the limit.Limit of bend or twist per 100 mm (3.94 in) in
length:
0.10 mm (0.0039 in)
3) Install the connecting rod fitted with bearing to
crankshaft, and then measure the side clearance
(thrust clearance). Replace the connecting rod if
the side clearance exceeds the specified limit.
Connecting rod side clearance:
Standard
0.070 — 0.330 mm (0.0028 — 0.0130 in)
Limit
0.4 mm (0.016 in)
4) Inspect the connecting rod bearing for scar,
peeling, seizure, melting, wear, etc.
5) Measure the oil clearance on individual connect-
ing rod bearings by means of plastigage. If any oil
clearance is not within specification, replace the
defective bearing with a new one of standard size
or undersize as necessary. (See the table below.)
Unit: mm (in)
Standard Limit
Piston
ring gapTop ring0.20 — 0.35
(0.0079 — 0.0138)1.0
(0.039)
Second
ring2.0 L0.35 — 0.50
(0.0138 — 0.0197)
1.0
(0.039)
2.5 L0.37 — 0.52
(0.0146 — 0.0204)
Oil ring rail0.20 — 0.50
(0.0079 — 0.0197)1.5
(0.059)
Unit: mm (in)
Standard Limit
Clearance
between pis-
ton ring and
piston ring
grooveTop ring0.040 — 0.080
(0.0016 —
0.0031)0.15 (0.0059)
Second
ring0.030 — 0.070
(0.0012 —
0.0028)0.15 (0.0059)
ME-00177
ME-00178
(A) Thickness gauge
(B) Connecting rod
(A)
(A) (B)
(B)
ME-00179
ME-00180