Page 2232 of 3870
Fig. 163: Locating Connector C
-24
Courtesy of MITSUBISHI MOTOR SALES OF AMERICA.
STEP 18. Check the refrigerant temperature switch.
1. Dip the metal part of the cooling temperature switch into engine oil and
increase the oil temperature using a gas burner or similar.
CAUTION: Do not heat more than necessary.
2004 Mitsubishi Endeavor LS
2004 HVAC Heater Air Conditioning, Ventilation - Endeavor
Page 2233 of 3870
Fig. 164: Checking Refrigerant Temperature Switch
Courtesy of MITSUBISHI MOTOR SALES OF AMERICA.
2. When the oil temperature reaches the standard value, check that voltage is
supplied between the terminals.
Standard value:
2004 Mitsubishi Endeavor LS
2004 HVAC Heater Air Conditioning, Ventilation - Endeavor
Page 2372 of 3870

ADJUSTMENT 1. Select a quiet area for testing. Duplicate conditions as much as possible.
Switch the compressor on and off several times to clearly identify compressor
noise. To duplicate high ambient conditions (high head pressure), restrict air
flow through the condenser. Install a manifold gauge set to make sure
discharge pressure doesn't exceed 2,070 kPa (300.2 psi).
2. Tighten all compressor mounting bolts, clutch mounting bolt, and compressor
drive belt. Check to assure clutch coil is tight (no rotation or wobble).
3. Check refrigerant hoses for rubbing or interference that can cause unusual
noises.
4. Check refrigerant charge. (Refer to
CHARGING
and
DISCHARGING
).
5. Recheck compressor noise as in Step 1 .
6. If noise still exists, loosen compressor mounting bolts and retighten. Repeat
Step 1 .
7. If noise continues, replace compressor and repeat from Step 1 .
POWER RELAY CHECK FRONT BLOWER RELAY CONTINUITY CHECK
2004 Mitsubishi Endeavor LS
2004 HVAC Heater Air Conditioning, Ventilation - Endeavor
Page 2406 of 3870
Fig. 304: Inspecting Cooling Temperature Switch
Courtesy of MITSUBISHI MOTOR SALES OF AMERICA.
2. When the oil temperature reaches the standard value, check that voltage is
supplied between the terminals.
Standard value:
2004 Mitsubishi Endeavor LS
2004 HVAC Heater Air Conditioning, Ventilation - Endeavor
Page 2410 of 3870
To prevent the entry of dust or other foreign bodies, plug the dismantled hose and
condenser assembly nipples. INSTALLATION SERVICE POINT >> A << CONDENSER INSTALLATION When replacing the condenser, refill it with a specified amount of compressor oil
and install it to the vehicle.
Compressor oil: SUN PAG 56
Quantity:
15 cm
3 (0.5 fl.oz)
INSPECTION CONDENSER FAN MOTOR CHECK Check to be sure that the condenser fan motor operates when battery voltage is
applied to terminal 2 and terminal 1
grounded.
plug the hose and nipples.
2004 Mitsubishi Endeavor LS
2004 HVAC Heater Air Conditioning, Ventilation - Endeavor
Page 2420 of 3870

handling R-134a.
R-134a evaporates so rapidly at normal atmospheric pressures and temperatures that
it tends to freeze anything it contacts. For this reason, extreme care must be taken to
prevent any liquid refrigerant from contacting the skin and especially the eyes.
Always wear safety goggles when servicing the refrigeration part of the A/C
system. Keep a bottle of sterile mineral oil handy when working on the refrigeration
system.
1. Should any liquid refrigerant get into your eyes, use a few drops of mineral oil
to wash them out.
R-134a is rapidly absorbed by the oil.
2. Next splash your eyes with plenty of cold water.
3. Call your doctor immediately even if irritation has ceased.
In most instances, moderate heat is required to bring the pressure of the refrigerant
in its container above the pressure of the system when charging or adding
refrigerant.
A bucket or large pan of hot water not over 40°C (104.0°F) is all the heat required
for this purpose. Do not heat the refrigerant container with a blow torch or any other
means that would raise temperature and pressure above this temperature. Do not
weld or steam-clean on or near the system components or refrigerant lines.
WARNING:Do not heat R-134a above 40 °C (104.0 °F) or it may
catch fire and explode.
CAUTION: Keep R-134a containers upright when charging the
system.
WARNING:The leak detector for R-134a should be used to
check for refrigerant gas leaks.
CAUTION: Do not allow liquid refrigerant to touch bright metal
2004 Mitsubishi Endeavor LS
2004 HVAC Automatic Air Conditioning - Endeavor
Page 2685 of 3870
IGNITION COIL CHEC
K
Check by the following procedure, and replace the coil if there is a malfunction. PRIMARY COIL AND IGNITION POWER TRANSISTOR CONTINUITY CHECK Fig. 3: Checking Primary Coil And Ignition Power Transistor
Courtesy of MITSUBISHI MOTOR SALES OF AMERICA.
NOTE: An analog-type ohmmeter should be used.
NOTE: Connect the negative probe of the ohmmeter to terminal 1.
CAUTION: This test must be performed quickly (in less than 10
seconds) to prevent coil from burning and ignition
power transistor from breaking.
2004 Mitsubishi Endeavor Limited 2004 ENGINE Ignition System - Endeavor
Page 2686 of 3870

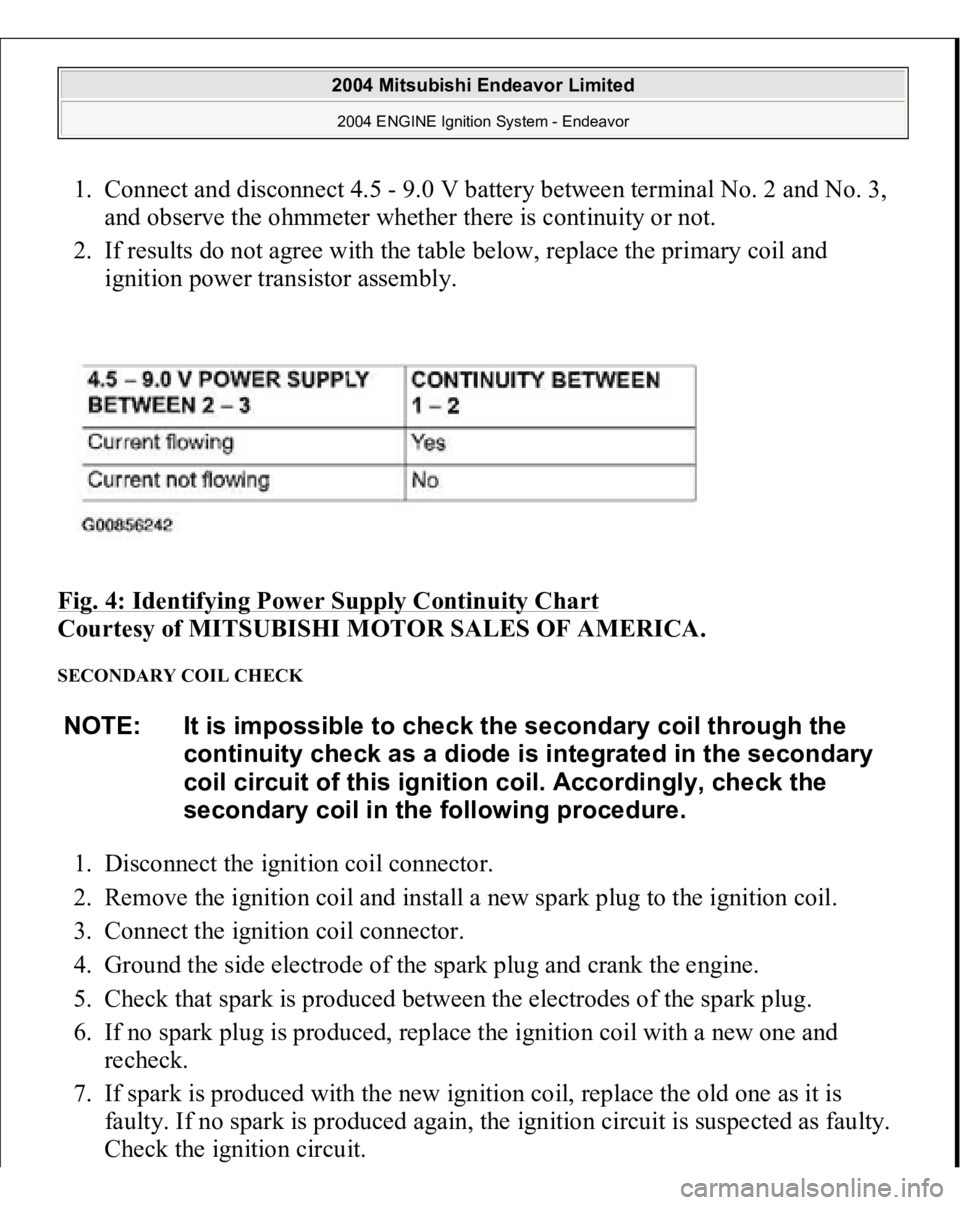
1. Connect and disconnect 4.5 - 9.0 V battery between terminal No. 2 and No. 3,
and observe the ohmmeter whether there is continuity or not.
2. If results do not agree with the table below, replace the primary coil and
ignition power transistor assembly.
Fig. 4: Identifying Power Supply Continuity Chart
Courtesy of MITSUBISHI MOTOR SALES OF AMERICA.
SECONDARY COIL CHECK 1. Disconnect the ignition coil connector.
2. Remove the ignition coil and install a new spark plug to the ignition coil.
3. Connect the ignition coil connector.
4. Ground the side electrode of the spark plug and crank the engine.
5. Check that spark is produced between the electrodes of the spark plug.
6. If no spark plug is produced, replace the ignition coil with a new one and
recheck.
7. If spark is produced with the new ignition coil, replace the old one as it is
faulty. If no spark is produced again, the ignition circuit is suspected as faulty.
Check the ignition circuit. NOTE: It is impossible to check the secondary coil through the
continuity check as a diode is integrated in the secondary
coil circuit of this ignition coil. Accordingly, check the
secondary coil in the following procedure.
2004 Mitsubishi Endeavor Limited 2004 ENGINE Ignition System - Endeavor