2004 ISUZU TF SERIES service
[x] Cancel search: servicePage 765 of 4264
ELECTRICAL-BODY AND CHASSIS 8A-107
REMOVAL AND INSTALLATION
ECM (ENGINE CONTROL MODULE):
4JA1-TC / 4JH1-TC
Removal
1. Remove the passenger side front seat – refer to Section 10
CAB.
2. Remove the passenger side front door opening scuff plate.
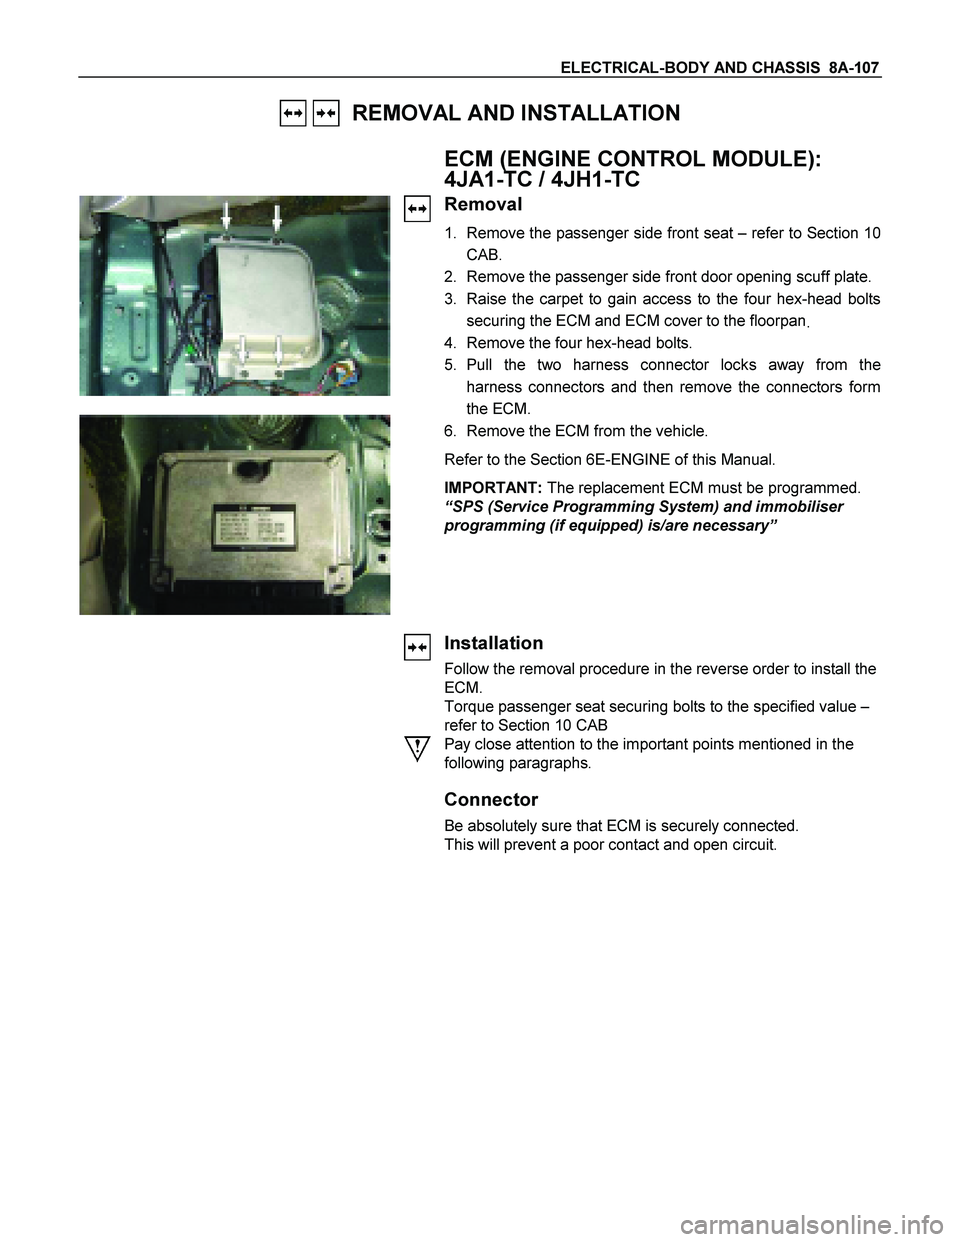
3. Raise the carpet to gain access to the four hex-head bolts
securing the ECM and ECM cover to the floorpan
.
4. Remove the four hex-head bolts.
5. Pull the two harness connector locks away from the
harness connectors and then remove the connectors form
the ECM.
6. Remove the ECM from the vehicle.
Refer to the Section 6E-ENGINE of this Manual.
IMPORTANT: The replacement ECM must be programmed.
“SPS (Service Programming System) and immobiliser
programming (if equipped) is/are necessary”
Installation
Follow the removal procedure in the reverse order to install the
ECM.
Torque passenger seat securing bolts to the specified value –
refer to Section 10 CAB
Pay close attention to the important points mentioned in the
following paragraphs.
Connector
Be absolutely sure that ECM is securely connected.
This will prevent a poor contact and open circuit.
Page 1099 of 4264
CRUISE CONTROL SYSTEM 8B-1
SECTION 8B
CRUISE CONTROL SYSTEM
TABLE OF CONTENTS
PAGE
Service Precaution .........................................................................................................................8B- 3
General Description .......................................................................................................................8B- 3
Brake Switch ...................................................................................................................................8B- 5
Removal .......................................................................................................................................8B- 5
Installation ..................................................................................................................................8B- 5
Adjustment ..................................................................................................................................8B- 6
Clutch switch ...................................................................................................................................8B- 6
Removal and Installation ........................................................................................................8B- 6
Adjustment ..................................................................................................................................8B- 6
Starter Switch ..................................................................................................................................8B- 6
Removal .......................................................................................................................................8B- 6
Installation ..................................................................................................................................8B- 6
Cruise Control Main Switch .........................................................................................................8B- 7
Removal .......................................................................................................................................8B- 7
Installation ..................................................................................................................................8B- 7
Cruise Control Switch (Combination Switch) ........................................................................8B- 7
Removal and Installation ........................................................................................................8B- 7
Cruise Control Unit ........................................................................................................................8B- 8
Removal .......................................................................................................................................8B- 8
Installation ..................................................................................................................................8B- 8
Cruise Actuator ...............................................................................................................................8B- 8
Actuator Cable Diagram ..........................................................................................................8B- 9
Removal .......................................................................................................................................8B- 9
Installation ..................................................................................................................................8B- 9
Adjustment ..................................................................................................................................8B- 9
Mode Switch ....................................................................................................................................8B- 9
Removal and Installation ........................................................................................................8B- 9
Page 1101 of 4264
CRUISE CONTROL SYSTEM 8B-3
Service Precaution
WARNING: THIS VEHICLE HAS A SUPPLEMENTAL RESTRAIN SYSTEM (SRS). REFER TO THE SRS
COMPONENT AND WIRING LOCATION VIEW IN ORDER TO DETERMINE WHETHER YOU ARE
PERFORMING SERVICE ON OR NEAR THE SRS COMPONENTS OR THE SRS WIRING. WHEN YOU ARE
PERFORMING SERVICE ON OR NEAR THE SRS COMPONENTS OR THE SRS WIRING, REFER TO THE SRS
SERVICE INFORMATION. FAILURE TO FOLLOW WARNINGS COULD RESULT IN POSSIBLE AIR BAG
DEPLOYMENT, PERSONAL INJURY, OR OTHER WISE UNNEEDED SRS SYSTEM REPAIRS.
CAUTION: Always use the correct fastener in the proper location. When you replace a faster, use ONLY the
exact part number for that application. Dealer will call out those fasteners that require a replacement after
removal. Dealer will also call out the fasteners that require thread lockers or thread sealant. UNLESS
OTHERWISE SPECIFIED, do not use supplemental coatings (Paints, greases, or other corrosion inhibitors)
on threaded fasteners or fastener joint interfaces. Generally, such coatings adversely affect the fastener
torque and joint Clamping force, and may damaged the fastener. When you install fasteners, use the
correct tightening sequence and specifications. Following these instructions can help you avoid damage to
parts and systems.
General Description
The cruise control keeps the vehicle running at a fixed speed until a signal canceling this fixed speed is received.
When the main switch “AUTO CRUISE” is turned on with the vehicle in the running mode, the battery voltage is
applied to the control unit. When a signal from the control unit while the vehicle is in this state, the cruise control
actuator is activated to operate the system. Also, while the system is operating, the “AUTO CRUISE” indicator light
in the meter assembly lights up.
LTW48BSH000101
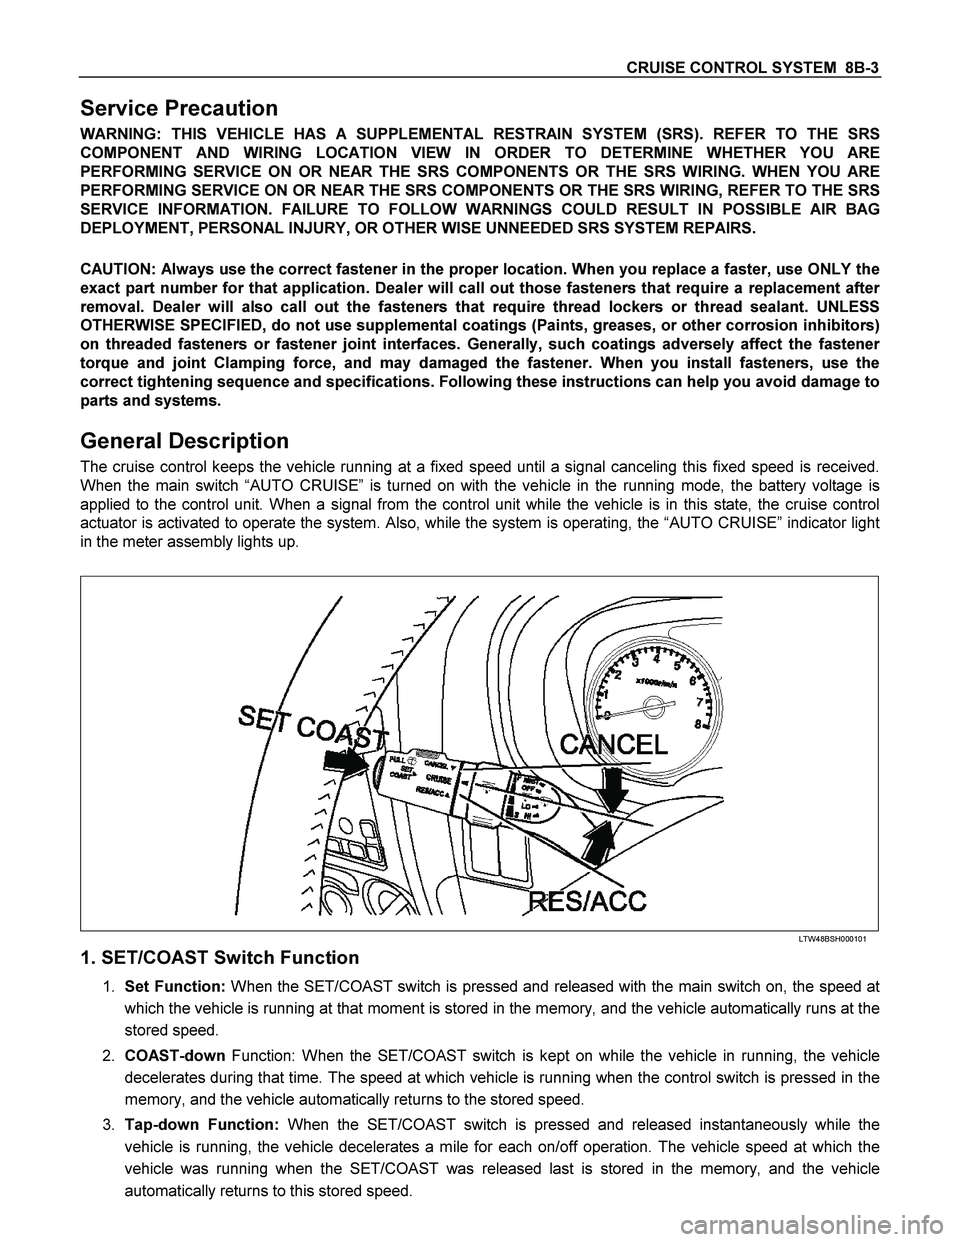
1. SET/COAST Switch Function
1. Set Function: When the SET/COAST switch is pressed and released with the main switch on, the speed at
which the vehicle is running at that moment is stored in the memory, and the vehicle automatically runs at the
stored speed.
2. COAST-down Function: When the SET/COAST switch is kept on while the vehicle in running, the vehicle
decelerates during that time. The speed at which vehicle is running when the control switch is pressed in the
memory, and the vehicle automatically returns to the stored speed.
3. Tap-down Function: When the SET/COAST switch is pressed and released instantaneously while the
vehicle is running, the vehicle decelerates a mile for each on/off operation. The vehicle speed at which the
vehicle was running when the SET/COAST was released last is stored in the memory, and the vehicle
automatically returns to this stored speed.
Page 1164 of 4264
6A – 24 ENGINE MECHANICAL
SERVICING
Servicing refers to general maintenance procedures to be performed by qualified service personnel.
RTW36ASH000401
MODEL IDENTIFICATION
Engine Serial Number
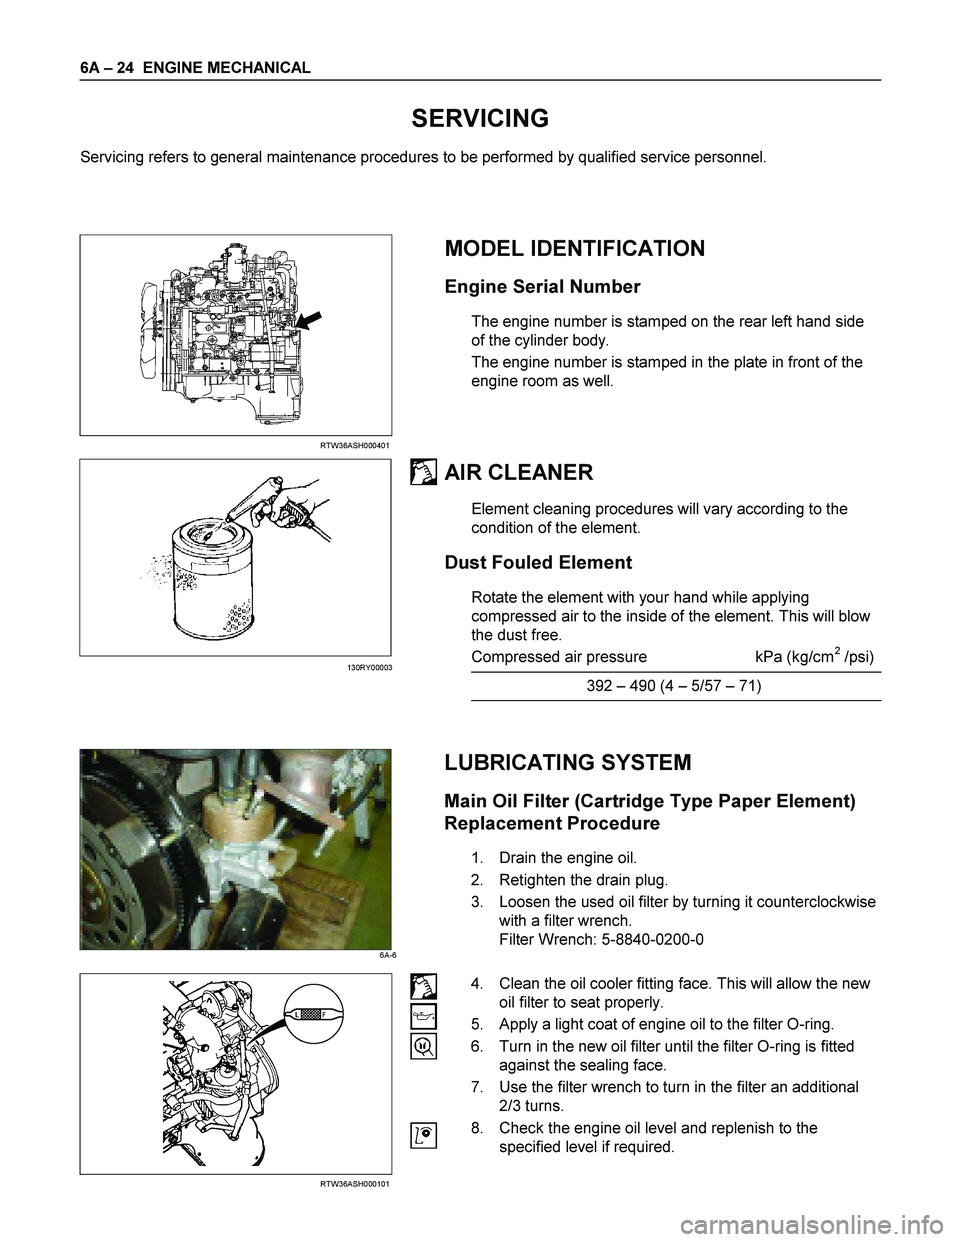
The engine number is stamped on the rear left hand side
of the cylinder body.
The engine number is stamped in the plate in front of the
engine room as well.
AIR CLEANER
Element cleaning procedures will vary according to the
condition of the element.
Dust Fouled Element
Rotate the element with your hand while applying
compressed air to the inside of the element. This will blow
the dust free.
Compressed air pressure kPa (kg/cm
2 /psi)
392 – 490 (4 – 5/57 – 71)
LUBRICATING SYSTEM
Main Oil Filter (Cartridge Type Paper Element)
Replacement Procedure
1. Drain the engine oil.
2. Retighten the drain plug.
3. Loosen the used oil filter by turning it counterclockwise
with a filter wrench.
Filter Wrench: 5-8840-0200-0
RTW36ASH000101
4. Clean the oil cooler fitting face. This will allow the new
oil filter to seat properly.
5. Apply a light coat of engine oil to the filter O-ring.
6. Turn in the new oil filter until the filter O-ring is fitted
against the sealing face.
7. Use the filter wrench to turn in the filter an additional
2/3 turns.
8. Check the engine oil level and replenish to the
specified level if required.
130RY00003
6A-6
Page 1176 of 4264
6A – 36 ENGINE MECHANICAL
GENERAL DESCRIPTION
RTW46AMF000401
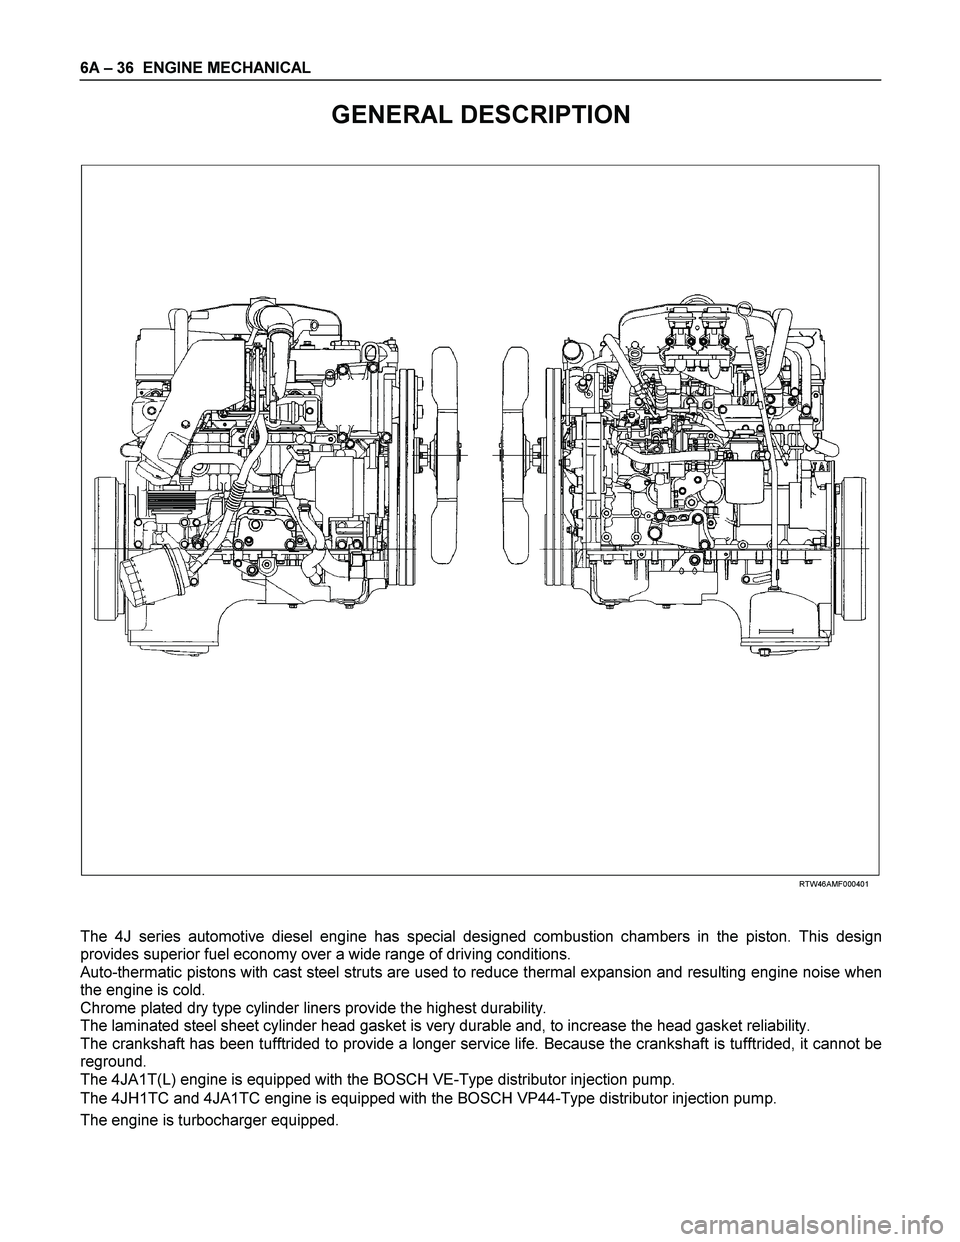
The 4J series automotive diesel engine has special designed combustion chambers in the piston. This design
provides superior fuel economy over a wide range of driving conditions.
Auto-thermatic pistons with cast steel struts are used to reduce thermal expansion and resulting engine noise when
the engine is cold.
Chrome plated dry type cylinder liners provide the highest durability.
The laminated steel sheet cylinder head gasket is very durable and, to increase the head gasket reliability.
The crankshaft has been tufftrided to provide a longer service life. Because the crankshaft is tufftrided, it cannot be
reground.
The 4JA1T(L) engine is equipped with the BOSCH VE-Type distributor injection pump.
The 4JH1TC and 4JA1TC engine is equipped with the BOSCH VP44-Type distributor injection pump.
The engine is turbocharger equipped.
Page 1212 of 4264
6A – 72 ENGINE MECHANICAL
012RY00022
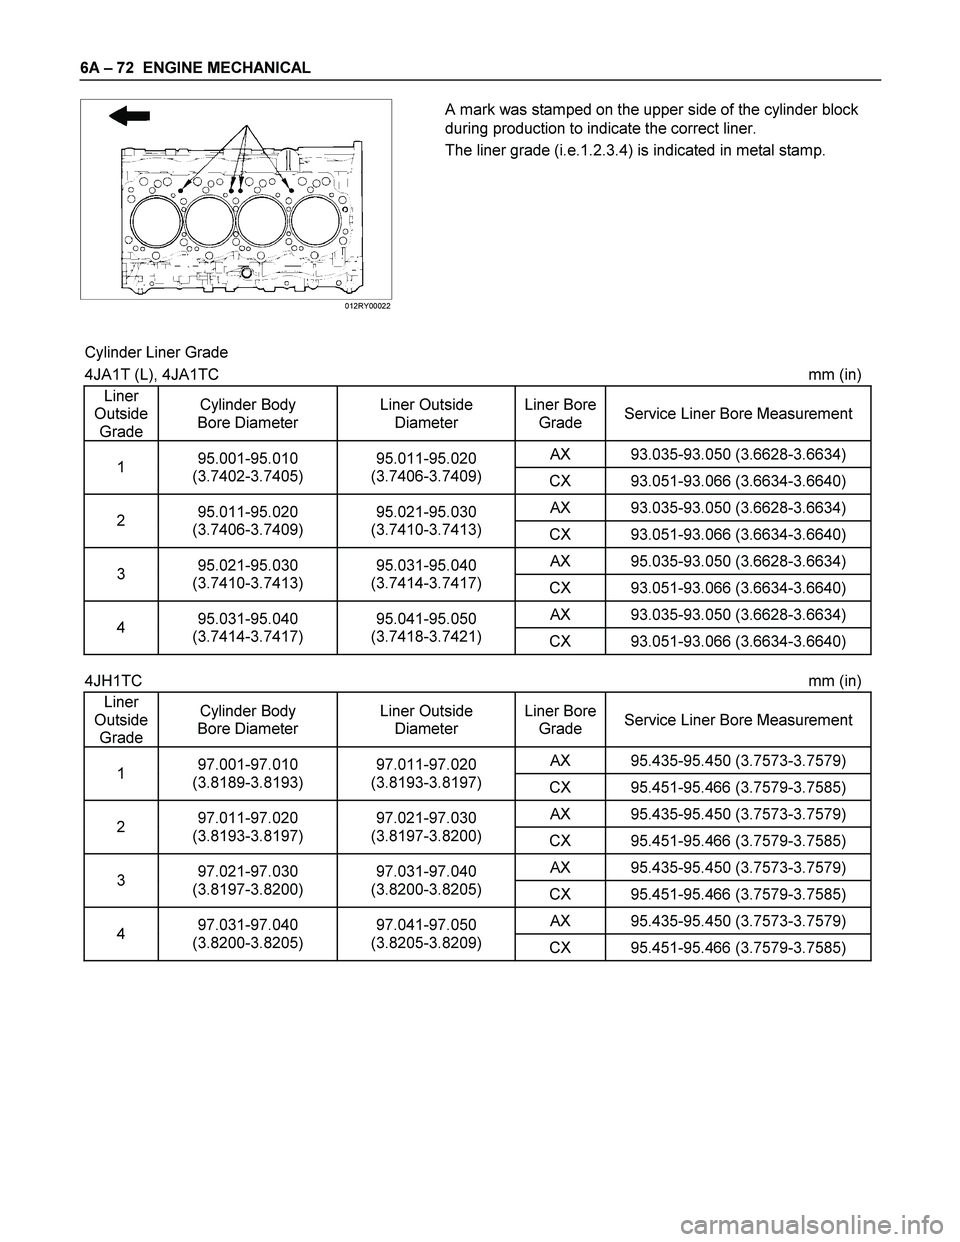
A mark was stamped on the upper side of the cylinder block
during production to indicate the correct liner.
The liner grade (i.e.1.2.3.4) is indicated in metal stamp.
Cylinder Liner Grade
4JA1T (L), 4JA1TC mm (in)
Liner
Outside
Grade Cylinder Body
Bore Diameter Liner Outside
Diameter Liner Bore
Grade Service Liner Bore Measurement
AX 93.035-93.050 (3.6628-3.6634) 1 95.001-95.010
(3.7402-3.7405) 95.011-95.020
(3.7406-3.7409)
CX 93.051-93.066 (3.6634-3.6640)
AX 93.035-93.050 (3.6628-3.6634) 2 95.011-95.020
(3.7406-3.7409) 95.021-95.030
(3.7410-3.7413)
CX 93.051-93.066 (3.6634-3.6640)
AX 95.035-93.050 (3.6628-3.6634) 3 95.021-95.030
(3.7410-3.7413) 95.031-95.040
(3.7414-3.7417)
CX 93.051-93.066 (3.6634-3.6640)
AX 93.035-93.050 (3.6628-3.6634) 4 95.031-95.040
(3.7414-3.7417) 95.041-95.050
(3.7418-3.7421)
CX 93.051-93.066 (3.6634-3.6640)
4JH1TC mm (in)
Liner
Outside
Grade Cylinder Body
Bore Diameter Liner Outside
Diameter Liner Bore
Grade Service Liner Bore Measurement
AX 95.435-95.450 (3.7573-3.7579) 1 97.001-97.010
(3.8189-3.8193) 97.011-97.020
(3.8193-3.8197)
CX 95.451-95.466 (3.7579-3.7585)
AX 95.435-95.450 (3.7573-3.7579) 2 97.011-97.020
(3.8193-3.8197) 97.021-97.030
(3.8197-3.8200)
CX 95.451-95.466 (3.7579-3.7585)
AX 95.435-95.450 (3.7573-3.7579) 3 97.021-97.030
(3.8197-3.8200) 97.031-97.040
(3.8200-3.8205)
CX 95.451-95.466 (3.7579-3.7585)
AX 95.435-95.450 (3.7573-3.7579) 4 97.031-97.040
(3.8200-3.8205) 97.041-97.050
(3.8205-3.8209)
CX 95.451-95.466 (3.7579-3.7585)
Page 1214 of 4264
6A – 74 ENGINE MECHANICAL
Piston Grade Selection
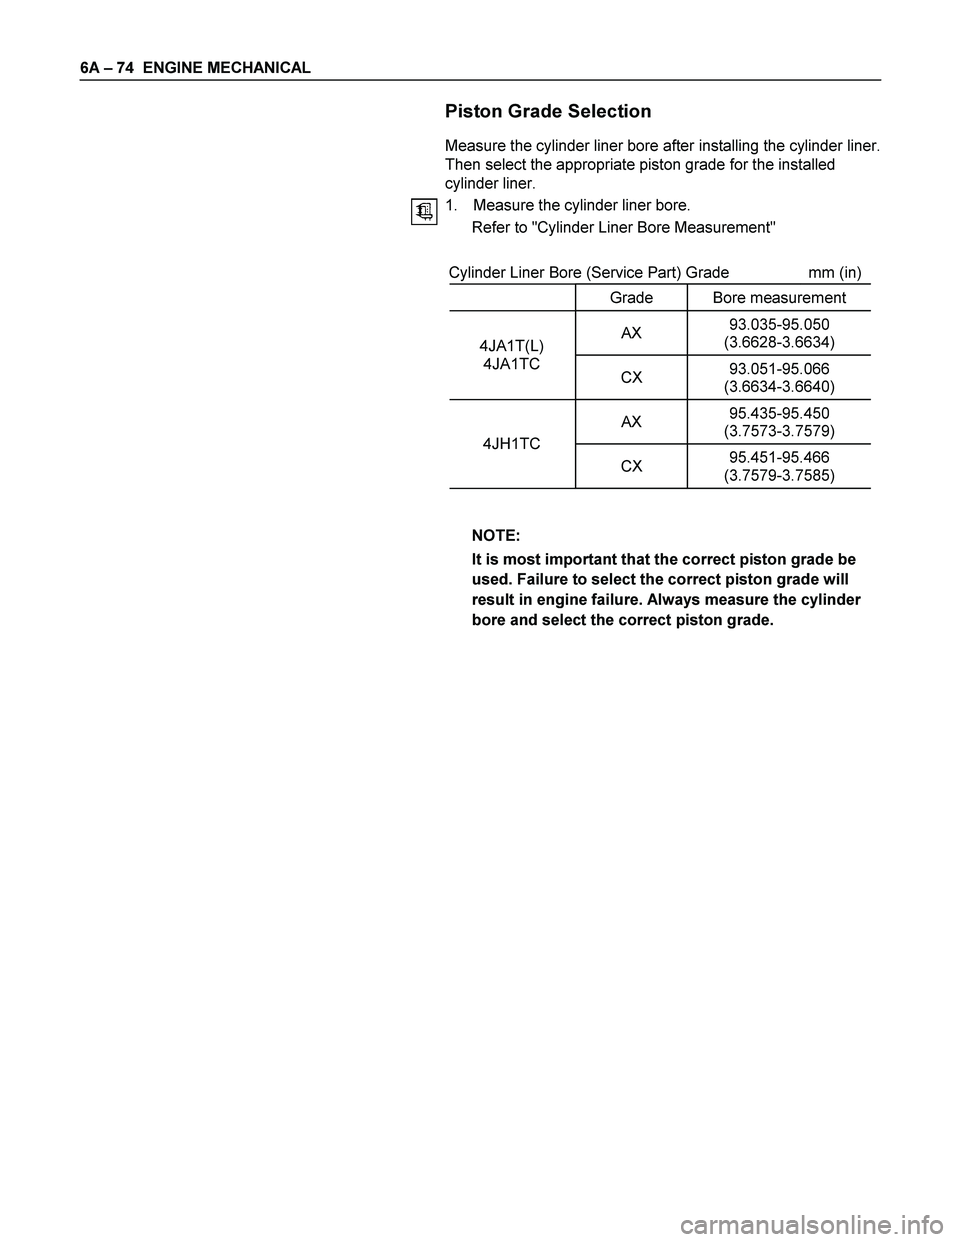
Measure the cylinder liner bore after installing the cylinder liner.
Then select the appropriate piston grade for the installed
cylinder liner.
1. Measure the cylinder liner bore.
Refer to "Cylinder Liner Bore Measurement"
Cylinder Liner Bore (Service Part) Grade mm (in)
Grade Bore measurement
AX 93.035-95.050
(3.6628-3.6634) 4JA1T(L)
4JA1TC
CX 93.051-95.066
(3.6634-3.6640)
AX 95.435-95.450
(3.7573-3.7579)
4JH1TC
CX 95.451-95.466
(3.7579-3.7585)
NOTE:
It is most important that the correct piston grade be
used. Failure to select the correct piston grade will
result in engine failure. Always measure the cylinder
bore and select the correct piston grade.
Page 1215 of 4264
ENGINE MECHANICAL 6A – 75
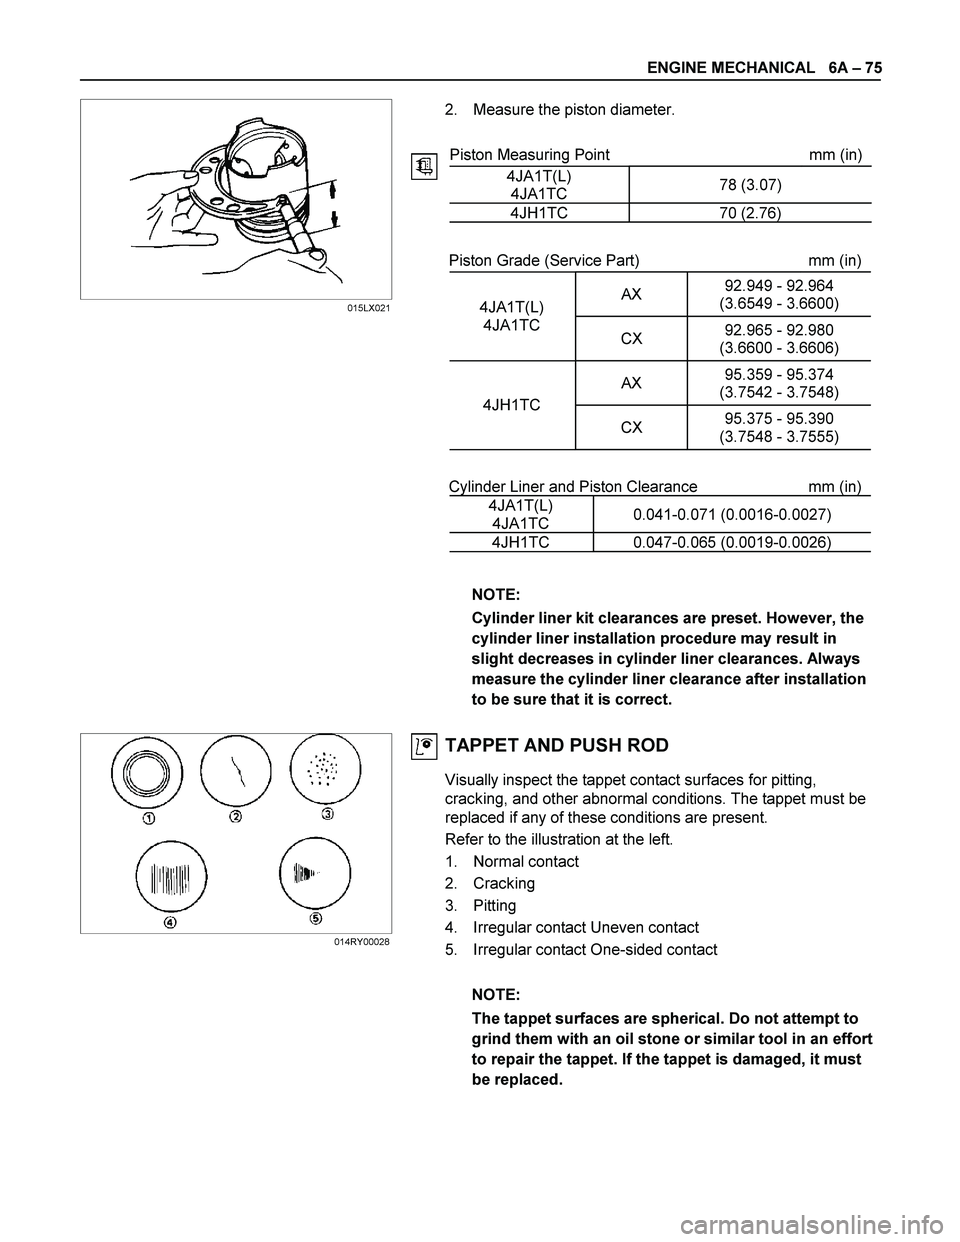
2. Measure the piston diameter.
Piston Measuring Point mm (in)
4JA1T(L)
4JA1TC 78 (3.07)
4JH1TC 70 (2.76)
Piston Grade (Service Part) mm (in)
AX 92.949 - 92.964
(3.6549 - 3.6600)
4JA1T(L)
4JA1TC
CX 92.965 - 92.980
(3.6600 - 3.6606)
AX 95.359 - 95.374
(3.7542 - 3.7548)
4JH1TC
CX 95.375 - 95.390
(3.7548 - 3.7555)
Cylinder Liner and Piston Clearance mm (in)
4JA1T(L)
4JA1TC 0.041-0.071 (0.0016-0.0027)
4JH1TC 0.047-0.065 (0.0019-0.0026)
NOTE:
Cylinder liner kit clearances are preset. However, the
cylinder liner installation procedure may result in
slight decreases in cylinder liner clearances. Always
measure the cylinder liner clearance after installation
to be sure that it is correct.
TAPPET AND PUSH ROD
Visually inspect the tappet contact surfaces for pitting,
cracking, and other abnormal conditions. The tappet must be
replaced if any of these conditions are present.
Refer to the illustration at the left.
1. Normal contact
2. Cracking
3. Pitting
4. Irregular contact Uneven contact
5. Irregular contact One-sided contact
NOTE:
The tappet surfaces are spherical. Do not attempt to
grind them with an oil stone or similar tool in an effort
to repair the tappet. If the tappet is damaged, it must
be replaced.
015LX021
014RY00028