Page 974 of 4264
8A-316 ELECTRICAL-BODY AND CHASSIS
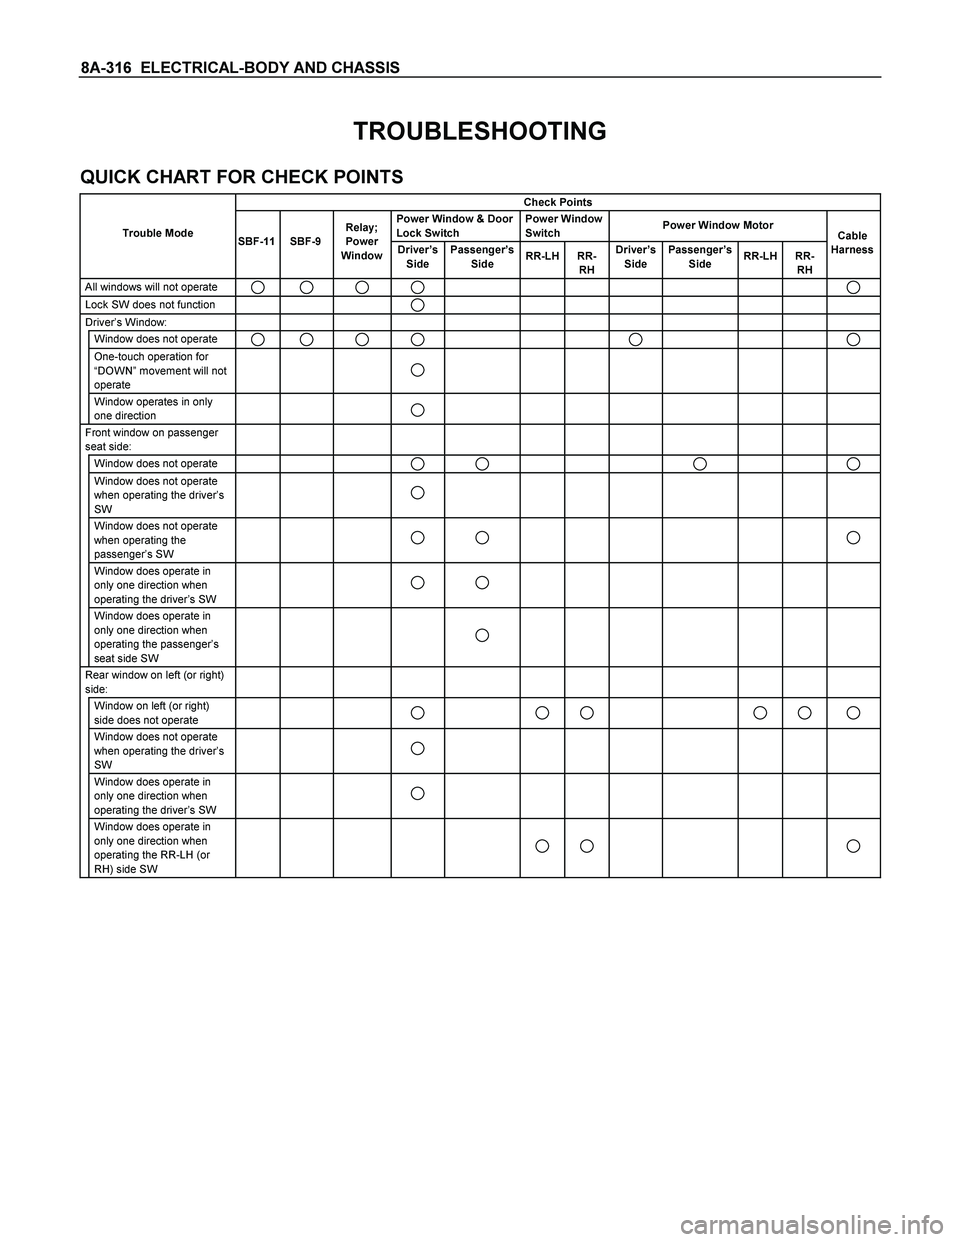
TROUBLESHOOTING
QUICK CHART FOR CHECK POINTS
Check Points
Trouble Mode Power Window & Door
Lock Switch Power Window
Switch Power Window Motor
Driver’s
Side Passenger’s
Side RR-LH RR-
RH Driver’s
Side Passenger’s
Side RR-LH RR-
RH
All windows will not operate Lock SW does not function Driver’s Window:
Window does not operate One-touch operation for
“DOWN” movement will not
operate
Window operates in only
one direction
Front window on passenger
seat side:
Window does not operate Window does not operate
when operating the driver’s
SW
Window does not operate
when operating the
passenger’s SW
Window does operate in
only one direction when
operating the driver’s SW
Window does operate in
only one direction when
operating the passenger’s
seat side SW
Rear window on left (or right)
side:
Window on left (or right)
side does not operate
Window does not operate
when operating the driver’s
SW
Window does operate in
only one direction when
operating the driver’s SW
Window does operate in
only one direction when
operating the RR-LH (or
RH) side SW
Cable
Harness Relay;
Power
Window
SBF-9
SBF-11
Page 975 of 4264
ELECTRICAL-BODY AND CHASSIS 8A-317
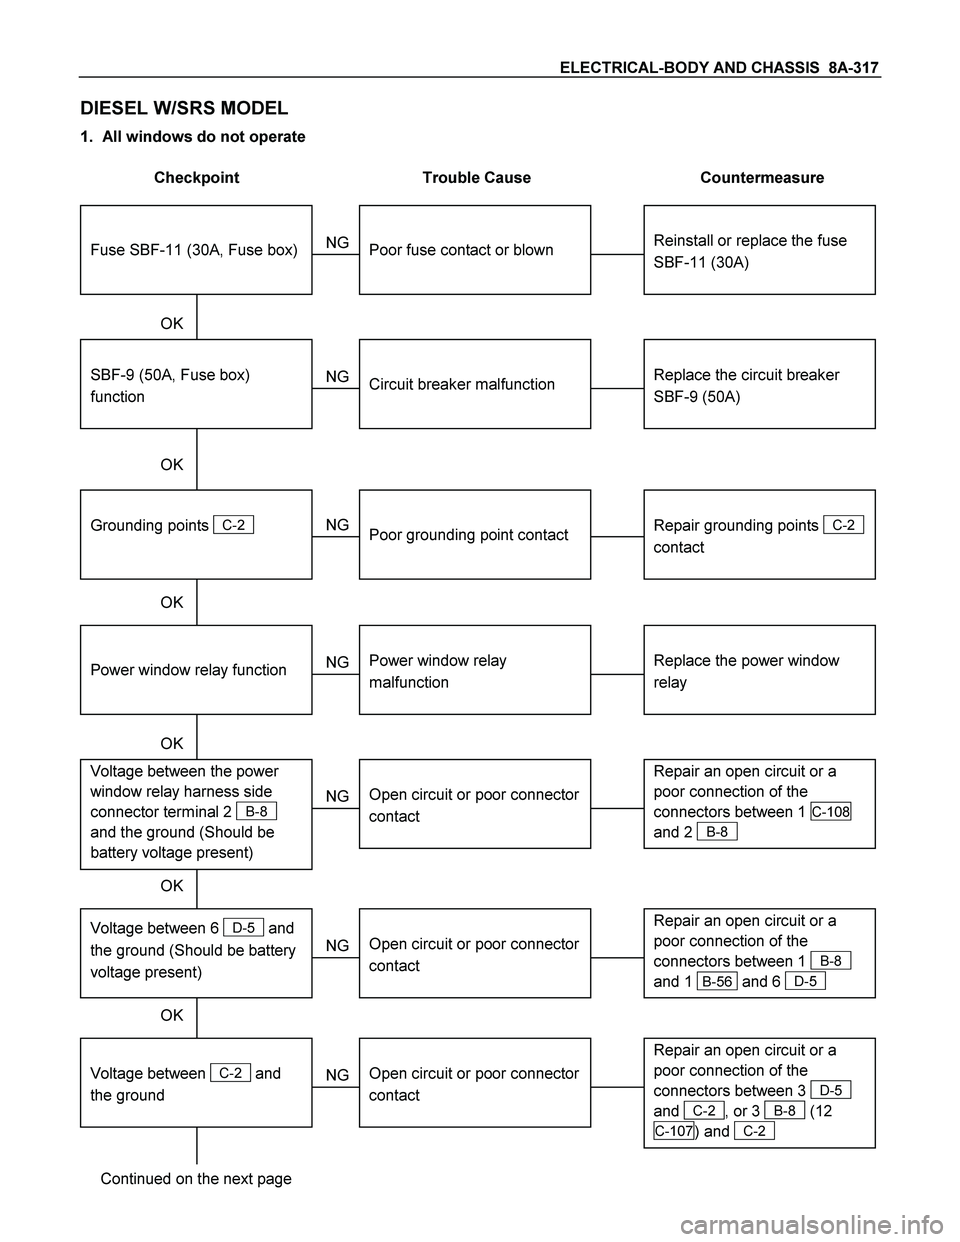
DIESEL W/SRS MODEL
1. All windows do not operate
Checkpoint Trouble Cause Countermeasure
Reinstall or replace the fuse
SBF-11 (30A)
Poor fuse contact or blown
NG
Replace the circuit breaker
SBF-9 (50A)
SBF-9 (50A, Fuse box)
function
Circuit breaker malfunction
Repair grounding points
C-2
contact
Grounding points
C-2
Poor grounding point contact
NG NG OK
OK OK
Fuse SBF-11 (30A, Fuse box)
Replace the power window
relay
Power window relay
malfunction
NG
Repair an open circuit or a
poor connection of the
connectors between 1
C-108
and 2
B-8
Voltage between the power
window relay harness side
connector terminal 2
B-8
and the ground (Should be
battery voltage present)
Open circuit or poor connector
contact
NG OK
Power window relay function
OK
Repair an open circuit or a
poor connection of the
connectors between 1
B-8
and 1
B-56 and 6 D-5
Open circuit or poor connector
contact
NG Voltage between 6 D-5 and
the ground (Should be battery
voltage present)
OK
Repair an open circuit or a
poor connection of the
connectors between 3
D-5
and
C-2 , or 3 B-8 (12
C-107 )
and C-2
Open circuit or poor connector
contact
NG
Continued on the next page
Voltage between
C-2 and
the ground
Page 981 of 4264
ELECTRICAL-BODY AND CHASSIS 8A-323
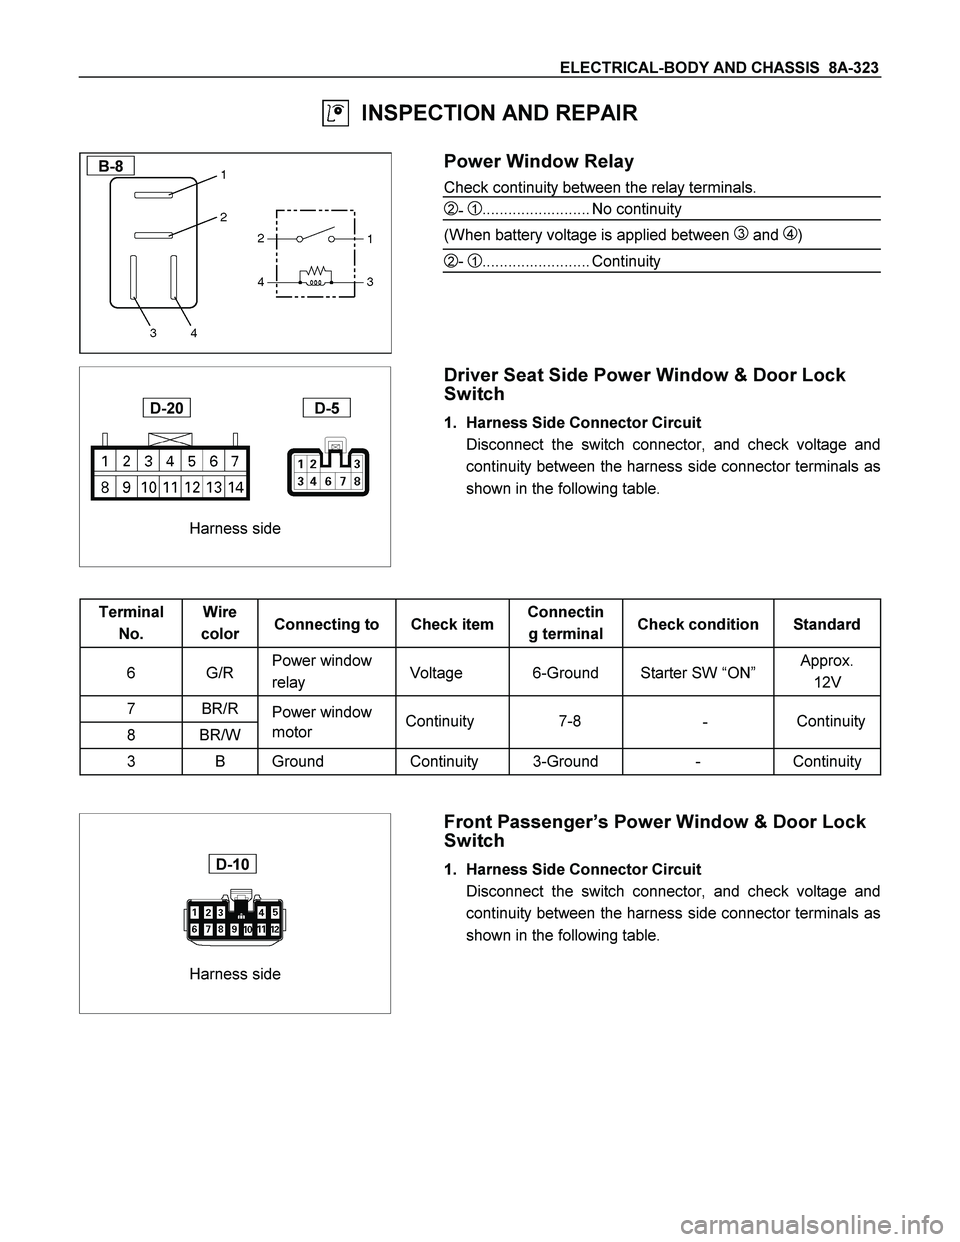
INSPECTION AND REPAIR
B-8
Power Window Relay
Check continuity between the relay terminals.
2- 1......................... No continuity
(When battery voltage is applied between
3 and 4)
2- 1......................... Continuity
Harness side
D-20 D-5
Driver Seat Side Power Window & Door Lock
Switch
1. Harness Side Connector Circuit
Disconnect the switch connector, and check voltage and
continuity between the harness side connector terminals as
shown in the following table.
Terminal
No. Wire
color Connecting to Check item Connectin
g terminal Check condition Standard
6 G/R Power window
relay Voltage 6-Ground Starter SW “ON” Approx.
12V
7 BR/R
Power window
8 BR/W motor
3 B Ground Continuity 3-Ground - Continuity
Harness side
D-10
Front Passenger’s Power Window & Door Lock
Switch
1. Harness Side Connector Circuit
Disconnect the switch connector, and check voltage and
continuity between the harness side connector terminals as
shown in the following table.
Continuity
- 7-8 Continuity
Page 982 of 4264
8A-324 ELECTRICAL-BODY AND CHASSIS
Terminal
No. Wire
color Connecting to Check item Connectin
g terminal Check condition Standard
11 G/R Power window
relay Voltage 11-Ground Starter SW “ON” Approx.
12V
12 BR/R
Power window
10 BR/W motor
5 B Ground Continuity 5-Ground - Continuity
Harness side
D-12 D-16
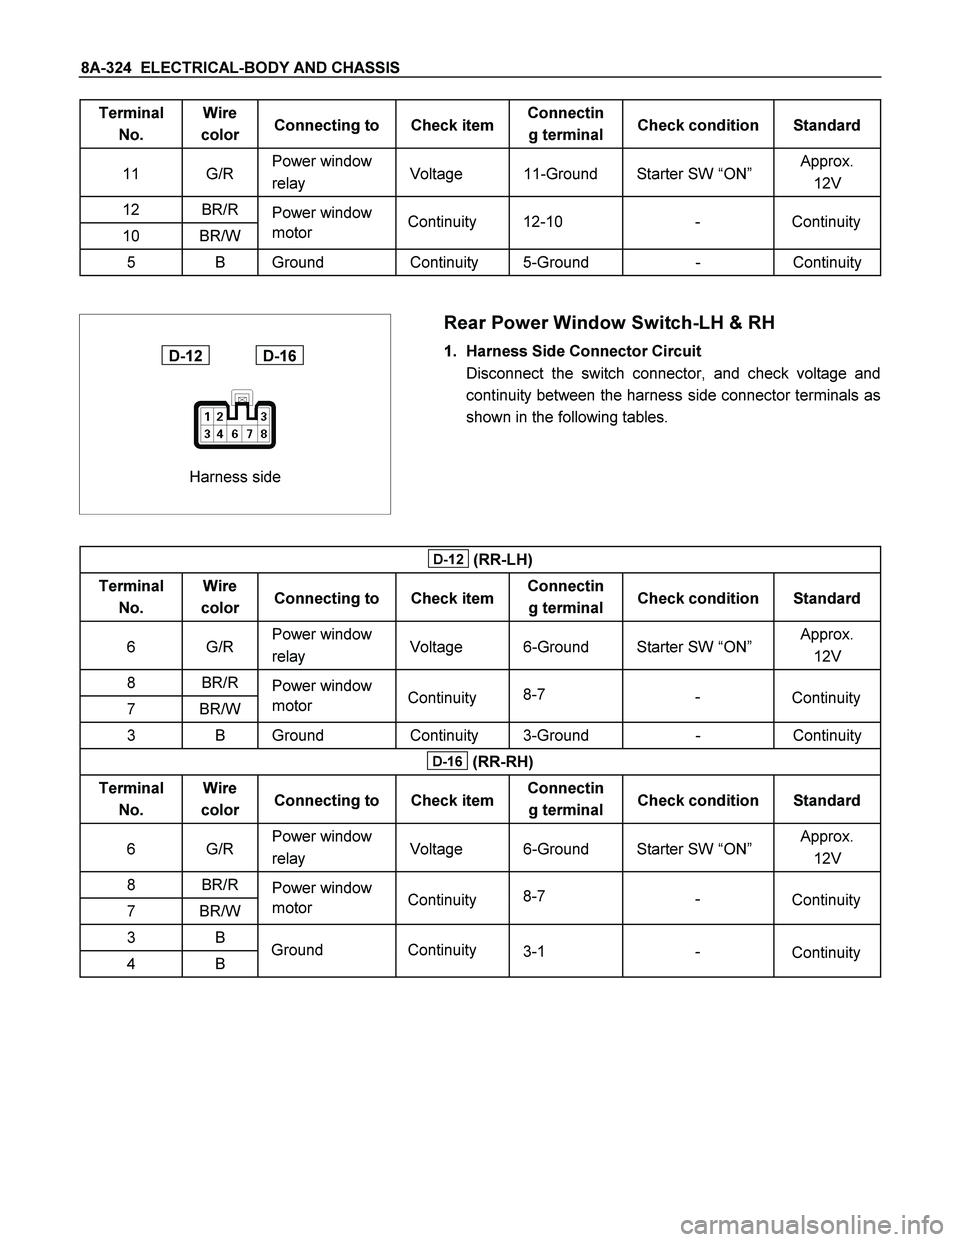
Rear Power Window Switch-LH & RH
1. Harness Side Connector Circuit
Disconnect the switch connector, and check voltage and
continuity between the harness side connector terminals as
shown in the following tables.
D-12 (RR-LH)
Terminal
No. Wire
color Connecting to Check item Connectin
g terminal Check condition Standard
6 G/R Power window
relay Voltage 6-Ground Starter SW “ON” Approx.
12V
8 BR/R
Power window
7 BR/W motor
3 B Ground Continuity 3-Ground - Continuity
D-16 (RR-RH)
Terminal
No. Wire
color Connecting to Check item Connectin
g terminal Check condition Standard
6 G/R Power window
relay Voltage 6-Ground Starter SW “ON” Approx.
12V
8 BR/R
Power window
7 BR/W motor
3 B
4 B
Continuity - 12-10 Continuity
Continuity Continuity 8-7
-
Continuity Continuity 8-7
-
Ground Continuity
3-1
Continuity -
Page 1011 of 4264
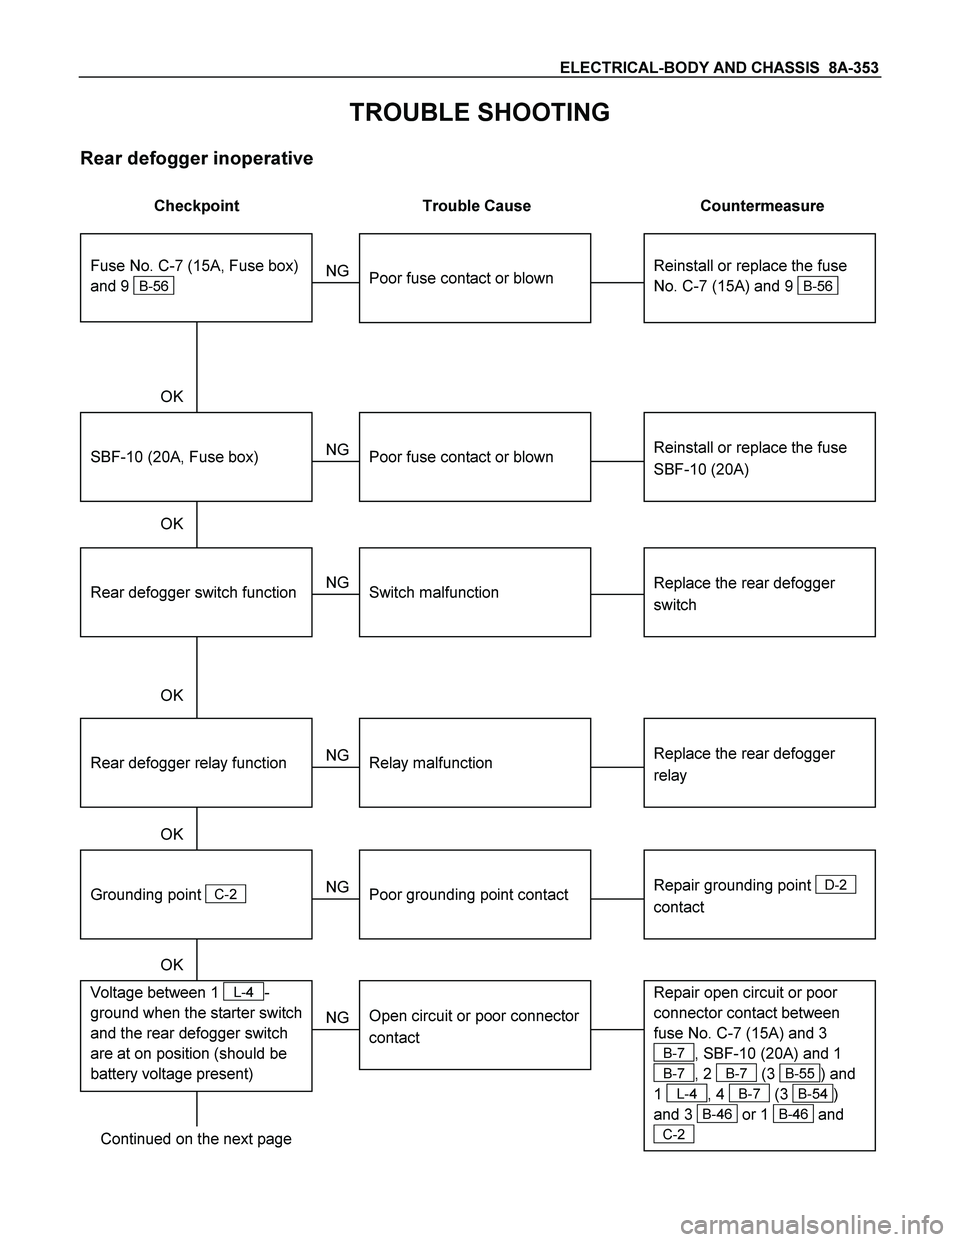
ELECTRICAL-BODY AND CHASSIS 8A-353
TROUBLE SHOOTING
Rear defogger inoperative
Checkpoint Trouble Cause Countermeasure
Reinstall or replace the fuse
No. C-7 (15A) and 9
B-56
Poor fuse contact or blown
NG
Reinstall or replace the fuse
SBF-10 (20A)
SBF-10 (20A, Fuse box)
Poor fuse contact or blown
Replace the rear defogger
switch
Rear defogger switch function
Switch malfunction
NG NG OK
OK OK
Fuse No. C-7 (15A, Fuse box)
and 9
B-56
Replace the rear defogger
relay
Relay malfunction
NG
Continued on the next page
Rear defogger relay function
Repair grounding point
D-2
contact
Grounding point
C-2
Poor grounding point contact
NG OK
Repair open circuit or poor
connector contact between
fuse No. C-7 (15A) and 3
B-7, SBF-10 (20A) and 1
B-7, 2 B-7 (3 B-55) and
1
L-4, 4 B-7 (3 B-54)
and 3
B-46 or 1 B-46 and
C-2
Voltage between 1 L-4-
ground when the starter switch
and the rear defogger switch
are at on position (should be
battery voltage present)
Open circuit or poor connector
contact
NG OK
Page 1014 of 4264
8A-356 ELECTRICAL-BODY AND CHASSIS
INSPECTION AND REPAIR
Switch side
B-57
REAR DEFOGGER SWITCH
Rear Defogger Switch Connections
Terminal No.
SW position 9 7 8
ON
OFF
B-7
REAR DEFOGGER RELAY
Check continuity between the relay terminals.
2- 1......................... No continuity
(When battery voltage is applied between
4 and 3)
2- 1......................... Continuity
INSPECTION OF REAR DEFOGGER HEAT
WIRE
� Heat wires are printed on the inner side of glass.
To clean, use a soft cloth and wipe horizontally along the
wires.
� Never use glass cleaner or equivalent.
� When measuring voltage, wind a piece of tin foil around the
tip of the negative probe and press the foil against the wire
with your finger as shown.
(1) Turn the ignition switch on.
(2) Turn the defogger switch on.
(3) Measure the voltage between the three points on the hea
t
wire and the (-) terminal with a voltmeter.
(4) Check that the voltage becomes smaller from
A to B to C.
Page 1076 of 4264
8A-418 ELECTRICAL-BODY AND CHASSIS
CONNECTOR LIST
No. Connector face No. Connector face
B-1
~
B-6 NOT USED B-17
~
B-19 NOT USED
B-7
Black
Rear defogger relay B-20
WhiteCigar lighter illumination
B-8
Black
Power Window Relay B-21
WhiteCigar lighter
B-9
NOT USED B-22
Black
Cigar lighter
B-10
White
Clock B-23
GreenMeter-A
B-11
�
B-12 NOT USED B-24
Green
Meter-B
B-13
White
Fan switch B-25
~
B-27 NOT USED
B-14
Gray
Audio B-24
GreenGround Driver Side
B-15
NOT USED B-30
~
B-29 NOT USED
B-16
White
Hazard switch B-31
SDM
Page 1077 of 4264
ELECTRICAL-BODY AND CHASSIS 8A-419
No. Connector face No. Connector face
B-32
NOT USED B-44
Keyless Entry (B)
B-33
Illumination control B-45
WhiteAlarmer control unit
B-34
NOT USED B-46
Gray
Rear defogger timer
B-35
Yellow
Infrator; passenger side B-47
WhiteGlove box illumination
B-36
Yellow
Infrator; Driver side B-48
BlackG/sensor
B-37
~
B-39 NOT USED B-49
White
A/T Lever
B-40
Black
Acc socket relay B-50
WhitePower/3rd start switch
B-41
Natural
Acc socket B-51
~
B-52 NOT USED
B-42
White
Acc socket B-53
WhiteJ/B I1
B-43
Keyless Entry (A) B-54
WhiteJ/B I2