Page 1201 of 4264
ENGINE MECHANICAL 6A – 61
INSPECTION AND REPAIR
Make the necessary adjustments, repairs, and part replacements if excessive wear or damage is discovered during
inspection.
CYLINDER HEAD
Cylinder Head Lower Face Warpage
1. Use a straight edge and a feeler gauge to measure the
four sides and the two diagonals of the cylinder head lower
face.
2. The cylinder head lower surface warpage is more than the
limit, it should be replaced.
Cylinder Head Lower Face Warpage mm (in)
Standard Limit
0.05
(0.002) or less 0.20
(0.0079)
NOTE:
The cylinder head lower face cannot be reground.
Cylinder Head Height (
H) (Reference) mm (in)
Standard
91.95 – 92.05
(3.620 – 3.624)
Positive Crankcase Ventilation (PCV) Valve
1. Remove PCV valve assembly from cylinder head cover.
2. Inspect the diaphragm for broken.
3. Inspect the spring for broken or weaken.
4. If find any abnormal condition, replace the PCV valve
assembly.
011RY00012
011RY00013
011RY00014
Page 1203 of 4264
ENGINE MECHANICAL 6A – 63
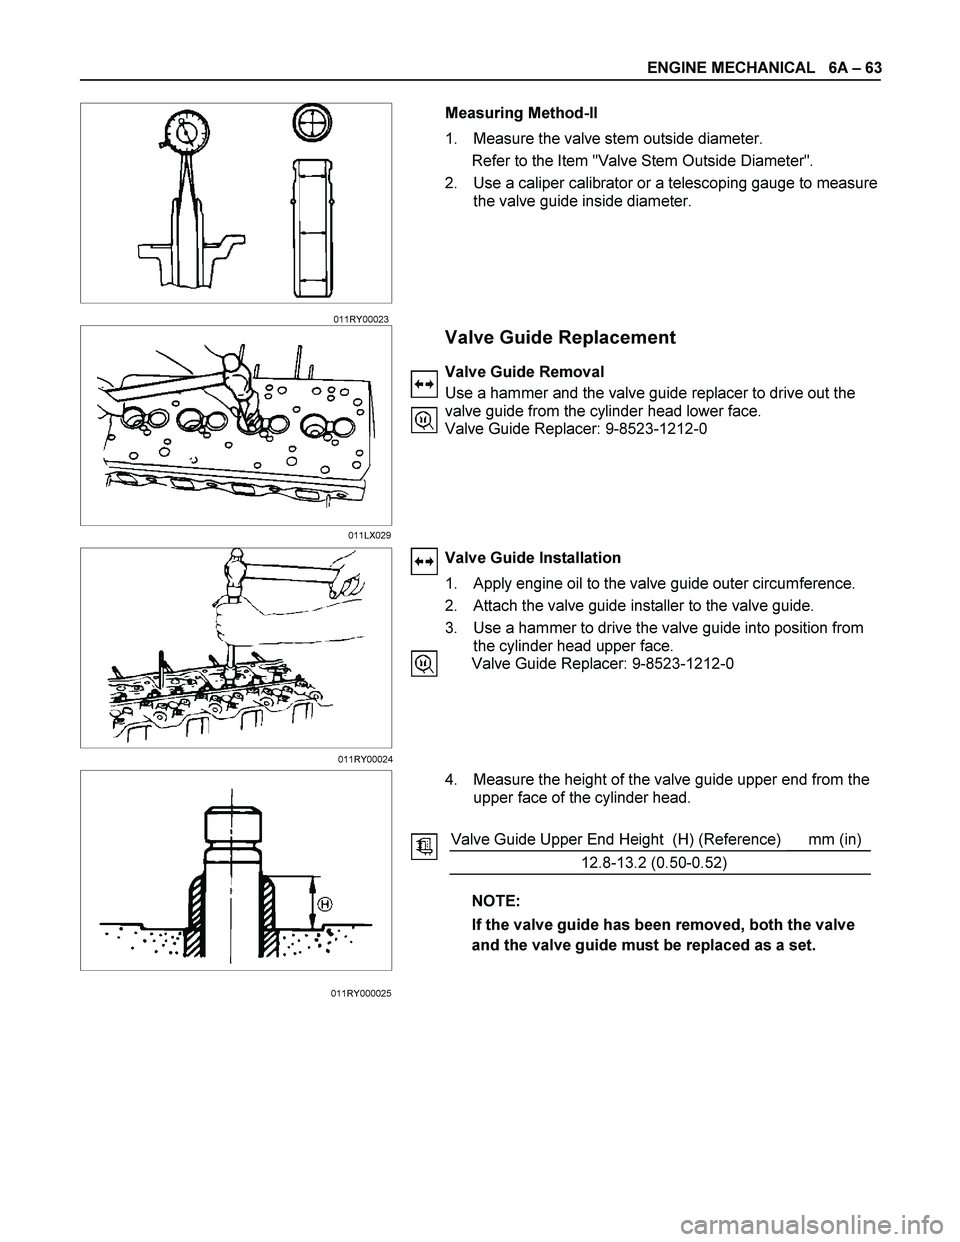
Measuring Method-II
1. Measure the valve stem outside diameter.
Refer to the Item "Valve Stem Outside Diameter".
2. Use a caliper calibrator or a telescoping gauge to measure
the valve guide inside diameter.
Valve Guide Replacement
Valve Guide Removal
Use a hammer and the valve guide replacer to drive out the
valve guide from the cylinder head lower face.
Valve Guide Replacer: 9-8523-1212-0
Valve Guide Installation
1. Apply engine oil to the valve guide outer circumference.
2. Attach the valve guide installer to the valve guide.
3. Use a hammer to drive the valve guide into position from
the cylinder head upper face.
Valve Guide Replacer: 9-8523-1212-0
4. Measure the height of the valve guide upper end from the
upper face of the cylinder head.
Valve Guide Upper End Height (H) (Reference) mm (in)
12.8-13.2 (0.50-0.52)
NOTE:
If the valve guide has been removed, both the valve
and the valve guide must be replaced as a set.
011LX029
011RY00024
011RY000025011RY00023
Page 1207 of 4264
ENGINE MECHANICAL 6A – 67
Valve Spring Free Height
Use a vernier caliper to measure the valve spring free height.
If the measured value is less than the specified limit, the valve
spring must be replaced.
Spring Free Height mm (in)
Standard Limit
4JA1T (L)
4JA1TC,
4JH1TC Single spring 48.0 (1.89) 47.1 (1.85)
Valve Spring Squareness
Use a surface plate and a square to measure the valve spring
squareness.
If the measured value exceeds the specified limit, the valve
spring must be replaced.
Spring Squareness mm (in)
Limit
4JA1T (L)
4JA1TC,
4JH1TC Single spring 1.7 (0.070)
Valve Spring Tension
Use a spring tester to measure the valve spring tension.
If the measured value is less than the specified limit, the valve
spring must be replaced.
Valve Spring Tension N (kg/lb)
Compressed
Height Standard Limit
4JA1T (L)
4JA1TC,
4JH1TCSingle
spring38.9mm
(1.53in) 296.0
(30.2/66.4) 257.7
(26.3/57.9)
011LX024
014RY00025
011LX026
Page 1209 of 4264
ENGINE MECHANICAL 6A – 69
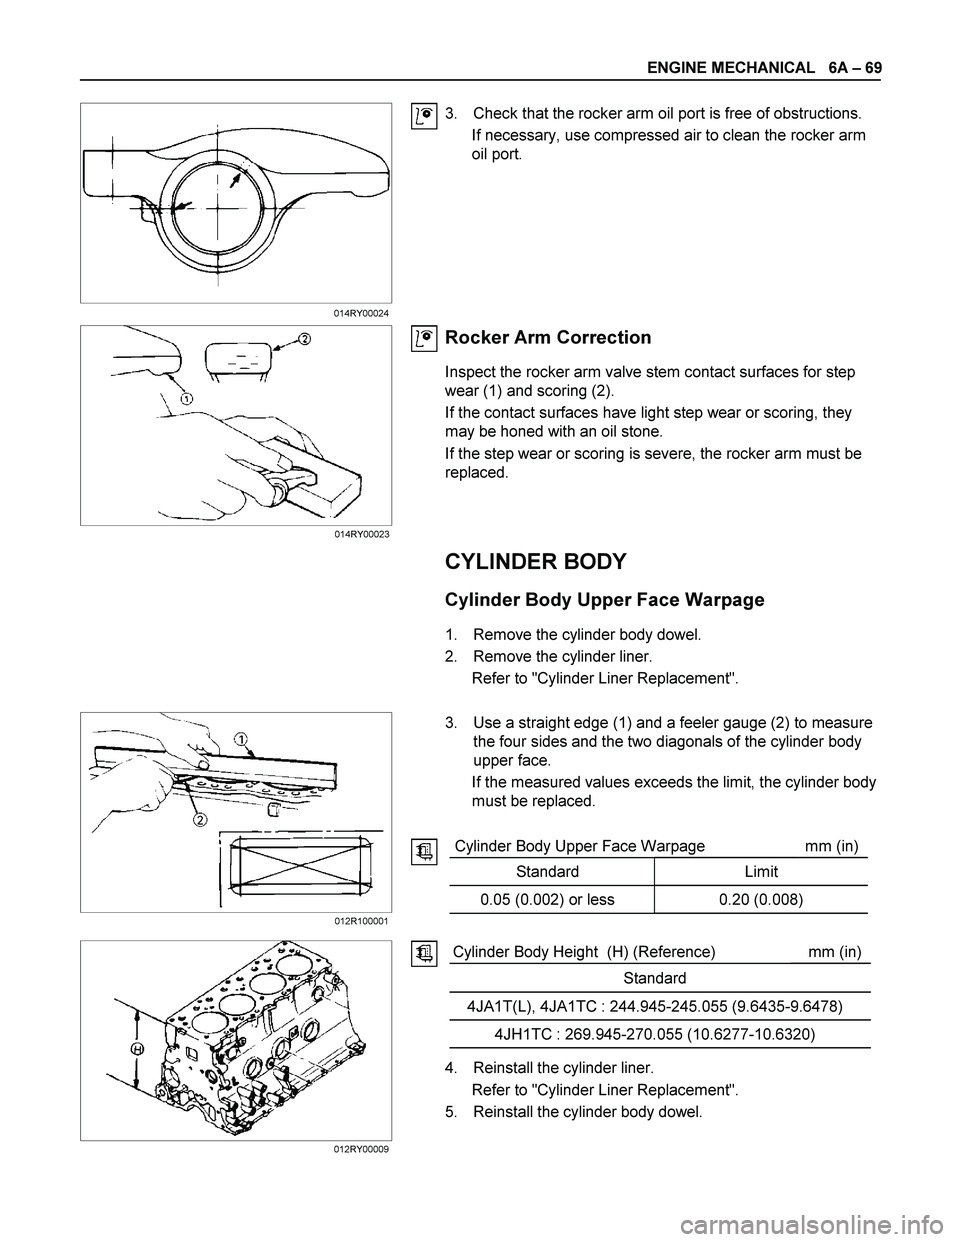
3. Check that the rocker arm oil port is free of obstructions.
If necessary, use compressed air to clean the rocker arm
oil port.
Rocker Arm Correction
Inspect the rocker arm valve stem contact surfaces for step
wear (1) and scoring (2).
If the contact surfaces have light step wear or scoring, they
may be honed with an oil stone.
If the step wear or scoring is severe, the rocker arm must be
replaced.
CYLINDER BODY
Cylinder Body Upper Face Warpage
1. Remove the cylinder body dowel.
2. Remove the cylinder liner.
Refer to "Cylinder Liner Replacement".
3. Use a straight edge (1) and a feeler gauge (2) to measure
the four sides and the two diagonals of the cylinder body
upper face.
If the measured values exceeds the limit, the cylinder body
must be replaced.
Cylinder Body Upper Face Warpage mm (in)
Standard Limit
0.05 (0.002) or less 0.20 (0.008)
Cylinder Body Height (H) (Reference) mm (in)
Standard
4JA1T(L), 4JA1TC : 244.945-245.055 (9.6435-9.6478)
4JH1TC : 269.945-270.055 (10.6277-10.6320)
4. Reinstall the cylinder liner.
Refer to "Cylinder Liner Replacement".
5. Reinstall the cylinder body dowel.
014RY00024
012R100001
012RY00009014RY00023
Page 1210 of 4264
6A – 70 ENGINE MECHANICAL
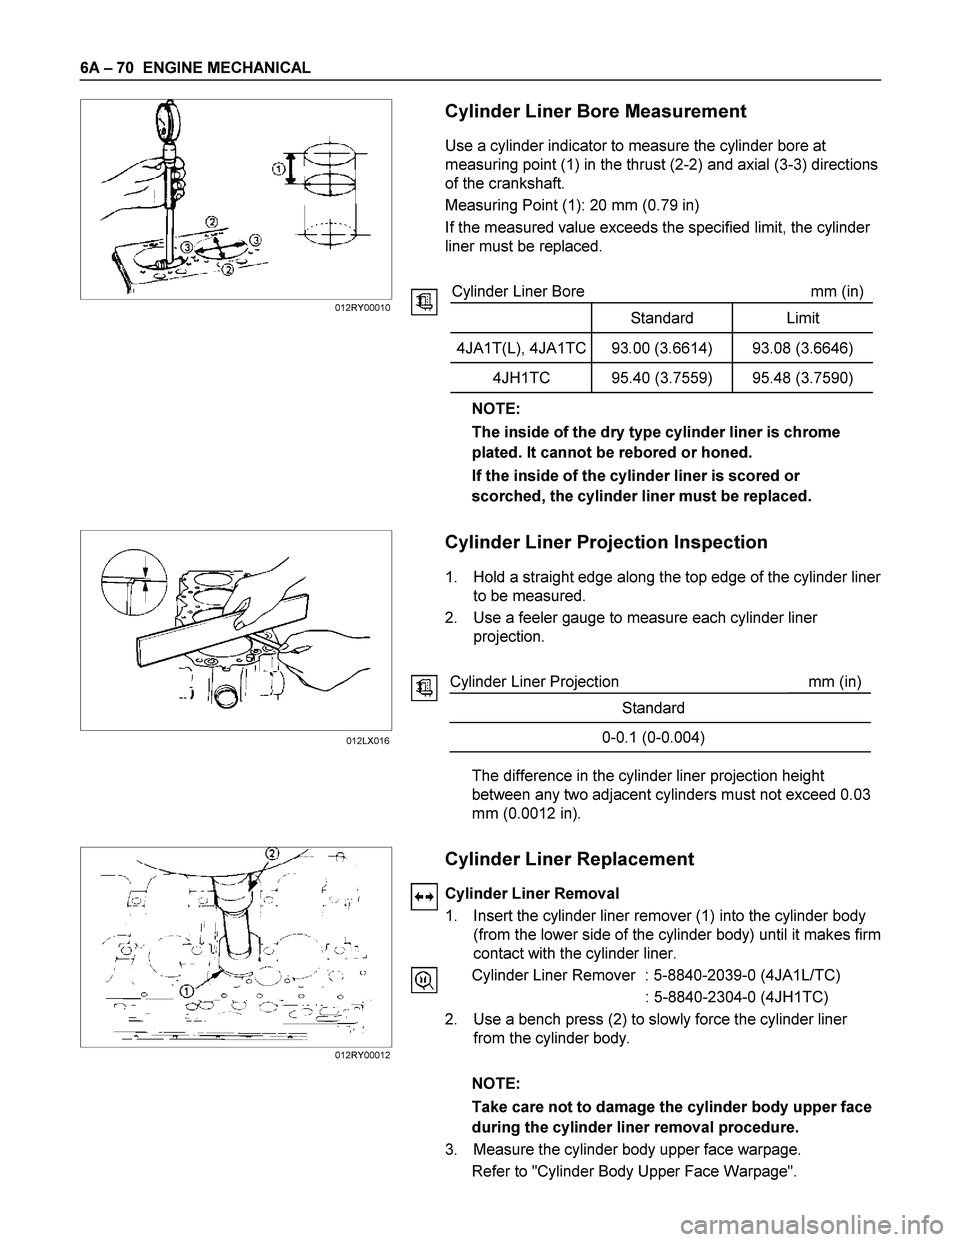
Cylinder Liner Bore Measurement
Use a cylinder indicator to measure the cylinder bore at
measuring point (1) in the thrust (2-2) and axial (3-3) directions
of the crankshaft.
Measuring Point (1): 20 mm (0.79 in)
If the measured value exceeds the specified limit, the cylinder
liner must be replaced.
Cylinder Liner Bore mm (in)
Standard Limit
4JA1T(L), 4JA1TC 93.00 (3.6614) 93.08 (3.6646)
4JH1TC 95.40 (3.7559) 95.48 (3.7590)
NOTE:
The inside of the dry type cylinder liner is chrome
plated. It cannot be rebored or honed.
If the inside of the cylinder liner is scored or
scorched, the cylinder liner must be replaced.
Cylinder Liner Projection Inspection
1. Hold a straight edge along the top edge of the cylinder liner
to be measured.
2. Use a feeler gauge to measure each cylinder liner
projection.
Cylinder Liner Projection mm (in)
Standard
0-0.1 (0-0.004)
The difference in the cylinder liner projection height
between any two adjacent cylinders must not exceed 0.03
mm (0.0012 in).
Cylinder Liner Replacement
Cylinder Liner Removal
1. Insert the cylinder liner remover (1) into the cylinder body
(from the lower side of the cylinder body) until it makes firm
contact with the cylinder liner.
Cylinder Liner Remover : 5-8840-2039-0 (4JA1L/TC)
: 5-8840-2304-0 (4JH1TC)
2. Use a bench press (2) to slowly force the cylinder liner
from the cylinder body.
NOTE:
Take care not to damage the cylinder body upper face
during the cylinder liner removal procedure.
3. Measure the cylinder body upper face warpage.
Refer to "Cylinder Body Upper Face Warpage".
012RY00010
012LX016
012RY00012
Page 1217 of 4264
ENGINE MECHANICAL 6A – 77
CAMSHAFT
Visually inspect the journals, the cams, the oil pump drive gear,
and the camshaft bearings for excessive wear and damage.
The camshaft and the camshaft bearings must be replaced if
these conditions are discovered during inspection.
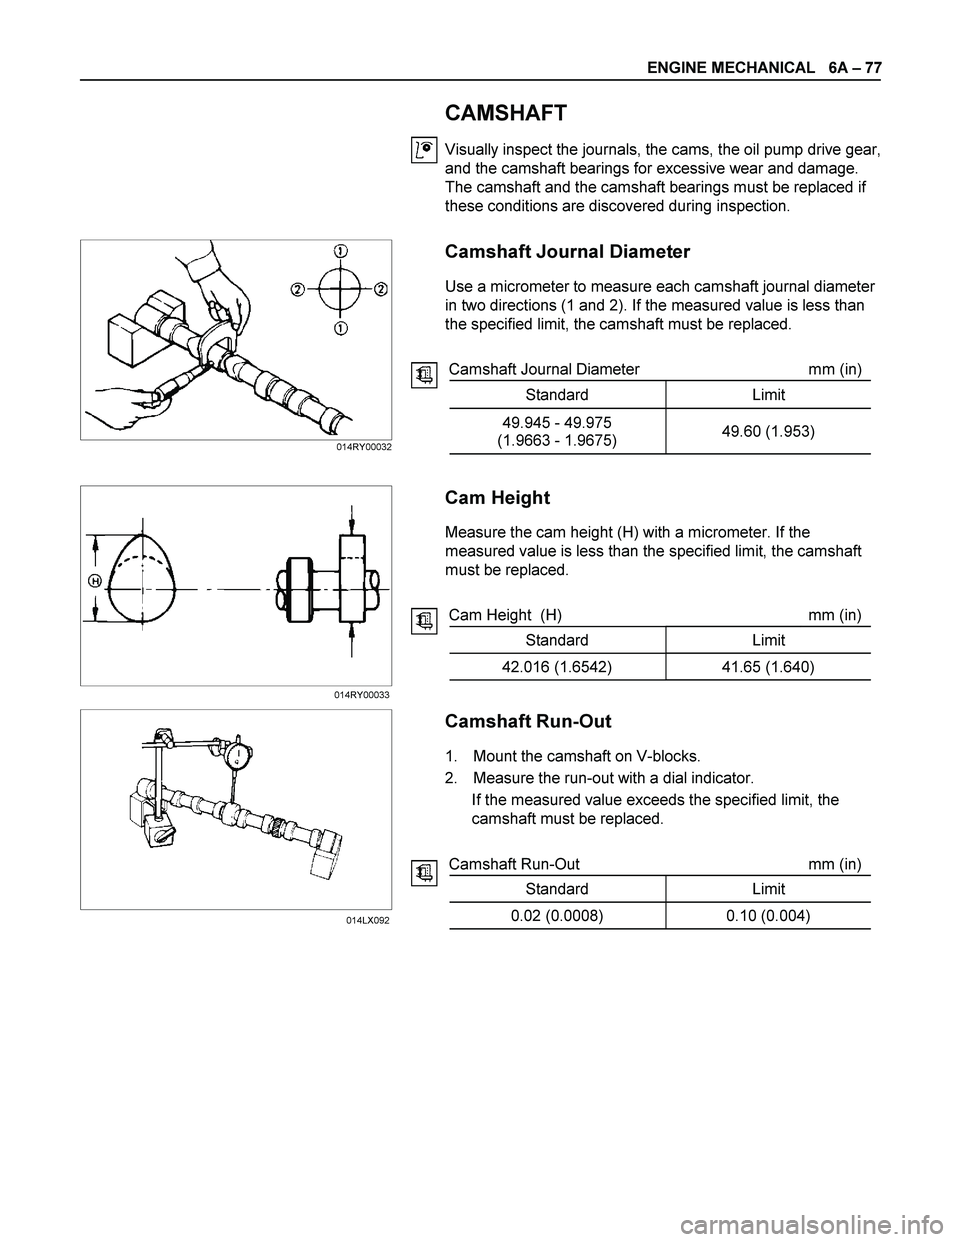
Camshaft Journal Diameter
Use a micrometer to measure each camshaft journal diameter
in two directions (1 and 2). If the measured value is less than
the specified limit, the camshaft must be replaced.
Camshaft Journal Diameter mm (in)
Standard Limit
49.945 - 49.975
(1.9663 - 1.9675) 49.60 (1.953)
Cam Height
Measure the cam height (H) with a micrometer. If the
measured value is less than the specified limit, the camshaft
must be replaced.
Cam Height (H) mm (in)
Standard Limit
42.016 (1.6542) 41.65 (1.640)
Camshaft Run-Out
1. Mount the camshaft on V-blocks.
2. Measure the run-out with a dial indicator.
If the measured value exceeds the specified limit, the
camshaft must be replaced.
Camshaft Run-Out mm (in)
Standard Limit
0.02 (0.0008) 0.10 (0.004)
014RY00032
014RY00033
014LX092
Page 1850 of 4264
6A-26 ENGINE MECHANICAL (6VE1 3.5L)
Exhaust Manifold LH
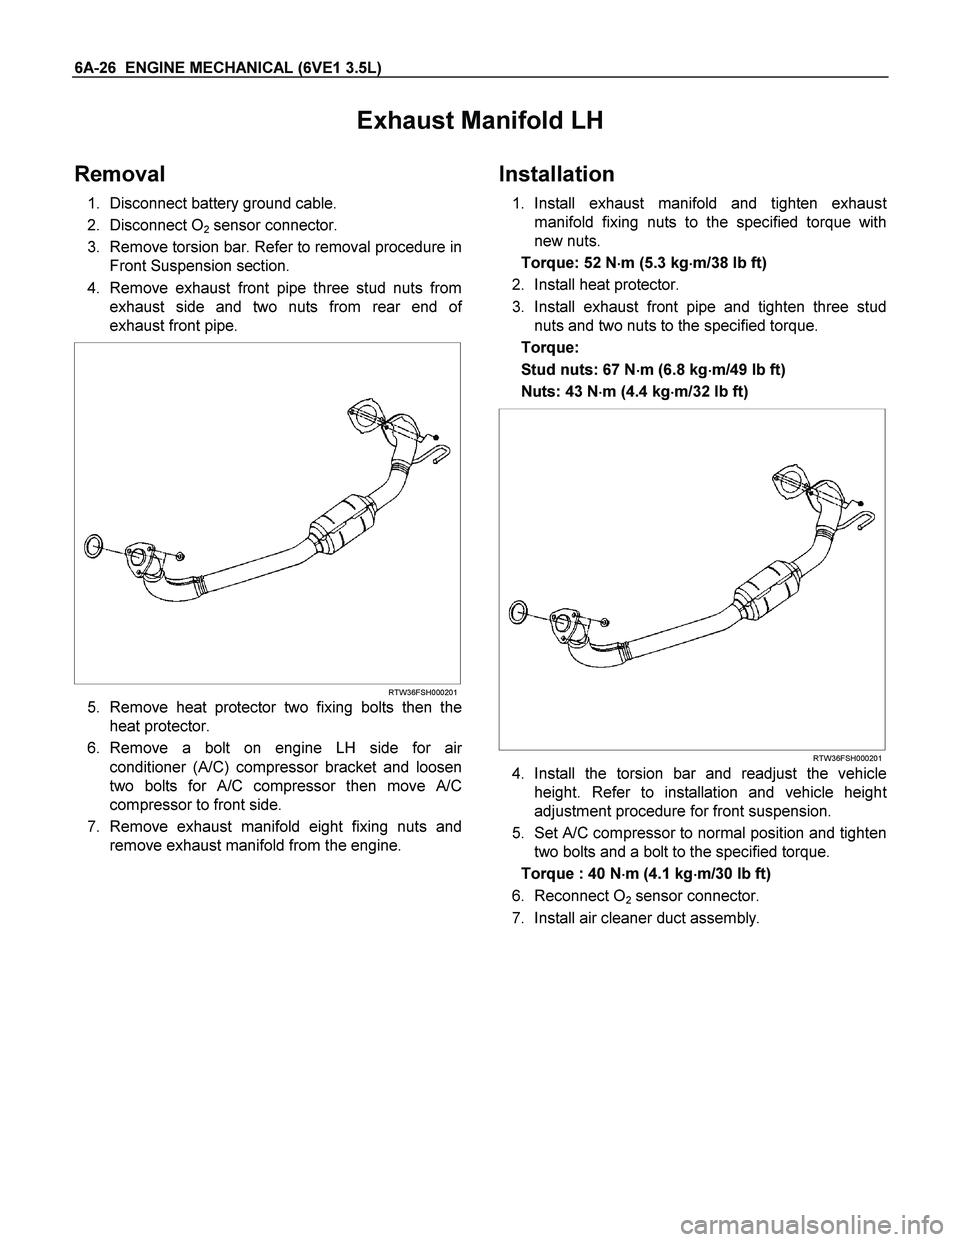
Removal
1. Disconnect battery ground cable.
2. Disconnect O
2 sensor connector.
3. Remove torsion bar. Refer to removal procedure in
Front Suspension section.
4. Remove exhaust front pipe three stud nuts from
exhaust side and two nuts from rear end o
f
exhaust front pipe.
RTW36FSH000201
5. Remove heat protector two fixing bolts then the
heat protector.
6. Remove a bolt on engine LH side for ai
r
conditioner (A/C) compressor bracket and loosen
two bolts for A/C compressor then move A/C
compressor to front side.
7. Remove exhaust manifold eight fixing nuts and
remove exhaust manifold from the engine.
Installation
1. Install exhaust manifold and tighten exhaust
manifold fixing nuts to the specified torque with
new nuts.
Torque: 52 N�
�� �m (5.3 kg�
�� �m/38 lb ft)
2. Install heat protector.
3. Install exhaust front pipe and tighten three stud
nuts and two nuts to the specified torque.
Torque:
Stud nuts: 67 N�
�� �m (6.8 kg�
�� �m/49 lb ft)
Nuts: 43 N�
�� �m (4.4 kg�
�� �m/32 lb ft)
RTW36FSH000201
4. Install the torsion bar and readjust the vehicle
height. Refer to installation and vehicle heigh
t
adjustment procedure for front suspension.
5. Set A/C compressor to normal position and tighten
two bolts and a bolt to the specified torque.
Torque : 40 N�
�� �m (4.1 kg�
�� �m/30 lb ft)
6. Reconnect O
2 sensor connector.
7. Install air cleaner duct assembly.
Page 1877 of 4264
ENGINE MECHANICAL (6VE1 3.5L) 6A-53
Disassembly
NOTE:
� During disassembly, be sure that the valve train
components are kept together and identified so
that they can be reinstalled in their original
locations.
� Before removing the cylinder head from the engine
and before disassembling the valve mechanism,
perform a compression test and note the results.
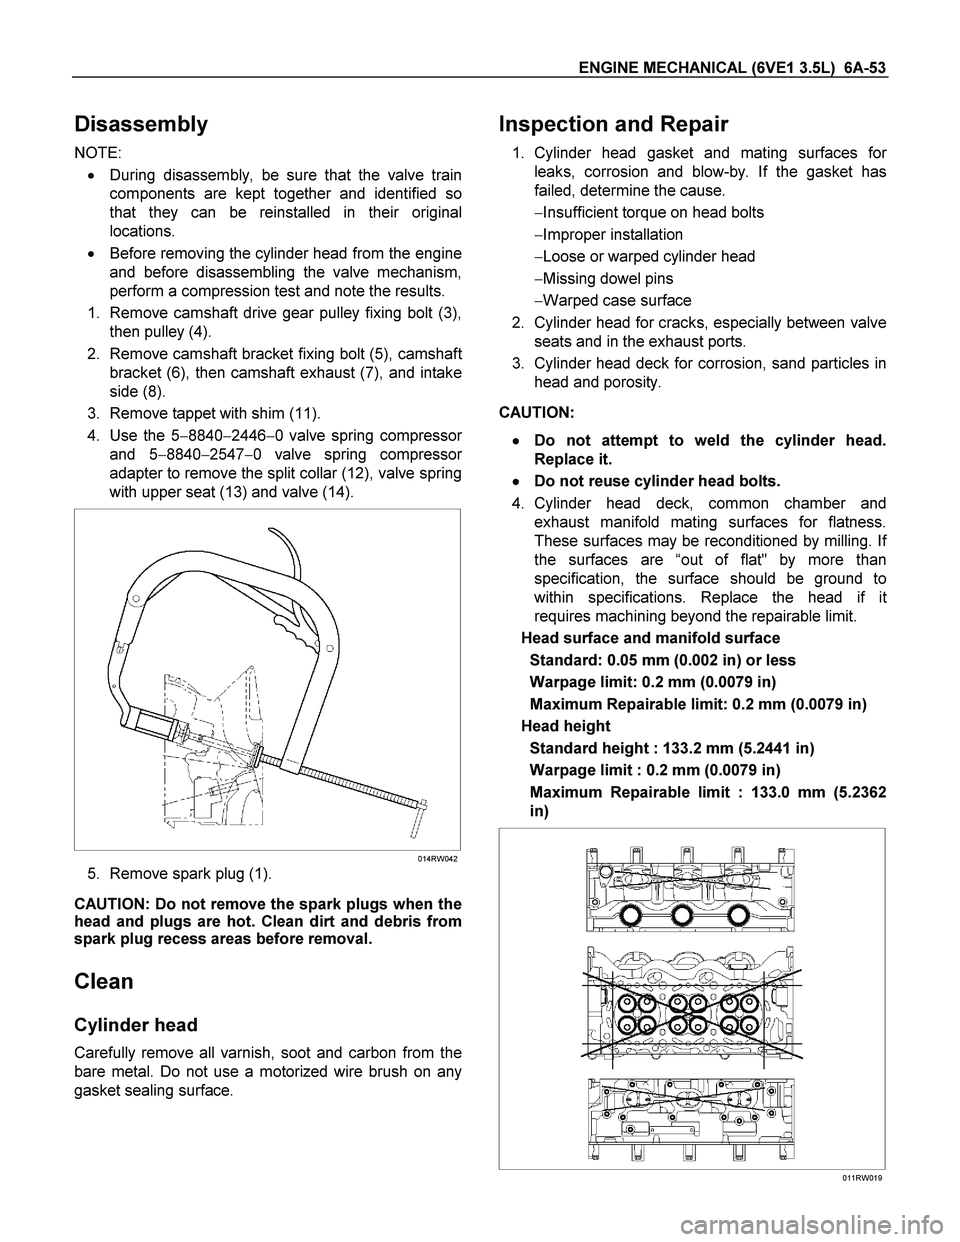
1. Remove camshaft drive gear pulley fixing bolt (3),
then pulley (4).
2. Remove camshaft bracket fixing bolt (5), camshaf
t
bracket (6), then camshaft exhaust (7), and intake
side (8).
3. Remove tappet with shim (11).
4. Use the 5�8840�2446�0 valve spring compresso
r
and 5�8840�2547�0 valve spring compressor
adapter to remove the split collar (12), valve spring
with upper seat (13) and valve (14).
014RW042
5. Remove spark plug (1).
CAUTION: Do not remove the spark plugs when the
head and plugs are hot. Clean dirt and debris from
spark plug recess areas before removal.
Clean
Cylinder head
Carefully remove all varnish, soot and carbon from the
bare metal. Do not use a motorized wire brush on any
gasket sealing surface.
Inspection and Repair
1. Cylinder head gasket and mating surfaces for
leaks, corrosion and blow-by. If the gasket has
failed, determine the cause.
�Insufficient torque on head bolts
�Improper installation
�Loose or warped cylinder head
�Missing dowel pins
�Warped case surface
2. Cylinder head for cracks, especially between valve
seats and in the exhaust ports.
3. Cylinder head deck for corrosion, sand particles in
head and porosity.
CAUTION:
�
�� � Do not attempt to weld the cylinder head.
Replace it.
�
�� � Do not reuse cylinder head bolts.
4. Cylinder head deck, common chamber and
exhaust manifold mating surfaces for flatness.
These surfaces may be reconditioned by milling. I
f
the surfaces are “out of flat" by more than
specification, the surface should be ground to
within specifications. Replace the head if i
t
requires machining beyond the repairable limit.
Head surface and manifold surface
Standard: 0.05 mm (0.002 in) or less
Warpage limit: 0.2 mm (0.0079 in)
Maximum Repairable limit: 0.2 mm (0.0079 in)
Head height
Standard height : 133.2 mm (5.2441 in)
Warpage limit : 0.2 mm (0.0079 in)
Maximum Repairable limit : 133.0 mm (5.2362
in)
011RW019