Page 65 of 166

CONNECT Nav+
64
– A vertical menu featuring the fol-
lowing icon keys:
Other menus:takes to second
page of telephone menu.
Frequent Numbers: allows
management of frequent number
list.
Last numbers received:stores
the phone numbers of the last 10
received calls.
Last numbers called: stores the
phone numbers of the last 10
made calls.
Directory:manages name/tele-
phone number database.
WAP:enables access to WAP
(Wireless Access Protocol) ser-
vice.
Voice memo:manages voice
box.If CONNECT Nav+ is already on
(e.g.: audio mode), to enter the tele-
phone mode proceed as follows:
– press shortly button
ß8-fig. 1, the
display will show for few seconds the
last dialled number;
– press again button
ß8-fig. 1to
start the phone call.When call is in progress, the display
shows the status as in fig. 42:
– Current telephone status (“call in
progress”).
– Conversation time of the active
call.
– Residual credit (prepaid cards on-
ly).
– Called or incoming telephone num-
ber (if available by the provider).
– Directory data associated to this
number.
– Numbers typed-in during the con-
versation when calling a service
provider and inputting requested in-
formation like credit card number, or
arrival time of your desired train,
etc…
fig. 42
F0C4038g
Page 66 of 166
 the
t")
CONNECT Nav+
65
Press “ESCAPE” to return to main
telephone screen 13-fig. 1.
– A long push on “TEL” button 10-
fig. 1switches off (the display shows
an hourglass during this operation) the
telephone mode (TEL OFF). To switch
it on again, a short push on the same
button will be required.INSERTING THE
TELEPHONE CARD
If no valid SIM card is inserted when
calling the telephone function, the dis-
play shows the relevant warning mes-
sage.
The insertion of a valid SIM card
makes it possible to make the tele-
phone operational and access its func-
tions. The telephone card is to be in-
serted in the special slot 6-fig. 1with
the integrated chip at the front right
in relation to the direction of travel,
until it is held in.
IMPORTANTWhen necessary,
only use the SIM card adapter provid-
ed with the car; in the event of loss,
breakage or for buying other adapters
contact Fiat Dealership.
Correct card insertion is confirmed
by the prompt to type the card PIN
code fig. 43.
When the card is already inserted,
access to the operating system is ob-
tained by pressing the “TEL” key 10-
fig. 1or
ß8-fig. 1.To remove the SIM card, slightly
press into its housing and then release
it; it will come out a little so that you
can extract it.
IMPORTANT Removing the
SIM card with the telephone on
may cause temporary faults; be-
fore removing the SIM card the
user should always turn the tele-
phone off through the “TEL” but-
ton 10-fig. 1 or turn the CON-
NECT Nav+ system off using the
“ON” button 19-fig. 1. In the
event of faults due to removing
the SIM card with the phone
working, normal operation will
be resumed switching the system
off and on again.
fig. 43
F0C4039g
Page 67 of 166
 prevents
unauthorised use of SIM card services.
PIN is asked by CONNECT Nav+ in
the following cases:
–")
CONNECT Nav+
66
ENTERING THE PIN CODE
IMPORTANTThe PIN code (Per-
sonal Identification Number) prevents
unauthorised use of SIM card services.
PIN is asked by CONNECT Nav+ in
the following cases:
– When the system is switched on,
with SIM card already inserted into the
SIM reader and PIN lock is enabled on
that SIM card.
– When a SIM card is inserted into
the SIM reader, and the system is al-
ready on, and PIN lock is enabled on
that SIM card.
– When “TEL” key 10-fig. 1is
pushed to switch on a previously
switched off telephone module (TEL
OFF), and the SIM card is inserted in-
to the SIM reader, the PIN lock is en-
abled on that SIM card and PIN code
has never been inserted before.– When the user tries to make a
non-emergency call and the SIM card
is inserted into the SIM reader, PIN
lock is enabled on that SIM card and
PIN code has never been inserted be-
fore.
– When “TEL” key 10-fig. 1or
ß8-fig. 1is pushed and a SIM card
is inserted into the SIM reader and the
system is already on and PIN lock is
enabled on that SIM card.
To enter the PIN code (between 4
and 8 digits) use the bottom keypad
on the front panel and then press “EN-
TER” to confirm 15-fig. 1. Entered
digits are shown by asterisks on the
display fig. 43.
If a PIN code digit needs to be cor-
rected, press “ESCAPE” 13-fig. 1to
delete it and write it again correctly. IMPORTANT If the user refuses
to insert PIN or if he confirms a wrong
PIN, a dialog box is displayed, saying
that telephone functions will not be
available till the insertion of the cor-
rect PIN. Only emergency calls (like
police or S.O.S.) will always be en-
abled; in this case only input box and
0-9 buttons will be available on the dis-
play.
IMPORTANTAfter three unsuc-
cessful PIN code entries, the card is
locked. To unlock the card, enter both
the PUK code (Pin Unblocking Key)
and the new PIN.
The network signal search begins af-
ter entering the PIN code and the dis-
play shows the main telephone func-
tion page. After connection, the dis-
play shows the network provider’s
name.
Page 68 of 166

CONNECT Nav+
67
INCOMING CALLS
Whichever is the CONNECT Nav+
system active mode, when an external
telephone call comes in, a dialog box
will be overlapped fig. 44on the cur-
rent window that shows the following
information:
– call from:
– name of the calling party (if avail-
able in the directory);
– caller phone number, if this service
is available from the network provider;
– animated icon which is associated
to the ringer sound;
– accept or refuse.To accept the call, proceed as fol-
lows:
– short push on button ß8-fig. 1;
dialog box disappears and ring stops,
the display shows the string “call in
progress”.
To close the conversation, pro-
ceed as follows:
– press button
ß8-fig. 1; the sys-
tem returns automatically to the pre-
vious mode and the display shows the
relevant status.
To refuse the call, proceed as fol-
lows:
– long push on button
ß8-fig. 1; di-
alog box disappears and ring stops. In
this case the screen will remain the
one shown before the incoming call.
IMPORTANT Dialog box disap-
pears and ring stops also if the line is
unwillingly lost.
OUTGOING CALLS
To start a call, proceed as follows:
– enter the telephone mode as pre-
viously described;
– dial the required number using the
12 bottom key corresponding to dig-
it/characters;
– to enter the international prefix
(“+” character), push “0”
– dialled number is shown in the in-
put box on the display; max. 20 digits
can be input and in case there is no
enough space to keep the whole
string, the interface will provide a left
string scroll;
– push button
ß8-fig. 1.
IMPORTANTWhen entering the
first digit, focus moves automatically
to “Delete” thus enabling to clear off
the inserted phone number.
fig. 44
F0C4040g
Page 69 of 166

CONNECT Nav+
68
IMPORTANT Short push on “ES-
CAPE” 13-fig. 1clears the last input
digit.
– to start a call, press button
ß8-fig. 1; active screen becomes the
one shown in fig. 42.
IMPORTANTPush on bottom
keys (1-9) selects the corresponding
stored phone number (see paragraph
“Frequent Numbers” for details).
Volume can be adjusted with the en-
coder 20-fig. 1.
DIALLING A
SERVICE NUMBER
Following the instructions given in
the previous paragraph, the user can
dial service numbers (e.g.:
�# xxxxx
�) according to ETSI Standard GSM
02.30.
“Frequent Numbers”
FUNCTION
“Frequent numbers” function enables
to create and have quick access to a
list with the 9 most frequently dialled
phone numbers.
To choose the required “frequent
number”, select it by rotating the en-
coder 14-fig. 1and then press “EN-
TER” 15-fig. 1to confirm the “Fre-
quent Numbers” function on the main
telephone function screen. The display
shows the submenu in fig. 45featur-
ing functions “Dial”, “New entry” and
“Order”.
fig. 45
F0C4041g
Page 70 of 166

CONNECT Nav+
69
“Dial” function
The “Dial” function fig. 46enables
the user to enter the list of stored fre-
quent numbers. After selecting an en-
try of the list with the encoder 14-
fig. 1, start the call by pushing button
ß8-fig. 1; active screen becomes the
one shown in fig. 42. Press “ENTER”
15-fig. 1to display detailed informa-
tion about selected name and number
and the icons “Call” and “Delete”
fig. 47.
To call the selected number proceed
as follows:
– select the “Call” key rotating the
encoder 14-fig. 1, e and pressing “EN-
TER” to confirm 15-fig. 1;
– push button
ß8-fig. 1.To delete the selected number from
the list proceed as follows:
– select “Delete” icon rotating the
encoder 14-fig. 1, a confirmation box
with “YES” - “NO” fig. 48will come
up;
– rotate the encoder 14-fig. 1, and
select “YES”; all the numbers below
the deleted one are moved up by one
position automatically.
IMPORTANT“Delete” shall be
used specially when the “Frequent
numbers” list is full (9 numbers stored)
and you want to enter a new number.“New entry” function
“New entry” icon key is used to copy
an entry from the directory.
To copy an entry from the directo-
ry and add it to the “Frequent num-
bers” list proceed as follows:
– rotate the encoder 14-fig. 1to se-
lect the “New entry” icon;
– press “ENTER” to confirm 15-fig. 1.
If the list is full (9 numbers), then “New
entry” icon is disabled;
– the display shows a keypad to be
used to type the desired number or the
names stored in the directory fig. 49.
fig. 47
F0C4043g
fig. 48
F0C4044g
fig. 46
F0C4042g
Page 71 of 166

CONNECT Nav+
70
Type-in or search as required by se-
lecting the first letters of the name
with the encoder 14-fig. 1and then
press “ENTER” to confirm 15-fig. 1.
If the user tries to add an already ex-
isting number to the “Frequent num-
bers” list, the display will show the al-
ready stored entry.“Order” function
“Order” function fig. 50allows
arrangements of the entries in the
“Frequent Numbers” list.
To move an entry from position “3”
to position “1” for example, proceed
as follows:
– rotate the encoder 14-fig. 1to se-
lect the “Order” key and then press
“ENTER” to confirm 15-fig. 1;
– select the number in position “3”
with the encoder 14-fig. 1and then
press “ENTER” to confirm 15-fig. 1;
– move selected number from posi-
tion “3” to “1” by rotating the en-
coder 14-fig. 1 then press “ENTER”
15-fig. 1to store the new position.“Last numbers
received” FUNCTION
“Last numbers received” pops up the
list of the last 10 calls received. The list
shows the name (if stored in the di-
rectory) and the phone number rele-
vant to the most recently received
callsfig. 51.
The list is managed and updated by
the system automatically.
fig. 49
F0C4190g
fig. 50
F0C4046g
fig. 51
F0C4047g
Page 72 of 166

CONNECT Nav+
71
To call directly one of the entries in
the list proceed as follows:
– select an entry in the list by rotat-
ing the encoder 14-fig. 1;
– push
ß8-fig. 1to start the call
(seefig. 42).After selecting the required entry,
pushing on “ENTER” 15-fig. 1 opens
a window with detailed information
regarding selected name and number
fig. 52. Keys “Call” and “Store” are
available on the display:
– rotate the encoder 14-fig. 1to se-
lect “Call” and press “ENTER” to con-
firm 15-fig. 1: system starts the call to
the displayed number;
– rotate the encoder 14-fig. 1to se-
lect “Store” and press “ENTER” to
confirm 15-fig. 1: the system stores
the current name in the directory.
If the entry is already present in the
directory, “Store” key is disabled.
“Last numbers
called” FUNCTION
“Last numbers called” pops up the
list of the last 10 made calls. The list
shows the name (if stored in the di-
rectory) and the phone number rele-
vant to the most recently made calls
fig. 53.
The list is managed and updated by
the system automatically.
To call directly one of the entry in
the list proceed as follows:
– select an entry in the list by rotat-
ing the encoder 14-fig. 1;
– push
ß8-fig. 1to start the call
(see fig. 42).
fig. 52
F0C4048g
fig. 53
F0C4191g
 1
1 2
2 3
3 4
4 5
5 6
6 7
7 8
8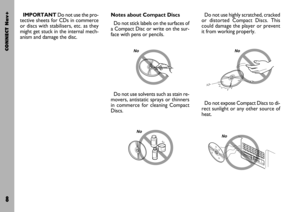 9
9 10
10 11
11 12
12 13
13 14
14 15
15 16
16 17
17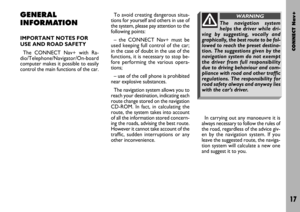 18
18 19
19 20
20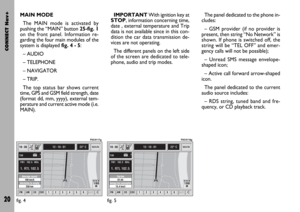 21
21 22
22 23
23 24
24 25
25 26
26 27
27 28
28 29
29 30
30 31
31 32
32 33
33 34
34 35
35 36
36 37
37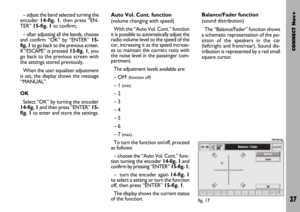 38
38 39
39 40
40 41
41 42
42 43
43 44
44 45
45 46
46 47
47 48
48 49
49 50
50 51
51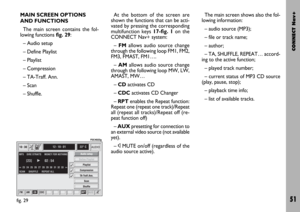 52
52 53
53 54
54 55
55 56
56 57
57 58
58 59
59 60
60 61
61 62
62 63
63 64
64 65
65 66
66 67
67 68
68 69
69 70
70 71
71 72
72 73
73 74
74 75
75 76
76 77
77 78
78 79
79 80
80 81
81 82
82 83
83 84
84 85
85 86
86 87
87 88
88 89
89 90
90 91
91 92
92 93
93 94
94 95
95 96
96 97
97 98
98 99
99 100
100 101
101 102
102 103
103 104
104 105
105 106
106 107
107 108
108 109
109 110
110 111
111 112
112 113
113 114
114 115
115 116
116 117
117 118
118 119
119 120
120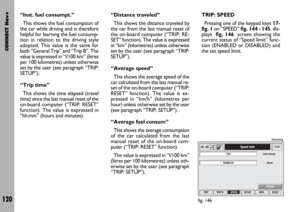 121
121 122
122 123
123 124
124 125
125 126
126 127
127 128
128 129
129 130
130 131
131 132
132 133
133 134
134 135
135 136
136 137
137 138
138 139
139 140
140 141
141 142
142 143
143 144
144 145
145 146
146 147
147 148
148 149
149 150
150 151
151 152
152 153
153 154
154 155
155 156
156 157
157 158
158 159
159 160
160 161
161 162
162 163
163 164
164 165
165