Page 17 of 166
CONNECT Nav+
16
ENTER button (i8-fig. 2)
This button is used to confirm the
previous selection made through but-
tons
RandE7 and 9.Screen icon keys
Screen icon keys are strictly con-
nected to the external front panel but-
tons. Icon keys are divided into:
– Upper keys: these keys are usual-
ly shown in column on the right side
of the screen. They can be selected by
rotating the encoder 14-fig. 1and
confirmed by pushing “ENTER” 15-
fig. 1.
– Bottom keys: these are located in
the lowest video section and are
switched on/off by the corresponding
buttons on the keypad 17-fig. 1.
These buttons are “multifunction”
since they change their function ac-
cording to the active menu. Selection buttons
(
RE7 and 9-fig. 2)
These buttons perform the same
functions of the encoder 14-fig. 1:
scroll the screen and allow item se-
lection.
Page 18 of 166

CONNECT Nav+
17
GENERAL
INFORMATION
IMPORTANT NOTES FOR
USE AND ROAD SAFETY
The CONNECT Nav+ with Ra-
dio/Telephone/Navigator/On-board
computer makes it possible to easily
control the main functions of the car. To avoid creating dangerous situa-
tions for yourself and others in use of
the system, please pay attention to the
following points:
– the CONNECT Nav+ must be
used keeping full control of the car;
in the case of doubt in the use of the
functions, it is necessary to stop be-
fore performing the various opera-
tions;
– use of the cell phone is prohibited
near explosive substances.
The navigation system allows you to
reach your destination, indicating each
route change stored on the navigation
CD-ROM. In fact, in calculating the
route, the system takes into account
of all the information stored concern-
ing the roads, advising the best route.
However it cannot take account of the
traffic, sudden interruptions or any
other inconvenience.In carrying out any manoeuvre it is
always necessary to follow the rules of
the road, regardless of the advice giv-
en by the navigation system. If you
leave the suggested route, the naviga-
tion system will calculate a new one
and suggest it to you.
The navigation system
helps the driver while dri-
ving by suggesting, vocally and
graphically, the best route to be fol-
lowed to reach the preset destina-
tion. The suggestions given by the
navigation system do not exempt
the driver from full responsibility
due to driving behaviour and com-
pliance with road and other traffic
regulations. The responsibility for
road safety always and anyway lies
with the car’s driver.
WARNING
Page 19 of 166

CONNECT Nav+
18
SYSTEM POWER ON
The CONNECT Nav+ can be
switched on according to two differ-
ent methods:
automatic switching onwith ig-
nition key to MAR;
manual switching on:
– by “ON” button 19-fig. 1;
– direct access to SOS menu by
pressing button “SOS” 1-fig. 1.Automatic switching on
Turning the ignition key to MAR, will
turn the CONNECT Nav+ system on
automatically, thus activating or mak-
ing available all the functions described
in this manual.
Manual switching on
With ignition key to STOP, press
button “ON” 19-fig. 1to switch on
the CONNECT Nav+ system thus
making available the following mod-
ules:
– MAIN
– AUDIO
– NAV
– MAP
– TEL
– SOS
– Targasys
•.IMPORTANTIn this mode, the
SETUP and TRIP modules can be ac-
tivated; however, it will not be possi-
ble to validate any operation con-
cerning parameter change, language
change, units change and any other
type of adjustment provided by the
CONNECT Nav+ system. These lim-
itations are normal when switching the
system on manually by the “ON” but-
ton 19-fig. 1, since with engine off
(key at STOP), the car data trans-
mission devices are not operating.
Turning the ignition key to MARwill
make all system functions active.
Page 20 of 166

CONNECT Nav+
19
SYSTEM POWER OFF
The CONNECT Nav+ system can
be switched off according to two dif-
ferent modes:
– deactivation independentof ig-
nition key
– deactivation dependenton ig-
nition key
To choose the power-off mode, see
the Power OFF submenu in the SET-
UP menu.Deactivation independent
of ignition key
With this mode active, CONNECT
Nav+ can be turned off by pressing
the “ON” button 19-fig. 1.
The display will show the message
“DEACTIVATION PROCEDURE IN
PROGRESS. PLEASE WAIT”.
IMPORTANTWith ignition key at
STOP, deactivation is delayed and will
take place after 20 minutes if the sys-
tem has a destination set or a phone
call is in progress.Deactivation dependent
on ignition key
With this mode active, CONNECT
Nav+ can be switched off by turning
the ignition key to STOPor by press-
ing the “ON” button19-fig. 1.
IMPORTANTDeactivation with
ignition key to STOPis delayed and
will take place after 20 minutes if the
system has a destination set or a
phone call is in progress.
Page 21 of 166

CONNECT Nav+
20
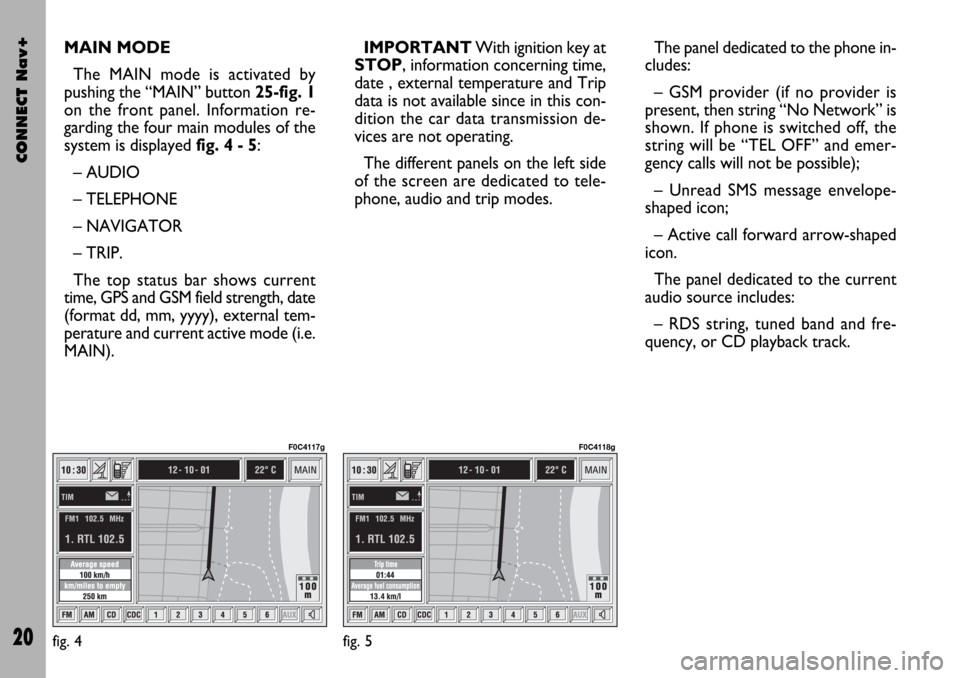
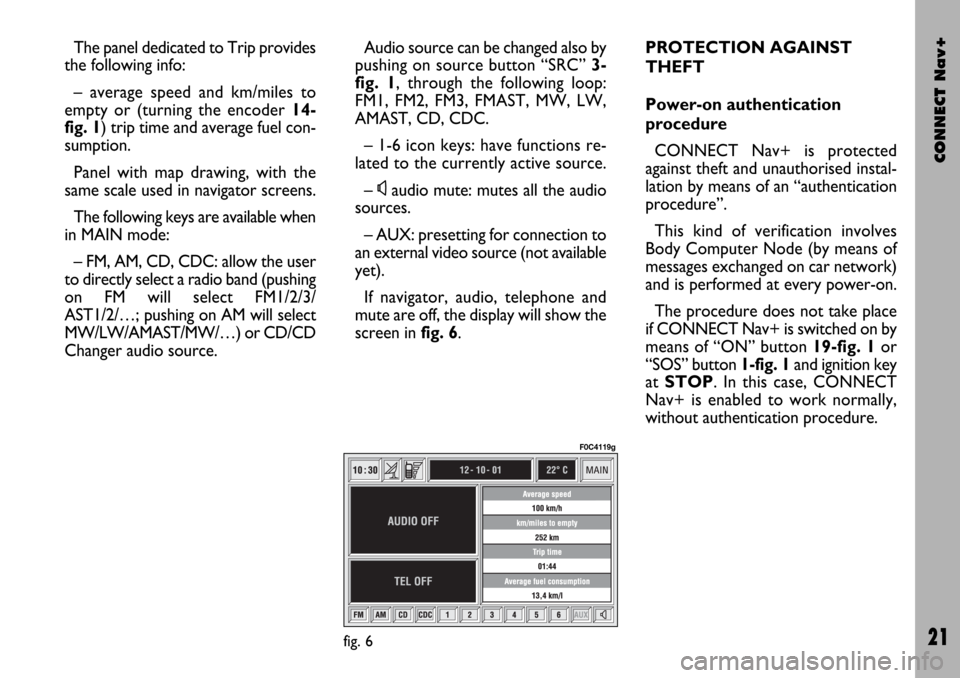
MAIN MODE
The MAIN mode is activated by
pushing the “MAIN” button 25-fig. 1
on the front panel. Information re-
garding the four main modules of the
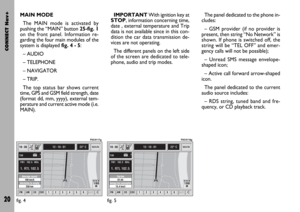
system is displayed fig. 4 - 5:
– AUDIO
– TELEPHONE
– NAVIGATOR
– TRIP.
The top status bar shows current
time, GPS and GSM field strength, date
(format dd, mm, yyyy), external tem-
perature and current active mode (i.e.
MAIN).IMPORTANTWith ignition key at
STOP, information concerning time,
date , external temperature and Trip
data is not available since in this con-
dition the car data transmission de-
vices are not operating.
The different panels on the left side
of the screen are dedicated to tele-
phone, audio and trip modes.The panel dedicated to the phone in-
cludes:
– GSM provider (if no provider is
present, then string “No Network” is
shown. If phone is switched off, the
string will be “TEL OFF” and emer-
gency calls will not be possible);
– Unread SMS message envelope-
shaped icon;
– Active call forward arrow-shaped
icon.
The panel dedicated to the current
audio source includes:
– RDS string, tuned band and fre-
quency, or CD playback track.
fig. 4
F0C4117g
fig. 5
F0C4118g
Page 22 of 166

CONNECT Nav+
21
The panel dedicated to Trip provides
the following info:
– average speed and km/miles to
empty or (turning the encoder 14-
fig. 1) trip time and average fuel con-
sumption.
Panel with map drawing, with the
same scale used in navigator screens.
The following keys are available when
in MAIN mode:
– FM, AM, CD, CDC: allow the user
to directly select a radio band (pushing
on FM will select FM1/2/3/
AST1/2/…; pushing on AM will select
MW/LW/AMAST/MW/…) or CD/CD
Changer audio source.Audio source can be changed also by
pushing on source button “SRC” 3-
fig. 1, through the following loop:
FM1, FM2, FM3, FMAST, MW, LW,
AMAST, CD, CDC.
– 1-6 icon keys: have functions re-
lated to the currently active source.
–
Ùaudio mute: mutes all the audio
sources.
– AUX: presetting for connection to
an external video source (not available
yet).
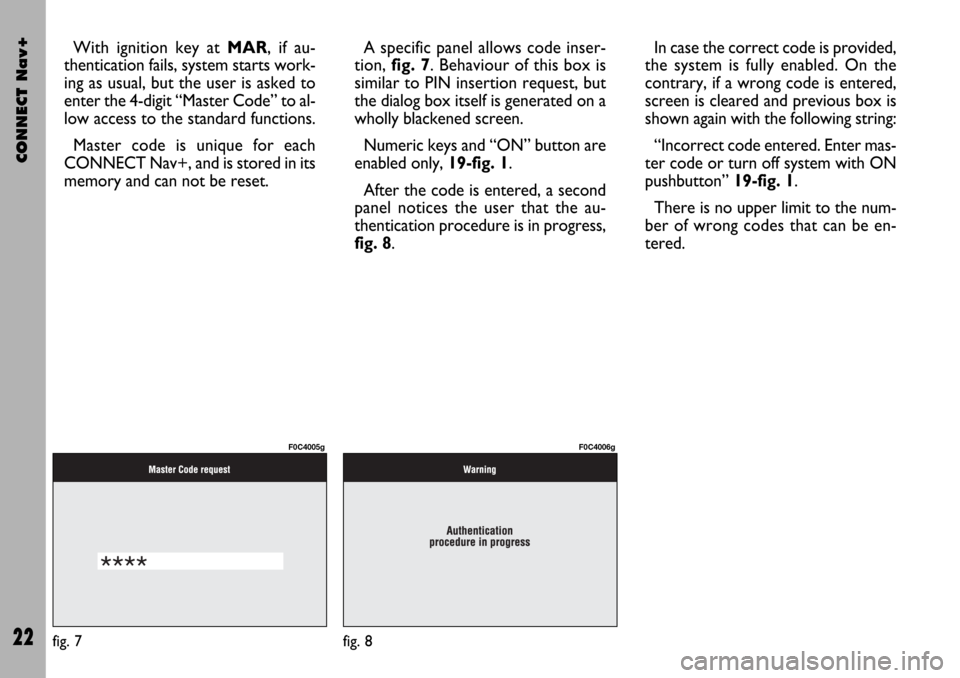
If navigator, audio, telephone and
mute are off, the display will show the
screen in fig. 6.PROTECTION AGAINST
THEFT
Power-on authentication
procedure
CONNECT Nav+ is protected
against theft and unauthorised instal-
lation by means of an “authentication
procedure”.
This kind of verification involves
Body Computer Node (by means of
messages exchanged on car network)
and is performed at every power-on.
The procedure does not take place
if CONNECT Nav+ is switched on by
means of “ON” button 19-fig. 1or
“SOS” button 1-fig. 1and ignition key
at STOP. In this case, CONNECT
Nav+ is enabled to work normally,
without authentication procedure.
fig. 6
F0C4119g
Page 23 of 166

CONNECT Nav+
22
With ignition key at MAR, if au-
thentication fails, system starts work-
ing as usual, but the user is asked to
enter the 4-digit “Master Code” to al-
low access to the standard functions.
Master code is unique for each
CONNECT Nav+, and is stored in its
memory and can not be reset.A specific panel allows code inser-
tion, fig. 7. Behaviour of this box is
similar to PIN insertion request, but
the dialog box itself is generated on a
wholly blackened screen.
Numeric keys and “ON” button are
enabled only, 19-fig. 1.
After the code is entered, a second
panel notices the user that the au-
thentication procedure is in progress,
fig. 8.In case the correct code is provided,
the system is fully enabled. On the
contrary, if a wrong code is entered,
screen is cleared and previous box is
shown again with the following string:
“Incorrect code entered. Enter mas-
ter code or turn off system with ON
pushbutton” 19-fig. 1.
There is no upper limit to the num-
ber of wrong codes that can be en-
tered.
fig. 7
F0C4005g
fig. 8
F0C4006g
Page 24 of 166

CONNECT Nav+
23
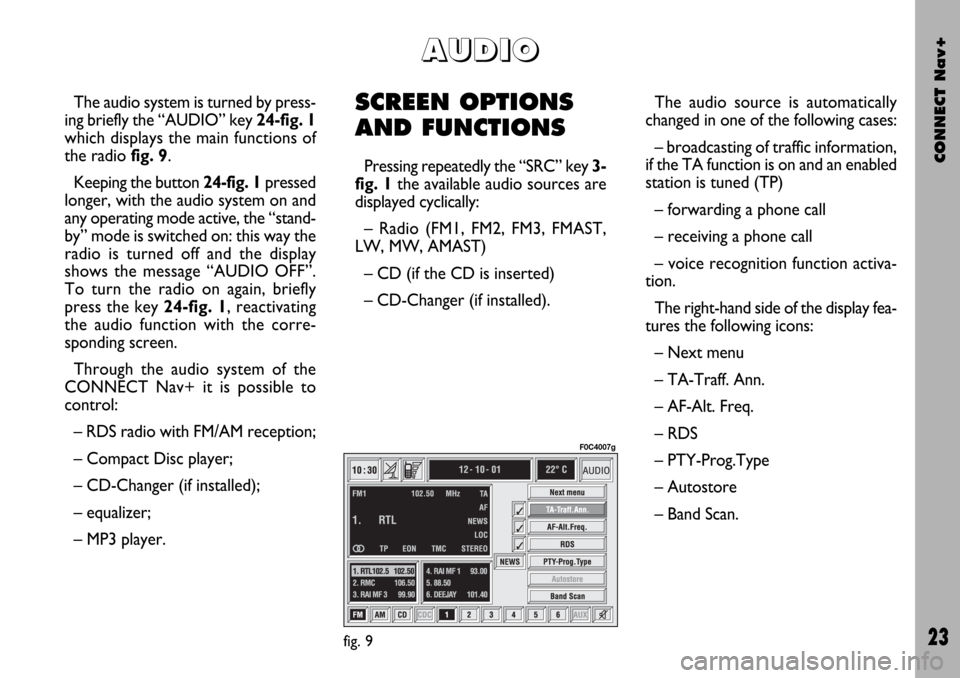
The audio system is turned by press-
ing briefly the “AUDIO” key 24-fig. 1
which displays the main functions of
the radio fig. 9.
Keeping the button 24-fig. 1pressed
longer, with the audio system on and
any operating mode active, the “stand-
by” mode is switched on: this way the
radio is turned off and the display
shows the message “AUDIO OFF”.
To turn the radio on again, briefly
press the key 24-fig. 1, reactivating
the audio function with the corre-
sponding screen.
Through the audio system of the
CONNECT Nav+ it is possible to
control:
– RDS radio with FM/AM reception;
– Compact Disc player;
– CD-Changer (if installed);
– equalizer;
– MP3 player.SCREEN OPTIONS
AND FUNCTIONS
Pressing repeatedly the “SRC” key 3-
fig. 1the available audio sources are
displayed cyclically:
– Radio (FM1, FM2, FM3, FMAST,
LW, MW, AMAST)
– CD (if the CD is inserted)
– CD-Changer (if installed).The audio source is automatically
changed in one of the following cases:
– broadcasting of traffic information,
if the TA function is on and an enabled
station is tuned (TP)
– forwarding a phone call
– receiving a phone call
– voice recognition function activa-
tion.
The right-hand side of the display fea-
tures the following icons:
– Next menu
– TA-Traff. Ann.
– AF-Alt. Freq.
– RDS
– PTY-Prog.Type
– Autostore
– Band Scan.
A A
U U
D D
I I
O O
fig. 9
F0C4007g