Page 97 of 166

CONNECT Nav+
96
If the system contains a wrong CD-
ROM, an audio CD or no CD, when-
ever the system asks for the navigation
CD-ROM for route calculation or map
up-date, the insertion prompt will ap-
pear on the display.GRAPHIC
INSTRUCTIONS
The main navigation function page
and the MAIN page display the ma-
noeuvres to be made using arrows or
symbols.
The downward graphic symbol rep-
resents next manoeuvre (turn left,
right, straight on, U-turn) while the
upward graphic symbol represents the
next one. The number displayed un-
der the graphic symbol indicates the
car distance from the manoeuvre
point.
VOICE
INSTRUCTIONS
The voice instructions provided by
the system guide you to your desti-
nation and suggest all manoeuvres to
be carried out in due time: in particu-
lar, the manoeuvres is announced first
and then detailed instructions are giv-
en.
Press the “RPT” key 7-fig. 1to re-
peat the last voice instruction.
To adjust the volume of the voice in-
struction turn the encoder 14-fig. 1
during voice information.
If necessary, press the “RPT” key 7-
fig. 1to repeat the voice instruction
and adjust the volume.
Page 98 of 166

CONNECT Nav+
97
k
The navigator CD-ROM player 5-fig.
1is located on the CONNECT Nav+
front panel and it is the same used for
the audio CD. Therefore, it is not pos-
sible to use the player for audio and
navigation CD-ROM at the same time:
however, the navigation system can
operate partially even without insert-
ing the navigation CD-ROM.
In this case, when pressing key
˚
9-fig.1to remove the CD-ROM with
navigation function engaged (to then
insert an audio CD), the following two
cases may occur:1) If no route has been calculated,
when ejecting the CD ROM only the
information on the car position (co-
ordinates) fig. 96will be available.
2) The route previously calculated is
still valid, the system provides the user
with any instruction to reach the des-
tination.
If the route previously calculated is
still valid, the system will show the
screen in fig. 97. If the user selects and confirms
“YES”, the system will store the navi-
gation data required to reach the set
destination; this operation requires a
few seconds and the display will
prompt the message to waitfig. 98.
After loading, the CD-ROM is eject-
ed and the system restarts its naviga-
tion function with the maximum scale
of “2 km”; therefore it may be possi-
ble that not all of the route is visible.
If the user selects and confirms
“NO”, route guide will be deactivated
and the display will go back to screen
in fig. 96.
fig. 96
F0C4059g
fig. 97
F0C4060g
fig. 98
F0C4061g
NAVIGATION CD-ROM PLAYER
Page 99 of 166

CONNECT Nav+
98
Moreover, navigation in these con-
ditions involves limitations and there-
fore some functions and commands
will not be available. Also information
shown on the map will be limited.
When the navigation system is no
longer able to continue destination
guidance or the car is now out of the
loaded map section, the system
prompts for inserting the navigation
CD-ROM fig. 99. If the user does not
insert the CD-ROM, the system re-
turns to the status shown in fig. 96.IMPORTANT
The driver is always responsible
for compliance with the enforced
traffic regulations: any indication
based on wrong map data leading
to unauthorised driving manoeu-
vres MUST NOT be followed.MAP
If the “MAP” key 16-fig. 1is pressed,
the display shows map, route (if pre-
sent), car position (town and street
names), icons of next two crosses (on-
ly if route is present fig. 100.
To modify the map scale, proceed as
follows:
– rotate the encoder 14-fig. 1and
select the required scale;
– press “ENTER” to confirm 15-fig.
1.
If the user gets near a cross, the map
is replaced by a zoom of the area fig.
101(zoom intersection option).
fig. 99
F0C4101g
fig. 100
F0C4062g
fig. 101
F0C4064g
Page 100 of 166
.
– Ca")
CONNECT Nav+
99
MAIN SCREEN
Main navigator screen fig. 102
shows the following information:
– Current time.
– GPS and GSM signal strengths.
– Date.
– Audio info.
– Active mode (NAV).
– Car position on the map (icon).
– Map scale.At the bottom of the screen are dis-
played the following options, that can
be activated by the corresponding
multifunction keys:
H1and H2(Home 1 and Home 2):
start route calculation towards one of
the two predefine or frequently used
destinations. If no point has been de-
fined as “Home 1” or “Home 2”, a
warning reminds the user that the
function is not available.
Info: displays info on car position and
destination.The display will show the following
information fig. 103:
– compass representation indicating
the car position (in degrees) with ref-
erence to the North;
– longitude, latitude and height;
– visible satellites number;
– destination (available only with nav-
igation on);
– time of arrival and distance to des-
tination (available only with navigation
on).
Pressing “ESCAPE” 13-fig. 1or
“NAV” 11-fig. 1, takes back to the
main navigation screen.
Atlas: enables map drawing in atlas
mode (for further details see the rel-
evant paragraph “ATLAS”).
fig. 102
F0C4063g
fig. 103
F0C4066g
Page 101 of 166
 an alternative route to
reach the selected destination, avoid-
ing a specified portion of the current-
ly calculated route.
To activate")
CONNECT Nav+
100
Detour: allows the user to choose
(if possible) an alternative route to
reach the selected destination, avoid-
ing a specified portion of the current-
ly calculated route.
To activate this function, select the
route portion to be avoided fig. 104
using the encoder 14-fig. 1and then
press “ENTER” 15-fig. 1to confirm.
The display will then show the new
distance and the time necessary to
reach the destination fig. 105.
Selecting “YES” or “NO” by the en-
coder 14-fig. 1and pressing “ENTER”
to confirm 15-fig. 1, the user can ac-
cept or reject the new route.If there is no alternative route, then
the display shows “No alternative
route” fig. 106.
Mute: enables/disables navigation
voice guidance.
Right vertical bar icons are:
Other menus: shows a second page
of navigation menu.
Select address: lets the user select
a geographical point (through address,
directory...).
Activate RG: enables/disables route
guide. If RG is disabled, then voice mes-
sages, cross icons and zooms are no
more available. If a route is active whenRG is disabled, it remains visible on the
map, while automatic route recalcula-
tion (if user leaves route) is not active.
Volume: sets the voice instruction
volume level.
Set route: defines route calculation
parameters.
Scale: allows change of map scale.
Push on the icon key shows available
scales (100m ÷ 200km).
If the user arrives near a cross and
cross zoom function is enabled, the
system provides cross zoom as shown
infig. 107.
fig. 104
F0C4067g
fig. 105
F0C4068g
fig. 106
F0C4069g
Page 102 of 166

CONNECT Nav+
101
OTHER MENUS
Selecting “Other menus” by rotating
the encoder 14-fig. 1and pressing
“ENTER” to confirm 15-fig. 1, takes
to a second navigation menu fig. 108
featuring the following:
Previous menu: to get back to the
previous menu.
Change display: to change map dis-
play between the following:
– Map;
– Whole route;
– Highway info;
– Graphic symbols.
fig. 107
F0C4104g
Delete destination: to delete cur-
rent destination.
Map options: map view parameters
setting:
– Draw map
– Draw areas
– Draw icon
– Draw RDS-TMC
– Draw wording
– Zoom intersection
– OK
Voice directory: controls naviga-
tor voice directory:
– Here voice directory
– Delete voice directory
fig. 108
F0C4070g
SELECT ADDRESS
Selecting “Select address” in the main
menu by rotating the encoder 14-
fig. 1and pressing “ENTER” to con-
firm 15-fig. 1, will display the screen
in fig. 109.
The available icons are:
Address: to select a point through
an address.
Points of interest: to select a
“point of interest” by the relevant sub-
menu.
Last destinations: to select a point
from the list of previous destinations.
Directory: to select a point from
the navigator directory.
fig. 109
F0C4071g
Page 103 of 166

CONNECT Nav+
102
RDS-TMC: to select a point from
the RDS-TMC generated “list of
events”.
Home 1: to select as destination, to
delete or to display the point stored
as “Home 1”;
Home 2: to select as destination, to
delete or to display the point stored
as “Home 2”;
ADDRESS
Selecting “Address” (from the first
page of the menu) by rotating the en-
coder 14-fig. 1and pressing “ENTER”
to confirm 15-fig. 1, the display shows
a submenu with the following icons:
“Place name”, “Street”, “Street num-
ber”, “2
ndstreet”, “Calculate route”
and “Other options” fig. 110.“Place name”
To enter the place name (destination
town), select “Place name” by rotat-
ing the encoder 14-fig. 1and press-
ing “ENTER” to confirm 15-fig. 1.
IMPORTANTIf current place
name is available, the corresponding
description will be displayed near the
place name setting field; the user can
however change it if it is not corre-
sponding to the required point.
To input characters, select them by
rotating the encoder 14-fig. 1and
then press “ENTER” to confirm 15-
fig. 1. If the combination of two characters
(alphabetical letter + symbol) is pos-
sible, the two characters are auto-
matically unified into their corre-
sponding single character: for exam-
ple, if the user selects Eand then¨the
two characters are replaced with Ë.
Blank and . , - _ ‘ ( )are word sepa-
rator characters.
After setting the place name, press
“ENTER” 15-fig. 1to confirm and to
go to next page to input the street
name. Push on “ESCAPE” 13-fig. 1
gets to previous screen without set-
ting the new place name.
“Street”
Destination street name is obtained
after entering the place name. Select
“Street” by rotating the encoder 14-
fig. 1and pressing “ENTER” to con-
firm 15-fig. 1.
To input street name characters, se-
lect them by rotating the encoder 14-
fig. 1and then press “ENTER” to con-
firm 15-fig. 1.
fig. 110
F0C4210g
Page 104 of 166

CONNECT Nav+
103
If in place of “Street” the user spec-
ifies “C”, it means “downtown” and
so neither “Street number” and “2nd
street” must be input.
The navigation system always guide
you downtown in case of small towns.
After setting the street name, press
“ENTER” 15-fig. 1to confirm and to
go to next screen to input the street
number. Push on “ESCAPE” 13-fig. 1
gets to previous screen without set-
ting the street name.
“Street number”
Destination street number is ob-
tained after entering the street name.
Select “Street number” by rotating the
encoder 14-fig. 1and pressing “EN-
TER” to confirm 15-fig. 1.
To input digits, select them by rotating
the encoder 14-fig. 1and then press
“ENTER” to confirm 15-fig. 1.“2nd street”
This option is used to enter the name
of a second street that intersects the
first entered street, so that the se-
lected destination is the intersection
between the two streets.
The second street name can be en-
tered, after entering the place name
and the first street name. Select “2nd
street” by rotating the encoder 14-fig.
1and press “ENTER” to confirm 15-
fig. 1.
To input the 2nd street name char-
acters, select them by rotating the en-
coder 14-fig. 1and then press “EN-
TER” to confirm 15-fig. 1.
“Calculate route”
This option will activate route calcu-
lation to the required destination.
If a destination is already set, the sys-
tem will ask for confirmation before
changing destination.“Other options”
– Directory
This function is used to store the se-
lected address into the navigation sys-
tem directory and to associate it to a
name for easy retrieval fig. 111.
The name to be associated with the
destination can be entered, after se-
lecting and confirming “Name”, by ro-
tating the encoder 14-fig. 1and press-
ing “ENTER” to confirm 15-fig. 1.
IMPORTANTWhen selecting
“Name”, remember that it is not pos-
sible to add a name already present in
the Telephone (TEL) function direc-
tory.
fig. 111
F0C4212g
 1
1 2
2 3
3 4
4 5
5 6
6 7
7 8
8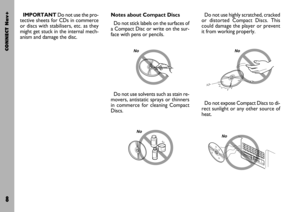 9
9 10
10 11
11 12
12 13
13 14
14 15
15 16
16 17
17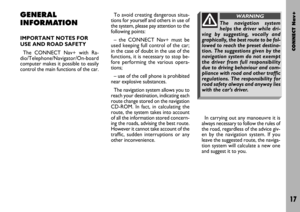 18
18 19
19 20
20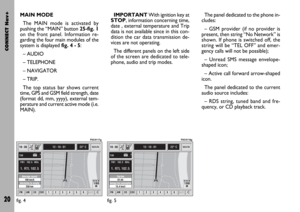 21
21 22
22 23
23 24
24 25
25 26
26 27
27 28
28 29
29 30
30 31
31 32
32 33
33 34
34 35
35 36
36 37
37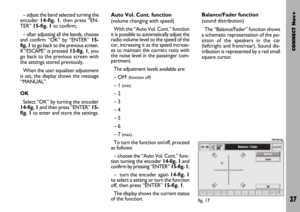 38
38 39
39 40
40 41
41 42
42 43
43 44
44 45
45 46
46 47
47 48
48 49
49 50
50 51
51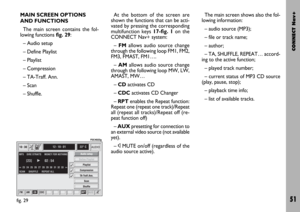 52
52 53
53 54
54 55
55 56
56 57
57 58
58 59
59 60
60 61
61 62
62 63
63 64
64 65
65 66
66 67
67 68
68 69
69 70
70 71
71 72
72 73
73 74
74 75
75 76
76 77
77 78
78 79
79 80
80 81
81 82
82 83
83 84
84 85
85 86
86 87
87 88
88 89
89 90
90 91
91 92
92 93
93 94
94 95
95 96
96 97
97 98
98 99
99 100
100 101
101 102
102 103
103 104
104 105
105 106
106 107
107 108
108 109
109 110
110 111
111 112
112 113
113 114
114 115
115 116
116 117
117 118
118 119
119 120
120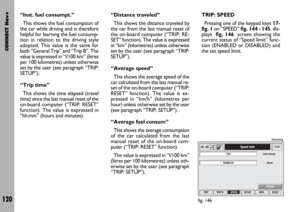 121
121 122
122 123
123 124
124 125
125 126
126 127
127 128
128 129
129 130
130 131
131 132
132 133
133 134
134 135
135 136
136 137
137 138
138 139
139 140
140 141
141 142
142 143
143 144
144 145
145 146
146 147
147 148
148 149
149 150
150 151
151 152
152 153
153 154
154 155
155 156
156 157
157 158
158 159
159 160
160 161
161 162
162 163
163 164
164 165
165