Page 105 of 166

CONNECT Nav+
104
To enter the characters simply select
them one by one by rotating the en-
coder14-fig. 1and then press “EN-
TER” to confirm 15-fig. 1.
After completing the name, select
“OK”.
The “Voice recognition” key allows
to associate a voice sample to a des-
tination stored in the directory. Sym-
bol “�” at the left of the key shows if
a sample has already been associated.
Selecting and confirming “Voice recog-
nition” will display the screen in
fig. 112:
New voice command”: allows
recording of a new voice sample. User
is invited to pronounce twice the
name to be recorded. “Delete voice command”: allows
deletion of a previously recorded
voice sample. If there is no sample, this
key is disabled.
“Listen to voice command”: repro-
duces a previously recorded voice
sample. If there is no recorded sam-
ple, this key is disabled.
To select the required function, ro-
tate the encoder 14-fig. 1and press
“ENTER” to confirm15-fig. 1.
When a geographical point is select-
ed on the map, by moving the cross-
shaped cursor and pressing “ENTER”
15-fig. 1, the display will show the
screen in fig. 113 with the following
options: Destination, Directory, Ser-
vice Info, Locate, RDS-TMC, Home 1,
Home 2.– Home 1 and Home 2: store the
selected point in the relevant memo-
ries.
If a point has already been previous-
ly stored as “Home 1” or “Home 2”,
a warning box asks the user for con-
firmation about substitution.
Pressing H1 or H2 17-fig. 1and then
“ENTER” 15-fig. 1to confirm, will
start route calculation to the destina-
tion stored in Home 1 or Home 2.
“Atlas”
From screen in fig. 114pressing one
of the multifunction keys 17-fig.1cor-
responding to “Atlas” will display a map
where the destination is identified by a
cross-shaped cursor.
The map is always represented with
North at the top of the display and
with “100 m” scale.
There are three available icon keys:
RE: press the corresponding multi-
function key 17-fig. 1, a rotation of the
encoder 14-fig. 1will move the cross
cursor horizontally;
fig. 113
F0C4211g
fig. 112
F0C4076g
Page 106 of 166

CONNECT Nav+
105
Q
Z: press the corresponding multi-
function key 17-fig. 1, a rotation of the
encoder 14-fig. 1will move the cross
cursor vertically;
ZOOM: pressing one of the corre-
sponding two multifunction keys 17-
fig. 1, the list of the available scales is
shown; to select the required scale ro-
tate the encoder 14-fig. 1and press
“ENTER” to confirm 15-fig. 1.
When a geographical point is select-
ed on the map, by moving the cross-
shaped cursor and pressing “ENTER”
15-fig. 1, the display will show the
screen in fig. 113with the following
options: Destination, Directory, Ser-
vice Info, Locate, RDS-TMC, Home 1,
Home 2.– Destination
When selecting “Destination” by ro-
tating the encoder 14-fig. 1and press-
ing “ENTER” to confirm 15-fig. 1, the
display shows the screen in fig. 115:
“Enter“: enters the new point in the
desired position of the list. The list can
include a maximum of 10 destinations.
To select required position, rotate
the encoder 14-fig. 1and press “EN-
TER” to confirm 15-fig. 1.
“Replace”: this function is used to re-
place one of the previous set destina-
tions with the new one.
IMPORTANTThe list is displayed
if at least one destination is present;
otherwise, the new destination is au-
tomatically entered in the first desti-
nation list location.“Delete“: deletes the destination se-
lected from the list. To delete a desti-
nation, select it with the encoder 14-
fig. 1and then press “ENTER” to con-
firm 15-fig. 1.
“Delete all”: deletes the entire des-
tination list.
“Calculate route”: starts route cal-
culation to the first destination in the
list. When destination is reached, the
system will calculate the route to the
next destination (if present in the list),
after receiving the user confirmation.
– Directory
This function is used to store the se-
lected address into the navigation sys-
tem directory and to associate it to a
name (e.g.: “Casa” - Home), for easy
retrieval fig. 111.
The name to be associated with the
destination can be entered, after se-
lecting and confirming “Name”, by ro-
tating the encoder 14-fig. 1 and press-
ing “ENTER” to confirm 15-fig. 1.
fig. 114
F0C4077g
fig. 115
F0C4074g
Page 107 of 166
 function directo-
ry.
To enter the characters simply selec")
CONNECT Nav+
106
IMPORTANT When selecting
“Name”, remember that it is not pos-
sible to add a name already present in
the Telephone (TEL) function directo-
ry.
To enter the characters simply select
them one by one by rotating the en-
coder 14-fig. 1and then press “EN-
TER” to confirm 15-fig. 1.
After completing the name, select
“OK”.
The “Voice recognition” key allows
to associate a voice sample to a desti-
nation stored in the directory. Sym-
bol “�” at the left of the key shows if
a sample has already been associated.
Selecting and confirming “Voice
recognition” will display the screen in
fig. 112:
“New voice command”: allows
recording of a new voice sample. User
is invited to pronounce twice the name
to be recorded.
“Delete voice command”: allows
deletion of a previously recorded voice
sample. If there is no sample, this key
is disabled.“Listen to voice command”: repro-
duces a previously recorded voice
sample. If there is no recorded sample,
this key is disabled.
To select the required function, ro-
tate the encoder 14-fig. 1and press
“ENTER” to confirm 15-fig. 1.
– Service Info (available only by se-
lection from “Atlas”): shows informa-
tion about a “service” selected on the
map fig. 116.
– Locate(available only by selection
from “Atlas”): shows the car position
on the map. All keys are disabled and
an arrow identifies the car position.
Car orientation (arrow direction) can
be modified by rotating the encoder
14-fig. 1and pressing “ENTER” 15-
fig. 1to confirm.RDS-TMC (available only by selection
from “Atlas”): shows information
about the “RDS-TMC” icon selected
on the map fig. 117.
–Home 1 and Home 2: store the
selected point in the relevant memo-
ries.
If a point has already been previous-
ly stored as “Home 1” or “Home 2”,
a warning box asks the user for con-
firmation about substitution.
Pressing H1 or H2 17-fig. 1and then
“ENTER” 15-fig. 1to confirm, will
start route calculation to the destina-
tion stored in Home 1 or Home 2.
fig. 116
F0C4080g
fig. 117
F0C4081g
Page 108 of 166

CONNECT Nav+
107
POINTS OF INTEREST
This function is used to obtain a file
containing the location and informa-
tion on points of general interest such
as, for example, restaurants, museums,
stations etc., divided by category.
Selecting “Points of interest” rotat-
ing the encoder 14-fig. 1and press-
ing “ENTER” 15-fig. 1to confirm, the
display will show the following menu
fig. 118:
– Near car
– Near destination
– Near address
– Name. “Near car”
“Near car” allows the user to find
the services near the current car po-
sition.
“Category” allows service category
selection in the system data-base us-
ing the keypad.
Selecting “List of services” will pro-
vide the list of available services for the
specified category indicating service
name, distance and direction fig. 119;
the list is scrolled by rotating the en-
coder 14-fig. 1and pressing “ENTER”
15-fig. 1to confirm.After selecting a “point of interest”,
the display shows the following op-
tions:
“Calculate route”: to start navigation;
“Other options”: the display will
show a screen with the following op-
tions: Directory, Home 1 and Home
2, previously described in paragraph
“Address”.
fig. 118
F0C4078g
fig. 119
F0C4103g
Page 109 of 166

CONNECT Nav+
108
“Near destination”
This function enables to find the re-
quired services near the selected des-
tination. The available options are
“Destination”, “Category” and “List of
services” fig. 120.
After selecting the destination and
selected service, information can be
obtained and the service can be lo-
cated using “Info” and “Atlas”. Select
“Calculate route” rotating the en-
coder 14-fig. 1and press “ENTER”
15-fig. 1to confirm selection.“Near address”
This is used to identify the services
sought nearest to the address set. The
available options are “Category”,
“Place name”, “Street”, “Street num-
ber” and “List of services”fig. 121.
After selecting the required service,
associated information and location
may be obtained using “Info” and
“Map”. Select “OK” by rotating the
encoder 14-fig. 1and press “ENTER”
15-fig. 1to confirm selection.“Name”
Service selection by “Name” is used
to select a known service as the des-
tination by entering “Category”, “Place
name” and “Service name” fig. 122.
After confirming the selected service,
associated information and location
may be obtained using “Info” and “At-
las”. Select “Calculate route” by ro-
tating the encoder 14-fig. 1and press
“ENTER” 15-fig. 1to confirm selec-
tion.
fig. 120
F0C4213g
fig. 121
F0C4214g
fig. 122
F0C4215g
Page 110 of 166
. At each route calcula-
tion, the destination is automatically in-
ser")
CONNECT Nav+
109
LAST DESTINATIONS
“Last destinations” key is used to get
the list of last inserted destinations
(maximum 10). At each route calcula-
tion, the destination is automatically in-
serted in the list. Selection of a desti-
nation from that list is done by rotat-
ing the encoder 14-fig. 1and press-
ing “ENTER” to confirm 15-fig. 1.
When the choice has been expressed,
the location is shown on the map.
Pressing “ENTER” 15-fig. 1, the user
will able to use the point as a destina-
tion, to enter it in the directory, to set
it as Home 1 or Home 2, or to locate
it.DIRECTORY
“Directory” key enables to select a
point from those stored in the direc-
tory fig. 123. If the list contains more
than 9 destinations, the display will
show the screen in fig. 124. Select-
ing “List”, the keypad disappears and
the required destination can be se-
lected directly, the display will show
the screen in fig. 125.The available functions are:
“Calculate route”: allows the use of
the point as already described.
“Change”: modifies the Name associ-
ated to the point and allows inser-
tion/change/deletion of a voice sample
associated to the entry fig. 126.
“Delete”: deletes entry.
fig. 123
F0C4085g
fig. 124
F0C4216g
fig. 126
F0C4218gfig. 125
F0C4217g
Page 111 of 166
CONNECT Nav+
110
8.Slippery road.
9.Ice / snow.
10.Fog.
11.Wind.
12.Procession, protest.
13.Danger of explosions.
14.Slow down.
15.Traffic sings out of order.
16.Parking.
17.Forecast.RDS-TMC
Select this function by rotating the
encoder 14-fig. 1and press “ENTER”
to confirm 15-fig. 1.
The display shows the following op-
tions
fig. 127:
– Near car;
– Near address.
“RDS-TMC” icon allows the user to
select a geographical point to get re-
lated RDS-TMC information: RDS-
TMC events are pictured through
dedicated icons on the map. A TMC
event cannot be used to identify a des-
tination.Here follow the icons (constantly up-
dated) shown on map:
1.Queue.
2.Accident.
3.Generic danger.
4.Works in progress.
5.Closed road.
6.Narrow road.
7.No entry road.
fig. 127
F0C4089g
Page 112 of 166
CONNECT Nav+
111
“Near car”
“Near car” option enables to get in-
formation on events near the current
car position.
The menu fig. 128includes the fol-
lowing keys:
“Category”: specifies the event cat-
egory: “Traffic”, “Weather”, “Info”,
“All”.
“List of events”: to open the event
list and to choose the event of inter-
est.
“Info”: press 17-fig. 1to get info
about the selected event. To select the required function, ro-
tate the encoder 14-fig. 1and press
“ENTER” 15-fig. 1to confirm.
fig. 128
F0C4219g
“Near address”
“Near address” enables to get infor-
mation on events near a specific ad-
dress. The following functions are
available fig. 129:
“Category”: specifies event catego-
ry: “Traffic”, “Weather”, “Info”, “All”.
“Place name”, “Street”, “Street num-
ber”: inputs resort address.
“List of events”: opens the event list
and choose the event of interest.
fig. 129
F0C4220g
 1
1 2
2 3
3 4
4 5
5 6
6 7
7 8
8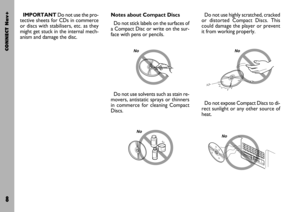 9
9 10
10 11
11 12
12 13
13 14
14 15
15 16
16 17
17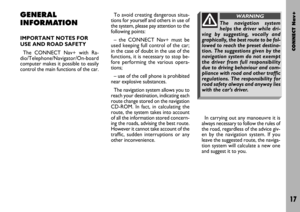 18
18 19
19 20
20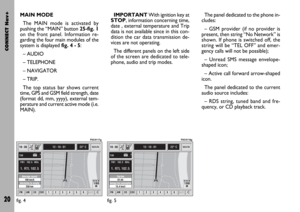 21
21 22
22 23
23 24
24 25
25 26
26 27
27 28
28 29
29 30
30 31
31 32
32 33
33 34
34 35
35 36
36 37
37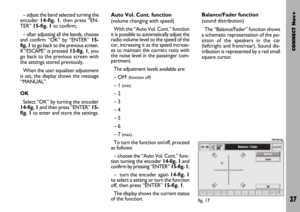 38
38 39
39 40
40 41
41 42
42 43
43 44
44 45
45 46
46 47
47 48
48 49
49 50
50 51
51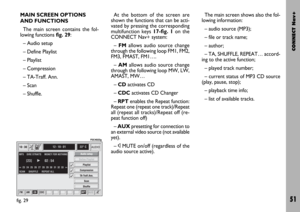 52
52 53
53 54
54 55
55 56
56 57
57 58
58 59
59 60
60 61
61 62
62 63
63 64
64 65
65 66
66 67
67 68
68 69
69 70
70 71
71 72
72 73
73 74
74 75
75 76
76 77
77 78
78 79
79 80
80 81
81 82
82 83
83 84
84 85
85 86
86 87
87 88
88 89
89 90
90 91
91 92
92 93
93 94
94 95
95 96
96 97
97 98
98 99
99 100
100 101
101 102
102 103
103 104
104 105
105 106
106 107
107 108
108 109
109 110
110 111
111 112
112 113
113 114
114 115
115 116
116 117
117 118
118 119
119 120
120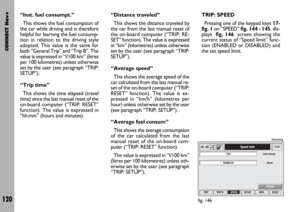 121
121 122
122 123
123 124
124 125
125 126
126 127
127 128
128 129
129 130
130 131
131 132
132 133
133 134
134 135
135 136
136 137
137 138
138 139
139 140
140 141
141 142
142 143
143 144
144 145
145 146
146 147
147 148
148 149
149 150
150 151
151 152
152 153
153 154
154 155
155 156
156 157
157 158
158 159
159 160
160 161
161 162
162 163
163 164
164 165
165
