Page 145 of 166

CONNECT Nav+
144
When automatic medical advice is
enabled, to avoid accidental forward-
ing, the user has about 25 seconds,
from pressing the “SOS” key 1-fig. 1,
to interrupt the call; to block the call,
simply turn the encoder 14-fig. 1to
another option or press “ESCAPE”
13-fig. 1.
IMPORTANTThe medical advice
centre number cannot be set by the
user.“ROADSIDE ASSIST.”
FUNCTION
Selecting this function on the “SOS”
menu main page using the encoder 14-
fig. 1and pressing “ENTER” to con-
firm 15-fig. 1, after about 10 seconds
a message calling for road assistance is
sent to the Targasysoperator, com-
pleted with the position of the car to
allow it to be located.
IMPORTANTThe roadside assis-
tance centre number cannot be set by
the user.
For both Roadside Assistance
and Medical Advice calls, if
transmission of the telematic call
is not successful, automatic di-
alling of the tollfree number con-
cerning the service required is
envisaged, to inform in any case
of the need for assistance (this
call will be successful only if the
area in which the car is has GSM
coverage).“PERSONAL NUMBER”
FUNCTION
Selecting this function on the “SOS”
menu main page using the encoder 14-
fig. 1and pressing “ENTER” to con-
firm 15-fig. 1, automatically sends a
phone call to a number set previous-
ly by the user.
The procedure for setting this num-
ber is described in the “Settings” para-
graph that follows.
“EMERGENCY 112”
FUNCTION
Selecting this function on the “SOS”
menu main page using the encoder 14-
fig. 1and pressing “ENTER” to con-
firm 15-fig. 1, directly sends a call to
the police force.
Page 146 of 166

CONNECT Nav+
145
IMPORTANT“112” is the emer-
gency call service for all the countries
in which the public service is available.
The “Emergency 112” call can always
be activated, even if the telephone card
is not inserted in the slot 6-fig. 1.
“SETTINGS” FUNCTION
Selecting this function on the “SOS”
menu main page using the encoded
14-fig. 1and pressing “ENTER” to
confirm 15-fig. 1, accesses a new
screen with the “CODE CONNECT”
function, “Personal number” and
“Medical advice” fig. 158.
“OK” icon key enables to save set
data.“CODE CONNECT”
function
This allows to view the system ter-
minal identification code (adopted by
Targasyscentre).
“Personal number” function
Selecting this function with the en-
coder 14-fig. 1and pressing “ENTER”
to confirm 15-fig. 1, it is possible to
enter the number to be called when
the “Personal number” function is ac-
tivated, on the screen that appears af-
ter pressing the “SOS” key 1-fig. 1for
the emergency call.
To enter the telephone number use
the keypad keys 17-fig. 1(normally
disabled), set on the lower screen bar
fig. 158.“Medical advice” function
The “Medical advice” function allows
to activate or deactivate automatic
sending of the medical call (“Auto-
matic” or “Manual” medical advice
call).
When automatic medical call is en-
abled, this will be sent by the system
about 25 seconds from when the user
has pressed the “SOS” key 1-fig. 1,
with no need to do anything else.
If the user wishes to call for medical
assistance when the function is dis-
abled (manual call), it will be necessary
to press the “SOS” key 1-fig. 1, select
“Medical advice” function with the en-
coder 14-fig. 1and the press “EN-
TER” to confirm 15-fig. 1.
fig. 158
F0C4122g
Page 147 of 166

CONNECT Nav+
146
If the function is enabled, pressing the
“SOS” key 1-fig. 1, automatically
opens the screen with the “Automat-
ic medical advice” function already
highlighted: if the user does not move
the cursor within 15 seconds using the
encoder 14-fig. 1and call is not can-
celled for other 10 seconds, the re-
quest for medical assistance will be
forwarded automatically. If not, the call
will not be sent and to activate it at a
later time, the user will have to select
again the “Medical advice” function
and press “ENTER” to confirm 15-
fig. 1.
“OK” icon key
To confirm settings, select “OK”
with the encoder 14-fig. 1and press
“ENTER” to confirm 15-fig. 1.CALLS FOR MEDICAL
ADVICE OR ROADSIDE
ASSISTANCE
During the forwarding of a call for as-
sistance to the operating centre, any
other operations activated are inter-
rupted and the volume of any audio
sources (except the phone) is muted.
These conditions will be maintained as
long as the call for assistance is active,
with the corresponding screen on the
display.
If a phone call is received while for-
warding a request for assistance, the
corresponding alert will not be shown
on the display but the ringer will ring.
If the user decides to accept the call
and briefly presses the
ß8-fig. 1key,
the assistance call screen goes off the
display.
IMPORTANTThe call for assis-
tance is always forwarded; however, if
you accept the incoming call, the
Targasysoperator might have diffi-
culty in contacting you since the num-
ber could be busy. When the call has been sent, the dis-
play shows the corresponding call for-
warded message for about 4 seconds.
If for any reason the call for assis-
tance cannot be sent, the display
shows a warning message and the user
is then asked if he/she wants to acti-
vate a phone call in any case (*) to the
operating centre to avail of the service
required, even if in this case the op-
erating centre will no longer be able
to locate the car.
(*) The call is normally made using the toll-
free number, while it is at the user’s expense
if it is made in roaming conditions.
Page 148 of 166

CONNECT Nav+
147
INFOMOBILITY SERVICES
Pressing
•12-fig. 1displays a
screen fig. 159to be used to request
pay services and information. Available
functions are:
– Connect
– Select.
Targasysoperator availability (GSM
field strength, etc...) is shown on the
left top of the screen, whereas SMS
sent to the Targasysoperator are
listed at the bottom of the screen.Services are available only upon sub-
scription. If the user hasn’t subscribed
yet of if Targasyssubscription ex-
pired, then the “Connect” icon is dis-
abled and screen in fig. 160 is dis-
played showing “Subscribed services
not enabled”.
User can call the Targasys opera-
tor to get information to (re)activate
the service.
If Targasyssubscription expired, it
is always possible to consult stored in-
formation.“Connect” function
Selecting this function with the en-
coder 14-fig. 1and pressing “ENTER”
to confirm 15-fig. 1, sends the re-
quest for information.
Upon receiving the request,
Targasysactivates a telephone con-
nection. When the connection is ac-
tivated the user can ask an operator
for the information required.
If it is not possible to activate the
telematic connection, the display will
show the corresponding warning mes-
sage. Some information will be given
only vocally by the operator, while
others may also be sent with SMS
messages, that will be received re-
gardless of the function active (MAIN,
AUDIO, etc.). The message will be
shown directly on the screen active at
that moment, in a window fig. 161
containing the “Save”, “Delete”, “Map”
(if the message contains geographical
indications) and “Call” (if a telephone
number is present).
Choosing “Save” option the message
will be stored, while “Delete” will
clear it from the screen and from
memory.
fig. 159
F0C4123g
fig. 160
F0C4124g
Page 149 of 166

CONNECT Nav+
148
Choosing “Map” will automatically
display the point on the map, with the
possibility to enter it as navigation sys-
tem destination. In this case the mes-
sage will also be stored automatically.
Choosing “Call” the telephone num-
ber contained in the message will be
dialled automatically and the message
will be stored.
Should a sequence of messages be
received, a specific window will be
opened for each of them and for each
of them it will be possible to perform
the storage, deletion, display on the
map or call phone number operations.“Select” function
If they are not deleted, all the mes-
sages received are stored. The list with
all the messages can be seen in the
bottom of the display, in the screen
with “Infomobility” function fig. 162.
A maximum of ten messages can be
stored: further arrivals overwrite the
oldest one. Every message is identified
by an icon recalling the message type
and an envelope recalling the message
status: read or not (sealed envelope =
unread message, open envelope =
read message).To access single messages of the list
which may contain information on the
traffic, points of interest or weather
information, activate the “Select” func-
tion with the encoder 14-fig. 1and
press “ENTER” to confirm 15-fig. 1,
then turn the encoder 14-fig. 1to
scroll the list of messages (also the in-
visible part).
When the message you want to read
is highlighted, press “ENTER” 15-fig. 1
to view to on the display.
fig. 161
F0C4125g
fig. 162
F0C4126g
Page 150 of 166
.
When the message contains geo-
graphical information fo")
CONNECT Nav+
149
Traffic information
The icon with “\” identifies mes-
sages with traffic information (e.g.:
buildings, accidents, etc...).
When the message contains geo-
graphical information for locating the
point, when viewing, “Delete” and
“Map” options are made available on
the display fig. 163.
Selecting “Delete” with the encoder
14-fig. 1and pressing “ENTER” to
confirm 15-fig. 1, eliminates defini-
tively the message from the list, while
with “Map” the map is displayed show-
ing the position involved in the event.
The screen with the map also shows
the corresponding graphic options
(zoom, etc.), described previously in
the “Map” paragraph of the “Naviga-
tor (Nav)” chapter.Information about points
of interest
The icon with “<” identifies messages
with traffic information about points
of interest or with generic informa-
tion.
When the message is shown on the
display, the options “Delete”, “Map”
and “Call” are made available fig. 164.
Selecting “Delete” with the encoder
14-fig. 1and pressing “ENTER” to
confirm 15-fig. 1, eliminates defini-
tively the message from the list, while
with “Map” the map is displayed show-
ing the point of interest that can also
be used as destination or entered in
the system directory. With the “Call”
key, when present, it is possible to
send a phone call directly to the num-
ber given in the message.Generic information
The icon with “<” identifies messages
with generic information (weather
conditions, atmospheric events, etc.).
When one of these messages, with-
out geographical information for loca-
tion, is shown on the display, only the
“Delete” option is available which al-
lows it to be definitively deleted from
the list fig. 165.
fig. 163
F0C4127g
fig. 164
F0C4128g
fig. 165
F0C4129g
Page 151 of 166

CONNECT Nav+
150
The SETUP mode enables to set dif-
ferent car and CONNECT Nav+ sys-
tem operating modes and parameters.
Parameters and operating modes
have been grouped in the following
four areas:
– LANGUAGE
– DATE & TEMP
– VEHICLE
– CONNECT.
Every above area is then divided in
different sub-areas. Read carefully
through this chapter to learn any fea-
tures offered by CONNECT Nav+
system.
To enter the SETUP mode, press the
“SETUP” key 4-fig. 1on the front
panel. Screen in fig. 166will be dis-
played.IMPORTANTIf the ignition key is
at STOPcertain SETUP informa-
tion/operations will only be accessible
for reference.
Any new setting on the CONNECT
Nav+, will be operative only after
check performed by car check com-
ponents; otherwise the warning mes-
sage “Setup change failed” will be dis-
played.
IMPORTANTTo be sure that any
new setting is positively received by
car check components, it is strictly
necessary that ignition key is at MAR.
For each item on the display, symbol
“✓” indicates whether the item is set.“Temperature units” shows directly
the selected unit (°C= Celsius, °F=
Fahrenheit).
On the right side of the display “Text
Language” shows which language for
written text is active, “VR language”
(Voice Recognition language) shows
which language is used by the system
for voice commands.
S S
E E
T T
U U
P P
fig. 166
F0C4130g
Page 152 of 166

language will start the updating pro-
cedure for both the written text and
for voice commands and instructions.
The written text (strings) will be up-
date")
CONNECT Nav+
151
IMPORTANTSetting (whatever)
language will start the updating pro-
cedure for both the written text and
for voice commands and instructions.
The written text (strings) will be up-
dated immediately upon selecting the
language. To update voice command
and message language the Setup CD
shall be inserted. if the Setup CD is not
inserted when requested, the required
voice command and message language
will not be updated.
To change parameters and operating
modes, press keypad keys 17-fig. 1
under LANGUAGE, DATE&TEMP,
VEHICLE or CONNECT.
This operation will display the spe-
cific screen thus allowing the desired
operations.LANGUAGE
To display the relevant screen page,
press one of the keypad keys 17-fig. 1
under LANGUAGE fig. 167.
IMPORTANTBefore starting lan-
guage upgrading procedure, be sure
that the provided Setup CD is avail-
able and ready to be used.
Selecting icon “LANGUAGE”, by ro-
tating the encoder 14-fig. 1and press-
ing “ENTER” to confirm 15-fig. 1, the
user can set the required language,
available languages are: Italian, English,
French, German, Spanish, Portuguese
and Dutch.Selected language will be valid for
both the written text (“Text Lan-
guage”) and voice recognition (“VR
language”) and for any voice instruc-
tion coming from the system.
To select the required language, ro-
tate the encoder 14-fig. 1and press
“ENTER” to confirm 15-fig. 1.
As concerns the written text, the new
language is active after selecting “OK”
with the encoder 14-fig. 1and press-
ing “ENTER” to confirm 15-fig. 1.
For setting voice recognition, the
user will be requested to input the
Setup CD.
IMPORTANTIf the Setup CD is
not inserted, the new set language will
be operative for written text only.
Voice recognition (and instruction
coming from the system) language will
be the default or the preset one.
fig. 167
F0C4202g
 1
1 2
2 3
3 4
4 5
5 6
6 7
7 8
8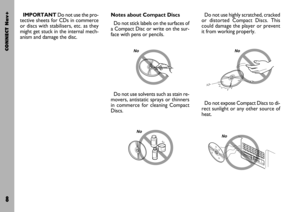 9
9 10
10 11
11 12
12 13
13 14
14 15
15 16
16 17
17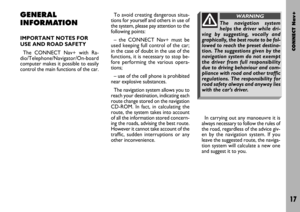 18
18 19
19 20
20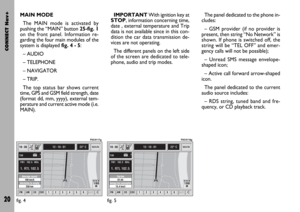 21
21 22
22 23
23 24
24 25
25 26
26 27
27 28
28 29
29 30
30 31
31 32
32 33
33 34
34 35
35 36
36 37
37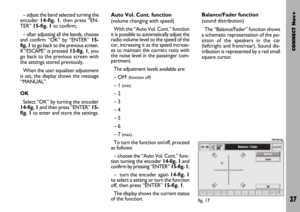 38
38 39
39 40
40 41
41 42
42 43
43 44
44 45
45 46
46 47
47 48
48 49
49 50
50 51
51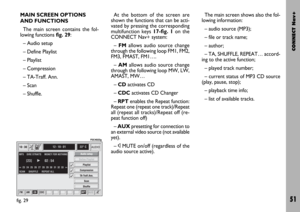 52
52 53
53 54
54 55
55 56
56 57
57 58
58 59
59 60
60 61
61 62
62 63
63 64
64 65
65 66
66 67
67 68
68 69
69 70
70 71
71 72
72 73
73 74
74 75
75 76
76 77
77 78
78 79
79 80
80 81
81 82
82 83
83 84
84 85
85 86
86 87
87 88
88 89
89 90
90 91
91 92
92 93
93 94
94 95
95 96
96 97
97 98
98 99
99 100
100 101
101 102
102 103
103 104
104 105
105 106
106 107
107 108
108 109
109 110
110 111
111 112
112 113
113 114
114 115
115 116
116 117
117 118
118 119
119 120
120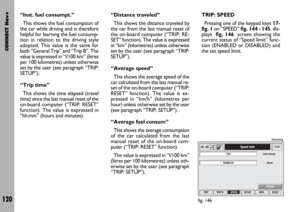 121
121 122
122 123
123 124
124 125
125 126
126 127
127 128
128 129
129 130
130 131
131 132
132 133
133 134
134 135
135 136
136 137
137 138
138 139
139 140
140 141
141 142
142 143
143 144
144 145
145 146
146 147
147 148
148 149
149 150
150 151
151 152
152 153
153 154
154 155
155 156
156 157
157 158
158 159
159 160
160 161
161 162
162 163
163 164
164 165
165