Page 663 of 4500
a. Disconnect the connector and remove the bolt.
b. Pull out the television camera ECU along the stereo component amplifier assy guide toward the
rear of the vehicle to remove it.
If the television camera ECU is not easily removed due to a lack of space between the television camera
ECU and the vehicle, remove the television camera ECU together with the stereo component amplifier
assy (see REPLACEMENT
).
Fig. 28: Removing Television Camera ECU
Courtesy of TOYOTA MOTOR SALES, U.S.A., INC.
7.INSTALL TELEVISION CAMERA ECU
a. Install the television camera ECU by aligning it with the stereo component amplifier assy guide,
and tighten the bolt.
b. Connect the connector.
HINT:
After the replacement, perform the screen noise automatic adjustment when screen noise occurs (see
SCREEN NOISE AUTOMATIC ADJUSTMENT
).
Page 696 of 4500
a. Pressing the claw of the power point socket assy in the direction indicated by the arrow, push the
power point socket assy toward the inside of the chamber and remove it.
Fig. 57: Removing Power Point Socket Assy
Courtesy of TOYOTA MOTOR SALES, U.S.A., INC.
4.REMOVE POWER POINT SOCKET COVER
5.INSTALL POWER POINT SOCKET ASSY
a. Align the claw of the power point socket assy with the cutout of the power point cover and fully
push it to install.
REPLACEMENT
HINT:
See COMPONENTS .
Installation is in the reverse order of removal.
Page 713 of 4500
Fig. 9: Identifying Fade Out Area
Courtesy of TOYOTA MOTOR SALES, U.S.A., INC.
3. Noise problem
It is very important for a technician to understand the specifics of the noise problem. To diagnose the
symptom, use the table below.
RADIO FREQUENCY CHART
Radio FrequencyNoise occurrence conditionPresumable cause
AMNoise occurs in a specified areaForeign noise
AMNoise occurs when listening to an
intermittent broadcastAn identical program transmitted from
multiple towers can cause noise where
the signals overlap
FMNoise occurs only at nightMusic beat from a far-off broadcast
FMNoise occurs while driving in a specified
areaMulti-path or phasing noise resulting
from a change in FM frequency
Page 961 of 4500
Fig. 136: Removing Nut And Disconnecting Shifting Rod From Connecting Rod Swivel
Courtesy of TOYOTA MOTOR SALES, U.S.A., INC.
b. Turn the control shaft lever of the neutral start switch counterclockwise until it stops, and turn it
clockwise 2 notches to set it to the N position.
c. Move the shift lever to the N position and tighten the nut while lightly pushing the lever toward the
R position.
d. After adjustment, check that the shift lever moves smoothly and the shift lever and gear operate
correctl
y.
Page 1166 of 4500
Fig. 191: Installing Hole Plug
Courtesy of TOYOTA MOTOR SALES, U.S.A., INC.
i.INSTALL REAR DISC BRAKE CALIPER ASSY LH
a. Temporarily tighten the brake caliper with the 2 new bolts.
b. Pulling the brake caliper towards the outer side of the vehicle and tighten bolt A first then
bolt B.
Torque: 78 N.m (800 kgf.cm, 58 ft.lbf)
Page 1188 of 4500
Fig. 212: Installing Hole Plug
Courtesy of TOYOTA MOTOR SALES, U.S.A., INC.
22.INSTALL REAR DISC BRAKE CALIPER ASSY LH
a. Temporarily tighten the brake caliper with the 2 new bolts.
b. Pulling the brake caliper towards the outer side of the vehicle and tighten bolt A first then bolt B.
Torque: 78 N.m (800 kgf.cm, 58 ft.lbf)
Page 2007 of 4500

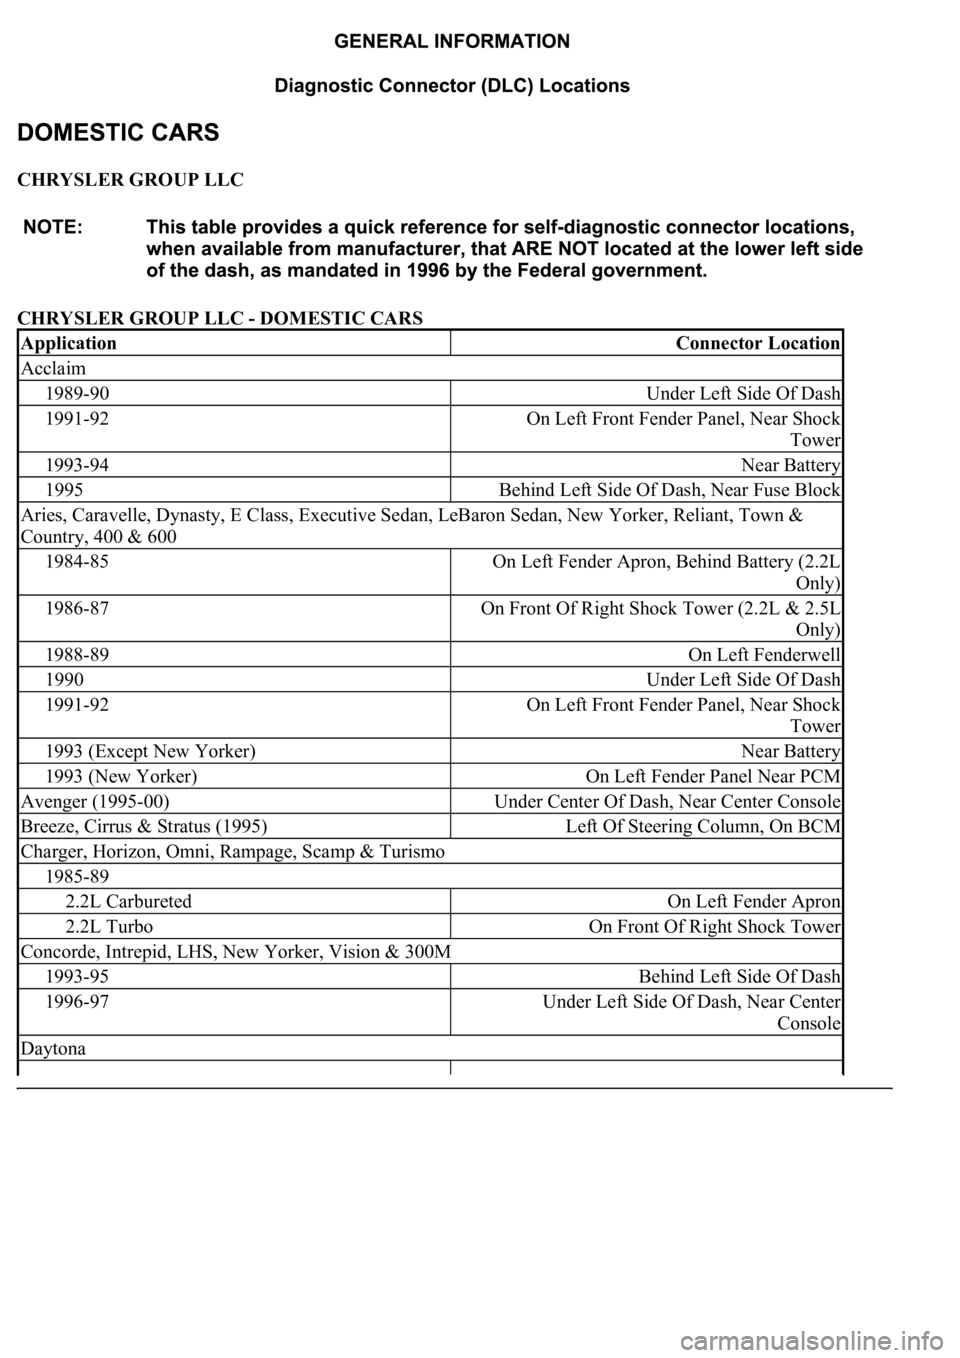
CHRYSLER GROUP LLC
CHRYSLER GROUP LLC - DOMESTIC CARS
ApplicationConnector Location
Acclaim
1989-90Under Left Side Of Dash
1991-92On Left Front Fender Panel, Near Shock
Tower
1993-94Near Battery
1995Behind Left Side Of Dash, Near Fuse Block
Aries, Caravelle, Dynasty, E Class, Executive Sedan, LeBaron Sedan, New Yorker, Reliant, Town &
Country, 400 & 600
1984-85On Left Fender Apron, Behind Battery (2.2L
Only)
1986-87On Front Of Right Shock Tower (2.2L & 2.5L
Only)
1988-89On Left Fenderwell
1990Under Left Side Of Dash
1991-92On Left Front Fender Panel, Near Shock
Tower
1993 (Except New Yorker)Near Battery
1993 (New Yorker)On Left Fender Panel Near PCM
Avenger (1995-00)Under Center Of Dash, Near Center Console
Breeze, Cirrus & Stratus (1995)Left Of Steering Column, On BCM
Charger, Horizon, Omni, Rampage, Scamp & Turismo
1985-89
2.2L CarburetedOn Left Fender Apron
2.2L TurboOn Front Of Right Shock Tower
Concorde, Intrepid, LHS, New Yorker, Vision & 300M
1993-95Behind Left Side Of Dash
1996-97Under Left Side Of Dash, Near Center
Console
Daytona
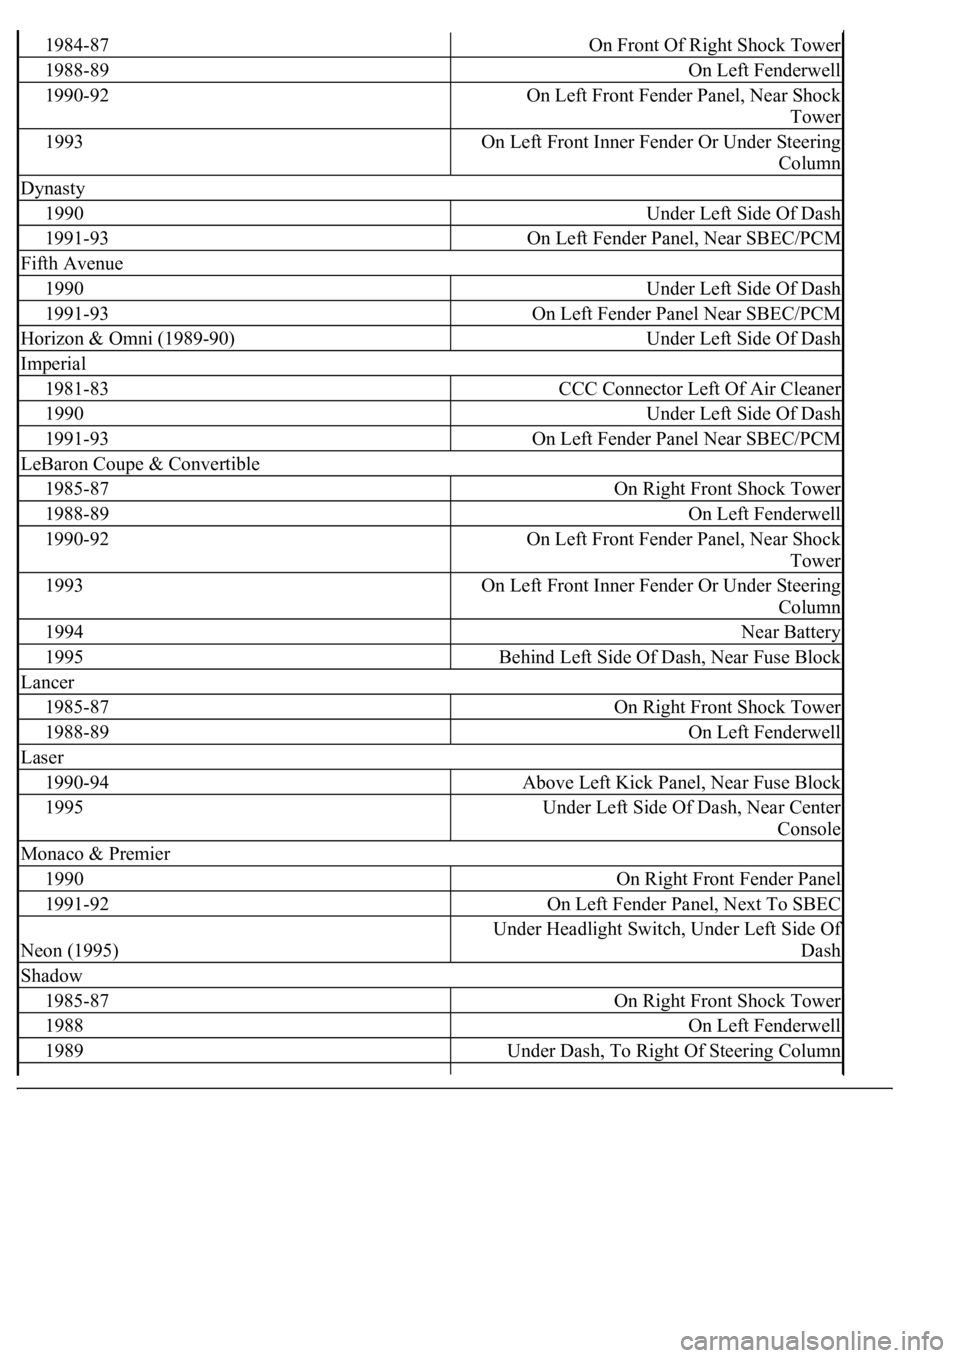
Page 2008 of 4500

1984-87On Front Of Right Shock Tower
1988-89On Left Fenderwell
1990-92On Left Front Fender Panel, Near Shock
Tower
1993On Left Front Inner Fender Or Under Steering
Column
Dynasty
1990Under Left Side Of Dash
1991-93On Left Fender Panel, Near SBEC/PCM
Fifth Avenue
1990Under Left Side Of Dash
1991-93On Left Fender Panel Near SBEC/PCM
Horizon & Omni (1989-90)Under Left Side Of Dash
Imperial
1981-83CCC Connector Left Of Air Cleaner
1990Under Left Side Of Dash
1991-93On Left Fender Panel Near SBEC/PCM
LeBaron Coupe & Convertible
1985-87On Right Front Shock Tower
1988-89On Left Fenderwell
1990-92On Left Front Fender Panel, Near Shock
Tower
1993On Left Front Inner Fender Or Under Steering
Column
1994Near Battery
1995Behind Left Side Of Dash, Near Fuse Block
Lancer
1985-87On Right Front Shock Tower
1988-89On Left Fenderwell
Laser
1990-94Above Left Kick Panel, Near Fuse Block
1995Under Left Side Of Dash, Near Center
Console
Monaco & Premier
1990On Right Front Fender Panel
1991-92On Left Fender Panel, Next To SBEC
Neon (1995)
Under Headlight Switch, Under Left Side Of
Dash
Shadow
1985-87On Right Front Shock Tower
1988On Left Fenderwell
1989Under Dash, To Right Of Steering Column