2003 LEXUS LS430 turn signal
[x] Cancel search: turn signalPage 3961 of 4500
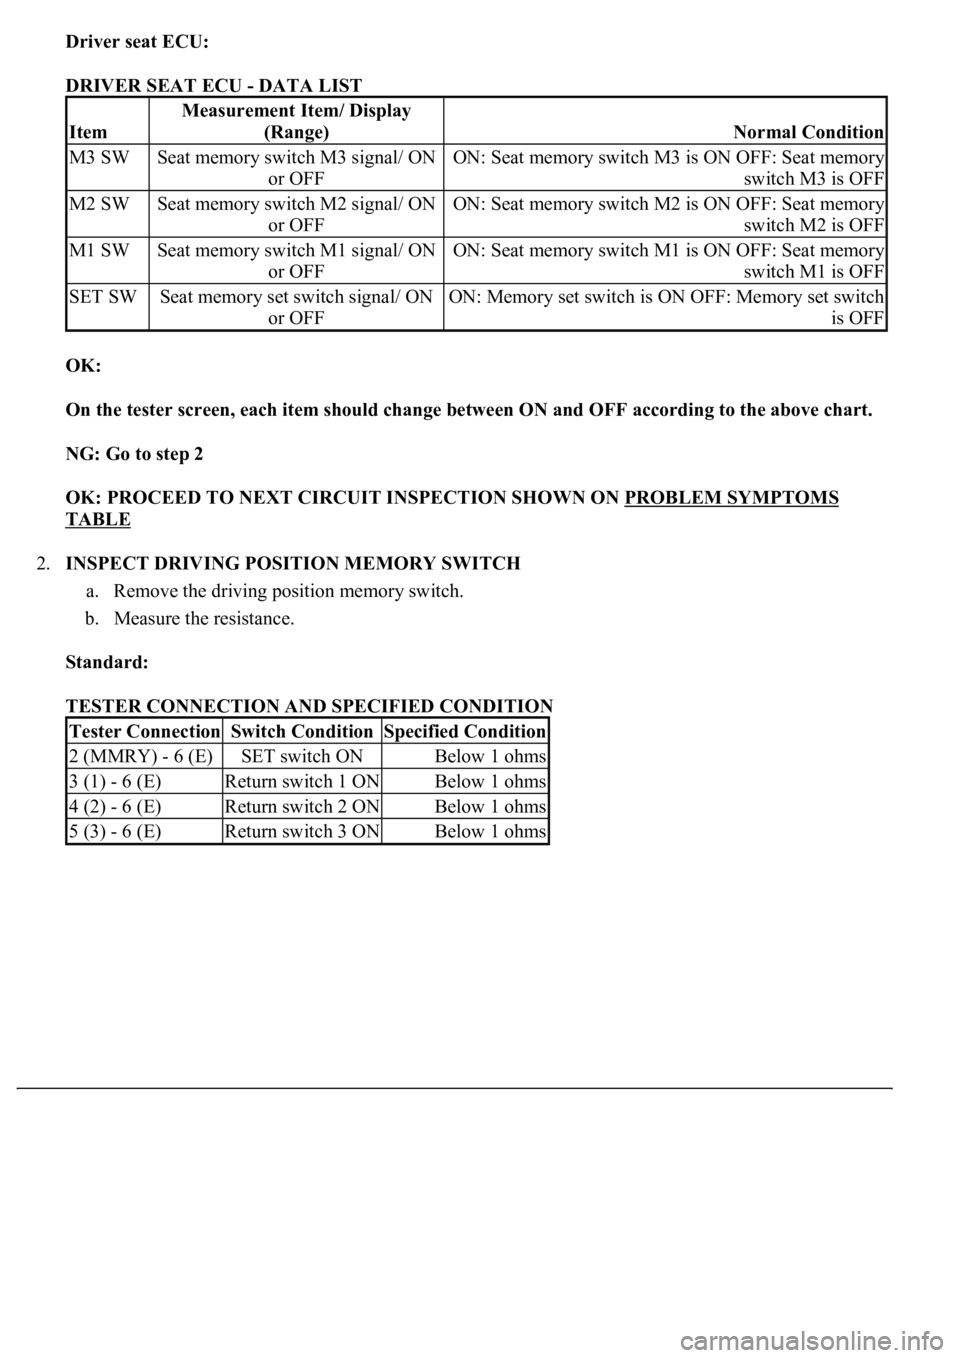
Driver seat ECU:
DRIVER SEAT ECU - DATA LIST
OK:
On the tester screen, each item should change between ON and OFF according to the above chart.
NG: Go to step 2
OK: PROCEED TO NEXT CIRCUIT INSPECTION SHOWN ON PROBLEM SYMPTOMS
TABLE
2.INSPECT DRIVING POSITION MEMORY SWITCH
a. Remove the driving position memory switch.
b. Measure the resistance.
Standard:
TESTER CONNECTION AND SPECIFIED CONDITION
Item
Measurement Item/ Display
(Range)
Normal Condition
M3 SWSeat memory switch M3 signal/ ON
or OFFON: Seat memory switch M3 is ON OFF: Seat memory
switch M3 is OFF
M2 SWSeat memory switch M2 signal/ ON
or OFFON: Seat memory switch M2 is ON OFF: Seat memory
switch M2 is OFF
M1 SWSeat memory switch M1 signal/ ON
or OFFON: Seat memory switch M1 is ON OFF: Seat memory
switch M1 is OFF
SET SWSeat memory set switch signal/ ON
or OFFON: Memory set switch is ON OFF: Memory set switch
is OFF
Tester ConnectionSwitch ConditionSpecified Condition
2 (MMRY) - 6 (E)SET switch ONBelow 1 ohms
3 (1) - 6 (E)Return switch 1 ONBelow 1 ohms
4 (2) - 6 (E)Return switch 2 ONBelow 1 ohms
5 (3) - 6 (E)Return switch 3 ONBelow 1 ohms
Page 3970 of 4500
3. After the current has stopped, release the lumbar support switch and wait for approximately
60 seconds.
4. Operate the lumbar support switch and move the seat to the opposite extreme of direction in
step (1). Check that the motor operates.
7.CHECK MEMORY AND REACTIVATION FUNCTION
a. Turn the ignition switch ON and move the shift lever into the P position.
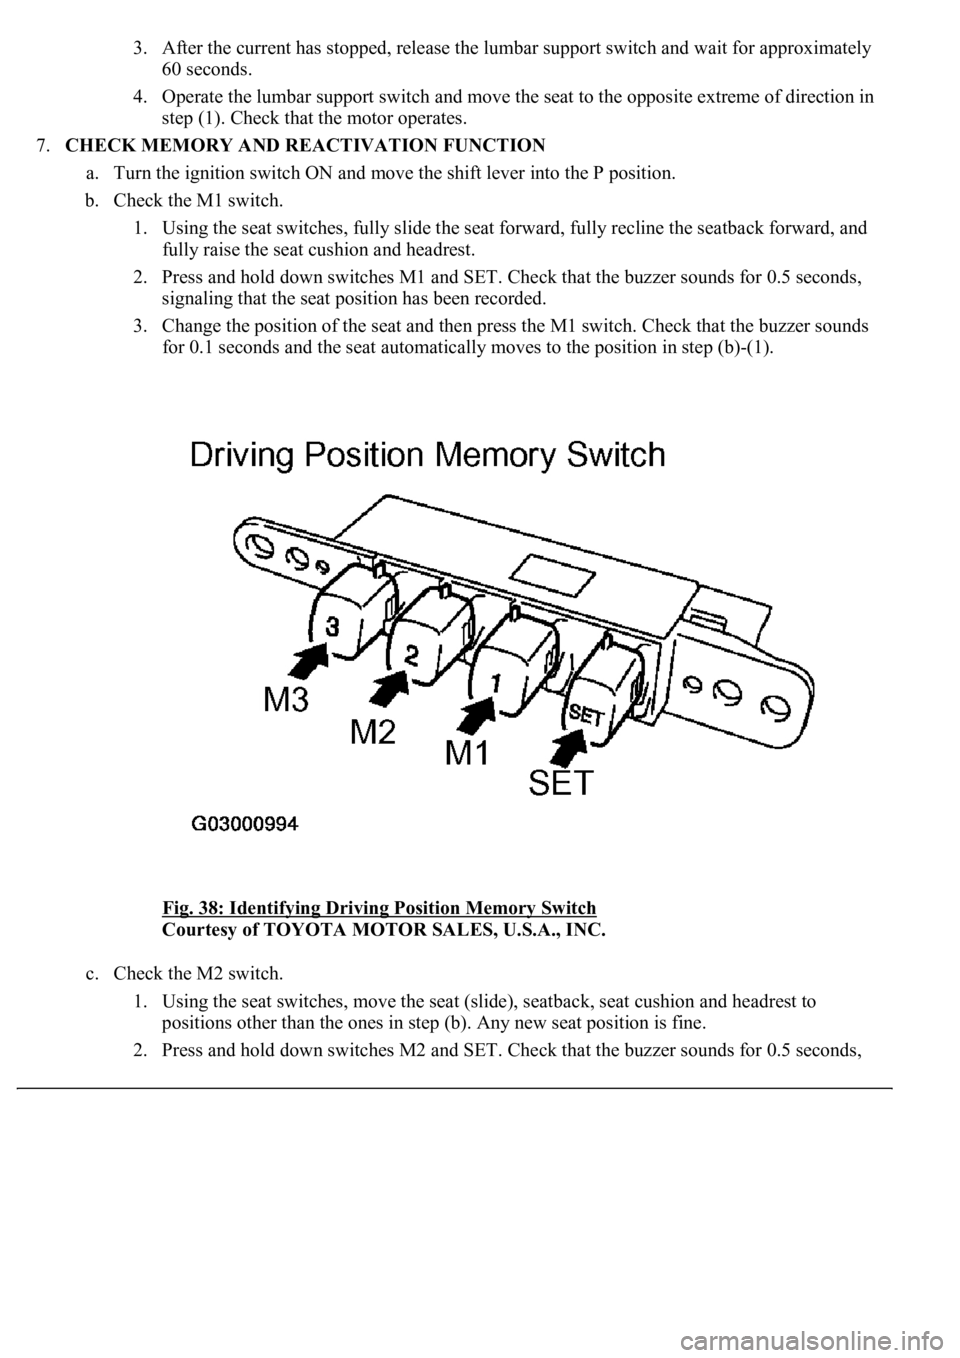
b. Check the M1 switch.
1. Using the seat switches, fully slide the seat forward, fully recline the seatback forward, and
fully raise the seat cushion and headrest.
2. Press and hold down switches M1 and SET. Check that the buzzer sounds for 0.5 seconds,
signaling that the seat position has been recorded.
3. Change the position of the seat and then press the M1 switch. Check that the buzzer sounds
for 0.1 seconds and the seat automatically moves to the position in step (b)-(1).
<0029004c004a001100030016001b001d0003002c0047004800510057004c0049005c004c0051004a000300270055004c0059004c0051004a0003003300520056004c0057004c00520051000300300048005000520055005c00030036005a004c0057004600
4b[
Courtesy of TOYOTA MOTOR SALES, U.S.A., INC.
c. Check the M2 switch.
1. Using the seat switches, move the seat (slide), seatback, seat cushion and headrest to
positions other than the ones in step (b). Any new seat position is fine.
2. Press and hold down switches M2 and SET. Check that the buzzer sounds for 0.5 seconds,
Page 3971 of 4500
signaling that the seat position has been recorded.
3. Change the position of the seat and then press the M2 switch. Check that the buzzer sounds
for 0.1 seconds and the seat automatically moves to the position in step (c)-(1).
d. Check the M3 switch.
1. Using the seat switches, fully slide the seat rearward, fully recline the seatback rearward and
fully lower the seat cushion and headrest.
2. Press and hold down switches M3 and SET. Check that the buzzer sounds for 0.5 seconds,
signaling that the seat position has been recorded.
3. Change the position of the seat and then press the M3 switch. Check that the buzzer sounds
for 0.1 seconds and the seat automatically moves to the position in step (d)-(1).
e. Check that the switches M1, M2 and M3 cause the seat to move to the recorded seat positions
under these conditions: turn the ignition switch to the LOCK position, remove the key from the key
cylinder, open the driver side door and press M1, M2 or M3 within 30 seconds.
f. Check that the following procedures will erase the recorded seat positions of switches M1, M2 and
M3: press and hold the power seat slide switch, disconnect the battery's negative terminal cable,
and wait for at least 1 minute.
g. Restore the seat's memory.
1. Using the seat switches, fully slide the seat forward, fully recline the seatback forward, and
fully raise the seat cushion and headrest.
2. Using the seat switches, fully slide the seat rearward, fully recline the seatback rearward and
fully lower the seat cushion and headrest.
HINT:
This will restore the seat's memory of the seat's maximum positions. However, it will not restore
any recorded seat positions to switches M1, M2 or M3.
h. Attempt to record a seat position by pressing and holding the SET switch and two other switches
<000b0044005000520051004a000300300014000f0003003000150003004400510047000300300016000c0011000300310052000300560048004400570003005300520056004c0057004c0052005100030056004b00520058004f0047000300450048000300
550048004600520055004700480047001100030026004b0048[ck this by pressing M1, M2 or
M3 and making sure that the seat does not move.
HINT:
This step will only be true if step (f) was performed properly, whereby all previously recorded set
positions were erased.
1.Passenger's seat:
INSPECT POWER SEAT SWITCH
a. Measure the resistance between the terminals when each switch is operated.
Standard:
Page 4082 of 4500
3.INSPECT BATTERY VOLTAGE
Standard: 11 to 14 V
If voltage is below 11 V, recharge the battery before proceeding.
1.DATA LIST
HINT:
Using the hand-held tester's DATA LIST allows switch, sensor, actuator and other item values to be read
without removing any parts. Reading the DATA LIST early in troubleshooting is one way to save time.
a. Connect the hand-held tester (with CAN VIM) to the DLC3.
b. Turn the ignition switch ON.
c. Read the DATA LIST on the tester's screen.
Driver side J/B ECU:
DRIVER SIDE J/B ECU
2.ACTIVE TEST
HINT:
Performing the hand-held tester's ACTIVE TEST allows relay, VSV, actuator and other items to be
operated without removing any parts. Performing the ACTIVE TEST early in troubleshooting is one way
to save time. The DATA LIST can be displayed during the ACTIVE TEST.
a. Connect the hand-held tester (with CAN VIM) to the DLC3.
b. Turn the ignition switch ON.
c. Perform the ACTIVE TEST accordin
g to the display on the tester.
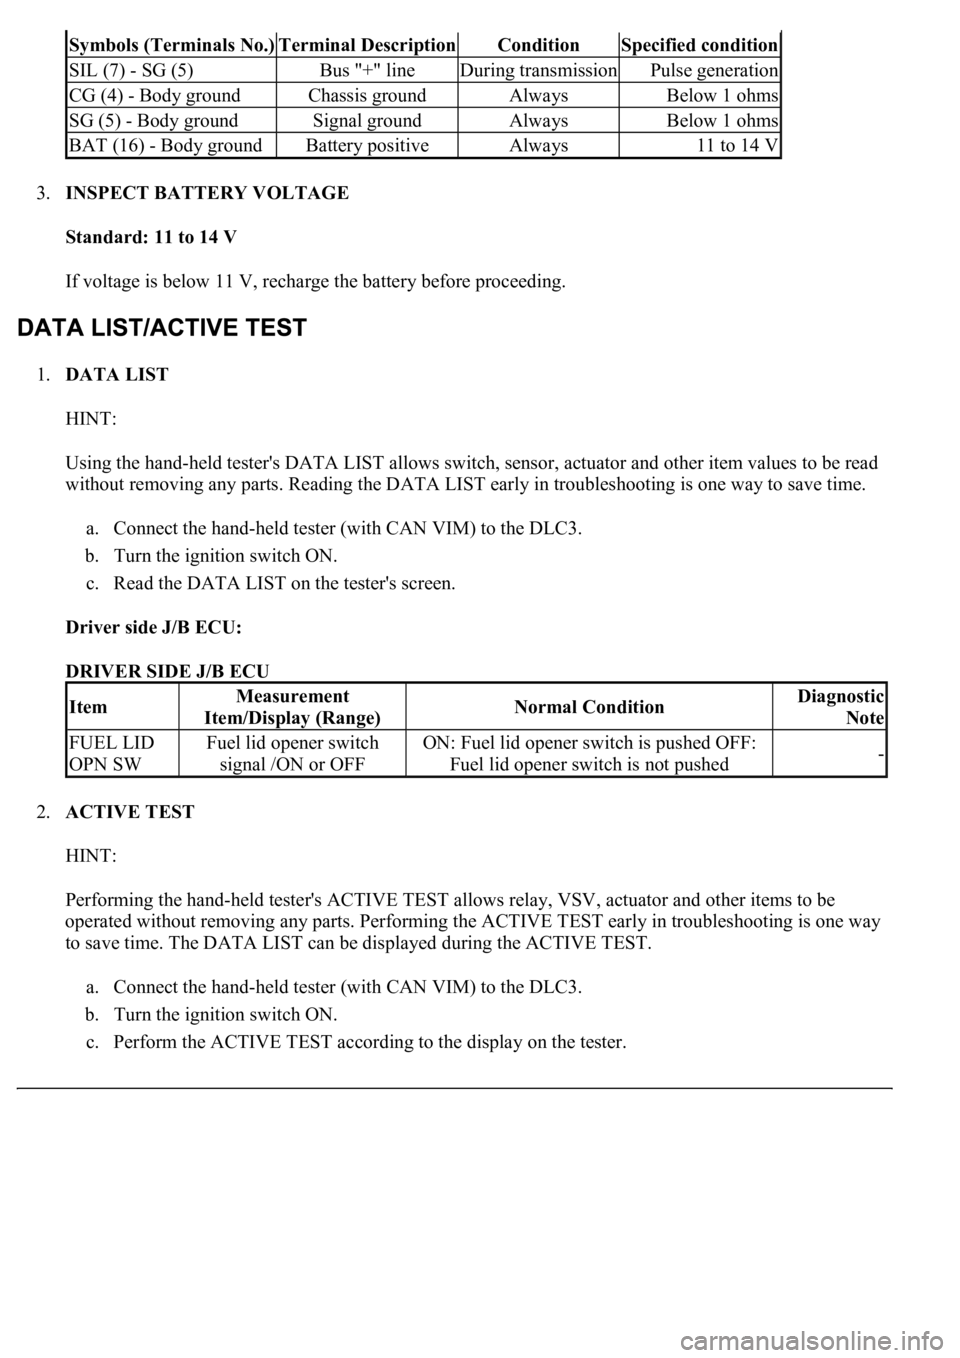
Symbols (Terminals No.)Terminal DescriptionConditionSpecified condition
SIL (7) - SG (5)Bus "+" lineDuring transmissionPulse generation
CG (4) - Body groundChassis groundAlwaysBelow 1 ohms
SG (5) - Body groundSignal groundAlwaysBelow 1 ohms
BAT (16) - Body groundBattery positiveAlways11 to 14 V
ItemMeasurement
Item/Display (Range)Normal ConditionDiagnostic
Note
FUEL LID
OPN SWFuel lid opener switch
signal /ON or OFFON: Fuel lid opener switch is pushed OFF:
Fuel lid opener switch is not pushed-
Page 4172 of 4500
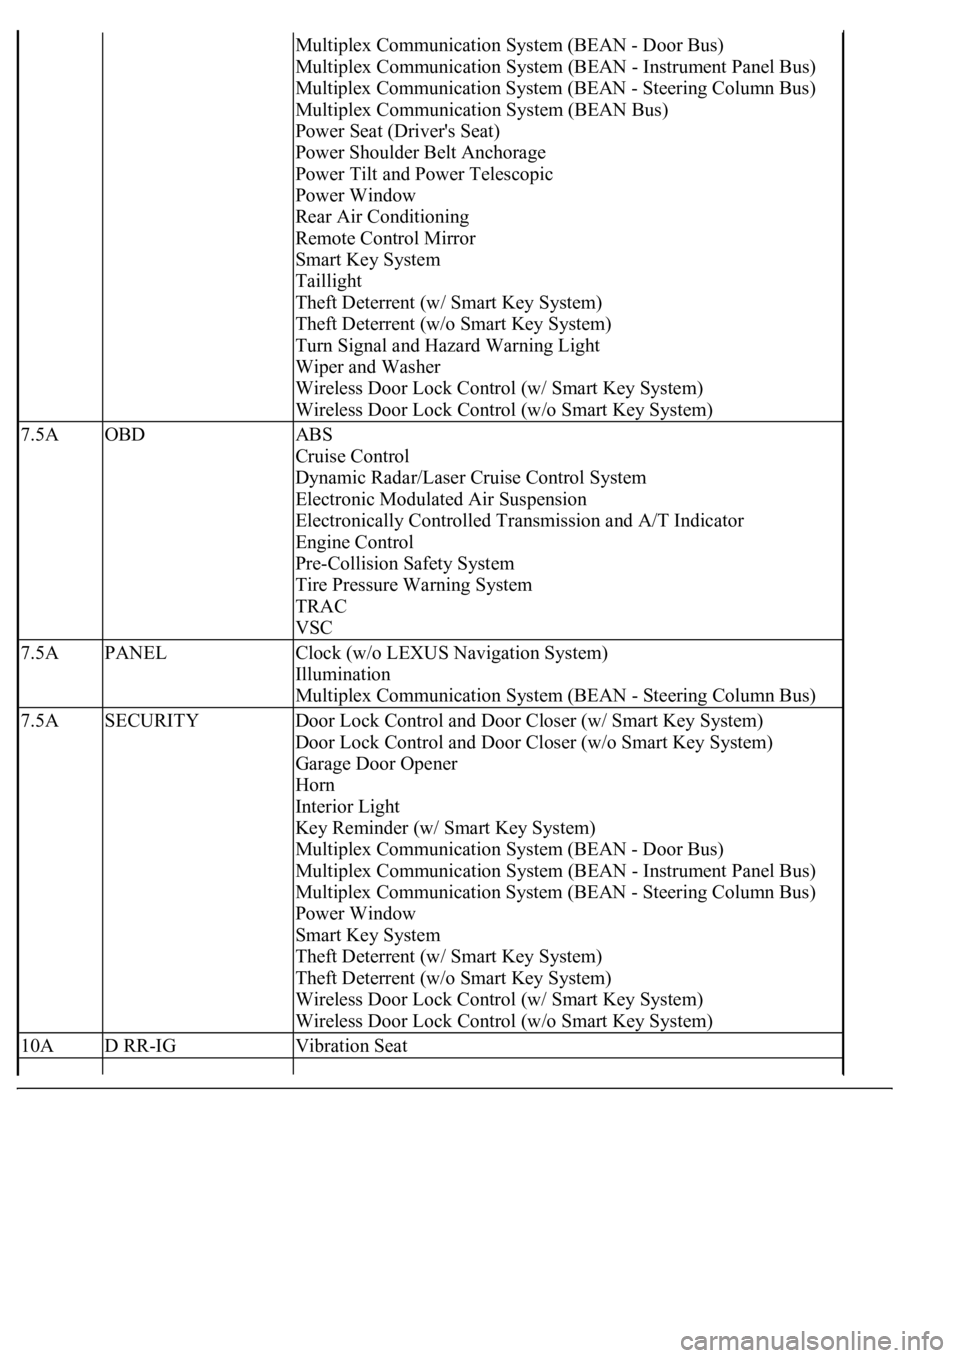
Multiplex Communication System (BEAN - Door Bus)
Multiplex Communication System (BEAN - Instrument Panel Bus)
Multiplex Communication System (BEAN - Steering Column Bus)
Multiplex Communication System (BEAN Bus)
Power Seat (Driver's Seat)
Power Shoulder Belt Anchorage
Power Tilt and Power Telescopic
Power Window
Rear Air Conditioning
Remote Control Mirror
Smart Key System
Taillight
Theft Deterrent (w/ Smart Key System)
Theft Deterrent (w/o Smart Key System)
Turn Signal and Hazard Warning Light
Wiper and Washer
Wireless Door Lock Control (w/ Smart Key System)
Wireless Door Lock Control (w/o Smart Key System)
7.5AOBDABS
Cruise Control
Dynamic Radar/Laser Cruise Control System
Electronic Modulated Air Suspension
Electronically Controlled Transmission and A/T Indicator
Engine Control
Pre-Collision Safety System
Tire Pressure Warning System
TRAC
VSC
7.5APANELClock (w/o LEXUS Navigation System)
Illumination
Multiplex Communication System (BEAN - Steering Column Bus)
7.5ASECURITYDoor Lock Control and Door Closer (w/ Smart Key System)
Door Lock Control and Door Closer (w/o Smart Key System)
Garage Door Opener
Horn
Interior Light
Key Reminder (w/ Smart Key System)
Multiplex Communication System (BEAN - Door Bus)
Multiplex Communication System (BEAN - Instrument Panel Bus)
Multiplex Communication System (BEAN - Steering Column Bus)
Power Window
Smart Key System
Theft Deterrent (w/ Smart Key System)
Theft Deterrent (w/o Smart Key System)
Wireless Door Lock Control (w/ Smart Key System)
Wireless Door Lock Control (w/o Smart Key System)
10AD RR-IGVibration Seat
Page 4176 of 4500
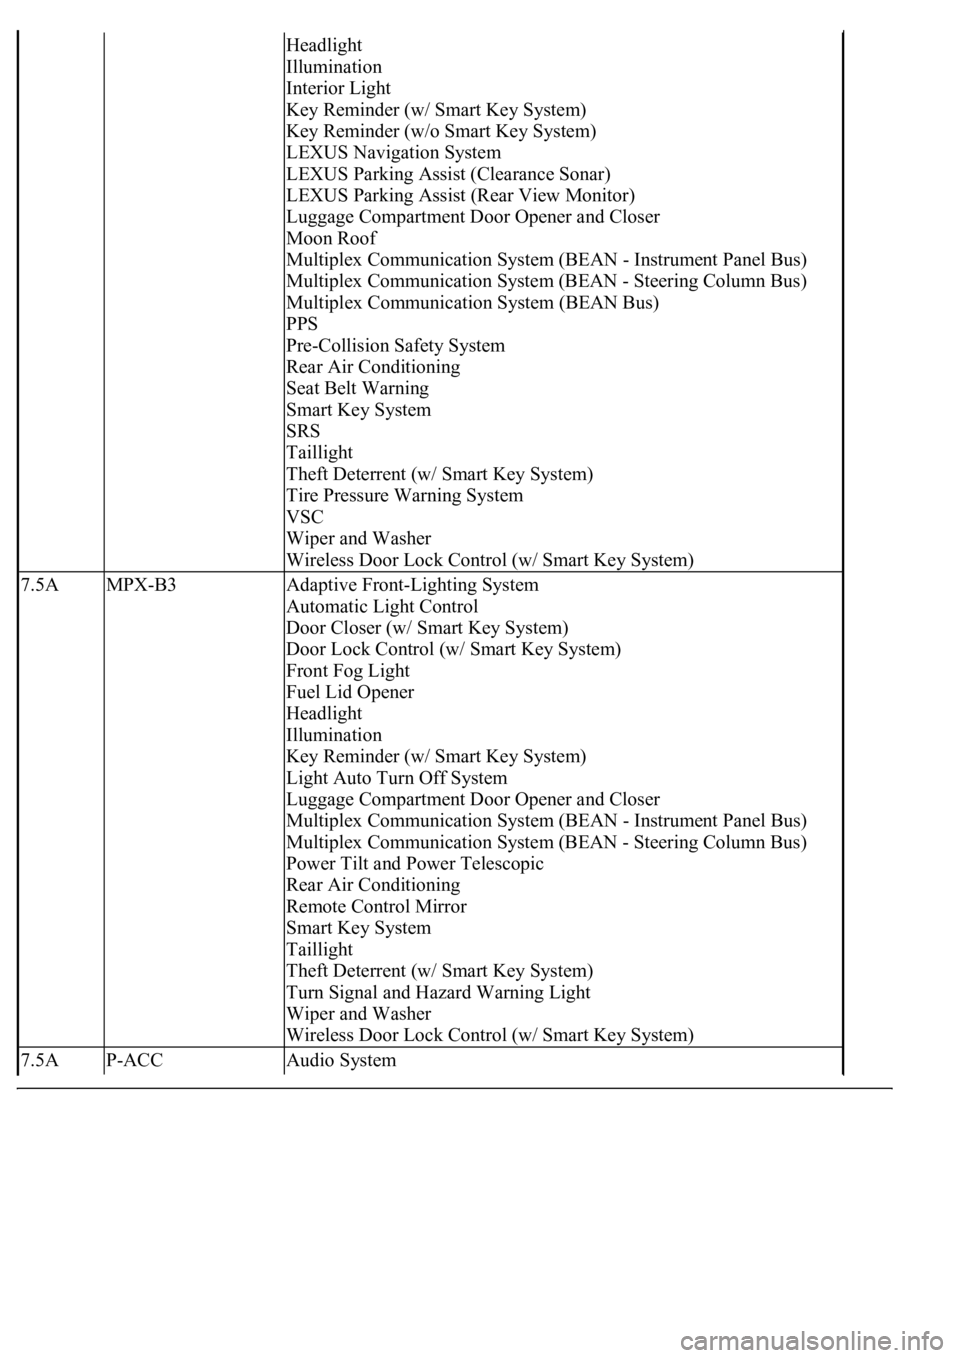
Headlight
Illumination
Interior Light
Key Reminder (w/ Smart Key System)
Key Reminder (w/o Smart Key System)
LEXUS Navigation System
LEXUS Parking Assist (Clearance Sonar)
LEXUS Parking Assist (Rear View Monitor)
Luggage Compartment Door Opener and Closer
Moon Roof
Multiplex Communication System (BEAN - Instrument Panel Bus)
Multiplex Communication System (BEAN - Steering Column Bus)
Multiplex Communication System (BEAN Bus)
PPS
Pre-Collision Safety System
Rear Air Conditioning
Seat Belt Warning
Smart Key System
SRS
Taillight
Theft Deterrent (w/ Smart Key System)
Tire Pressure Warning System
VSC
Wiper and Washer
Wireless Door Lock Control (w/ Smart Key System)
7.5AMPX-B3Adaptive Front-Lighting System
Automatic Light Control
Door Closer (w/ Smart Key System)
Door Lock Control (w/ Smart Key System)
Front Fog Light
Fuel Lid Opener
Headlight
Illumination
Key Reminder (w/ Smart Key System)
Light Auto Turn Off System
Luggage Compartment Door Opener and Closer
Multiplex Communication System (BEAN - Instrument Panel Bus)
Multiplex Communication System (BEAN - Steering Column Bus)
Power Tilt and Power Telescopic
Rear Air Conditioning
Remote Control Mirror
Smart Key System
Taillight
Theft Deterrent (w/ Smart Key System)
Turn Signal and Hazard Warning Light
Wiper and Washer
Wireless Door Lock Control (w/ Smart Key System)
7.5AP-ACCAudio System
Page 4178 of 4500
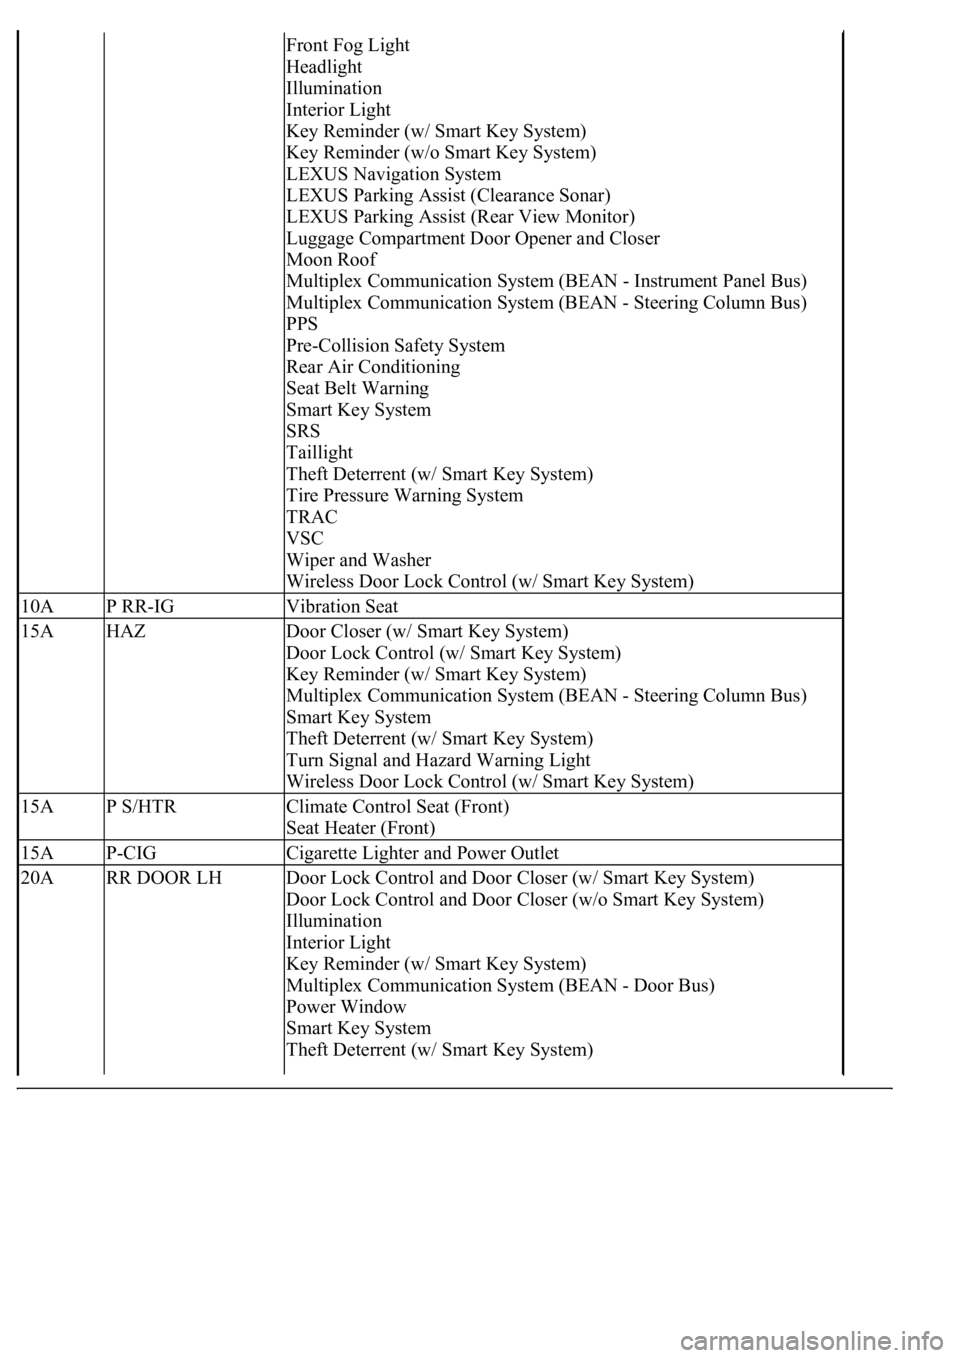
Front Fog Light
Headlight
Illumination
Interior Light
Key Reminder (w/ Smart Key System)
Key Reminder (w/o Smart Key System)
LEXUS Navigation System
LEXUS Parking Assist (Clearance Sonar)
LEXUS Parking Assist (Rear View Monitor)
Luggage Compartment Door Opener and Closer
Moon Roof
Multiplex Communication System (BEAN - Instrument Panel Bus)
Multiplex Communication System (BEAN - Steering Column Bus)
PPS
Pre-Collision Safety System
Rear Air Conditioning
Seat Belt Warning
Smart Key System
SRS
Taillight
Theft Deterrent (w/ Smart Key System)
Tire Pressure Warning System
TRAC
VSC
Wiper and Washer
Wireless Door Lock Control (w/ Smart Key System)
10AP RR-IGVibration Seat
15AHAZDoor Closer (w/ Smart Key System)
Door Lock Control (w/ Smart Key System)
Key Reminder (w/ Smart Key System)
Multiplex Communication System (BEAN - Steering Column Bus)
Smart Key System
Theft Deterrent (w/ Smart Key System)
Turn Signal and Hazard Warning Light
Wireless Door Lock Control (w/ Smart Key System)
15AP S/HTRClimate Control Seat (Front)
Seat Heater (Front)
15AP-CIGCigarette Lighter and Power Outlet
20ARR DOOR LHDoor Lock Control and Door Closer (w/ Smart Key System)
Door Lock Control and Door Closer (w/o Smart Key System)
Illumination
Interior Light
Key Reminder (w/ Smart Key System)
Multiplex Communication System (BEAN - Door Bus)
Power Window
Smart Key System
Theft Deterrent (w/ Smart Key System)
Page 4353 of 4500
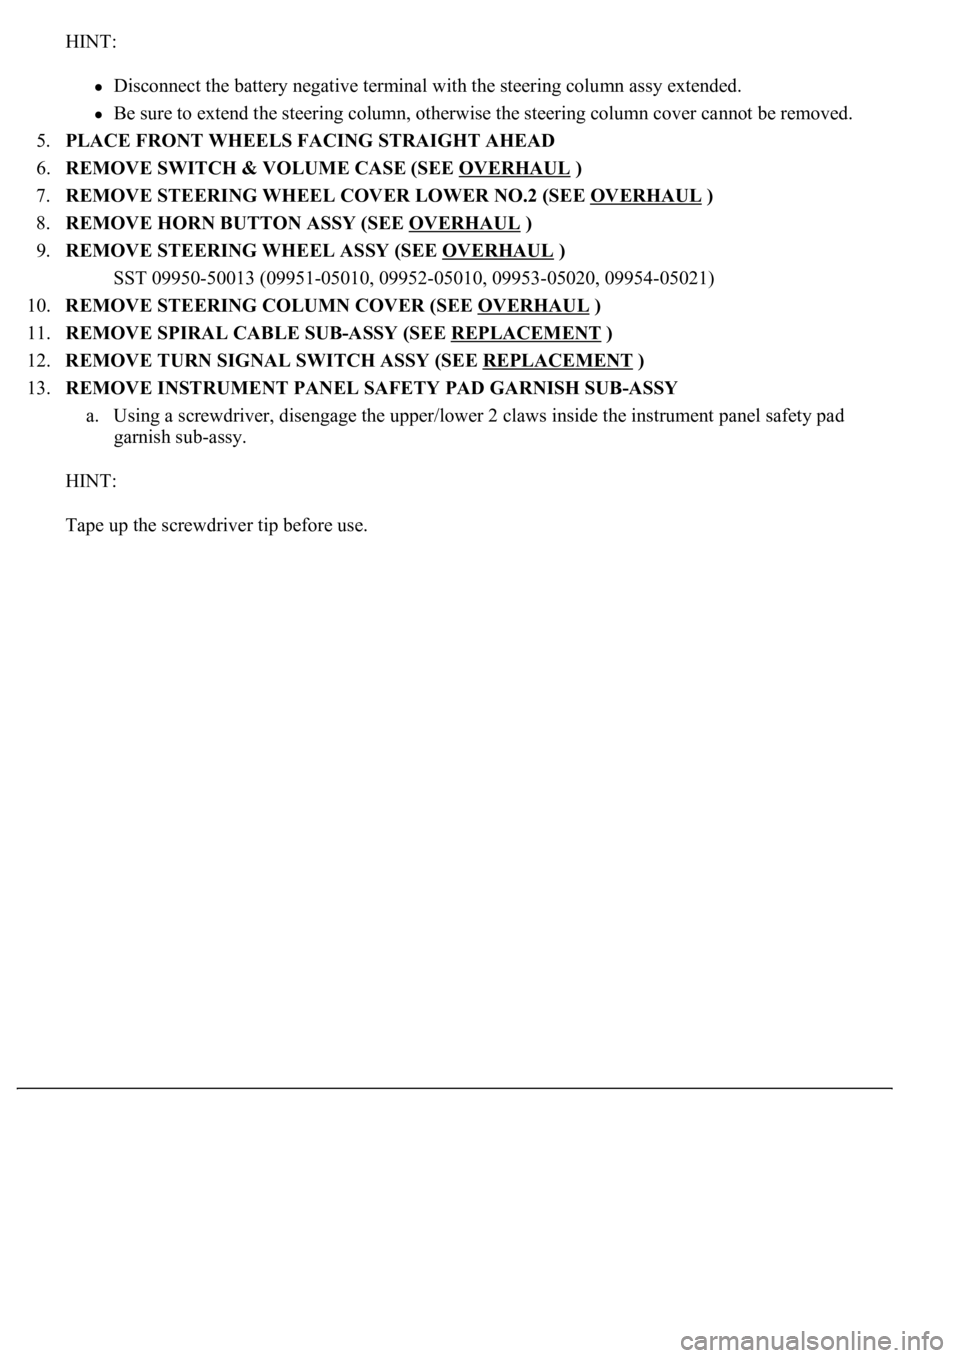
HINT:
Disconnect the battery negative terminal with the steering column assy extended.
Be sure to extend the steering column, otherwise the steering column cover cannot be removed.
5.PLACE FRONT WHEELS FACING STRAIGHT AHEAD
6.REMOVE SWITCH & VOLUME CASE (SEE OVERHAUL
)
7.REMOVE STEERING WHEEL COVER LOWER NO.2 (SEE OVERHAUL
)
8.REMOVE HORN BUTTON ASSY (SEE OVERHAUL
)
9.REMOVE STEERING WHEEL ASSY (SEE OVERHAUL
)
<00360036003700030013001c001c001800130010001800130013001400160003000b0013001c001c00180014001000130018001300140013000f00030013001c001c00180015001000130018001300140013000f00030013001c001c001800160010001300
18001300150013000f00030013001c001c0018001700100013[5021)
10.REMOVE STEERING COLUMN COVER (SEE OVERHAUL
)
11.REMOVE SPIRAL CABLE SUB-ASSY (SEE REPLACEMENT
)
12.REMOVE TURN SIGNAL SWITCH ASSY (SEE REPLACEMENT
)
13.REMOVE INSTRUMENT PANEL SAFETY PAD GARNISH SUB-ASSY
a. Using a screwdriver, disengage the upper/lower 2 claws inside the instrument panel safety pad
garnish sub-assy.
HINT:
Tape up the screwdriver tip before use.