2003 DODGE RAM key
[x] Cancel search: keyPage 1773 of 2895
OPERATION
The purpose of the fuel transfer pump is to supply
(transfer) a low-pressure fuel source:fromthe fuel
tank,throughthe fuel filter/water separator andto
the fuel injection pump. Here, the low-pressure is
raised to a high-pressure by the fuel injection pump
for operation of the high-pressure fuel injectors.
Check valves within the pump, control direction of
fuel flow and prevent fuel bleed-back during engine
shut down.
Maximum current flow to the pump is 5 amperes.
With the engine running, the pump has a 100 per-
cent duty-cycle with a minimum pressure of 11.5 psi.
The transfer pump is self-priming: When the key is
first turned on (without cranking engine), the pump
will operate for approximately 1/2 second and then
shut off. The pump will also operate for up to 25 sec-
onds after the starter is engaged, and then disen-
gaged and the engine is not running. The pump
shuts off immediately if the key is on and the engine
stops running.
The fuel volume of the transfer pump will always
provide more fuel than the fuel injection pump
requires. Excess fuel is returned from the injection
pump through an overflow valve, and then back to
the fuel tank.
REMOVAL
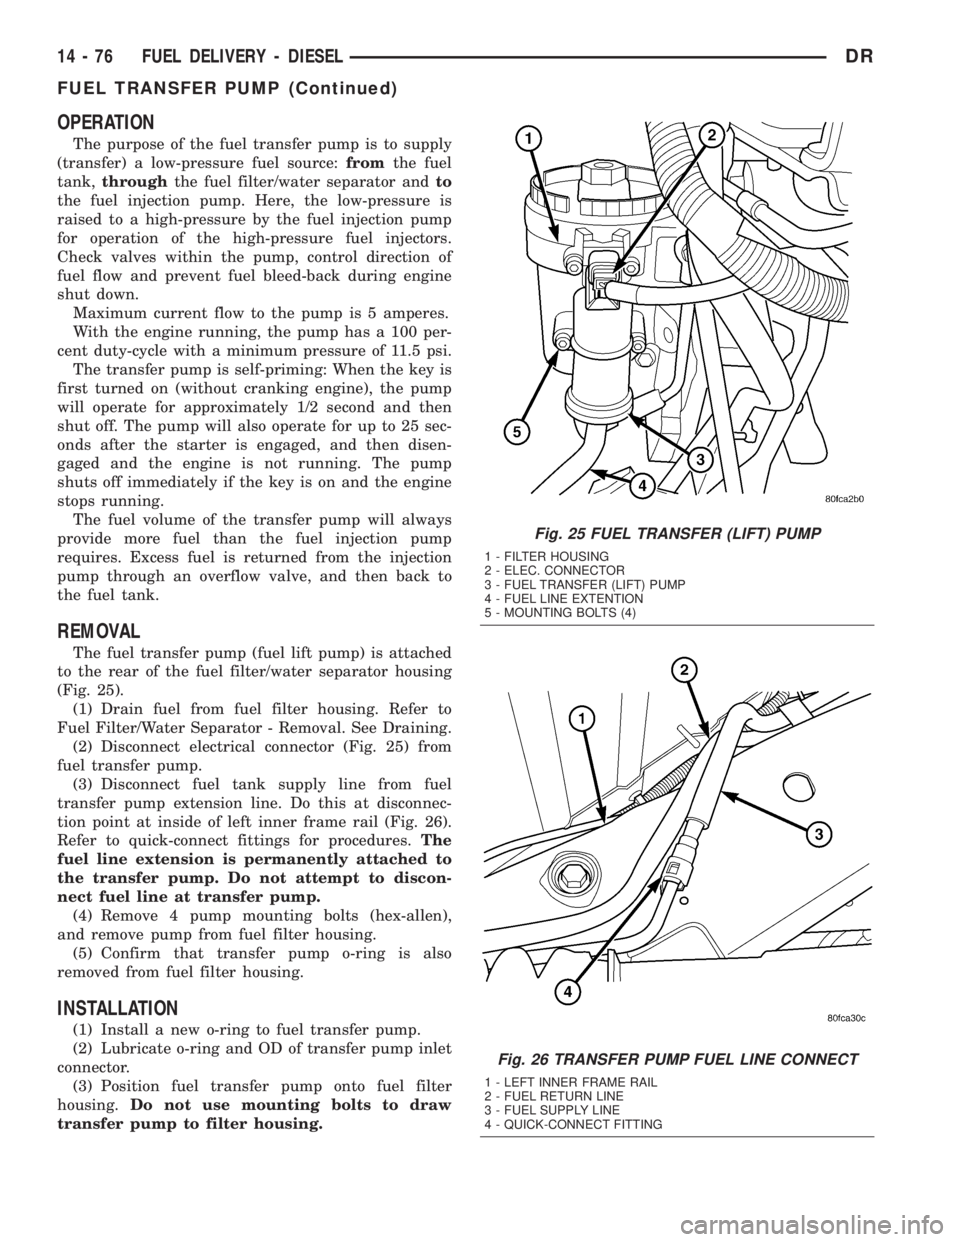
The fuel transfer pump (fuel lift pump) is attached
to the rear of the fuel filter/water separator housing
(Fig. 25).
(1) Drain fuel from fuel filter housing. Refer to
Fuel Filter/Water Separator - Removal. See Draining.
(2) Disconnect electrical connector (Fig. 25) from
fuel transfer pump.
(3) Disconnect fuel tank supply line from fuel
transfer pump extension line. Do this at disconnec-
tion point at inside of left inner frame rail (Fig. 26).
Refer to quick-connect fittings for procedures.The
fuel line extension is permanently attached to
the transfer pump. Do not attempt to discon-
nect fuel line at transfer pump.
(4) Remove 4 pump mounting bolts (hex-allen),
and remove pump from fuel filter housing.
(5) Confirm that transfer pump o-ring is also
removed from fuel filter housing.
INSTALLATION
(1) Install a new o-ring to fuel transfer pump.
(2) Lubricate o-ring and OD of transfer pump inlet
connector.
(3) Position fuel transfer pump onto fuel filter
housing.Do not use mounting bolts to draw
transfer pump to filter housing.
Fig. 25 FUEL TRANSFER (LIFT) PUMP
1 - FILTER HOUSING
2 - ELEC. CONNECTOR
3 - FUEL TRANSFER (LIFT) PUMP
4 - FUEL LINE EXTENTION
5 - MOUNTING BOLTS (4)
Fig. 26 TRANSFER PUMP FUEL LINE CONNECT
1 - LEFT INNER FRAME RAIL
2 - FUEL RETURN LINE
3 - FUEL SUPPLY LINE
4 - QUICK-CONNECT FITTING
14 - 76 FUEL DELIVERY - DIESELDR
FUEL TRANSFER PUMP (Continued)
Page 1774 of 2895
(4) Be sure pump is positioned flat to fuel filter
housing. Install mounting bolts and evenly tighten to
7 N´m (61 in. lbs.).
(5) Connect fuel line extension at fuel supply line.
(6) Connect electrical connector to pump.
(7)Prime System:Cycle key to actuate transfer
pump or use DRB II Scan Tool to actuate transfer
pump. Check for leaks.
(8) Operate engine and check for fuel leaks.
CASCADE OVERFLOW VALVE
DESCRIPTION
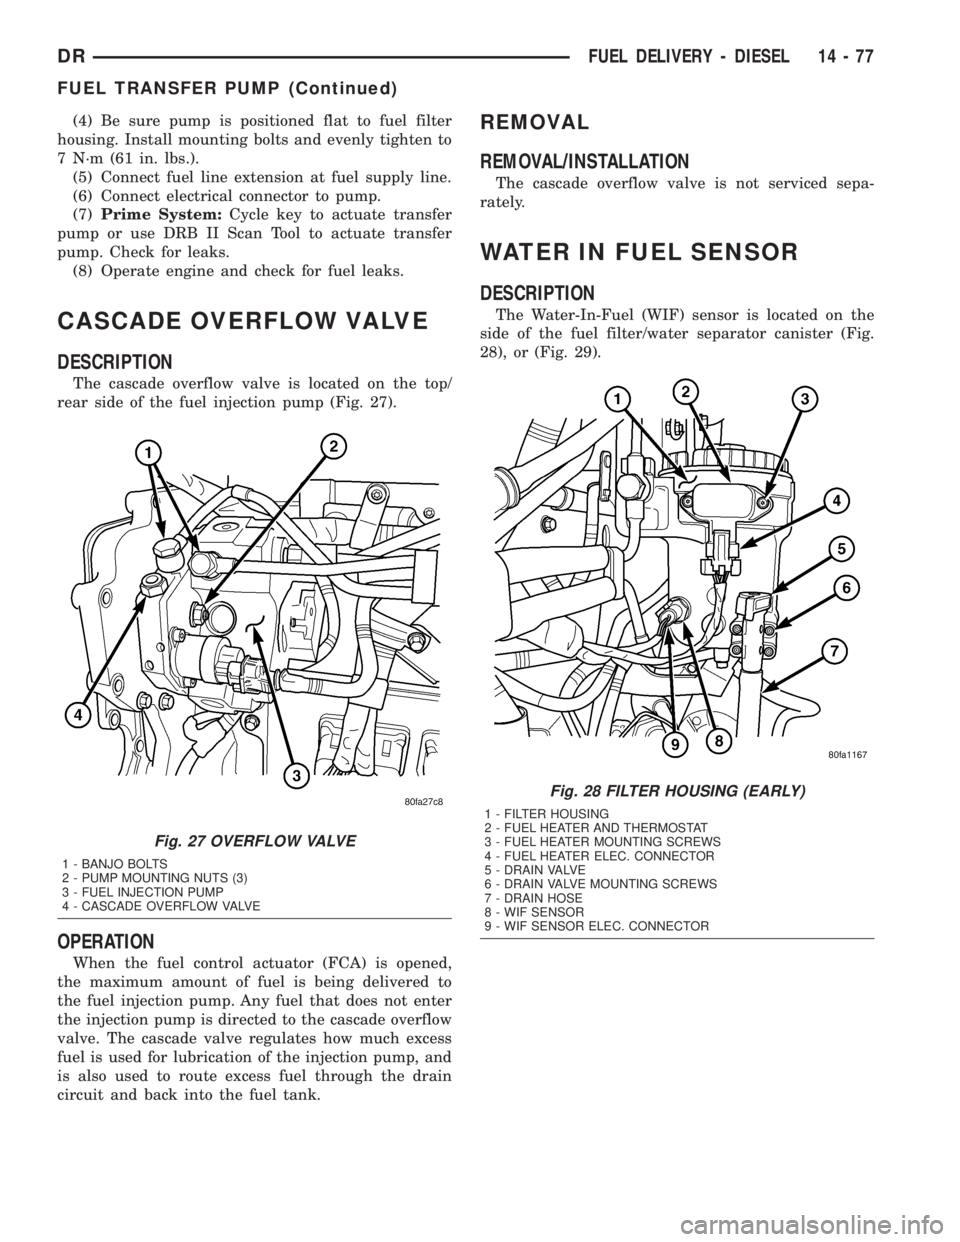
The cascade overflow valve is located on the top/
rear side of the fuel injection pump (Fig. 27).
OPERATION
When the fuel control actuator (FCA) is opened,
the maximum amount of fuel is being delivered to
the fuel injection pump. Any fuel that does not enter
the injection pump is directed to the cascade overflow
valve. The cascade valve regulates how much excess
fuel is used for lubrication of the injection pump, and
is also used to route excess fuel through the drain
circuit and back into the fuel tank.
REMOVAL
REMOVAL/INSTALLATION
The cascade overflow valve is not serviced sepa-
rately.
WATER IN FUEL SENSOR
DESCRIPTION
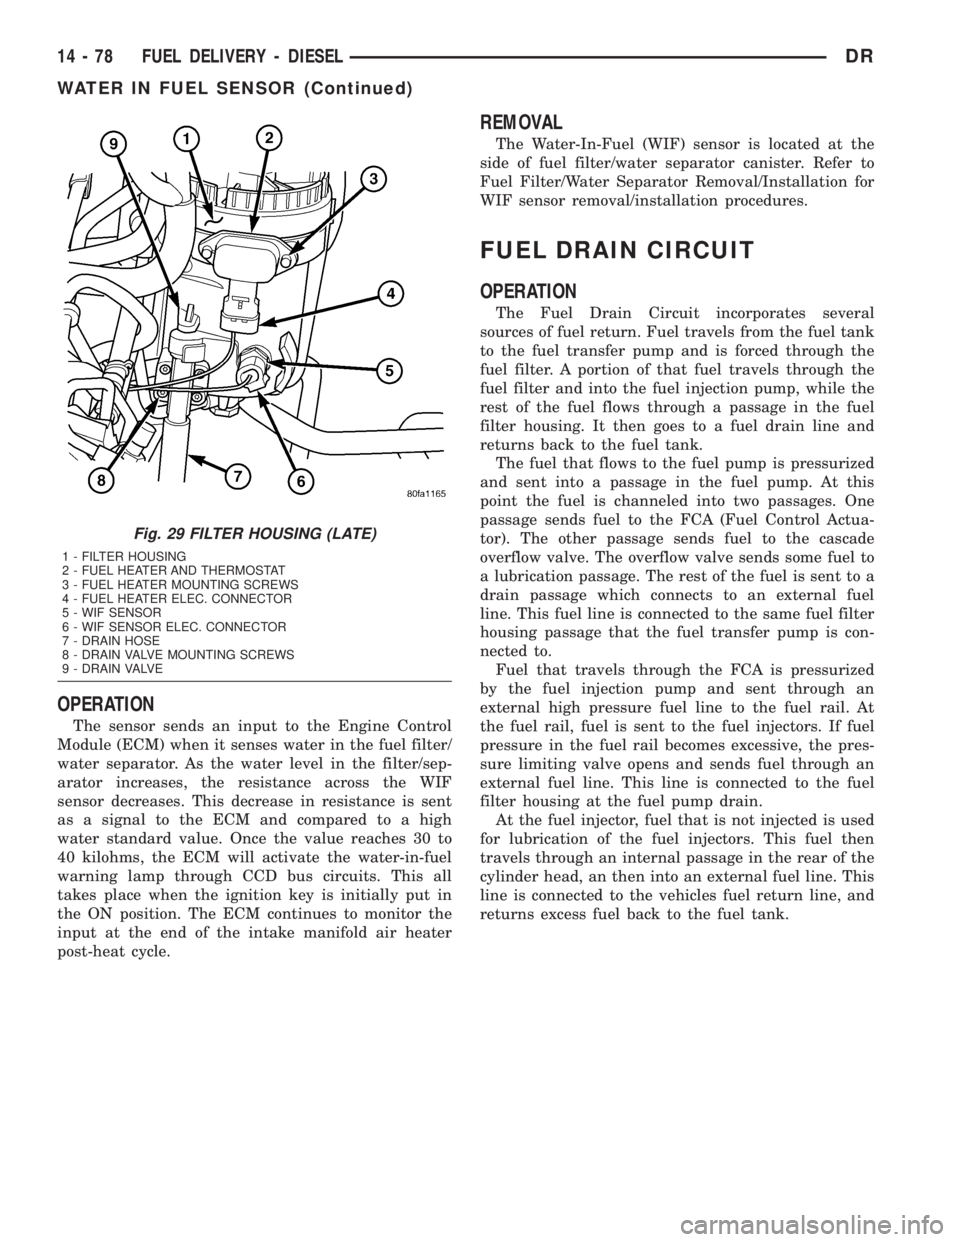
The Water-In-Fuel (WIF) sensor is located on the
side of the fuel filter/water separator canister (Fig.
28), or (Fig. 29).
Fig. 27 OVERFLOW VALVE
1 - BANJO BOLTS
2 - PUMP MOUNTING NUTS (3)
3 - FUEL INJECTION PUMP
4 - CASCADE OVERFLOW VALVE
Fig. 28 FILTER HOUSING (EARLY)
1 - FILTER HOUSING
2 - FUEL HEATER AND THERMOSTAT
3 - FUEL HEATER MOUNTING SCREWS
4 - FUEL HEATER ELEC. CONNECTOR
5 - DRAIN VALVE
6 - DRAIN VALVE MOUNTING SCREWS
7 - DRAIN HOSE
8 - WIF SENSOR
9 - WIF SENSOR ELEC. CONNECTOR
DRFUEL DELIVERY - DIESEL 14 - 77
FUEL TRANSFER PUMP (Continued)
Page 1775 of 2895
OPERATION
The sensor sends an input to the Engine Control
Module (ECM) when it senses water in the fuel filter/
water separator. As the water level in the filter/sep-
arator increases, the resistance across the WIF
sensor decreases. This decrease in resistance is sent
as a signal to the ECM and compared to a high
water standard value. Once the value reaches 30 to
40 kilohms, the ECM will activate the water-in-fuel
warning lamp through CCD bus circuits. This all
takes place when the ignition key is initially put in
the ON position. The ECM continues to monitor the
input at the end of the intake manifold air heater
post-heat cycle.
REMOVAL
The Water-In-Fuel (WIF) sensor is located at the
side of fuel filter/water separator canister. Refer to
Fuel Filter/Water Separator Removal/Installation for
WIF sensor removal/installation procedures.
FUEL DRAIN CIRCUIT
OPERATION
The Fuel Drain Circuit incorporates several
sources of fuel return. Fuel travels from the fuel tank
to the fuel transfer pump and is forced through the
fuel filter. A portion of that fuel travels through the
fuel filter and into the fuel injection pump, while the
rest of the fuel flows through a passage in the fuel
filter housing. It then goes to a fuel drain line and
returns back to the fuel tank.
The fuel that flows to the fuel pump is pressurized
and sent into a passage in the fuel pump. At this
point the fuel is channeled into two passages. One
passage sends fuel to the FCA (Fuel Control Actua-
tor). The other passage sends fuel to the cascade
overflow valve. The overflow valve sends some fuel to
a lubrication passage. The rest of the fuel is sent to a
drain passage which connects to an external fuel
line. This fuel line is connected to the same fuel filter
housing passage that the fuel transfer pump is con-
nected to.
Fuel that travels through the FCA is pressurized
by the fuel injection pump and sent through an
external high pressure fuel line to the fuel rail. At
the fuel rail, fuel is sent to the fuel injectors. If fuel
pressure in the fuel rail becomes excessive, the pres-
sure limiting valve opens and sends fuel through an
external fuel line. This line is connected to the fuel
filter housing at the fuel pump drain.
At the fuel injector, fuel that is not injected is used
for lubrication of the fuel injectors. This fuel then
travels through an internal passage in the rear of the
cylinder head, an then into an external fuel line. This
line is connected to the vehicles fuel return line, and
returns excess fuel back to the fuel tank.
Fig. 29 FILTER HOUSING (LATE)
1 - FILTER HOUSING
2 - FUEL HEATER AND THERMOSTAT
3 - FUEL HEATER MOUNTING SCREWS
4 - FUEL HEATER ELEC. CONNECTOR
5 - WIF SENSOR
6 - WIF SENSOR ELEC. CONNECTOR
7 - DRAIN HOSE
8 - DRAIN VALVE MOUNTING SCREWS
9 - DRAIN VALVE
14 - 78 FUEL DELIVERY - DIESELDR
WATER IN FUEL SENSOR (Continued)
Page 1779 of 2895
INSTALLATION
Early Diesel Engines
The APPS is serviced (replaced) as one assembly
including the lever, brackets and sensor. The APPS is
calibrated to its mounting bracket.
(1) Snap electrical connector into bottom of sensor.
(2) Position APPS assembly to engine and install 6
bolts. Tighten bolts to 24 N´m (18 ft. lbs.) torque.
(3) Connect wiring harness clip at bottom of
bracket.
(4) If equipped with an automatic transmission,
refer to Group 21, Transmission for transmission con-
trol cable installation procedures.
(5) Install speed control cable into mounting
bracket. Be sure pinch tabs have secured cable.
(6) Install throttle cable into mounting bracket. Be
sure pinch tabs have secured cable.
(7) Connect throttle cable at lever (snaps on).
(8) Connect speed control cable to lever by pushing
cable connector rearward onto lever pin while hold-
ing lever forward.
(9) Install cable cover.
(10) Connect both negative battery cables to both
batteries.
(11)ECM Calibration:Turn key to ON position.
Without starting engine, slowly press throttle pedal
to floor and then slowly release. This step must bedone (one time) to ensure accelerator pedal position
sensor calibration has been learned by ECM. If not
done, possible DTC's may be set.
(12) Use DRB III scan tool to erase any DTC's
from ECM.
Late Diesel Engines
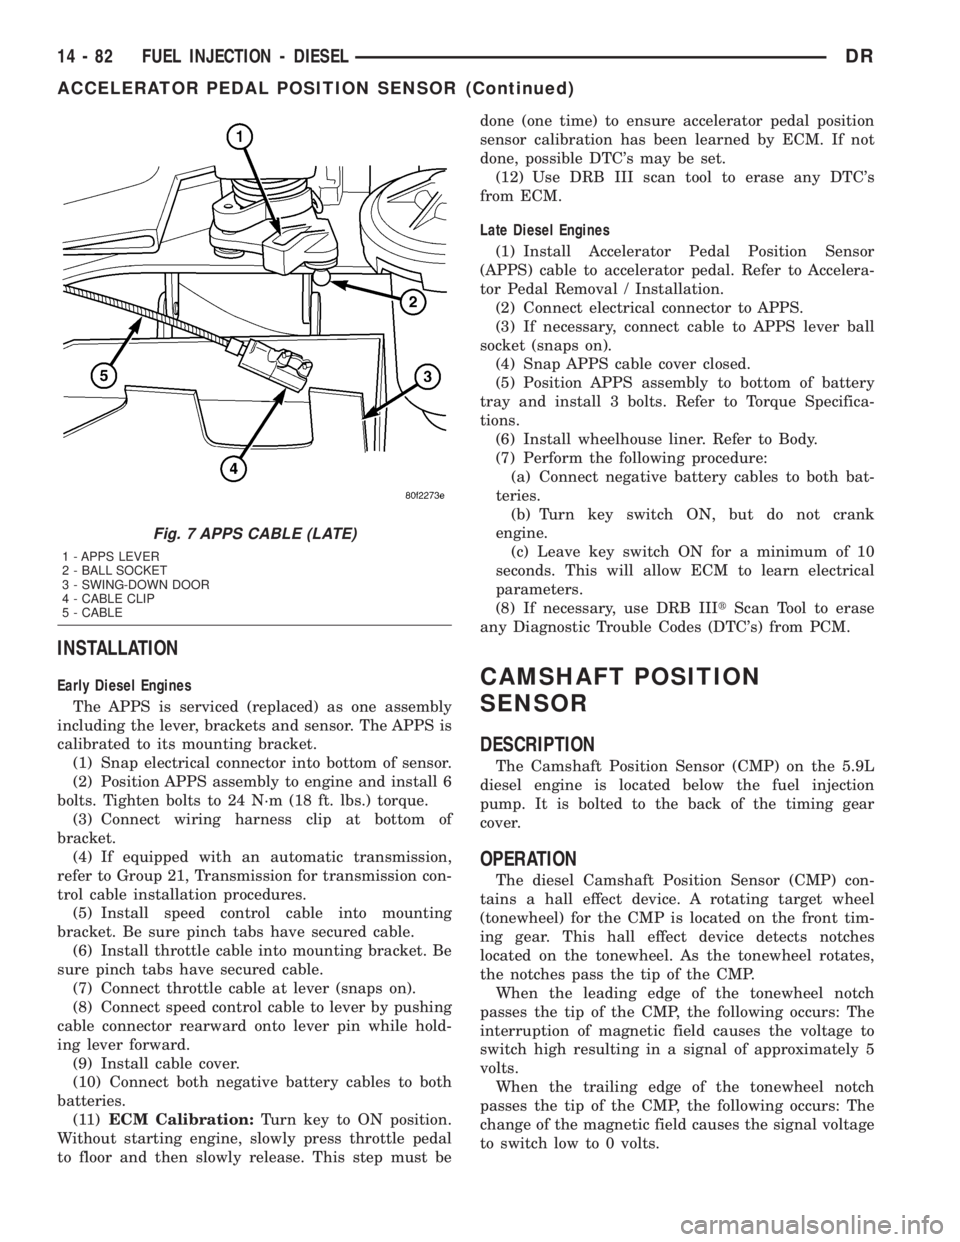
(1) Install Accelerator Pedal Position Sensor
(APPS) cable to accelerator pedal. Refer to Accelera-
tor Pedal Removal / Installation.
(2) Connect electrical connector to APPS.
(3) If necessary, connect cable to APPS lever ball
socket (snaps on).
(4) Snap APPS cable cover closed.
(5) Position APPS assembly to bottom of battery
tray and install 3 bolts. Refer to Torque Specifica-
tions.
(6) Install wheelhouse liner. Refer to Body.
(7) Perform the following procedure:
(a) Connect negative battery cables to both bat-
teries.
(b) Turn key switch ON, but do not crank
engine.
(c) Leave key switch ON for a minimum of 10
seconds. This will allow ECM to learn electrical
parameters.
(8) If necessary, use DRB IIItScan Tool to erase
any Diagnostic Trouble Codes (DTC's) from PCM.CAMSHAFT POSITION
SENSOR
DESCRIPTION
The Camshaft Position Sensor (CMP) on the 5.9L
diesel engine is located below the fuel injection
pump. It is bolted to the back of the timing gear
cover.
OPERATION
The diesel Camshaft Position Sensor (CMP) con-
tains a hall effect device. A rotating target wheel
(tonewheel) for the CMP is located on the front tim-
ing gear. This hall effect device detects notches
located on the tonewheel. As the tonewheel rotates,
the notches pass the tip of the CMP.
When the leading edge of the tonewheel notch
passes the tip of the CMP, the following occurs: The
interruption of magnetic field causes the voltage to
switch high resulting in a signal of approximately 5
volts.
When the trailing edge of the tonewheel notch
passes the tip of the CMP, the following occurs: The
change of the magnetic field causes the signal voltage
to switch low to 0 volts.
Fig. 7 APPS CABLE (LATE)
1 - APPS LEVER
2 - BALL SOCKET
3 - SWING-DOWN DOOR
4 - CABLE CLIP
5 - CABLE
14 - 82 FUEL INJECTION - DIESELDR
ACCELERATOR PEDAL POSITION SENSOR (Continued)
Page 1782 of 2895
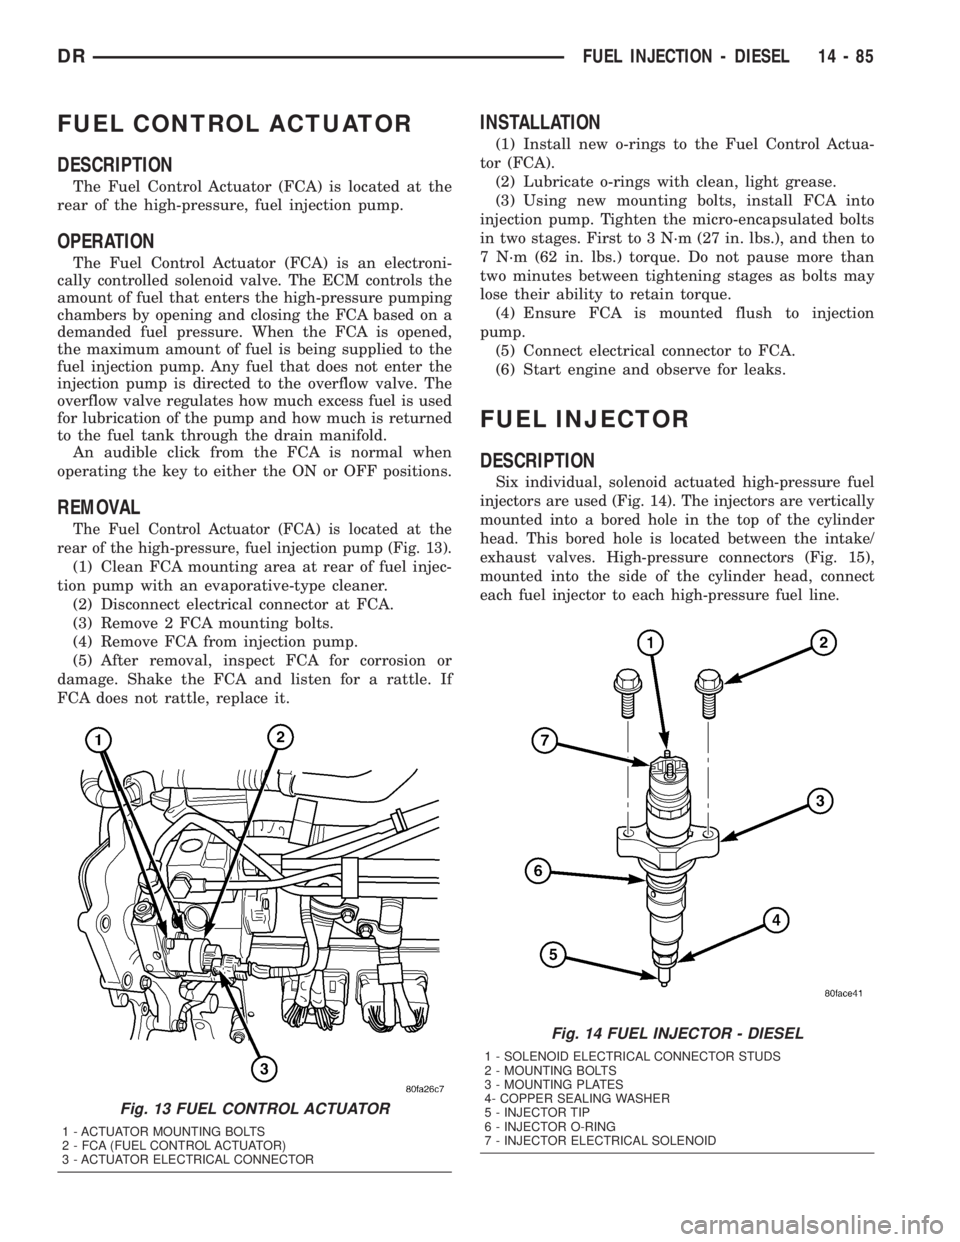
FUEL CONTROL ACTUATOR
DESCRIPTION
The Fuel Control Actuator (FCA) is located at the
rear of the high-pressure, fuel injection pump.
OPERATION
The Fuel Control Actuator (FCA) is an electroni-
cally controlled solenoid valve. The ECM controls the
amount of fuel that enters the high-pressure pumping
chambers by opening and closing the FCA based on a
demanded fuel pressure. When the FCA is opened,
the maximum amount of fuel is being supplied to the
fuel injection pump. Any fuel that does not enter the
injection pump is directed to the overflow valve. The
overflow valve regulates how much excess fuel is used
for lubrication of the pump and how much is returned
to the fuel tank through the drain manifold.
An audible click from the FCA is normal when
operating the key to either the ON or OFF positions.
REMOVAL
The Fuel Control Actuator (FCA) is located at the
rear of the high-pressure, fuel injection pump (Fig. 13).
(1) Clean FCA mounting area at rear of fuel injec-
tion pump with an evaporative-type cleaner.
(2) Disconnect electrical connector at FCA.
(3) Remove 2 FCA mounting bolts.
(4) Remove FCA from injection pump.
(5) After removal, inspect FCA for corrosion or
damage. Shake the FCA and listen for a rattle. If
FCA does not rattle, replace it.
INSTALLATION
(1) Install new o-rings to the Fuel Control Actua-
tor (FCA).
(2) Lubricate o-rings with clean, light grease.
(3) Using new mounting bolts, install FCA into
injection pump. Tighten the micro-encapsulated bolts
in two stages. First to 3 N´m (27 in. lbs.), and then to
7 N´m (62 in. lbs.) torque. Do not pause more than
two minutes between tightening stages as bolts may
lose their ability to retain torque.
(4) Ensure FCA is mounted flush to injection
pump.
(5) Connect electrical connector to FCA.
(6) Start engine and observe for leaks.
FUEL INJECTOR
DESCRIPTION
Six individual, solenoid actuated high-pressure fuel
injectors are used (Fig. 14). The injectors are vertically
mounted into a bored hole in the top of the cylinder
head. This bored hole is located between the intake/
exhaust valves. High-pressure connectors (Fig. 15),
mounted into the side of the cylinder head, connect
each fuel injector to each high-pressure fuel line.
Fig. 13 FUEL CONTROL ACTUATOR
1 - ACTUATOR MOUNTING BOLTS
2 - FCA (FUEL CONTROL ACTUATOR)
3 - ACTUATOR ELECTRICAL CONNECTOR
Fig. 14 FUEL INJECTOR - DIESEL
1 - SOLENOID ELECTRICAL CONNECTOR STUDS
2 - MOUNTING BOLTS
3 - MOUNTING PLATES
4- COPPER SEALING WASHER
5 - INJECTOR TIP
6 - INJECTOR O-RING
7 - INJECTOR ELECTRICAL SOLENOID
DRFUEL INJECTION - DIESEL 14 - 85
Page 1799 of 2895
COLUMN
TABLE OF CONTENTS
page page
COLUMN
DESCRIPTION..........................6
DIAGNOSIS AND TESTING - STEERING
COLUMN.............................7
REMOVAL.............................7
INSTALLATION..........................9
IGNITION SWITCH
DESCRIPTION..........................9
OPERATION............................9
DIAGNOSIS AND TESTING - IGNITION
SWITCH.............................9
REMOVAL.............................10
INSTALLATION.........................11
KEY-IN IGNITION SWITCH
DESCRIPTION.........................11
DIAGNOSIS AND TESTING - IGNITION
SWITCH AND KEY LOCK CYLINDER.......11
KEY CYLINDER
REMOVAL.............................12INSTALLATION.........................12
GEAR SHIFT LEVER
REMOVAL.............................12
INSTALLATION.........................12
UPPER STEERING COUPLING
REMOVAL.............................13
INSTALLATION.........................14
LOWER STEERING COUPLING
REMOVAL
REMOVAL - ALL LD & HD EXCEPT 4X4 HD . 14
REMOVAL - 4X4 HD...................14
INSTALLATION
INSTALLATION - ALL LD & HD EXCEPT 4X4
HD.................................15
INSTALLATION - 4X4 HD................15
STEERING WHEEL
REMOVAL.............................15
INSTALLATION.........................15
COLUMN
DESCRIPTION
NOTE: The steering column on vehicles with an
automatic transmission may not be equipped with
an internal locking shaft that allows the ignition key
cylinder to be locked with the key. Alternative meth-
ods of locking the steering wheel for service will
have to be used.
The tilt and standard column (Fig. 1) has been
designed to be serviced as an assembly; less wiring,
switches, shrouds, steering wheel, etc. Most steering
column components can be serviced without remov-
ing the steering column from the vehicle.
To service the steering wheel, switches or airbag,
refer to Restraints and follow all WARNINGS and
CAUTIONS.
WARNING: THE AIRBAG SYSTEM IS A SENSITIVE,
COMPLEX ELECTRO-MECHANICAL UNIT. BEFORE
ATTEMPTING TO DIAGNOSE, REMOVE OR INSTALL
THE AIRBAG SYSTEM COMPONENTS YOU MUST
FIRST DISCONNECT AND ISOLATE THE BATTERY
NEGATIVE (GROUND) CABLE. THEN WAIT TWO
MINUTES FOR THE SYSTEM CAPACITOR TO DIS-
CHARGE. FAILURE TO DO SO COULD RESULT IN
ACCIDENTAL DEPLOYMENT OF THE AIRBAG ANDPOSSIBLE PERSONAL INJURY. THE FASTENERS,
SCREWS, AND BOLTS, ORIGINALLY USED FOR
THE AIRBAG COMPONENTS, HAVE SPECIAL COAT-
INGS AND ARE SPECIFICALLY DESIGNED FOR THE
AIRBAG SYSTEM. THEY MUST NEVER BE
REPLACED WITH ANY SUBSTITUTES. ANYTIME A
NEW FASTENER IS NEEDED, REPLACE WITH THE
CORRECT FASTENERS PROVIDED IN THE SERVICE
PACKAGE OR FASTENERS LISTED IN THE PARTS
BOOKS.
CAUTION: Do not hammer on steering column
shaft. This may cause damage to the shaft or bear-
ing.
CAUTION: Do not attempt to remove the pivot bolts
to disassemble the tilting mechanism. Do not
remove shaft lock plate or plate retainer. This will
damage the column.
CAUTION: Do not attempt to remove or modify the
park lock slider or link.
NOTE: When servicing the steering wheel after
removing the old bolt a new bolt must be used
when installing.
19 - 6 COLUMNDR
Page 1802 of 2895
INSTALLATION
WARNING: BEFORE SERVICING THE STEERING
COLUMN THE AIRBAG SYSTEM MUST BE DIS-
ARMED. REFER TO ELECTRICAL RESTRAINT SYS-
TEM FOR SERVICE PROCEDURES. FAILURE TO DO
SO MAY RESULT IN ACCIDENTAL DEPLOYMENT OF
THE AIRBAG AND POSSIBLE PERSONAL INJURY.
CAUTION: All fasteners must be torqued to specifi-
cation to ensure proper operation of the steering
column.
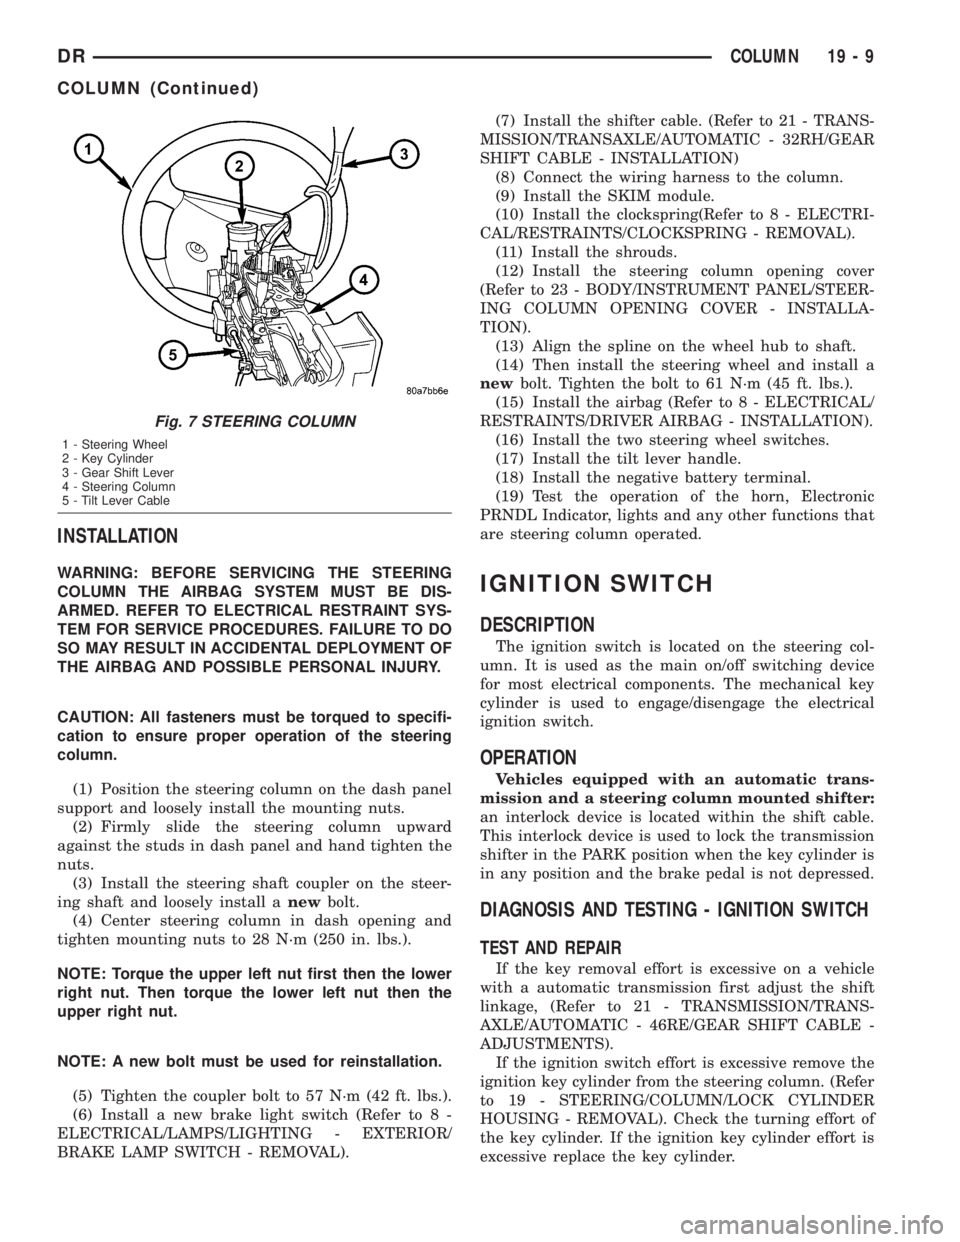
(1) Position the steering column on the dash panel
support and loosely install the mounting nuts.
(2) Firmly slide the steering column upward
against the studs in dash panel and hand tighten the
nuts.
(3) Install the steering shaft coupler on the steer-
ing shaft and loosely install anewbolt.
(4) Center steering column in dash opening and
tighten mounting nuts to 28 N´m (250 in. lbs.).
NOTE: Torque the upper left nut first then the lower
right nut. Then torque the lower left nut then the
upper right nut.
NOTE: A new bolt must be used for reinstallation.
(5) Tighten the coupler bolt to 57 N´m (42 ft. lbs.).
(6) Install a new brake light switch (Refer to 8 -
ELECTRICAL/LAMPS/LIGHTING - EXTERIOR/
BRAKE LAMP SWITCH - REMOVAL).(7) Install the shifter cable. (Refer to 21 - TRANS-
MISSION/TRANSAXLE/AUTOMATIC - 32RH/GEAR
SHIFT CABLE - INSTALLATION)
(8) Connect the wiring harness to the column.
(9) Install the SKIM module.
(10) Install the clockspring(Refer to 8 - ELECTRI-
CAL/RESTRAINTS/CLOCKSPRING - REMOVAL).
(11) Install the shrouds.
(12) Install the steering column opening cover
(Refer to 23 - BODY/INSTRUMENT PANEL/STEER-
ING COLUMN OPENING COVER - INSTALLA-
TION).
(13) Align the spline on the wheel hub to shaft.
(14) Then install the steering wheel and install a
newbolt. Tighten the bolt to 61 N´m (45 ft. lbs.).
(15) Install the airbag (Refer to 8 - ELECTRICAL/
RESTRAINTS/DRIVER AIRBAG - INSTALLATION).
(16) Install the two steering wheel switches.
(17) Install the tilt lever handle.
(18) Install the negative battery terminal.
(19) Test the operation of the horn, Electronic
PRNDL Indicator, lights and any other functions that
are steering column operated.IGNITION SWITCH
DESCRIPTION
The ignition switch is located on the steering col-
umn. It is used as the main on/off switching device
for most electrical components. The mechanical key
cylinder is used to engage/disengage the electrical
ignition switch.
OPERATION
Vehicles equipped with an automatic trans-
mission and a steering column mounted shifter:
an interlock device is located within the shift cable.
This interlock device is used to lock the transmission
shifter in the PARK position when the key cylinder is
in any position and the brake pedal is not depressed.
DIAGNOSIS AND TESTING - IGNITION SWITCH
TEST AND REPAIR
If the key removal effort is excessive on a vehicle
with a automatic transmission first adjust the shift
linkage, (Refer to 21 - TRANSMISSION/TRANS-
AXLE/AUTOMATIC - 46RE/GEAR SHIFT CABLE -
ADJUSTMENTS).
If the ignition switch effort is excessive remove the
ignition key cylinder from the steering column. (Refer
to 19 - STEERING/COLUMN/LOCK CYLINDER
HOUSING - REMOVAL). Check the turning effort of
the key cylinder. If the ignition key cylinder effort is
excessive replace the key cylinder.
Fig. 7 STEERING COLUMN
1 - Steering Wheel
2 - Key Cylinder
3 - Gear Shift Lever
4 - Steering Column
5 - Tilt Lever Cable
DRCOLUMN 19 - 9
COLUMN (Continued)
Page 1803 of 2895
REMOVAL
SERVICE PRECAUTIONS
NOTE: The steering column on vehicles equipped
with an automatic transmission is not equipped
with an internal locking shaft with the ignition cyl-
inder. Alternative methods of locking the steering
wheel for service will have to be used.
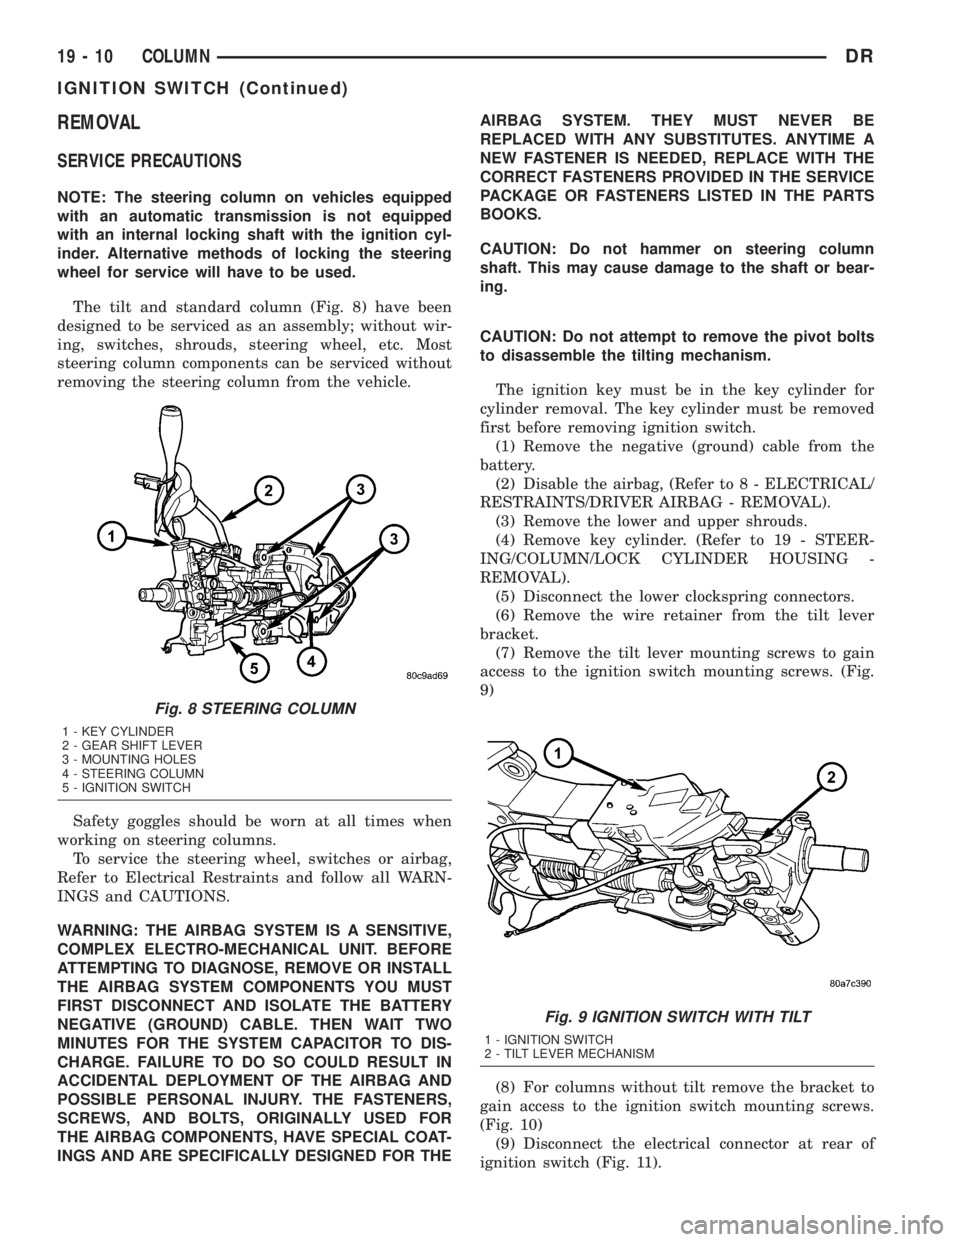
The tilt and standard column (Fig. 8) have been
designed to be serviced as an assembly; without wir-
ing, switches, shrouds, steering wheel, etc. Most
steering column components can be serviced without
removing the steering column from the vehicle.
Safety goggles should be worn at all times when
working on steering columns.
To service the steering wheel, switches or airbag,
Refer to Electrical Restraints and follow all WARN-
INGS and CAUTIONS.
WARNING: THE AIRBAG SYSTEM IS A SENSITIVE,
COMPLEX ELECTRO-MECHANICAL UNIT. BEFORE
ATTEMPTING TO DIAGNOSE, REMOVE OR INSTALL
THE AIRBAG SYSTEM COMPONENTS YOU MUST
FIRST DISCONNECT AND ISOLATE THE BATTERY
NEGATIVE (GROUND) CABLE. THEN WAIT TWO
MINUTES FOR THE SYSTEM CAPACITOR TO DIS-
CHARGE. FAILURE TO DO SO COULD RESULT IN
ACCIDENTAL DEPLOYMENT OF THE AIRBAG AND
POSSIBLE PERSONAL INJURY. THE FASTENERS,
SCREWS, AND BOLTS, ORIGINALLY USED FOR
THE AIRBAG COMPONENTS, HAVE SPECIAL COAT-
INGS AND ARE SPECIFICALLY DESIGNED FOR THEAIRBAG SYSTEM. THEY MUST NEVER BE
REPLACED WITH ANY SUBSTITUTES. ANYTIME A
NEW FASTENER IS NEEDED, REPLACE WITH THE
CORRECT FASTENERS PROVIDED IN THE SERVICE
PACKAGE OR FASTENERS LISTED IN THE PARTS
BOOKS.
CAUTION: Do not hammer on steering column
shaft. This may cause damage to the shaft or bear-
ing.
CAUTION: Do not attempt to remove the pivot bolts
to disassemble the tilting mechanism.
The ignition key must be in the key cylinder for
cylinder removal. The key cylinder must be removed
first before removing ignition switch.
(1) Remove the negative (ground) cable from the
battery.
(2) Disable the airbag, (Refer to 8 - ELECTRICAL/
RESTRAINTS/DRIVER AIRBAG - REMOVAL).
(3) Remove the lower and upper shrouds.
(4) Remove key cylinder. (Refer to 19 - STEER-
ING/COLUMN/LOCK CYLINDER HOUSING -
REMOVAL).
(5) Disconnect the lower clockspring connectors.
(6) Remove the wire retainer from the tilt lever
bracket.
(7) Remove the tilt lever mounting screws to gain
access to the ignition switch mounting screws. (Fig.
9)
(8) For columns without tilt remove the bracket to
gain access to the ignition switch mounting screws.
(Fig. 10)
(9) Disconnect the electrical connector at rear of
ignition switch (Fig. 11).
Fig. 8 STEERING COLUMN
1 - KEY CYLINDER
2 - GEAR SHIFT LEVER
3 - MOUNTING HOLES
4 - STEERING COLUMN
5 - IGNITION SWITCH
Fig. 9 IGNITION SWITCH WITH TILT
1 - IGNITION SWITCH
2 - TILT LEVER MECHANISM
19 - 10 COLUMNDR
IGNITION SWITCH (Continued)