Page 2749 of 4323

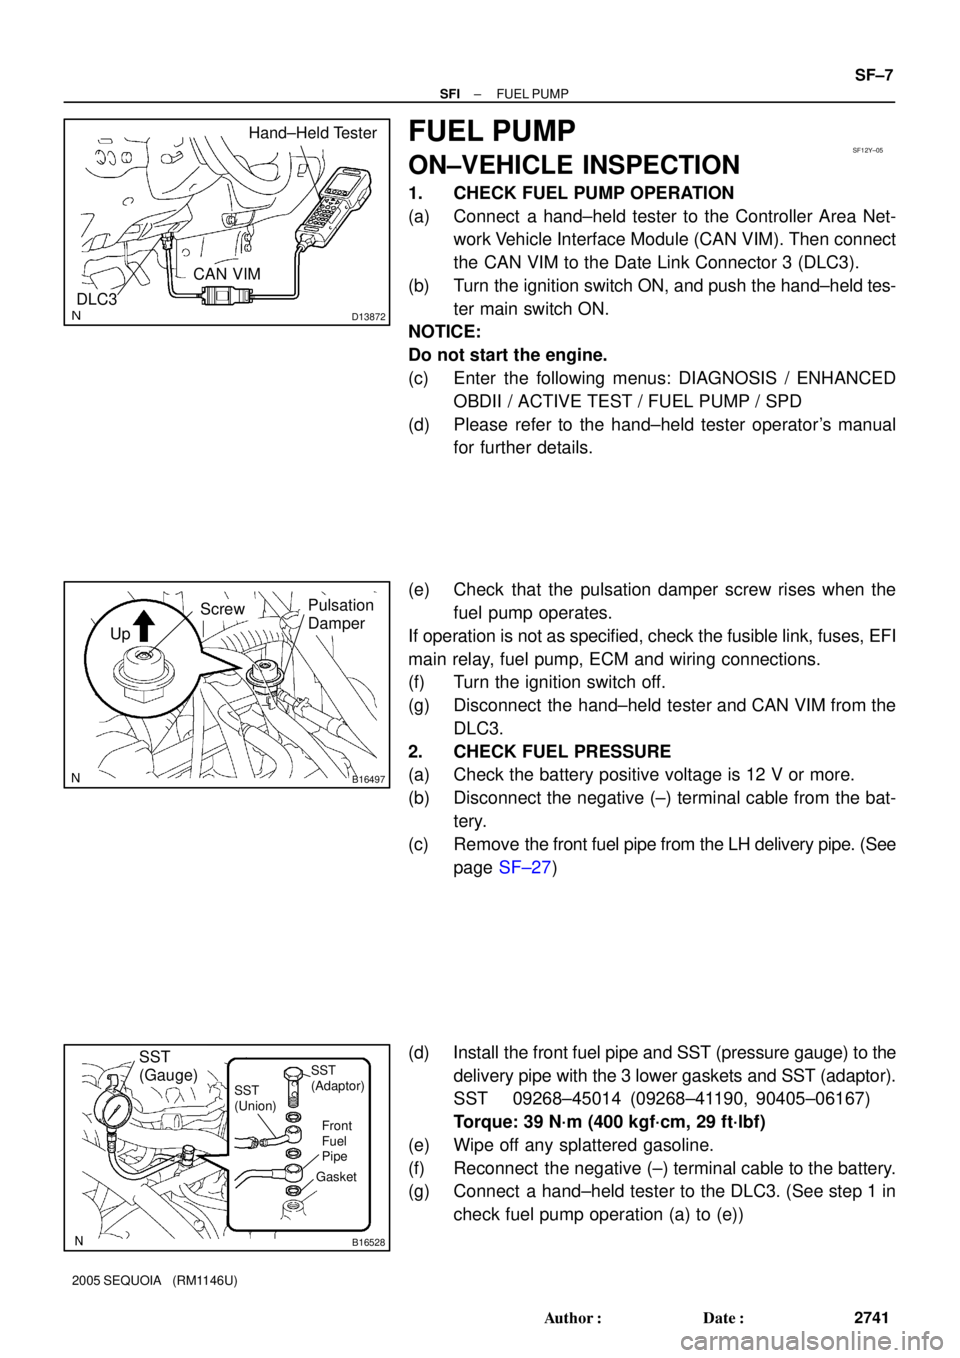
D13872
Hand±Held Tester
DLC3
CAN VIM
SF12Y±05
B16497
Up
Pulsation
DamperScrew
B16528
SST
(Gauge)
Front
Fuel
Pipe
Gasket SST
(Union)SST
(Adaptor)
± SFIFUEL PUMP
SF±7
2741 Author�: Date�:
2005 SEQUOIA (RM1146U)
FUEL PUMP
ON±VEHICLE INSPECTION
1. CHECK FUEL PUMP OPERATION
(a) Connect a hand±held tester to the Controller Area Net-
work Vehicle Interface Module (CAN VIM). Then connect
the CAN VIM to the Date Link Connector 3 (DLC3).
(b) Turn the ignition switch ON, and push the hand±held tes-
ter main switch ON.
NOTICE:
Do not start the engine.
(c) Enter the following menus: DIAGNOSIS / ENHANCED
OBDII / ACTIVE TEST / FUEL PUMP / SPD
(d) Please refer to the hand±held tester operator's manual
for further details.
(e) Check that the pulsation damper screw rises when the
fuel pump operates.
If operation is not as specified, check the fusible link, fuses, EFI
main relay, fuel pump, ECM and wiring connections.
(f) Turn the ignition switch off.
(g) Disconnect the hand±held tester and CAN VIM from the
DLC3.
2. CHECK FUEL PRESSURE
(a) Check the battery positive voltage is 12 V or more.
(b) Disconnect the negative (±) terminal cable from the bat-
tery.
(c) Remove the front fuel pipe from the LH delivery pipe. (See
page SF±27)
(d) Install the front fuel pipe and SST (pressure gauge) to the
delivery pipe with the 3 lower gaskets and SST (adaptor).
SST 09268±45014 (09268±41190, 90405±06167)
Torque: 39 N´m (400 kgf´cm, 29 ft´lbf)
(e) Wipe off any splattered gasoline.
(f) Reconnect the negative (±) terminal cable to the battery.
(g) Connect a hand±held tester to the DLC3. (See step 1 in
check fuel pump operation (a) to (e))
Page 3492 of 4323

I04138
1 21 2
I04139
5 65 6
I04140
1 21 2
I04141
3 43 4
I04141
3 43 4
BE±80
± BODY ELECTRICALPOWER DOOR LOCK CONTROL SYSTEM
3484 Author�: Date�:
2005 SEQUOIA (RM1146U)
6. INSPECT DRIVER'S DOOR LOCK MOTOR OPERA-
TION
(a) Connect the positive (+) lead from the battery to terminal
1 and the negative (±) lead to terminal 2, and check that
the door lock cable moves to the UNLOCK position.
(b) Reverse the polarity and check that the door lock cable
moves to the LOCK position.
If operation is not as specified, replace the door lock motor.
7. INSPECT PASSENGER'S DOOR LOCK MOTOR OP-
ERATION
(a) Connect the positive (+) lead from the battery to terminal
5 and the negative (±) lead to terminal 6, and check that
the door lock cable moves to the UNLOCK position.
(b) Reverse the polarity and check that the door lock cable
moves to the LOCK position.
If operation is not as specified, replace the door lock motor.
8. INSPECT REAR LEFT SIDE DOOR LOCK MOTOR OP-
ERATION
(a) Connect the positive (+) lead from the battery to terminal
1 and the negative (±) lead to terminal 2, and check that
the door lock cable moves to the UNLOCK position.
(b) Reverse the polarity and check that the door lock cable
moves to the LOCK position.
If operation is not as specified, replace the door lock motor.
9. INSPECT REAR RIGHT SIDE DOOR LOCK MOTOR
OPERATION
(a) Connect the positive (+) lead from the battery to terminal
3 and the negative (±) lead to terminal 4, and check that
the door lock cable moves to the UNLOCK position.
(b) Reverse the polarity and check that the door lock cable
moves to the LOCK position.
If operation is not as specified, replace the door lock motor.
10. INSPECT BACK DOOR LOCK MOTOR OPERATION
(a) Connect the positive (+) lead from the battery to terminal
3 and the negative (±) lead to terminal 4, and check that
the door lock cable moves to the UNLOCK position.
(b) Reverse the polarity and check that the door lock cable
moves to the LOCK position.
If operation is not as specified, replace the door lock motor.
Page 4243 of 4323

05_SEQUOIA_U (L/O 0408)
384
2005 SEQUOIA from Aug. '04 Prod. (OM34424U)
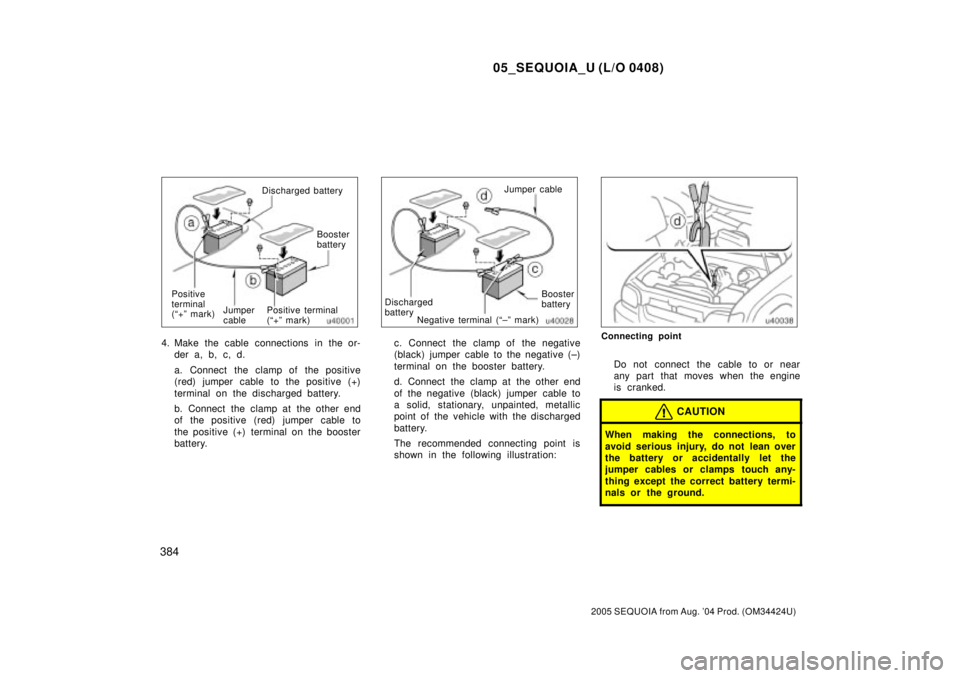
Discharged battery
Booster
battery
Positive
terminal
(ª+º mark)Jumper
cablePositive terminal
(ª+º mark)
4. Make the cable connections in the or-
der a, b, c, d.
a. Connect the clamp of the positive
(red) jumper cable to the positive (+)
terminal on the discharged battery.
b. Connect the clamp at the other end
of the positive (red) jumper cable to
the positive (+) terminal on the booster
battery.
Jumper cable
Booster
battery
Negative terminal (ª±º mark) Discharged
battery
c. Connect the clamp of the negative
(black) jumper cable to the negative (±)
terminal on the booster battery.
d. Connect the clamp at the other end
of the negative (black) jumper cable to
a solid, stationary, unpainted, metallic
point of the vehicle with the discharged
battery.
The recommended connecting point is
shown in the following illustration:Connecting point
Do not connect the cable to or near
any part that moves when the engine
is cranked.
CAUTION
When making the connections, to
avoid serious injury, do not lean over
the battery or accidentally let the
jumper cables or clamps touch any-
thing except the correct battery termi-
nals or the ground.
Page 4244 of 4323

05_SEQUOIA_U (L/O 0408)
385
2005 SEQUOIA from Aug. '04 Prod. (OM34424U)
5. Charge the discharged battery with the
jumper cables connected for approxi-
mately 5 minutes. At this time, run the
engine in the vehicle with the booster
battery at about 2000 rpm with the ac-
celerator pedal lightly depressed.
6. Start your engine in the normal way.
After starting, run it at about 2000 rpm
for several minutes with the accelerator
pedal lightly depressed.
7. Carefully disconnect the cables in the
exact reverse order: the negative cable
and then the positive cable.
8. Carefully dispose of the battery cover
clothsÐthey may now contain sulfuric
acid.
9. If removed, replace all the battery vent
plugs.
If the cause of your battery discharging is
not apparent (for example, lights left on),
you should have it checked at your Toyota
dealer.If the first start attempt is not success-
ful...
Check that the clamp on the jumper
cables are tight. Recharge the discharged
battery with the jumper cables connected
for several minutes and restart your en-
gine in the normal way.
If the another attempt is not successful,
the battery may be depleted. Have it ch-
ecked at any authorized Toyota dealer or
repairer, or another duly qualified and
equipped professional.If your engine stalls while driving...
1. Reduce your speed gradually, keeping
a straight line. Move cautiously off the
road to a safe place.
2. Turn on your emergency flashers.
3. Turn the ignition key to ªACCº or
ªLOCKº, and try starting the engine
again.
If the engine will not start, see ªIf your
vehicle will not startº on page 382 in this
Section.
CAUTION
If the engine is not running, the pow-
er assist for the brakes and steering
will not work so steering and braking
will be much harder than usual.
If your engine stalls while
driving
Page:
< prev 1-8 9-16 17-24