Page 2848 of 4323
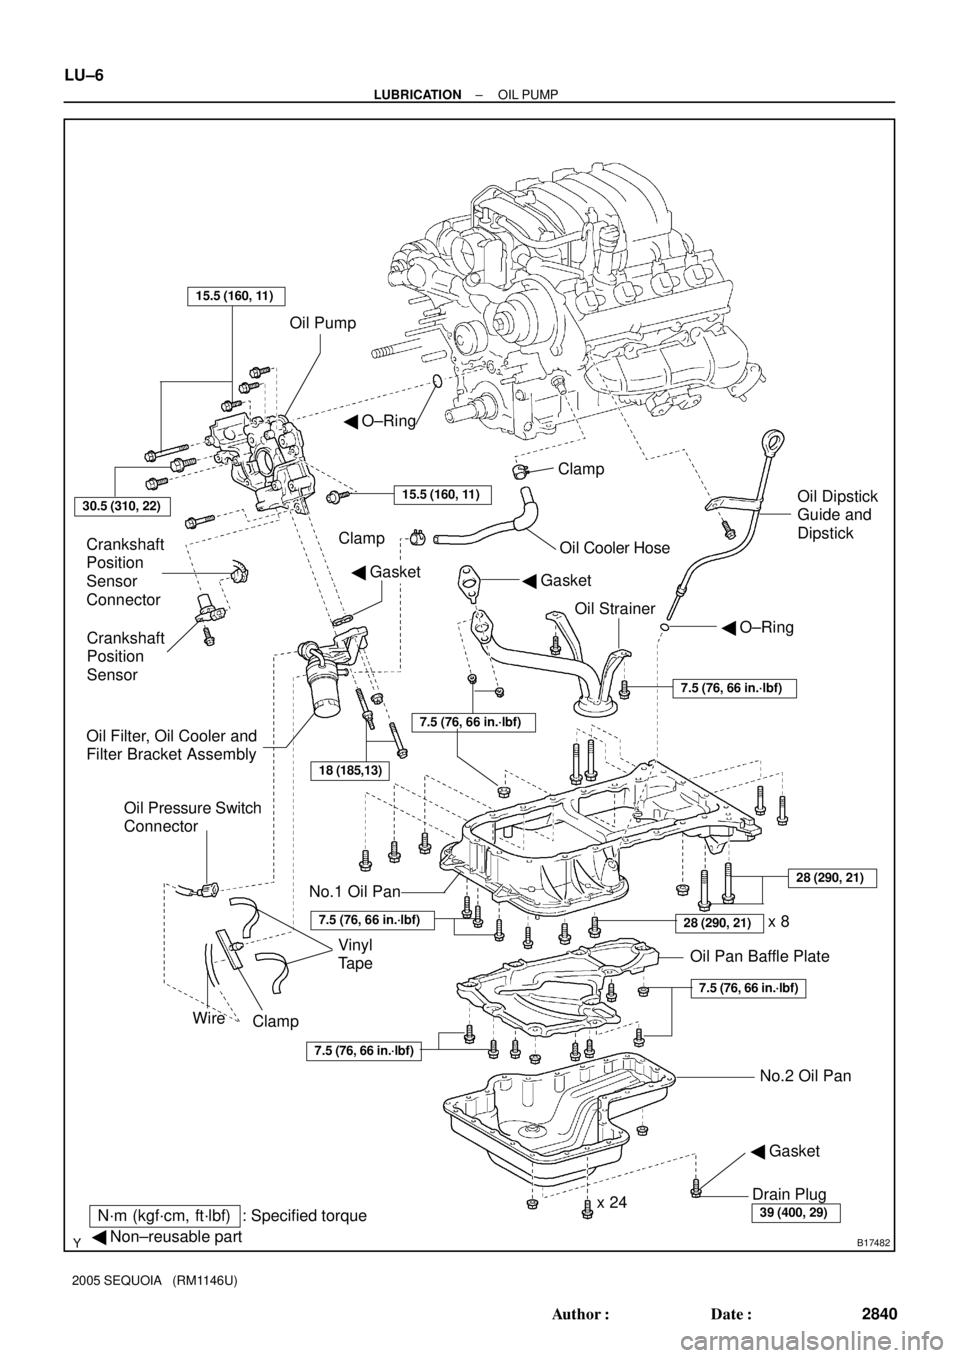
B17482
Oil Pump
Crankshaft
Position
Sensor
Connector
Crankshaft
Position
Sensor
Oil Filter, Oil Cooler and
Filter Bracket AssemblyOil Cooler Hose Clamp
Oil StrainerOil Dipstick
Guide and
Dipstick � O±Ring
� Gasket
No.1 Oil Pan
No.2 Oil Pan Oil Pan Baffle Plate Clamp
Drain Plug
x 24
N´m (kgf´cm, ft´lbf) : Specified torque
� Non±reusable part
� Gasket
30.5 (310, 22)
� O±Ring
15.5 (160, 11)
18 (185,13)
Vinyl
Tape
Wire
Clamp
Oil Pressure Switch
Connector
15.5 (160, 11)
� Gasket
39 (400, 29)
x 828 (290, 21)
7.5 (76, 66 in.´lbf)
28 (290, 21)
7.5 (76, 66 in.´lbf)
7.5 (76, 66 in.´lbf)
7.5 (76, 66 in.´lbf)
7.5 (76, 66 in.´lbf)
LU±6
± LUBRICATIONOIL PUMP
2840 Author�: Date�:
2005 SEQUOIA (RM1146U)
Page 2850 of 4323

REMOVAL
HINT:
When repairing the oil pump, the oil pan and strainer should be
removed an")
LU08Q±10
B05837
Pull O±Ring
B05838
LU±8
± LUBRICATIONOIL PUMP
2842 Author�: Date�:
2005 SEQUOIA (RM1146U)
REMOVAL
HINT:
When repairing the oil pump, the oil pan and strainer should be
removed and cleaned.
1. REMOVE ENGINE FROM VEHICLE
(2WD: See page EM±79)
(4WD: See page EM±92)
2. INSTALL ENGINE TO ENGINE STAND FOR DIS-
ASSEMBLY
3. REMOVE TIMING BELT (See page EM±16)
4. REMOVE NO.1 IDLER PULLEY (See page EM±16)
5. REMOVE NO.2 IDLER PULLEY (See page EM±16)
6. REMOVE CRANKSHAFT TIMING PULLEY
(See page EM±16)
7. REMOVE CRANKSHAFT POSITION SENSOR
(See page IG±11)
8. REMOVE OIL DIPSTICK AND GUIDE
(a) Remove the bolt holding the oil dipstick to the LH cylinder
head.
(b) Pull out the dipstick guide together with the dipstick from
the No.1 oil pan.
(c) Remove the O±ring from the dipstick guide.
9. REMOVE OIL FILTER, OIL COOLER AND FILTER
BRACKET ASSEMBLY
(a) Disconnect the oil pressure switch connector.
(b) Take out the vinyl tape, and disconnect the wire from the
clamp.
(c) Turn the clamp counterclockwise, and remove the clamp
from the oil filter bracket.
(d) Disconnect the oil cooler hose from the oil cooler.
(e) Remove the 2 bolts, nut, the oil filter, oil cooler and filter
bracket assembly.
(f) Remove the gasket from the filter bracket.
Page 2860 of 4323

�Parts must be assembled within 3 minutes of ap-
plication. Otherwise the mate")
B05838
B05846
Vinyl Tape
B05837
Push New O-Ring
LU-18
- LUBRICATIONOIL PUMP
2852 Author�: Date�:
2005 SEQUOIA (RM1146U)
�Parts must be assembled within 3 minutes of ap-
plication. Otherwise the material must be removed
and reapplied.
�Immediately remove nozzle from the tube and rein-
stall cap.
(c) Install the No.2 oil pan with the 24 bolts and 2 nuts. Uni-
formly tighten the bolts and nuts in several passes.
Torque: 7.5 N´m (76 kgf´cm, 66 in.´lbf)
6. INSTALL CRANKSHAFT POSITION SENSOR
(See page IG-13)
7. INSTALL OIL FILTER, OIL COOLER AND FILTER
BRACKET ASSEMBLY
(a) Install a new gasket to the oil filter bracket.
(b) Install the oil filter, oil cooler and filter bracket assembly
with the 2 bolts and nut.
Torque: 18 N´m (185 kgf´cm, 13 ft´lbf)
(c) Connect the oil cooler hose to the oil cooler.
(d) Install the clamp.
Turn the clamp clockwise, and install the clamp to the oil
filter bracket.
(e) Install the wire to the clamp with a vinyl tape.
(f) Connect the oil pressure switch connector.
8. INSTALL OIL DIPSTICK GUIDE AND DIPSTICK
(a) Install a new O-ring to the dipstick guide.
(b) Apply soapy water to the O-ring.
(c) Push in the oil dipstick guide end into the guide hole of the
No.1 oil pan.
(d) Install the oil dipstick guide with the bolt.
Torque: 15 N´m, (155 kgf´cm, 11 ft´lbf)
(e) Install the oil dipstick.
9. INSTALL CRANKSHAFT TIMING PULLEY
(See page EM-23)
Page 2862 of 4323
LU08W-1 1
B07331
Oil Cooler Hose
� O-Ring
Oil Cooler
Plate Washer
Union Bolt
Oil Filter
N´m (kgf´cm, ft´lbf): Specified torque
� Non-reusable part
68.6 (700, 51)
LU-20
- LUBRICATIONOIL COOLER
2854 Author�: Date�:
2005 SEQUOIA (RM1146U)
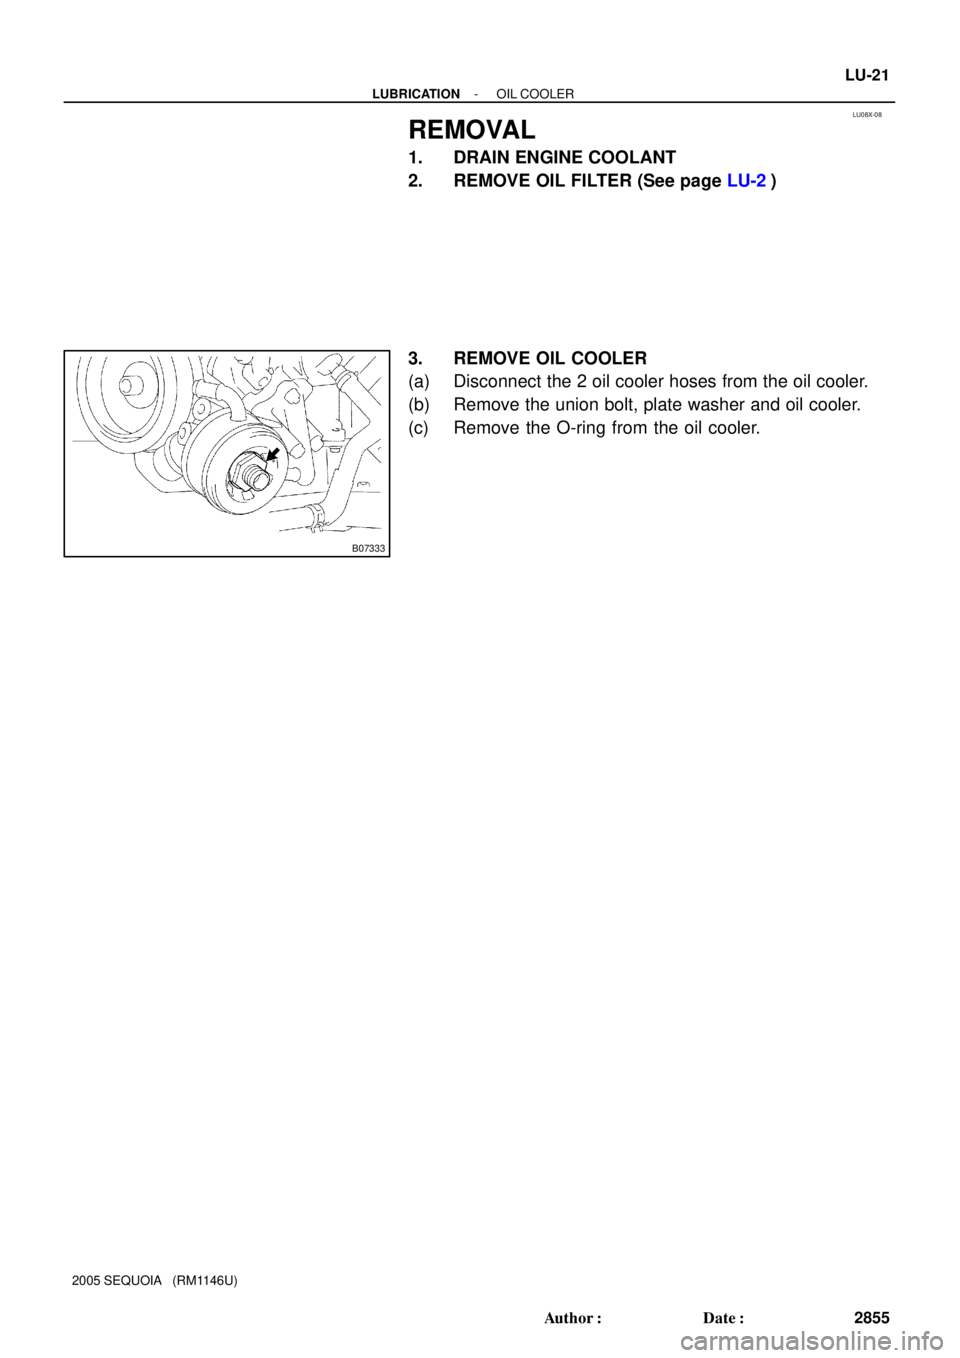
OIL COOLER
COMPONENTS
Page 2863 of 4323
LU08X-08
B07333
- LUBRICATIONOIL COOLER
LU-21
2855 Author�: Date�:
2005 SEQUOIA (RM1146U)
REMOVAL
1. DRAIN ENGINE COOLANT
2. REMOVE OIL FILTER (See page LU-2)
3. REMOVE OIL COOLER
(a) Disconnect the 2 oil cooler hoses from the oil cooler.
(b) Remove the union bolt, plate washer and oil cooler.
(c) Remove the O-ring from the oil cooler.
Page 2865 of 4323
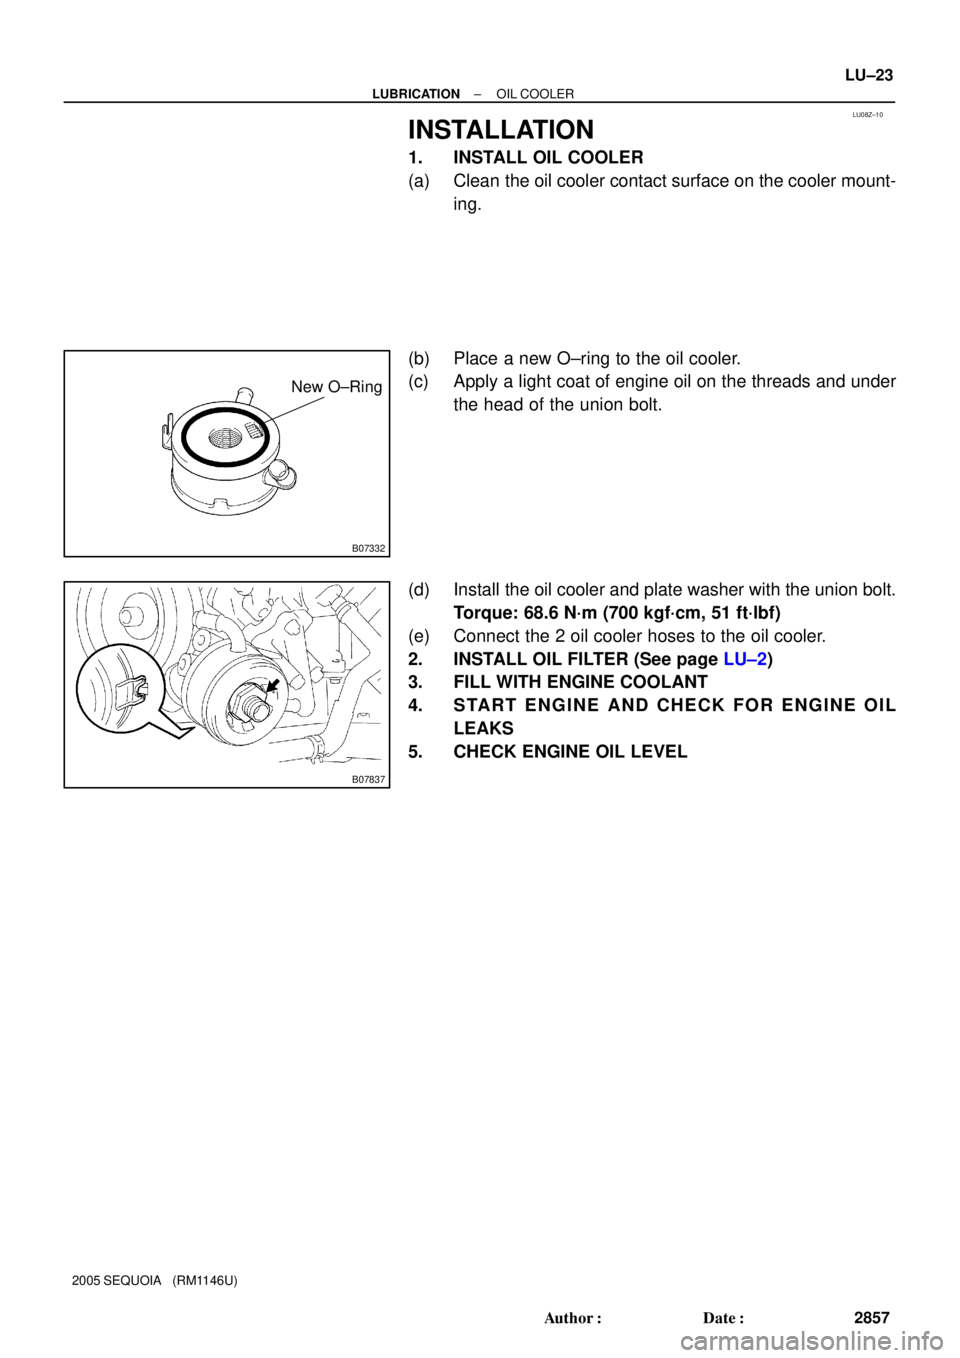
LU08Z±10
B07332
New O±Ring
B07837
± LUBRICATIONOIL COOLER
LU±23
2857 Author�: Date�:
2005 SEQUOIA (RM1146U)
INSTALLATION
1. INSTALL OIL COOLER
(a) Clean the oil cooler contact surface on the cooler mount-
ing.
(b) Place a new O±ring to the oil cooler.
(c) Apply a light coat of engine oil on the threads and under
the head of the union bolt.
(d) Install the oil cooler and plate washer with the union bolt.
Torque: 68.6 N´m (700 kgf´cm, 51 ft´lbf)
(e) Connect the 2 oil cooler hoses to the oil cooler.
2. INSTALL OIL FILTER (See page LU±2)
3. FILL WITH ENGINE COOLANT
4. START ENGINE AND CHECK FOR ENGINE OIL
LEAKS
5. CHECK ENGINE OIL LEVEL
Page 4279 of 4323

420
2005 SEQUOIA from Aug. 04 Prod. (OM34424U)
If you perform maintenance by yourself,
be sure to follow the correct procedure
given in this Section.
You should be aware that")
05_SEQUOIA_U (L/O 0408)
420
2005 SEQUOIA from Aug. '04 Prod. (OM34424U)
If you perform maintenance by yourself,
be sure to follow the correct procedure
given in this Section.
You should be aware that improper or in-
complete servicing may result in operating
problems.
Performing do±it±yourself maintenance
during the warranty period may affect your
warranty coverage. Read the separate
Toyota Warranty statement for details and
suggestions.
This Section gives instructions only for
those items that are relatively easy for an
owner to perform. As explained in Section
6, there are still a number of items that
must be done by a qualified technician
with special tools.
For information on tools and parts for do±
it±yourself maintenance, see ªParts and
toolsº on page 421 in this Section.
Utmost care should be taken when work-
ing on your vehicle to prevent accidental
injury. Here are a few precautions that
you should be especially careful to ob-
serve:CAUTION
�When the engine is running, keep
hands, clothing, and tools away
from the moving fan and engine
drive belts. (Removing rings,
watches, and ties is advisable.)
�Right after driving, the engine
compartmentÐthe engine, radiator,
exhaust manifold, power steering
fluid reservoir and spark plug
boots, etc.Ðwill be hot. So be care-
ful not to touch them. Oil, fluids
and spark plugs may also be hot.
�If the engine is hot, do not remove
the radiator cap or loosen the drain
plugs to prevent burning yourself.
�Do not leave anything that may
burn easily, such as paper or rags,
in the engine compartment.
�Do not smoke, cause sparks or al-
low open flames around fuel or the
battery. Their fumes are flammable.
�Do not get under your vehicle with
just the body jack supporting it. Al-
ways use automotive jack stands or
other solid supports.
�Use eye protection whenever you
work on or under your vehicle
where you may be exposed to flying
or falling material, fluid spray, etc.
�Used engine oil contains potentially
harmful contaminants which may
cause skin disorders such as in-
flammation or skin cancer, so care
should be taken to avoid prolonged
and repeated contact with it. To re-
move used engine oil from your
skin, wash thoroughly with soap
and water.
�Do not leave used oil within the
reach of children.
�Dispose of used oil and filter only
in a safe and acceptable manner.
Do not dispose of used oil and fil-
ter in household trash, in sewers or
onto the ground. Call your dealer or
a service station for information
concerning recycling or disposal.
�Be extremely cautious when work-
ing on the battery. It contains poi-
sonous and corrosive sulfuric acid.
Do±it±yourself service
precautions
Page 4280 of 4323

421
2005 SEQUOIA from Aug. 04 Prod. (OM34424U)
NOTICE
�Remember that battery and ignition
cables carry high currents or volt-
ages. Be careful of accidentally
causing a short")
05_SEQUOIA_U (L/O 0408)
421
2005 SEQUOIA from Aug. '04 Prod. (OM34424U)
NOTICE
�Remember that battery and ignition
cables carry high currents or volt-
ages. Be careful of accidentally
causing a short circuit.
�Add only ªToyota Super Long Life
Coolantº or similar high quality eth-
ylene glycol based non±silicate,
non±amine, non±nitrite, and non±bo-
rate coolant with long±life hybrid
organic acid technology to fill the
radiator. ªToyota Super Long Life
Coolantº is a mixture of 50% cool-
ant and 50% deionized water (for
the U.S.A.) or 55% coolant and 45%
deionized water (for Canada).
�If you spill some of the coolant, be
sure to wash it off with water to
prevent it from damaging the parts
or paint.
�Do not allow dirt or anything else
to fall through the spark plug holes.
�Use only spark plugs of the speci-
fied type. Using other types will
cause engine damage, loss of per-
formance or radio noise.
�Do not reuse iridium±tipped spark
plugs by cleaning or regapping.
�Do not overfill automatic transmis-
sion fluid, or the transmission
could be damaged.
�Do not drive with the air cleaner
filter removed, or excessive engine
wear could result. Also backfiring
could cause a fire in the engine
compartment.
�Be careful not to scratch the glass
surface with the wiper frame.
�When closing the engine hood,
check to see that you have not for-
gotten any tools, rags, etc.
Here is a list of parts and tools you will
need to perform do±it±yourself mainte-
nance. Remember all Toyota parts are de-
signed in metric sizes, so your tools must
be metric.
CHECKING THE ENGINE OIL LEVEL
Parts (if level is low):
�ªToyota Genuine Motor Oilº or equiva-
lent
See page 425 in Section 7±2 for de-
tails about engine oil selection.
Tools:
�Rag or paper towel
�Funnel (only for adding oil)
CHECKING THE ENGINE COOLANT
LEVEL
Parts (if level is low):
�ªToyota Super Long Life Coolantº or
similar high quality ethylene glycol
based non±silicate, non±amine, non±ni-
trite, and non±borate coolant with long±
life hybrid organic acid technology.
ªToyota Super Long Life Coolantº is a
mixture of 50% coolant and 50% deion-
ized water (for the U.S.A.) or 55%
coolant and 45% deionized water (for
Canada).
Parts and tools