Page 419 of 4323
A15470A19381
I8 Ignition Coil with Igniter No. 8
B±W
BR23
Ignition Coil with Igniter No. 7 I7
4
1
B±R
B±RECM
24
E8IGF1
IGF2
IGT8 E8
25
12E8
IGT7 9
E8
IGT6
11E8
15 E8 IGT5
E8
8IGT4
IGT3
E814
IGT2 13
E8
E8 10
IGT1
I18 Ignition SW
W±R IG2
AM25 1C2
1C3 IGN2 Instrument Panel J/B
2
1D
7 B±R 5
IG4 B±R
W±R
Engine Room J/B
2C 1
2DAM2 1
2
B
BatteryF10
Fusible Link Block4 1 2
N1 Noise Filter No. 1
B±R
1 3B±R4
BR
EC
2
I1 Ignition Coil with Igniter No. 1
B±R
I2 Ignition Coil with Igniter No. 2
1 3
4 2
B±W
BRB±R
I3 Ignition Coil with Igniter No. 3
BRBR
B±R B±R
B±R
B±R
B±R
B±R B±RB±R
3B±R1
4 2
B±W
I4 Ignition Coil with Igniter No. 4
413
2
I5 Ignition Coil with Igniter No. 5B±W
I6 Ignition Coil with Igniter No. 6
1 3
2
4
13
2
41 4 23
BR
B±W
G±R
P±L
G±W
R±W
G±B
LG±B
B±L
B±R
LG
BR
BR
BR
1J
BR
B±R
B±R
B±R
B±R
6
B±R BR
BR BRBRBR BR BR B±R
B±R
B±R
B
± DIAGNOSTICSENGINE
DI±225
419 Author�: Date�:
2005 SEQUOIA (RM1146U)
WIRING DIAGRAM
Page 2628 of 4323

A23337
12
345
6
7
811
12 13
14
15
1617
18 2122
910 1920
A23338
Service Bolt
A23339
Approx.
10°
A23340
1 2
21
22
19 20
7
8 11
12
13
14
15
16
3
4 17
18
5
6 9
10
± ENGINE MECHANICALCYLINDER HEAD
EM±41
2620 Author�: Date�:
2005 SEQUOIA (RM1146U)
(4) Uniformly loosen the 22 bearing cap bolts in several
steps, in the sequence shown.
(5) Remove the 22 bearing cap bolts, 4 seal washers,
oil feed pipe, 9 bearing caps, camshaft housing
plug, oil control valve filter and 2 camshafts.
(d) Remove the RH camshafts.
(1) Bring the service bolt hole of the sub±gear upward
by turning the hexagon head portion of the exhaust
camshaft with a wrench.
(2) Secure the sub±gear to the main gear with a service
bolt.
Recommended service bolt:
Thread diameter6 mm
Thread pitch1.0 mm
Bolt length16 to 20 mm (0.63 to 0.79 in.)
HINT:
When removing the camshafts, make sure that the torsional
spring force of the sub±gear has been eliminated by the above
operation.
(3) Set the timing mark (1±dot mark) of the camshaft
main gear at approx. 10° angle by turning the hexa-
gon head portion of the exhaust camshaft with a
wrench.
(4) Uniformly loosen the 22 bearing cap bolts in several
steps, in the sequence shown.
(5) Remove the 22 bearing cap bolts, 4 seal washers,
oil feed pipe, 9 bearing caps, camshaft housing
plug, strainer and 2 camshafts.
HINT:
Arrange the bearing caps for RH and LH sides.
Page 2662 of 4323
EM11Z±07
A21014
MAF Meter Connector
PS Air HoseHood
Windshield Washer Hose
Engine Under Cover PCV Hose Vacuum Hose
Fan with Fluid Coupling Assembly
Drive Belt
Fan
Pulley
Throttle Body Cover
Radiator Assembly
No.2 Fan
Shroud Air Cleaner and
Intake Air Connector
AssemblyAir Cleaner Case
Air Filter
N´m (kgf´cm, ft´lbf) : Specified torqueMAF Meter Wire
Clip
A/T Oil Cooler Hose
12 (120, 9)29 (296, 21)
Clip
Suction Hose
29 (296, 21)
± ENGINE MECHANICALENGINE UNIT (2WD)
EM±75
2654 Author�: Date�:
2005 SEQUOIA (RM1146U)
ENGINE UNIT (2WD)
COMPONENTS
Page 2675 of 4323
EM1O7±04
A23399
MAF Meter Connector
PS Air HoseVacuum HoseHood
Windshield Washer Hose
Engine Under Cover PCV Hose
Fan with Fluid Coupling Assembly
Drive Belt
Fan
Pulley
Throttle Body Cover
Radiator Assembly
No.2 Fan
Shroud Air Cleaner and Intake Air
Connector Assembly
Air Cleaner Case
Air Filter
N´m (kgf´cm, ft´lbf) : Specified torqueMAF Meter Wire
Clip
A/T Oil Cooler Hose
12 (120, 9)29 (296, 21)
Clip
Suction Hose
29 (296, 21)
EM±88
± ENGINE MECHANICALENGINE UNIT (4WD)
2667 Author�: Date�:
2005 SEQUOIA (RM1146U)
ENGINE UNIT (4WD)
COMPONENTS
Page 2758 of 4323
SF1XF±01
B17549
B17548
B17609
B17546
B17542
SF±16
± SFIFUEL PUMP
2750 Author�: Date�:
2005 SEQUOIA (RM1146U)
REASSEMBLY
1. REMOVE FUEL SUCTION PLATE NO.2
(a) Install the 2 springs and suction plate No.2 to the suction
plate No.1.
(b) Using a needle±nose pliers, install the 2 new E±rings to
the suction plate No.2.
2. INSTALL FUEL PUMP
(a) Apply a light coat of gasoline or spindle oil to a new O±
ring, and install it to the fuel pump.
(b) Connect the fuel pump harness connector to the fuel
pump.
(c) Install the fuel pump with the suction filter to the fuel filter.
3. INSTALL FUEL FILTER
Install the fuel filter to the fuel sub±tank.
Page 2843 of 4323
:
TEMPERATURE RANGE ANTICIPATED BEFORE NEXT OIL CHANGE5W±30°C °F
±20
±290
±1820
±740
460
1680
27100
38
LU0GV±05
B07230
Oil Pressure Gauge
Oil Pressure Switch")
B16233
Recommended Viscosity (SAE):
TEMPERATURE RANGE ANTICIPATED BEFORE NEXT OIL CHANGE5W±30°C °F
±20
±290
±1820
±740
460
1680
27100
38
LU0GV±05
B07230
Oil Pressure Gauge
Oil Pressure Switch
P08343
Adhesive
± LUBRICATIONOIL AND FILTER
LU±1
2835 Author�: Date�:
2005 SEQUOIA (RM1146U)
OIL AND FILTER
INSPECTION
1. CHECK ENGINE OIL QUALITY
Check the oil for deterioration, entry of water, discoloring or thin-
ning.
If the quality is visibly poor, replace the oil.
Oil grade:
API grade SL Energy±Conserving or ILSAC multi-
grade engine oil.
2. CHECK ENGINE OIL LEVEL
The oil level should be between the ºLº and ºFº marks on the dip-
stick.
If low, check for leakage and add oil up to the ºFº mark.
NOTICE:
Do not fill with engine oil above the ºFº mark.
3. REMOVE ENGINE UNDER COVER
4. REMOVE OIL PRESSURE SWITCH
5. INSTALL OIL PRESSURE GAUGE
6. WARM UP ENGINE
Allow the engine to warm up to normal operating temperature.
7. CHECK OIL PRESSURE
Oil pressure:
At idle29 kPa (0.3 kgf/cm2, 4.2 psi) or more
At 3,000 rpm294 ± 588 kPa (3.0 ± 6.0 kgf/cm2, 43 ± 85 psi)
8. REMOVE OIL PRESSURE GAUGE
9. REINSTALL OIL PRESSURE SWITCH
(a) Apply adhesive to 2 or 3 threads of the oil pressure switch.
Adhesive:
Part No. 08833±00080, THREE BOND 1344, LOCTITE
242 or equivalent
(b) Reinstall the oil pressure switch.
10. START ENGINE, AND CHECK FOR ENGINE OIL
LEAKS
11. REINSTALL ENGINE UNDER COVER
Page 2844 of 4323

REPLACEMENT
CAUTION:
�Prolonged and repeated contact with mineral oil will
result in the r")
LU0GW±07
B07231
B07232
SST
LU±2
± LUBRICATIONOIL AND FILTER
2836 Author�: Date�:
2005 SEQUOIA (RM1146U)
REPLACEMENT
CAUTION:
�Prolonged and repeated contact with mineral oil will
result in the removal of natural fats from the skin,
leading to dryness, irritation and dermatitis. In addi-
tion, used engine oil contains potentially harmful
contaminants which may cause skin cancer.
�Care should be taken, therefore, when changing en-
gine oil to minimize the frequency and length of time
your skin is exposed to used engine oil. Protective
clothing and gloves that cannot be penetrated by oil
should be worn. The skin should be thoroughly
washed with soap and water, or use water±less hand
cleaner, to remove any used engine oil. Do not use
gasoline, thinners, or solvents.
�In order to preserve the environment, used oil and
used oil filters must be disposed of only at desig-
nated disposal sites.
1. w/ Oil filter change:
REMOVE ENGINE UNDER COVER
2. DRAIN ENGINE OIL
(a) Remove the oil filler cap.
(b) Remove the oil drain plug and gasket, and drain the oil
into a container.
3. REPLACE OIL FILTER
(a) Using SST, remove the oil filter.
SST 09228±07501
(b) Clean the oil filter contact surface on the oil filter mount-
ing.
(c) Lubricate the filter rubber gasket with clean engine oil.
Page 2845 of 4323
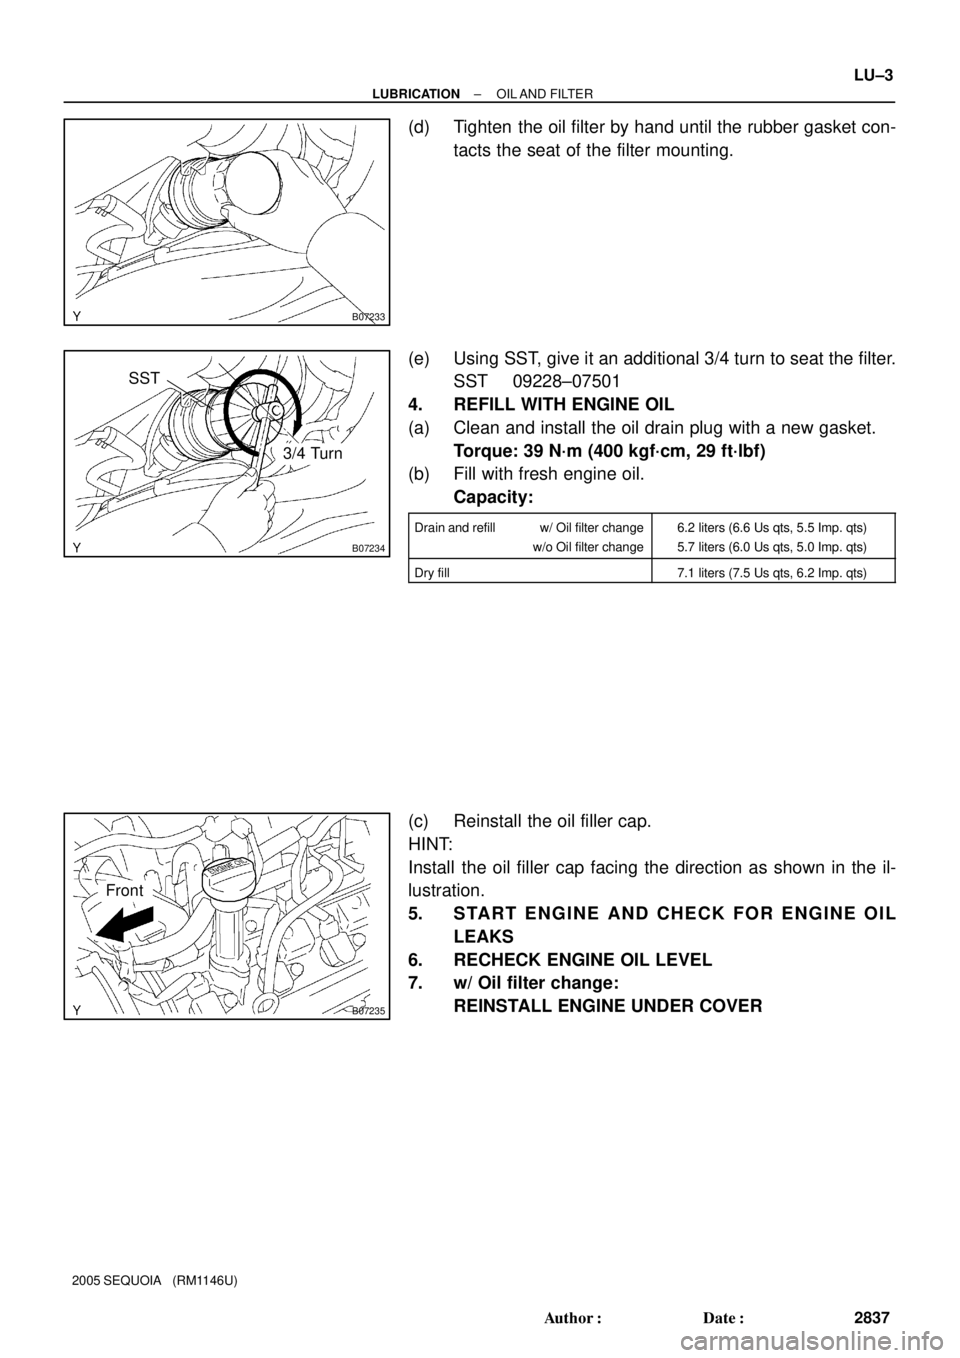
B07233
B07234
SST
3/4 Turn
B07235
Front
± LUBRICATIONOIL AND FILTER
LU±3
2837 Author�: Date�:
2005 SEQUOIA (RM1146U)
(d) Tighten the oil filter by hand until the rubber gasket con-
tacts the seat of the filter mounting.
(e) Using SST, give it an additional 3/4 turn to seat the filter.
SST 09228±07501
4. REFILL WITH ENGINE OIL
(a) Clean and install the oil drain plug with a new gasket.
Torque: 39 N´m (400 kgf´cm, 29 ft´lbf)
(b) Fill with fresh engine oil.
Capacity:
Drain and refill w/ Oil filter change
w/o Oil filter change6.2 liters (6.6 Us qts, 5.5 Imp. qts)
5.7 liters (6.0 Us qts, 5.0 Imp. qts)
Dry fill7.1 liters (7.5 Us qts, 6.2 Imp. qts)
(c) Reinstall the oil filler cap.
HINT:
Install the oil filler cap facing the direction as shown in the il-
lustration.
5. START ENGINE AND CHECK FOR ENGINE OIL
LEAKS
6. RECHECK ENGINE OIL LEVEL
7. w/ Oil filter change:
REINSTALL ENGINE UNDER COVER