Page 3348 of 3833
ATC-72
TROUBLE DIAGNOSIS
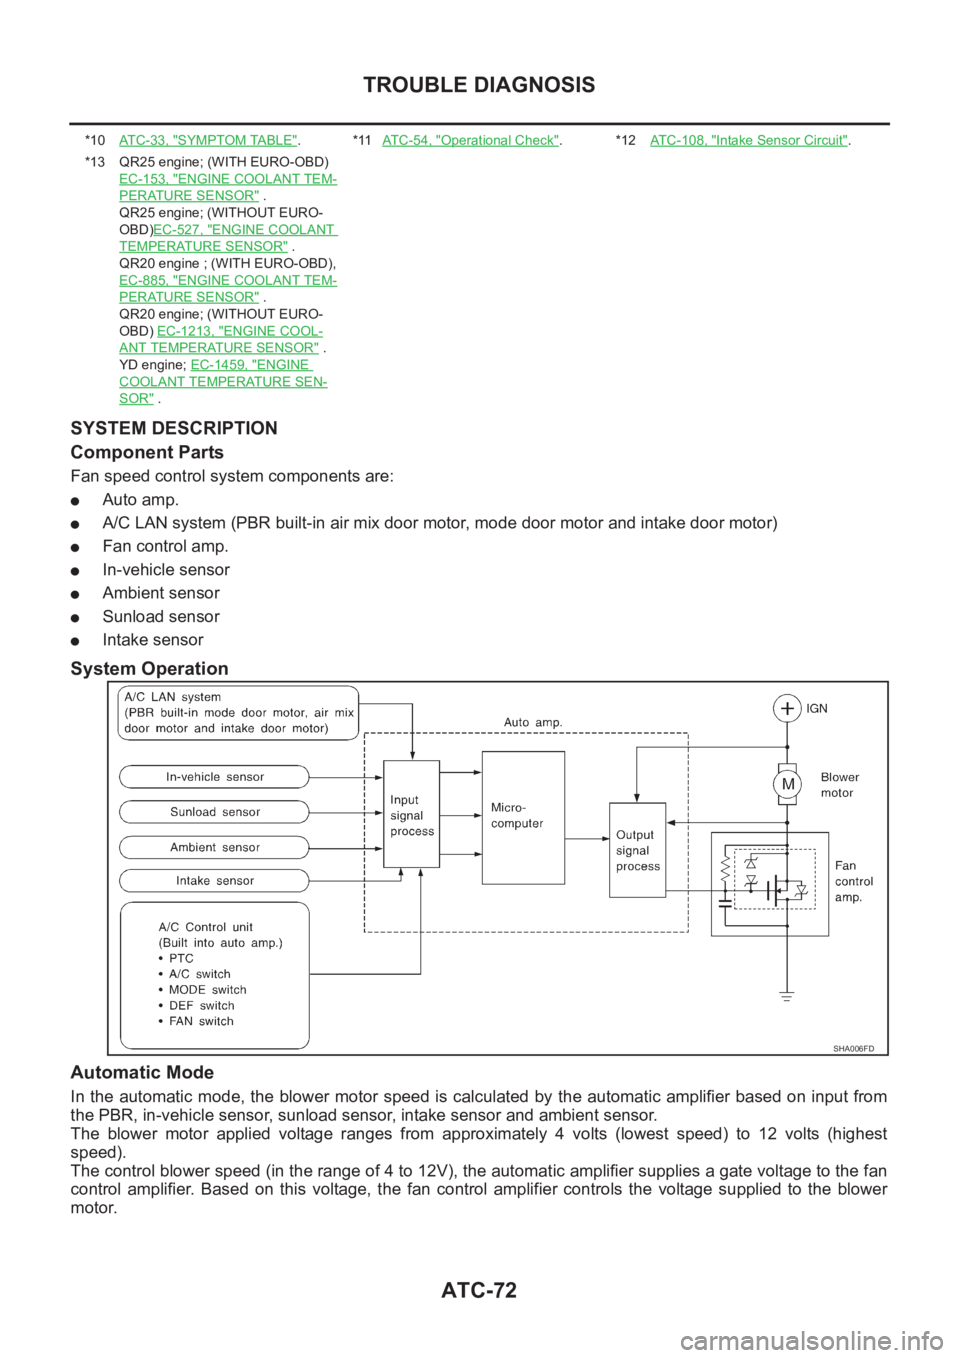
SYSTEM DESCRIPTION
Component Parts
Fan speed control system components are:
●Auto amp.
●A/C LAN system (PBR built-in air mix door motor, mode door motor and intake door motor)
●Fan control amp.
●In-vehicle sensor
●Ambient sensor
●Sunload sensor
●Intake sensor
System Operation
Automatic Mode
In the automatic mode, the blower motor speed is calculated by the automatic amplifier based on input from
the PBR, in-vehicle sensor, sunload sensor, intake sensor and ambient sensor.
The blower motor applied voltage ranges from approximately 4 volts (lowest speed) to 12 volts (highest
speed).
The control blower speed (in the range of 4 to 12V), the automatic amplifier supplies a gate voltage to the fan
control amplifier. Based on this voltage, the fan control amplifier controls the voltage supplied to the blower
motor.
*10AT C - 3 3 , "SYMPTOM TABLE".*11AT C - 5 4 , "Operational Check".*12ATC-108, "Intake Sensor Circuit".
*13 QR25 engine; (WITH EURO-OBD)
EC-153, "
ENGINE COOLANT TEM-
PERATURE SENSOR" .
QR25 engine; (WITHOUT EURO-
OBD)EC-527, "
ENGINE COOLANT
TEMPERATURE SENSOR" .
QR20 engine ; (WITH EURO-OBD),
EC-885, "
ENGINE COOLANT TEM-
PERATURE SENSOR" .
QR20 engine; (WITHOUT EURO-
OBD) EC-1213, "
ENGINE COOL-
ANT TEMPERATURE SENSOR" .
YD engine; EC-1459, "
ENGINE
COOLANT TEMPERATURE SEN-
SOR" .
SHA006FD
Page 3357 of 3833
TROUBLE DIAGNOSIS
ATC-81
C
D
E
F
G
H
I
K
L
MA
B
AT C
4.CHECK A/C RELAY AFTER DISCONNECTING IT
Refer to ATC-84, "
A/C Relay" .
OK or NG
OK >> Reconnect A/C relay. And GO TO 5.
NG >> 1. replace A/C relay.
2. Go to self-diagnosis AT C - 4 7 , "
PROCEDURE" and perform self-diagnosis STEP-4.Confirm that
magnet clutch operation is normal.
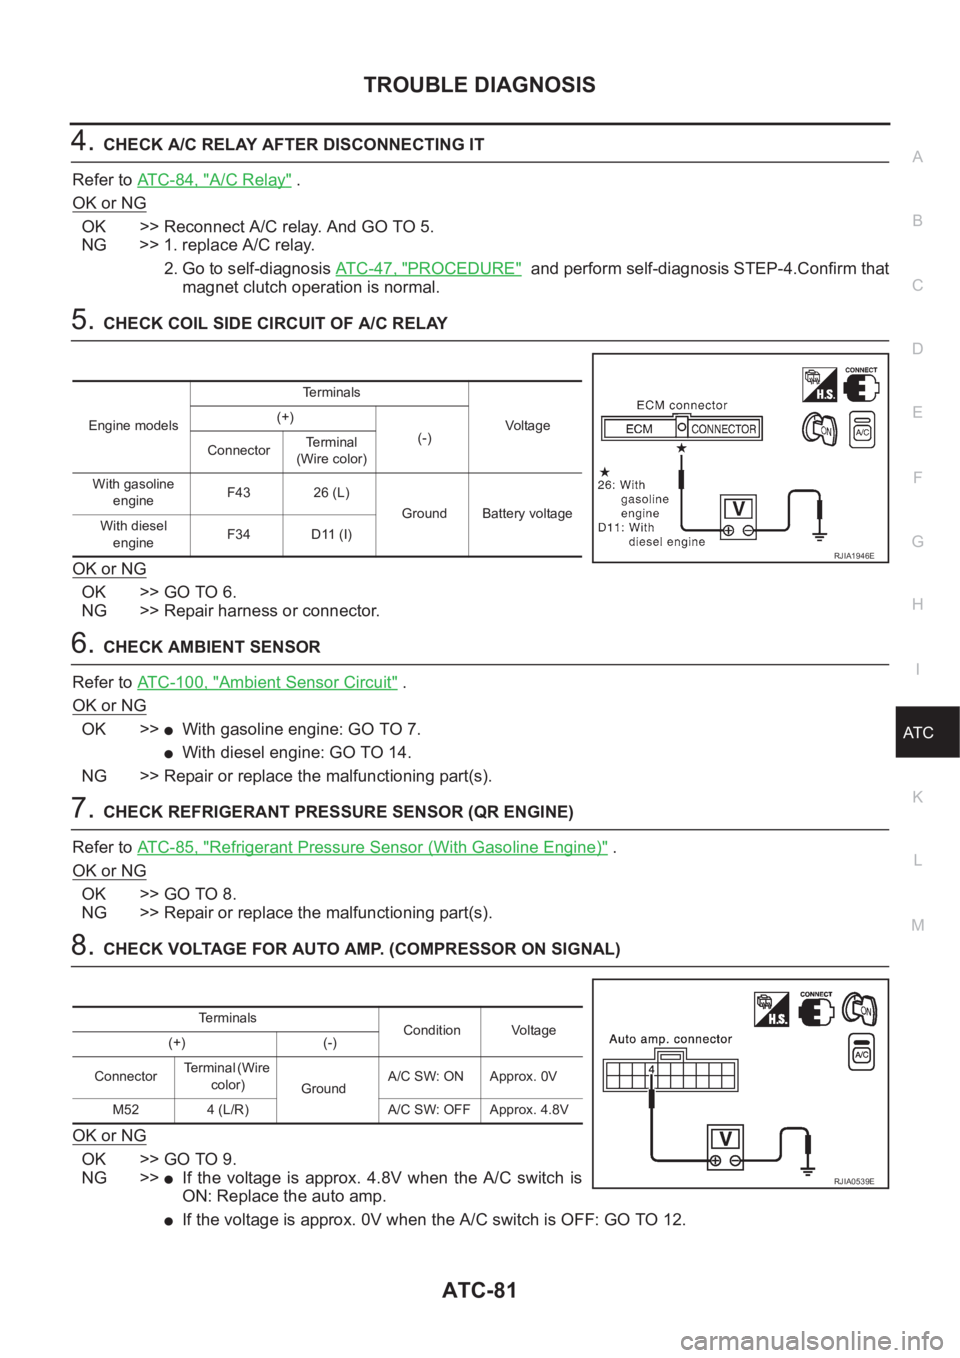
5.CHECK COIL SIDE CIRCUIT OF A/C RELAY
OK or NG
OK >> GO TO 6.
NG >> Repair harness or connector.
6.CHECK AMBIENT SENSOR
Refer to ATC-100, "
Ambient Sensor Circuit" .
OK or NG
OK >>●With gasoline engine: GO TO 7.
●With diesel engine: GO TO 14.
NG >> Repair or replace the malfunctioning part(s).
7.CHECK REFRIGERANT PRESSURE SENSOR (QR ENGINE)
Refer to ATC-85, "
Refrigerant Pressure Sensor (With Gasoline Engine)" .
OK or NG
OK >> GO TO 8.
NG >> Repair or replace the malfunctioning part(s).
8.CHECK VOLTAGE FOR AUTO AMP. (COMPRESSOR ON SIGNAL)
OK or NG
OK >> GO TO 9.
NG >>
●If the voltage is approx. 4.8V when the A/C switch is
ON: Replace the auto amp.
●If the voltage is approx. 0V when the A/C switch is OFF: GO TO 12.
Engine modelsTerminals
Voltag e (+)
(-)
ConnectorTerminal
(Wire color)
With gasoline
engineF43 26 (L)
Ground Battery voltage
With diesel
engineF34 D11 (I)
RJIA1946E
Terminals
Condition Voltage
(+) (-)
ConnectorTe r m i n a l ( W i r e
color)
GroundA/C SW: ON Approx. 0V
M52 4 (L/R) A/C SW: OFF Approx. 4.8V
RJIA0539E
Page 3358 of 3833
ATC-82
TROUBLE DIAGNOSIS
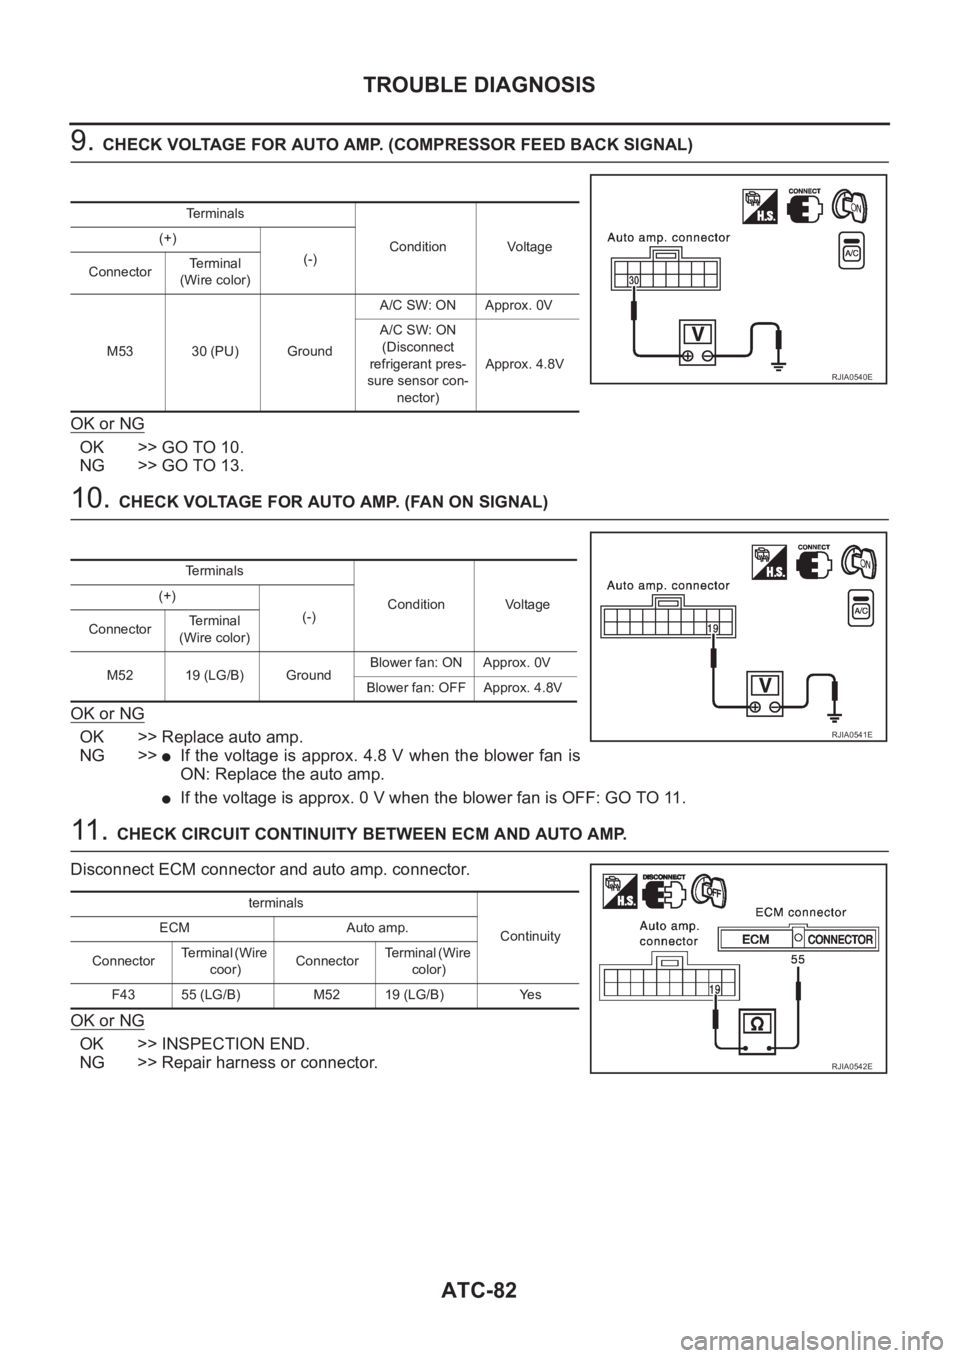
9. CHECK VOLTAGE FOR AUTO AMP. (COMPRESSOR FEED BACK SIGNAL)
OK or NG
OK >> GO TO 10.
NG >> GO TO 13.
10. CHECK VOLTAGE FOR AUTO AMP. (FAN ON SIGNAL)
OK or NG
OK >> Replace auto amp.
NG >>
●If the voltage is approx. 4.8 V when the blower fan is
ON: Replace the auto amp.
●If the voltage is approx. 0 V when the blower fan is OFF: GO TO 11.
11 . CHECK CIRCUIT CONTINUITY BETWEEN ECM AND AUTO AMP.
Disconnect ECM connector and auto amp. connector.
OK or NG
OK >> INSPECTION END.
NG >> Repair harness or connector.
Terminals
Condition Voltage (+)
(-)
ConnectorTerminal
(Wire color)
M53 30 (PU) GroundA/C SW: ON Approx. 0V
A/C SW: ON
(Disconnect
refrigerant pres-
sure sensor con-
nector)Approx. 4.8V
RJIA0540E
Terminals
Condition Voltage (+)
(-)
ConnectorTerminal
(Wire color)
M52 19 (LG/B) GroundBlower fan: ON Approx. 0V
Blower fan: OFF Approx. 4.8V
RJIA0541E
terminals
Continuity ECM Auto amp.
ConnectorTerminal (Wire
coor)ConnectorTerminal (Wire
color)
F43 55 (LG/B) M52 19 (LG/B) Yes
RJIA0542E
Page 3359 of 3833
TROUBLE DIAGNOSIS
ATC-83
C
D
E
F
G
H
I
K
L
MA
B
AT C
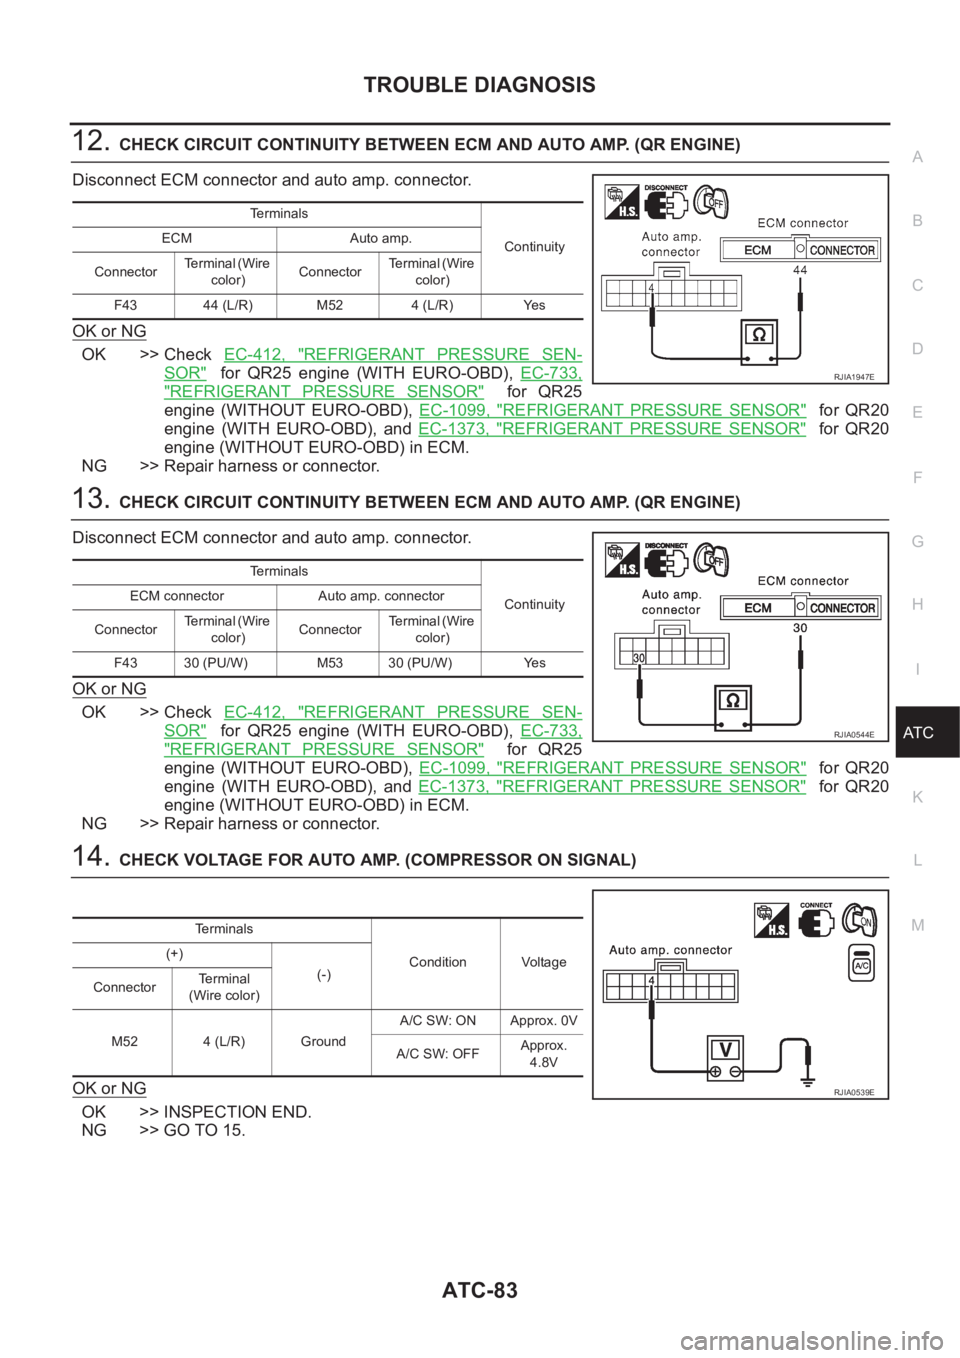
12.CHECK CIRCUIT CONTINUITY BETWEEN ECM AND AUTO AMP. (QR ENGINE)
Disconnect ECM connector and auto amp. connector.
OK or NG
OK >> Check EC-412, "REFRIGERANT PRESSURE SEN-
SOR" for QR25 engine (WITH EURO-OBD), EC-733,
"REFRIGERANT PRESSURE SENSOR" for QR25
engine (WITHOUT EURO-OBD), EC-1099, "
REFRIGERANT PRESSURE SENSOR" for QR20
engine (WITH EURO-OBD), and EC-1373, "
REFRIGERANT PRESSURE SENSOR" for QR20
engine (WITHOUT EURO-OBD) in ECM.
NG >> Repair harness or connector.
13.CHECK CIRCUIT CONTINUITY BETWEEN ECM AND AUTO AMP. (QR ENGINE)
Disconnect ECM connector and auto amp. connector.
OK or NG
OK >> Check EC-412, "REFRIGERANT PRESSURE SEN-
SOR" for QR25 engine (WITH EURO-OBD), EC-733,
"REFRIGERANT PRESSURE SENSOR" for QR25
engine (WITHOUT EURO-OBD), EC-1099, "
REFRIGERANT PRESSURE SENSOR" for QR20
engine (WITH EURO-OBD), and EC-1373, "
REFRIGERANT PRESSURE SENSOR" for QR20
engine (WITHOUT EURO-OBD) in ECM.
NG >> Repair harness or connector.
14.CHECK VOLTAGE FOR AUTO AMP. (COMPRESSOR ON SIGNAL)
OK or NG
OK >> INSPECTION END.
NG >> GO TO 15.
Te r m i n a l s
Continuity ECM Auto amp.
ConnectorTerminal (Wire
color)ConnectorTerminal (Wire
color)
F43 44 (L/R) M52 4 (L/R) Yes
RJIA1947E
Te r m i n a l s
Continuity ECM connector Auto amp. connector
ConnectorTerminal (Wire
color)ConnectorTerminal (Wire
color)
F43 30 (PU/W) M53 30 (PU/W) Yes
RJIA0544E
Terminals
Condition Voltage (+)
(-)
ConnectorTerminal
(Wire color)
M52 4 (L/R) GroundA/C SW: ON Approx. 0V
A/C SW: OFFApprox.
4.8V
RJIA0539E
Page 3376 of 3833
ATC-100
TROUBLE DIAGNOSIS
Ambient Sensor Circuit
EJS001HB
COMPONENT DESCRIPTION
Ambient Sensor
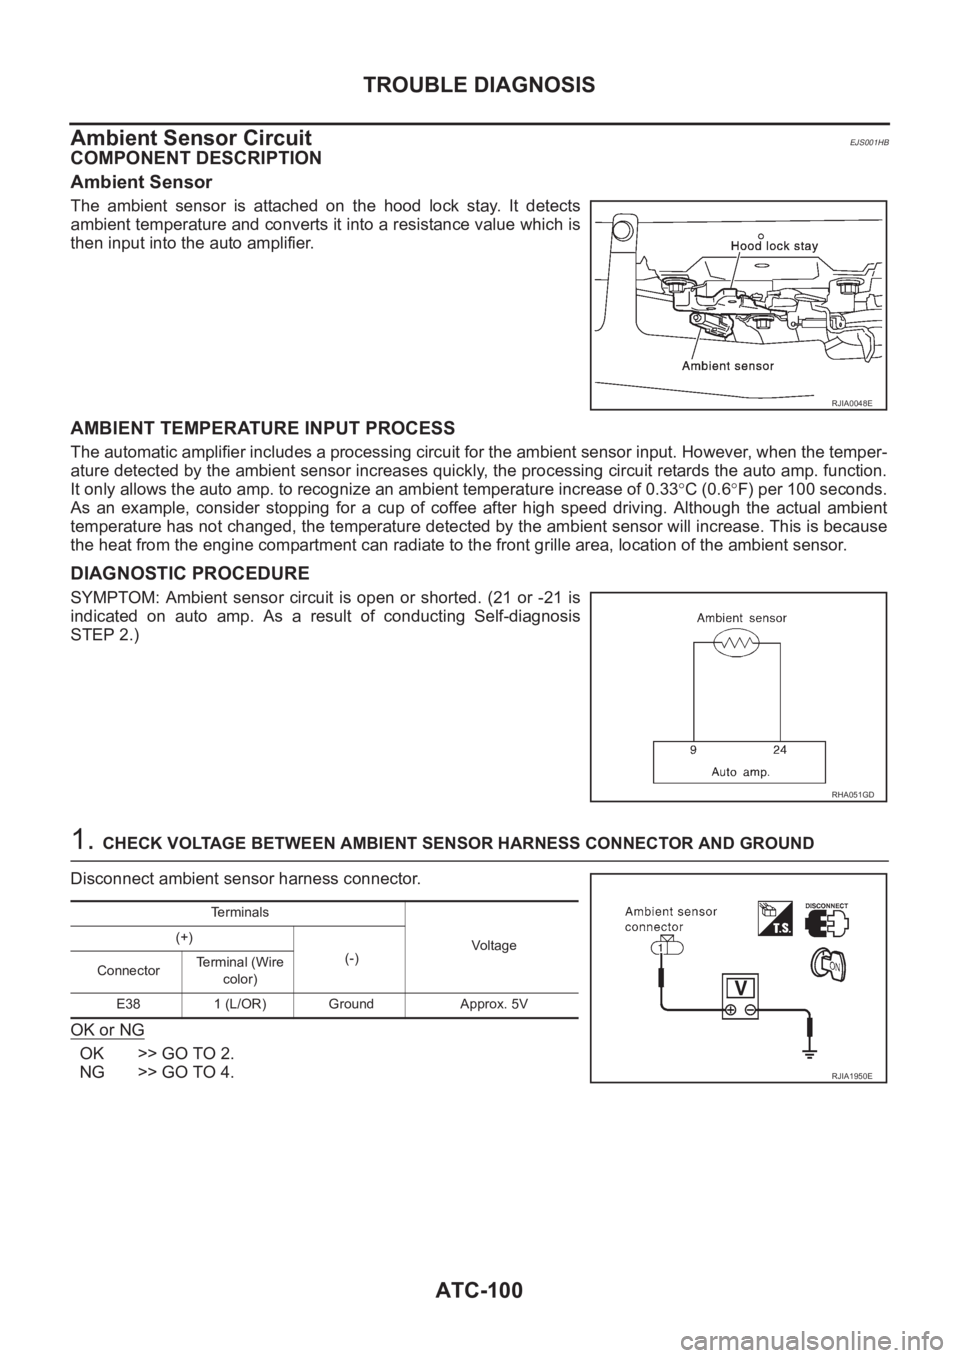
The ambient sensor is attached on the hood lock stay. It detects
ambient temperature and converts it into a resistance value which is
then input into the auto amplifier.
AMBIENT TEMPERATURE INPUT PROCESS
The automatic amplifier includes a processing circuit for the ambient sensor input. However, when the temper-
ature detected by the ambient sensor increases quickly, the processing circuit retards the auto amp. function.
It only allows the auto amp. to recognize an ambient temperature increase of 0.33°C (0.6°F) per 100 seconds.
As an example, consider stopping for a cup of coffee after high speed driving. Although the actual ambient
temperature has not changed, the temperature detected by the ambient sensor will increase. This is because
the heat from the engine compartment can radiate to the front grille area, location of the ambient sensor.
DIAGNOSTIC PROCEDURE
SYMPTOM: Ambient sensor circuit is open or shorted. (21 or -21 is
indicated on auto amp. As a result of conducting Self-diagnosis
STEP 2.)
1. CHECK VOLTAGE BETWEEN AMBIENT SENSOR HARNESS CONNECTOR AND GROUND
Disconnect ambient sensor harness connector.
OK or NG
OK >> GO TO 2.
NG >> GO TO 4.
RJIA0048E
RHA051GD
Terminals
Voltage (+)
(-)
ConnectorTerminal (Wire
color)
E38 1 (L/OR) Ground Approx. 5V
RJIA1950E
Page 3379 of 3833
TROUBLE DIAGNOSIS
ATC-103
C
D
E
F
G
H
I
K
L
MA
B
AT C
DIAGNOSTIC PROCEDURE
SYMPTOM: In-vehicle sensor circuit is open or shorted. (22 or -22 is
indicated on auto amp. as a result of conducting Self-diagnosis
STEP 2.)
1.CHECK IN-VEHICLE SENSOR CIRCUIT BETWEEN IN-VEHICLE SENSOR AND BODY GROUND
Disconnect in-vehicle sensor harness connector.
OK or NG
OK >> GO TO 2.
NG >> GO TO 4.
2.CHECK IN-VEHICLE SENSOR CIRCUIT BETWEEN IN-VEHICLE SENSOR AND AUTO AMP. (LCU)
Disconnect auto amp. (LCU) harness connector.
OK or NG
OK >> GO TO 3.
NG >> Repair harness or connector.
RHA482A
RJIA0745E
Terminals
Voltag e (+)
(-)
ConnectorTerminal (Wire
color)
M34 1 (P) Ground Approx. 5V
RJIA0559E
Te r m i n a l s
Continuity
ConnectorTerminal
(Wire color)ConnectorTerminal
(Wire color)
M34 2 (B/Y) M53 24 (B/Y) Yes
RJIA0560E
Page 3381 of 3833
TROUBLE DIAGNOSIS
ATC-105
C
D
E
F
G
H
I
K
L
MA
B
AT C
Sunload Sensor CircuitEJS001HD
COMPONENT DESCRIPTION
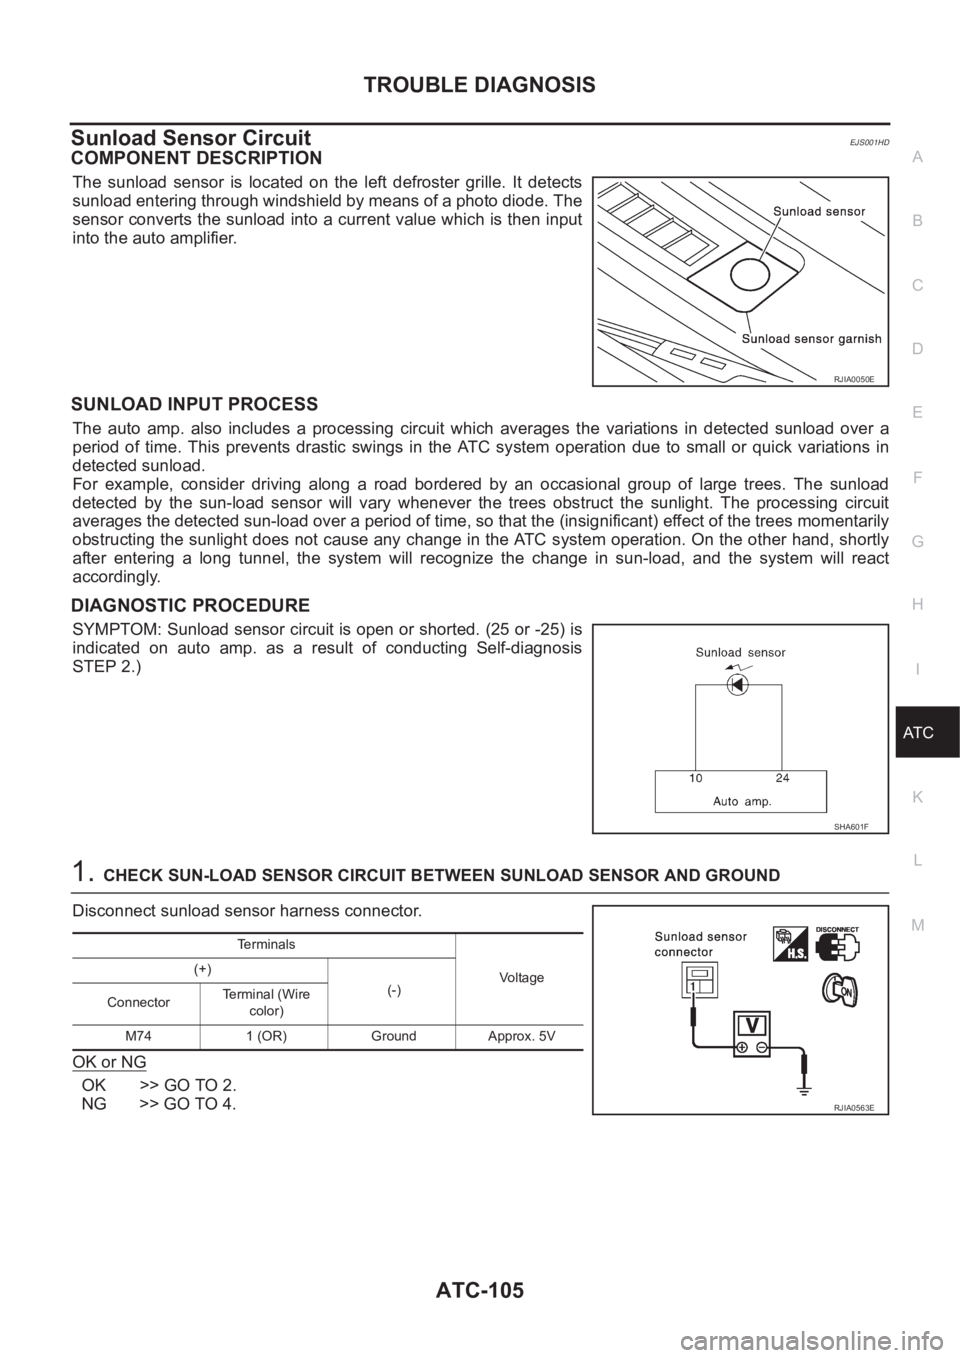
The sunload sensor is located on the left defroster grille. It detects
sunload entering through windshield by means of a photo diode. The
sensor converts the sunload into a current value which is then input
into the auto amplifier.
SUNLOAD INPUT PROCESS
The auto amp. also includes a processing circuit which averages the variations in detected sunload over a
period of time. This prevents drastic swings in the ATC system operation due to small or quick variations in
detected sunload.
For example, consider driving along a road bordered by an occasional group of large trees. The sunload
detected by the sun-load sensor will vary whenever the trees obstruct the sunlight. The processing circuit
averages the detected sun-load over a period of time, so that the (insignificant) effect of the trees momentarily
obstructing the sunlight does not cause any change in the ATC system operation. On the other hand, shortly
after entering a long tunnel, the system will recognize the change in sun-load, and the system will react
accordingly.
DIAGNOSTIC PROCEDURE
SYMPTOM: Sunload sensor circuit is open or shorted. (25 or -25) is
indicated on auto amp. as a result of conducting Self-diagnosis
STEP 2.)
1.CHECK SUN-LOAD SENSOR CIRCUIT BETWEEN SUNLOAD SENSOR AND GROUND
Disconnect sunload sensor harness connector.
OK or NG
OK >> GO TO 2.
NG >> GO TO 4.
RJIA0050E
SHA601F
Te r m i n a l s
Voltage (+)
(-)
ConnectorTe r m i n a l ( W i r e
color)
M74 1 (OR) Ground Approx. 5V
RJIA0563E
Page 3385 of 3833
TROUBLE DIAGNOSIS
ATC-109
C
D
E
F
G
H
I
K
L
MA
B
AT C
1.CHECK INTAKE SENSOR CIRCUIT BETWEEN INTAKE SENSOR AND BODY GROUND
Disconnect intake sensor harness connector.
OK or NG
OK >> GO TO 2.
NG >> GO TO 4.
2.CHECK INTAKE SENSOR CIRCUIT BETWEEN INTAKE SENSOR AND AUTO AMP. (LCU)
Disconnect auto amp. (LCU) harness connector.
OK or NG
OK >> GO TO 3.
NG >> Repair harness or connector.
Engine modelTerminals
Vo l ta g e (+)
(-)
ConnectorTe r m i n a l ( W i r e
color)
With gasoline
engineM68 1 (BR/Y)
Ground Approx. 5V
With diesel engine M69 1 (BR/Y)
RJIA0568E
Engine modelTerminals
Continuity Intake sensor Auto amp.
ConnectorTe r m i n a l ( W i r e
color)ConnectorTerminal (Wire
color)
With gasoline
engineM68 2 (B/Y)
M5324 (B/Y)
Ye s
With diesel engine M69 2 (B/Y) 24 (B/Y)
RJIA0569E