Page 3354 of 3833
ATC-78
TROUBLE DIAGNOSIS
Magnet Clutch Circuit
EJS001H5
SYMPTOM: Magnet clutch does not engage.
INSPECTION FLOW
*1AT C - 4 7 , "PROCEDURE", see No. 1. *2ATC-100, "Ambient Sensor Circuit".*3ATC-102, "In-vehicle Sensor Cir-
cuit".
*4ATC-105, "
Sunload Sensor Circuit".*5ATC-64, "Air Mix Door Motor Circuit".*6ATC-47, "PROCEDURE", see No.
14.
*7AT C - 7 8 , "
Magnet Clutch Circuit".*8ATC-92, "TROUBLE DIAGNOSES
FOR UNUSUAL PRESSURE".*9ATC-54, "
Operational Check".
*10AT C - 4 7 , "
PROCEDURE", see No. 5
to 7.*11ATC-54, "Operational Check".*12ATC-33, "SYMPTOM TABLE".
*13ATC-108, "
Intake Sensor Circuit".
RJIA0533E
Page 3355 of 3833
TROUBLE DIAGNOSIS
ATC-79
C
D
E
F
G
H
I
K
L
MA
B
AT C
SYSTEM DESCRIPTION
Auto amplifier controls compressor operation by ambient temperature and signal from ECM.
Low Temperature Protection Control (With Gasoline Engine)
Auto amplifier will turn the compressor ON or OFF as determined by
a signal detected by ambient sensor.
When ambient temperatures are greater than -2°C, the compressor
turns ON. The compressor turns OFF when ambient temperatures
are less than -5°C.
Evaporator Freeze Protection Control (With Diesel Engine)
Auto amplifier will turn the compressor ON or OFF as determined by
a signal detected by intake sensor.
When intake temperatures are greater than 4°C, the compressor
turns ON. The compressor turns OFF when intake temperatures are
less than 2.5°C.
DIAGNOSTIC PROCEDURE
SYMPTOM: Magnet clutch does not engage when A/C switch is ON.
RHA094GB
RJIA0534E
RJIA0535E
Page 3356 of 3833

ATC-80
TROUBLE DIAGNOSIS
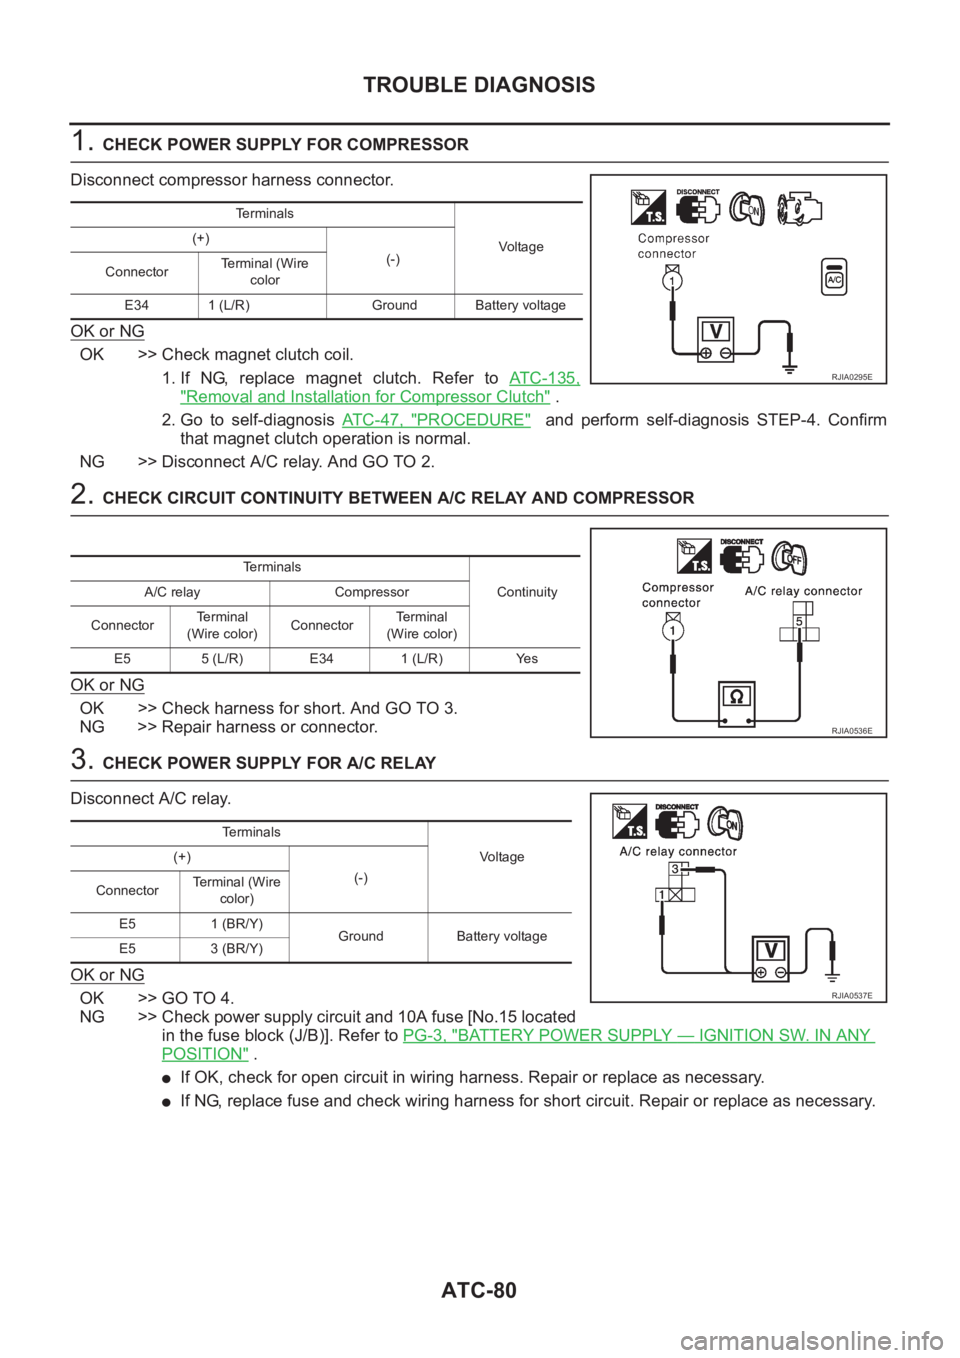
1. CHECK POWER SUPPLY FOR COMPRESSOR
Disconnect compressor harness connector.
OK or NG
OK >> Check magnet clutch coil.
1. If NG, replace magnet clutch. Refer to ATC-135,
"Removal and Installation for Compressor Clutch" .
2. Go to self-diagnosis AT C - 4 7 , "
PROCEDURE" and perform self-diagnosis STEP-4. Confirm
that magnet clutch operation is normal.
NG >> Disconnect A/C relay. And GO TO 2.
2. CHECK CIRCUIT CONTINUITY BETWEEN A/C RELAY AND COMPRESSOR
OK or NG
OK >> Check harness for short. And GO TO 3.
NG >> Repair harness or connector.
3. CHECK POWER SUPPLY FOR A/C RELAY
Disconnect A/C relay.
OK or NG
OK >> GO TO 4.
NG >> Check power supply circuit and 10A fuse [No.15 located
in the fuse block (J/B)]. Refer to PG-3, "
BATTERY POWER SUPPLY — IGNITION SW. IN ANY
POSITION" .
●If OK, check for open circuit in wiring harness. Repair or replace as necessary.
●If NG, replace fuse and check wiring harness for short circuit. Repair or replace as necessary.
Te r m i n a l s
Voltag e (+)
(-)
ConnectorTe r m i n a l ( W i r e
color
E34 1 (L/R) Ground Battery voltage
RJIA0295E
Terminals
Continuity A/C relay Compressor
ConnectorTerminal
(Wire color)ConnectorTerminal
(Wire color)
E5 5 (L/R) E34 1 (L/R) Yes
RJIA0536E
Te r m i n a l s
Voltage (+)
(-)
ConnectorTe r m i n a l ( W i r e
color)
E5 1 (BR/Y)
Ground Battery voltage
E5 3 (BR/Y)
RJIA0537E
Page 3357 of 3833

TROUBLE DIAGNOSIS
ATC-81
C
D
E
F
G
H
I
K
L
MA
B
AT C
4.CHECK A/C RELAY AFTER DISCONNECTING IT
Refer to ATC-84, "
A/C Relay" .
OK or NG
OK >> Reconnect A/C relay. And GO TO 5.
NG >> 1. replace A/C relay.
2. Go to self-diagnosis AT C - 4 7 , "
PROCEDURE" and perform self-diagnosis STEP-4.Confirm that
magnet clutch operation is normal.
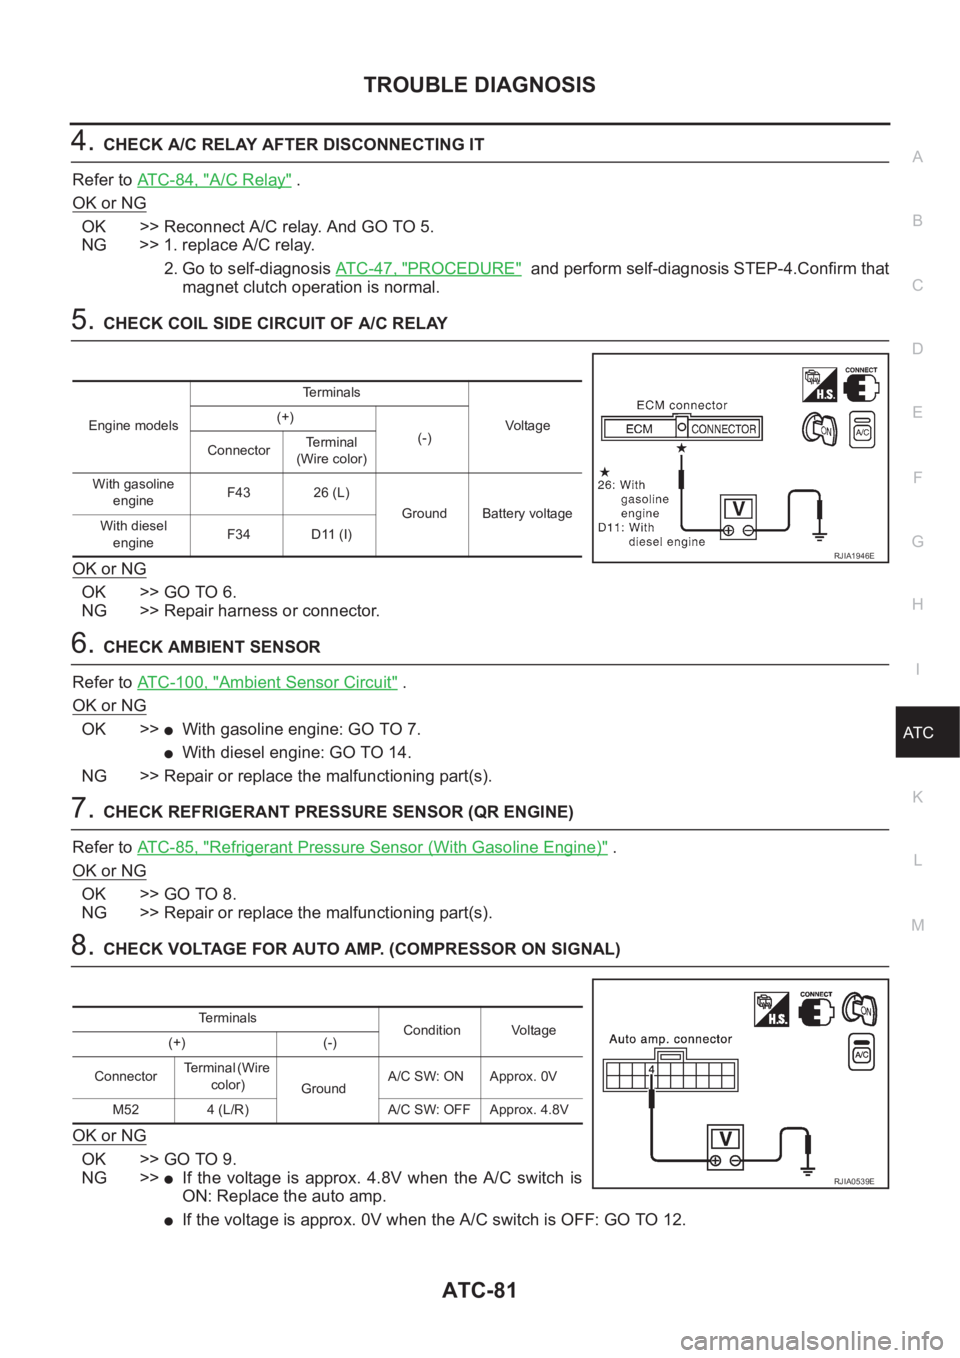
5.CHECK COIL SIDE CIRCUIT OF A/C RELAY
OK or NG
OK >> GO TO 6.
NG >> Repair harness or connector.
6.CHECK AMBIENT SENSOR
Refer to ATC-100, "
Ambient Sensor Circuit" .
OK or NG
OK >>●With gasoline engine: GO TO 7.
●With diesel engine: GO TO 14.
NG >> Repair or replace the malfunctioning part(s).
7.CHECK REFRIGERANT PRESSURE SENSOR (QR ENGINE)
Refer to ATC-85, "
Refrigerant Pressure Sensor (With Gasoline Engine)" .
OK or NG
OK >> GO TO 8.
NG >> Repair or replace the malfunctioning part(s).
8.CHECK VOLTAGE FOR AUTO AMP. (COMPRESSOR ON SIGNAL)
OK or NG
OK >> GO TO 9.
NG >>
●If the voltage is approx. 4.8V when the A/C switch is
ON: Replace the auto amp.
●If the voltage is approx. 0V when the A/C switch is OFF: GO TO 12.
Engine modelsTerminals
Voltag e (+)
(-)
ConnectorTerminal
(Wire color)
With gasoline
engineF43 26 (L)
Ground Battery voltage
With diesel
engineF34 D11 (I)
RJIA1946E
Terminals
Condition Voltage
(+) (-)
ConnectorTe r m i n a l ( W i r e
color)
GroundA/C SW: ON Approx. 0V
M52 4 (L/R) A/C SW: OFF Approx. 4.8V
RJIA0539E
Page 3363 of 3833
TROUBLE DIAGNOSIS
ATC-87
C
D
E
F
G
H
I
K
L
MA
B
AT C
*7ATC-78, "Magnet Clutch Circuit".*8AT C - 8 8 , "PERFORMANCE TEST
DIAGNOSES"
*9ATC-54, "Operational Check".
*10ATC-47, "
PROCEDURE", see No.5
to 7.*11 QR engine; EM-12, "Checking Drive
Belts" .
YD engine; EM-118, "
Checking Drive
Belts" .*12 QR25 engine; (WITH EURO-OBD)
EC-323, "
COOLING FAN CON-
TROL" .
QR25 engine; (WITHOOUT EUR-
OBD)EC-603, "
COOLING FAN
CONTROL" .
QR20 engine; (WITH EURO-OBD)
EC-1050, "
COOLING FAN CON-
TROL" .
QR20 engine; (WITHOUT EURO-
OBD)EC-1287, "
COOLING FAN
CONTROL" .
YD engine; EC-1508, "
SYSTEM
DESCRIPTION" .
Page 3365 of 3833
TROUBLE DIAGNOSIS
ATC-89
C
D
E
F
G
H
I
K
L
MA
B
AT C
*1ATC-135, "Removal and Installation
for Compressor Clutch".*2 \ ATC-70, "
Blower Motor Circuit" . *3 QR engine; EM-12, "Checking Drive
Belts" .
YD engine; EM-118, "
Checking Drive
Belts" .
RJIA1595E
Page 3374 of 3833
ATC-98
TROUBLE DIAGNOSIS
Self-diagnosis
EJS001H9
Symptom: Self-diagnosis cannot be performed.
INSPECTION FLOW
*1ATC-135, "Removal and Installation
for Compressor Clutch".*2ATC-138, "
Inspection".*3AT C - 2 4 , "Maintenance of Lubricant
Quantity in Compressor".
*4ATC-54, "
Operational Check".*5QR engine; EM-12, "Checking Drive
Belts" .
YD engine; EM-118, "
Checking Drive
Belts" .
*1ATC-57, "
Power Supply and Ground
Circuit for Auto Amp.".*2AT C - 1 0 0 , "
Ambient Sensor Circuit".*3ATC-102, "In-vehicle Sensor Circuit".
*4ATC-105, "
Sunload Sensor Circuit".*5ATC-108, "Intake Sensor Circuit".*6AT C - 6 4 , "Air Mix Door Motor Circuit".
*7ATC-54, "
Operational Check".*8ATC-33, "SYMPTOM TABLE".*9AT C - 5 4 , "Operational Check".
RJIA1949E
Page 3411 of 3833
REFRIGERANT LINES
ATC-135
C
D
E
F
G
H
I
K
L
MA
B
AT C
Removal and Installation for Compressor ClutchEJS000VA
REMOVAL
Overhaul (With Gasoline Engine: CWV-615M Compressor)
1. When removing center bolt, hold clutch disc with wrench.
2. Remove the clutch disc using the clutch disc puller.
3. Remove the snap ring using external snap ring pliers.
RHA136EB
RHA399F
RHA124F
RHA138E