2001 NISSAN X-TRAIL power steering fluid
[x] Cancel search: power steering fluidPage 24 of 3833

GI-22
HOW TO USE THIS MANUAL
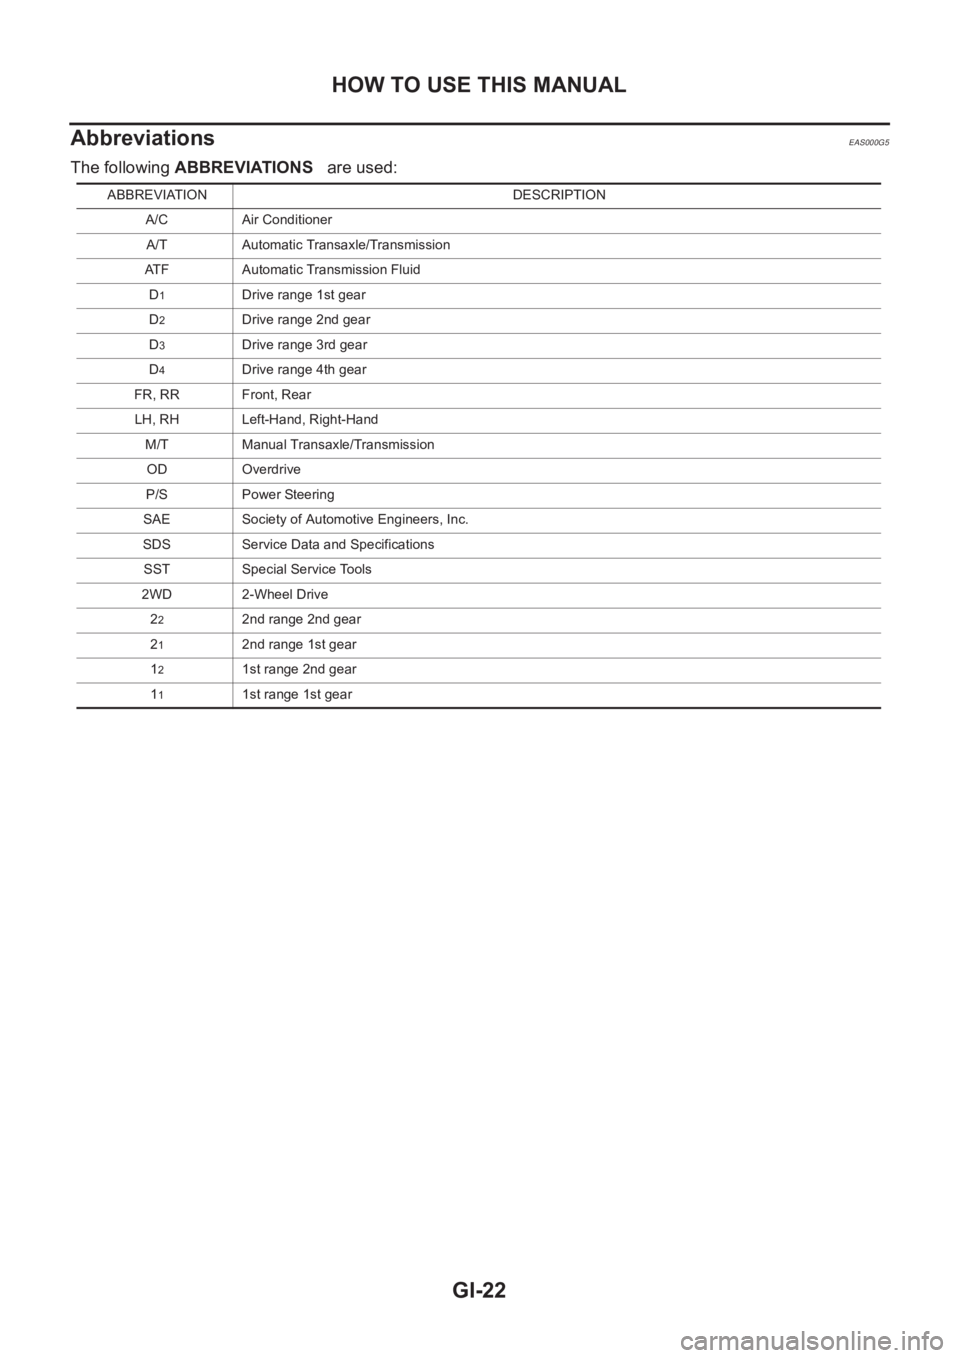
Abbreviations
EAS000G5
The following ABBREVIATIONS are used:
ABBREVIATION DESCRIPTION
A/C Air Conditioner
A/T Automatic Transaxle/Transmission
ATF Automatic Transmission Fluid
D
1Drive range 1st gear
D
2Drive range 2nd gear
D
3Drive range 3rd gear
D
4Drive range 4th gear
FR, RR Front, Rear
LH, RH Left-Hand, Right-Hand
M/T Manual Transaxle/Transmission
OD Overdrive
P/S Power Steering
SAE Society of Automotive Engineers, Inc.
SDS Service Data and Specifications
SST Special Service Tools
2WD 2-Wheel Drive
2
22nd range 2nd gear
2
12nd range 1st gear
1
21st range 2nd gear
1
11st range 1st gear
Page 88 of 3833
![NISSAN X-TRAIL 2001 Service Repair Manual EM-38
[QR]
TIMING CHAIN
REMOVAL
1. Remove the parts listed below.
●Engine hood
●Engine undercover
●PCV hose
●Ignition coil; Refer to EM-29, "IGNITION COIL" .
●Rocker cover; Refer to NISSAN X-TRAIL 2001 Service Repair Manual EM-38
[QR]
TIMING CHAIN
REMOVAL
1. Remove the parts listed below.
●Engine hood
●Engine undercover
●PCV hose
●Ignition coil; Refer to EM-29, "IGNITION COIL" .
●Rocker cover; Refer to](/manual-img/5/57405/w960_57405-87.png)
EM-38
[QR]
TIMING CHAIN
REMOVAL
1. Remove the parts listed below.
●Engine hood
●Engine undercover
●PCV hose
●Ignition coil; Refer to EM-29, "IGNITION COIL" .
●Rocker cover; Refer to EM-35, "ROCKER COVER" .
●Engine coolant reservoir tank
●Drive belt; Refer to EM-12, "REMOVAL" .
●Alternator
●Drive belt auto-tensioner; Refer to EM-13, "REMOVAL" .
●Exhaust front tube; Refer to EX-2, "Removal and Installation" .
2. Remove A/C compressor from engine. Temporarily secure A/C compressor to vehicle side with a rope to
avoid putting a load on them.
3. Remove bracket mounting bolts for fixing A/C piping on right strut housing and exhaust manifold cover.
Doing so simplifies moving.
4. Move power steering pump with piping connected, and secure it to vehicle side temporarily.
5. Pull power steering reservoir tank out of brackets to move power steering piping.
CAUTION:
To avoid power steering fluid leakage, temporarily fix reservoir tank vertically.
6. Suspend engine with a hoist, and support the engine posture.
For installation of engine slingers, refer to EM-69, "
ENGINE ASSEMBLY" .
7. Remove RH engine mount insulator.
8. Remove center member and rear engine mounting bracket.
9. Drain engine oil.
10. Remove oil pan upper and lower, and oil strainer. Refer to EM-26, "
OIL PAN AND OIL STRAINER" .
11. Remove intake valve timing control cover.
a. Loosen bolts in reverse order shown in the figure.
b. Remove the cover using Tool (Seal cutter).
CAUTION:
Be careful not to damage mounting surface.
12. Pull chain guide between camshaft sprockets out through front
cover.
13. Set No. 1 cylinder at TDC on its compression stroke with the fol-
lowing procedure.
a. Rotate crankshaft pulley clockwise and align mating marks to
timid indicator on front cover.
KBIA0085E
KBIA0190E
Page 120 of 3833
![NISSAN X-TRAIL 2001 Service Repair Manual EM-70
[QR]
ENGINE ASSEMBLY
1. Release fuel pressure. Refer to EC-775, "FUEL PRESSURE RELEASE" [QR20DE (WITH EURO-OBD)],
EC-1139, "
FUEL PRESSURE RELEASE" [QR20DE (WITHOUT EURO NISSAN X-TRAIL 2001 Service Repair Manual EM-70
[QR]
ENGINE ASSEMBLY
1. Release fuel pressure. Refer to EC-775, "FUEL PRESSURE RELEASE" [QR20DE (WITH EURO-OBD)],
EC-1139, "
FUEL PRESSURE RELEASE" [QR20DE (WITHOUT EURO](/manual-img/5/57405/w960_57405-119.png)
EM-70
[QR]
ENGINE ASSEMBLY
1. Release fuel pressure. Refer to EC-775, "FUEL PRESSURE RELEASE" [QR20DE (WITH EURO-OBD)],
EC-1139, "
FUEL PRESSURE RELEASE" [QR20DE (WITHOUT EURO-OBD)], EC-42, "FUEL PRES-
SURE RELEASE" [QR25DE (WITH EURO-OBD)] or EC-452, "FUEL PRESSURE RELEASE" [QR25DE
(WITHOUT EURO-OBD)].
2. Remove engine hood.
3. Drain engine coolant from radiator drain plug. Refer to CO-9, "
DRAINING ENGINE COOLANT" .
4. Remove the following parts.
●LH/RH undercovers
●LH/RH front wheels
●Battery
●Drive belts; Refer to EM-12, "REMOVAL" .
●Air duct and air cleaner case assembly; Refer to EM-14, "REMOVAL" .
●Alternator
●Radiator and radiator fan assembly; Refer to CO-11, "RADIATOR" .
5. Disconnect engine room harness from the engine side and set it aside for easier work.
6. Disconnect all the body-side vacuum hoses and air hoses at engine side.
Engine room LH
7. Disconnect fuel hose, and plug it to prevent fuel from draining. Refer to EM-16, "
INTAKE MANIFOLD"
8. Disconnect heater hose, and install plug it to prevent engine coolant from draining.
9. Disconnect select cable from transaxle (A/T models).
10. Remove clutch operating cylinder from transaxle, and move it aside (M/T models).
11. Disconnect shift cable from transaxle (M/T models).
Engine room RH
12. Remove engine coolant reservoir tank.
13. Remove air conditioner compressor with piping connected from engine. Temporarily secure it on body
with a rope to avoid putting load on it.
Vehicle underbody
14. Remove exhaust front tube.
15. Remove propeller shaft.
16. Remove steering shaft from steering gear.
17. Disconnect power steering fluid cooler piping at a point between body and engine.
18. Remove ABS sensor from brake caliper.
19. Remove brake caliper with piping connected from steering knuckle. Temporarily secure it on body with a
rope to avoid load on it.
20. Remove LH/RH suspensions from steering knuckle under strut.
Removal
21. Install engine slingers into front left of cylinder head and rear right of cylinder head.
●Use alternator bracket mounting bolt holes for the front side.
22. Lift with hoist and secure the engine in position.Slinger bolts:
Front
: 51.0 - 64.7 N·m (5.2 - 6.6 kg-m, 38 - 47 ft-lb)
Rear
: 24.5 - 31.4 N·m (2.5 - 3.2 kg-m, 18 - 23 ft-lb)
SBIA0271E
Page 244 of 3833
![NISSAN X-TRAIL 2001 Service Repair Manual EM-194
[YD22DDTi]
ENGINE ASSEMBLY
REMOVAL
Description of work
Remove engine, transaxle and transfer assembly with front suspension member from vehicle down ward.
Separate suspension membe NISSAN X-TRAIL 2001 Service Repair Manual EM-194
[YD22DDTi]
ENGINE ASSEMBLY
REMOVAL
Description of work
Remove engine, transaxle and transfer assembly with front suspension member from vehicle down ward.
Separate suspension membe](/manual-img/5/57405/w960_57405-243.png)
EM-194
[YD22DDTi]
ENGINE ASSEMBLY
REMOVAL
Description of work
Remove engine, transaxle and transfer assembly with front suspension member from vehicle down ward.
Separate suspension member, and then separate engine and transaxle.
Preparation
1. Remove engine hood.
2. Drain engine coolant from radiator drain plug.
3. Remove the following parts.
●LH/RH undercovers
●LH/RH front wheels
●Battery
●Drive belts; Refer to EM-119, "Removal and Installation" .
●Air duct and air cleaner case assembly; Refer to EM-120, "Removal and Installation" .
●Alternator
●Radiator and radiator fan assembly; Refer to CO-32, "Removal and Installation" .
●Charge air cooler
4. Disconnect engine room harness from the engine side and set it aside for easier work.
5. Disconnect all the body-side vacuum hoses and air hoses at engine side.
Engine room LH
6. Disconnect fuel feed and return hoses, and plug it to prevent fuel from draining.
7. Disconnect heater hose, and install plug it to prevent engine coolant from draining.
8. Remove clutch operating cylinder from transaxle, and move it aside.
9. Disconnect shift cable from transaxle.
Engine room RH
10. Remove engine coolant reservoir tank.
11. Remove air conditioner compressor with piping connected from engine. Temporarily secure it on body
with a rope to avoid putting load on it.
Vehicle underbody
12. Remove exhaust front tube.
13. Remove propeller shaft.
14. Remove steering shaft from steering gear.
15. Disconnect power steering fluid cooler piping at a point between body and engine.
16. Remove ABS sensor from brake caliper.
17. Remove brake caliper with piping connected from steering knuckle. Temporarily secure it on body with a
rope to avoid load on it.
18. Remove LH/RH suspensions from steering knuckle under strut.
Removal
19. Install engine slingers into front right of cylinder head and rear
left of cylinder head.
20. Lift with hoist and secure the engine in position.Slinger bolts:
: 30 - 37 N·m (3.0 - 3.8 kg-m, 22 - 27 ft-lb)
SBIA0191E
Page 2785 of 3833

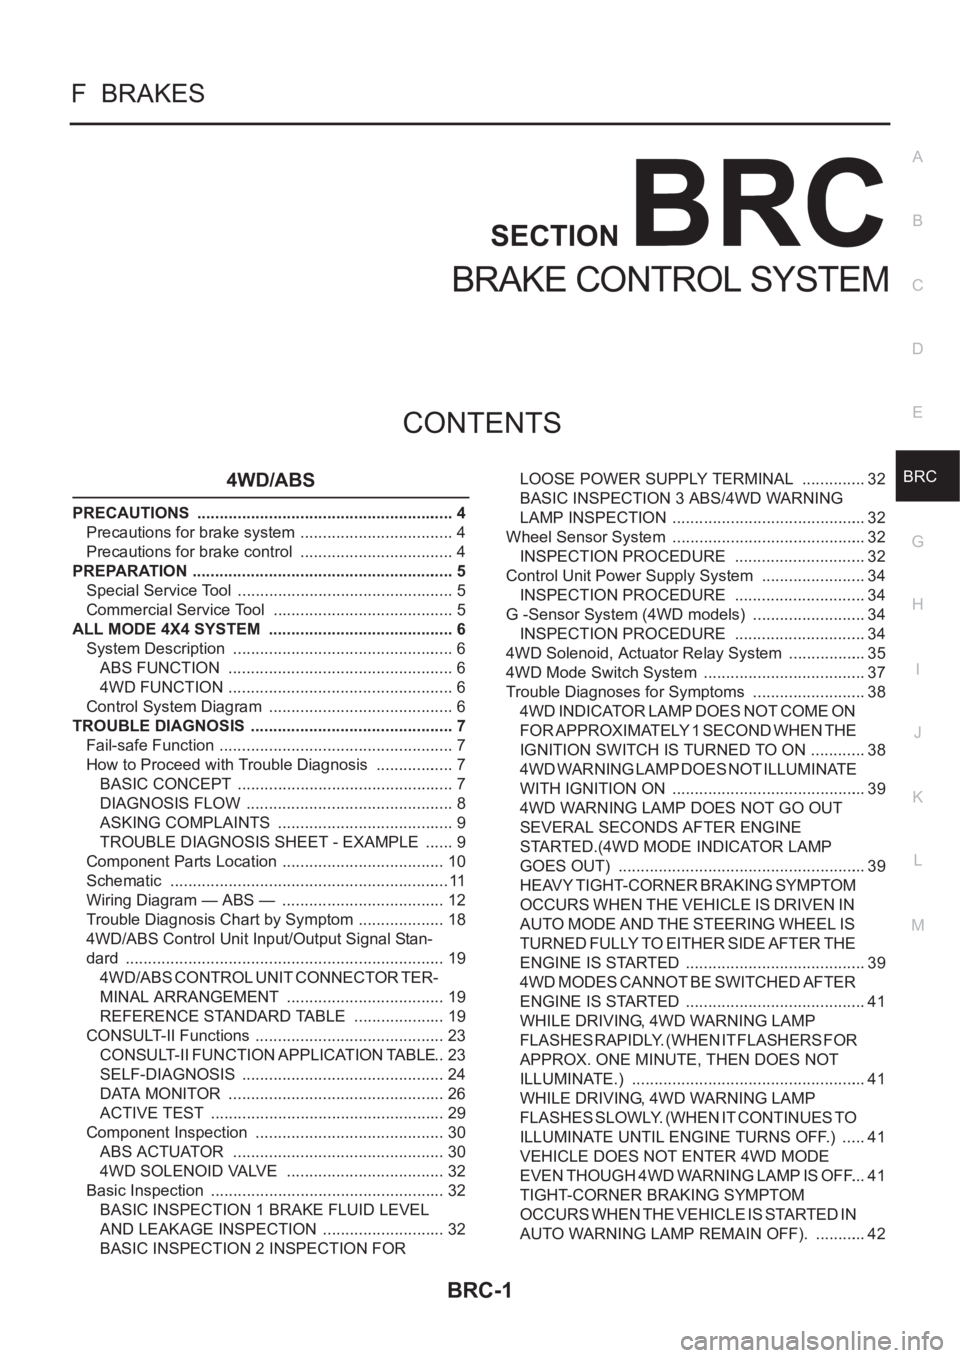
BRC-1
BRAKE CONTROL SYSTEM
F BRAKES
CONTENTS
C
D
E
G
H
I
J
K
L
M
SECTION
A
B
BRC
BRAKE CONTROL SYSTEM
4WD/ABS
PRECAUTIONS .......................................................... 4
Precautions for brake system ................................... 4
Precautions for brake control ................................... 4
PREPARATION ........................................................... 5
Special Service Tool ................................................. 5
Commercial Service Tool ......................................... 5
ALL MODE 4X4 SYSTEM .......................................... 6
System Description .................................................. 6
ABS FUNCTION ................................................... 6
4WD FUNCTION ................................................... 6
Control System Diagram .......................................... 6
TROUBLE DIAGNOSIS .............................................. 7
Fail-safe Function ..................................................... 7
How to Proceed with Trouble Diagnosis .................. 7
BASIC CONCEPT ................................................. 7
DIAGNOSIS FLOW ............................................... 8
ASKING COMPLAINTS ........................................ 9
TROUBLE DIAGNOSIS SHEET - EXAMPLE ....... 9
Component Parts Location ..................................... 10
Schematic ............................................................... 11
Wiring Diagram — ABS — ..................................... 12
Trouble Diagnosis Chart by Symptom .................... 18
4WD/ABS Control Unit Input/Output Signal Stan-
dard ........................................................................ 19
4WD/ABS CONTROL UNIT CONNECTOR TER-
MINAL ARRANGEMENT .................................... 19
REFERENCE STANDARD TABLE ..................... 19
CONSULT-II Functions ........................................... 23
CONSULT-II FUNCTION APPLICATION TABLE ... 23
SELF-DIAGNOSIS .............................................. 24
DATA MONITOR ................................................. 26
ACTIVE TEST ..................................................... 29
Component Inspection ........................................... 30
ABS ACTUATOR ................................................ 30
4WD SOLENOID VALVE .................................... 32
Basic Inspection ..................................................... 32
BASIC INSPECTION 1 BRAKE FLUID LEVEL
AND LEAKAGE INSPECTION ............................ 32
BASIC INSPECTION 2 INSPECTION FOR LOOSE POWER SUPPLY TERMINAL ............... 32
BASIC INSPECTION 3 ABS/4WD WARNING
LAMP INSPECTION ............................................ 32
Wheel Sensor System ............................................ 32
INSPECTION PROCEDURE .............................. 32
Control Unit Power Supply System ........................ 34
INSPECTION PROCEDURE .............................. 34
G -Sensor System (4WD models) .......................... 34
INSPECTION PROCEDURE .............................. 34
4WD Solenoid, Actuator Relay System .................. 35
4WD Mode Switch System ..................................... 37
Trouble Diagnoses for Symptoms .......................
... 38
4WD INDICATOR LAMP DOES NOT COME ON
FOR APPROXIMATELY 1 SECOND WHEN THE
IGNITION SWITCH IS TURNED TO ON ............. 38
4WD WARNING LAMP DOES NOT ILLUMINATE
WITH IGNITION ON ............................................ 39
4WD WARNING LAMP DOES NOT GO OUT
SEVERAL SECONDS AFTER ENGINE
STARTED.(4WD MODE INDICATOR LAMP
GOES OUT) ........................................................ 39
HEAVY TIGHT-CORNER BRAKING SYMPTOM
OCCURS WHEN THE VEHICLE IS DRIVEN IN
AUTO MODE AND THE STEERING WHEEL IS
TURNED FULLY TO EITHER SIDE AFTER THE
ENGINE IS STARTED ......................................... 39
4WD MODES CANNOT BE SWITCHED AFTER
ENGINE IS STARTED ......................................... 41
WHILE DRIVING, 4WD WARNING LAMP
FLASHES RAPIDLY. (WHEN IT FLASHERS FOR
APPROX. ONE MINUTE, THEN DOES NOT
ILLUMINATE.) ..................................................... 41
WHILE DRIVING, 4WD WARNING LAMP
FLASHES SLOWLY. (WHEN IT CONTINUES TO
ILLUMINATE UNTIL ENGINE TURNS OFF.) ...... 41
VEHICLE DOES NOT ENTER 4WD MODE
EVEN THOUGH 4WD WARNING LAMP IS OFF. ... 41
TIGHT-CORNER BRAKING SYMPTOM
OCCURS WHEN THE VEHICLE IS STARTED IN
AUTO WARNING LAMP REMAIN OFF). ............ 42
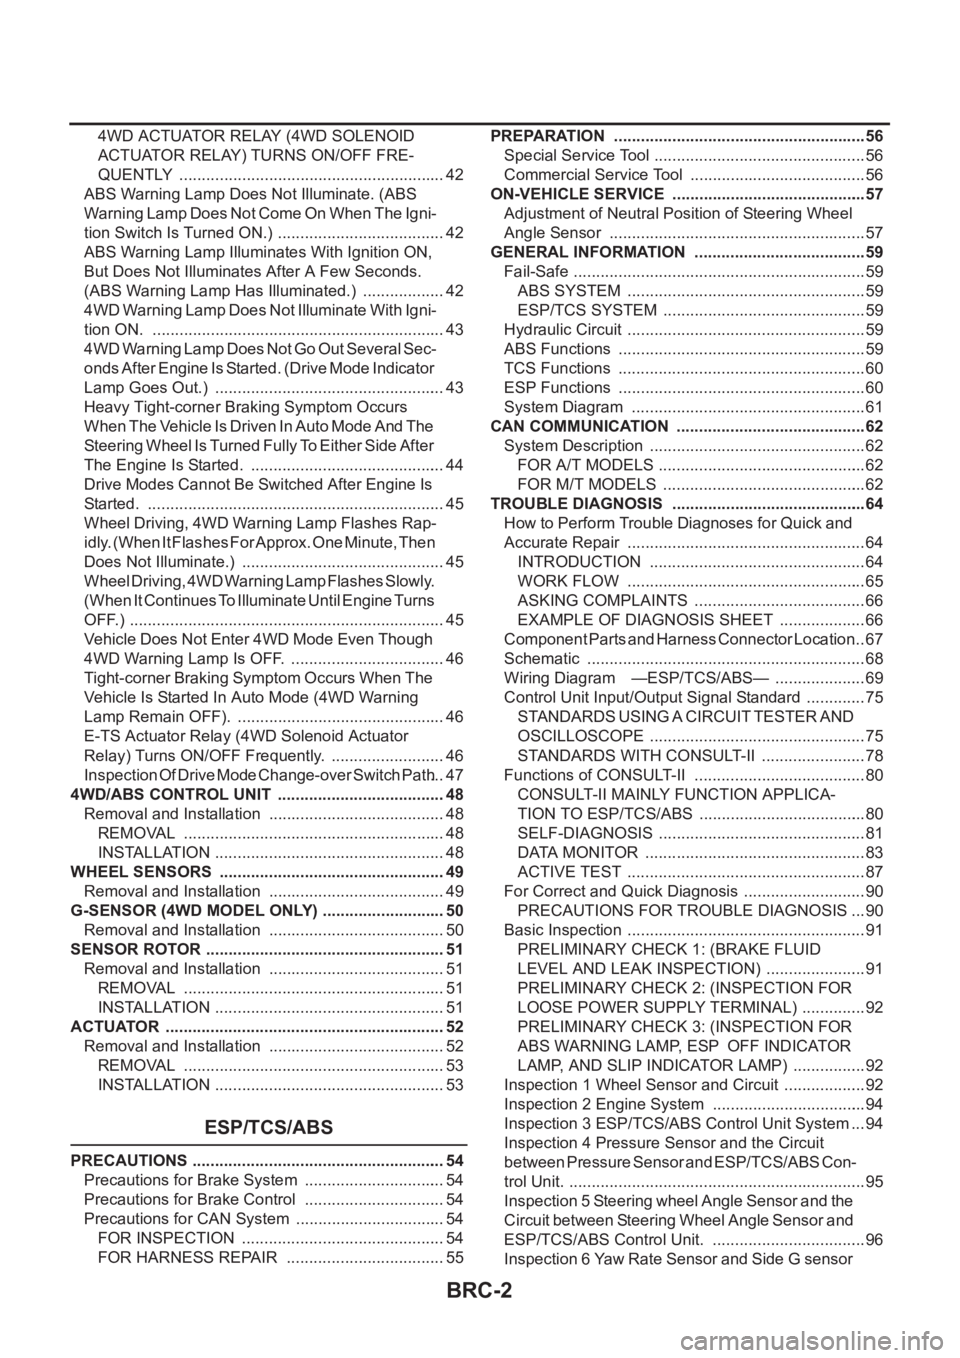
Page 2786 of 3833

BRC-2
4WD ACTUATOR RELAY (4WD SOLENOID
A C T U AT O R R E L AY ) T U R N S O N / O F F F R E -
QUENTLY ............................................................ 42
ABS Warning Lamp Does Not Illuminate. (ABS
Warning Lamp Does Not Come On When The Igni-
tion Switch Is Turned ON.) ...................................... 42
ABS Warning Lamp Illuminates With Ignition ON,
But Does Not Illuminates After A Few Seconds.
(ABS Warning Lamp Has Illuminated.) ................... 42
4WD Warning Lamp Does Not Illuminate With Igni-
tion ON. .................................................................. 43
4WD Warning Lamp Does Not Go Out Several Sec-
onds After Engine Is Started. (Drive Mode Indicator
Lamp Goes Out.) .................................................... 43
Heavy Tight-corner Braking Symptom Occurs
When The Vehicle Is Driven In Auto Mode And The
Steering Wheel Is Turned Fully To Either Side After
The Engine Is Started. ............................................ 44
Drive Modes Cannot Be Switched After Engine Is
Started. ................................................................... 45
Wheel Driving, 4WD Warning Lamp Flashes Rap-
idly. (When It Flashes For Approx. One Minute, Then
Does Not Illuminate.) .............................................. 45
Wheel Driving, 4WD Warning Lamp Flashes Slowly.
(When It Continues To Illuminate Until Engine Turns
OFF.) ....................................................................... 45
Vehicle Does Not Enter 4WD Mode Even Though
4WD Warning Lamp Is OFF. ................................... 46
Tight-corner Braking Symptom Occurs When The
Vehicle Is Started In Auto Mode (4WD Warning
Lamp Remain OFF). ............................................... 46
E-TS Actuator Relay (4WD Solenoid Actuator
Relay) Turns ON/OFF Frequently. .......................... 46
Inspection Of Drive Mode Change-over Switch Path ... 47
4WD/ABS CONTROL UNIT ...................................... 48
Removal and Installation ........................................ 48
REMOVAL ........................................................... 48
INSTALLATION .................................................... 48
WHEEL SENSORS ................................................... 49
Removal and Installation ........................................ 49
G-SENSOR (4WD MODEL ONLY) ............................ 50
Removal and Installation ........................................ 50
SENSOR ROTOR ................................................... ... 51
Removal and Installation ........................................ 51
REMOVAL ........................................................... 51
INSTALLATION .................................................... 51
ACTUATOR ............................................................... 52
Removal and Installation ........................................ 52
REMOVAL ........................................................... 53
INSTALLATION .................................................... 53
ESP/TCS/ABS
PRECAUTIONS ......................................................... 54
Precautions for Brake System ................................ 54
Precautions for Brake Control ................................ 54
Precautions for CAN System .................................. 54
FOR INSPECTION .............................................. 54
FOR HARNESS REPAIR .................................... 55PREPARATION ......................................................... 56
Special Service Tool ................................................ 56
Commercial Service Tool ........................................ 56
ON-VEHICLE SERVICE ............................................ 57
Adjustment of Neutral Position of Steering Wheel
Angle Sensor .......................................................... 57
GENERAL INFORMATION ....................................... 59
Fail-Safe .................................................................. 59
ABS SYSTEM ...................................................... 59
ESP/TCS SYSTEM .............................................. 59
Hydraulic Circuit ...................................................... 59
ABS Functions ........................................................ 59
TCS Functions ........................................................ 60
ESP Functions ........................................................ 60
System Diagram ..................................................... 61
CAN COMMUNICATION ........................................... 62
System Description ................................................. 62
FOR A/T MODELS ............................................... 62
FOR M/T MODELS .............................................. 62
TROUBLE DIAGNOSIS ............................................ 64
How to Perform Trouble Diagnoses for Quick and
Accurate Repair ...................................................... 64
INTRODUCTION ................................................. 64
WORK FLOW ...................................................... 65
ASKING COMPLAINTS ....................................... 66
EXAMPLE OF DIAGNOSIS SHEET .................... 66
Component Parts and Harness Connector Location ... 67
Schematic ............................................................... 68
Wiring Diagram —ESP/TCS/ABS— ..................... 69
Control Unit Input/Output Signal Standard .............. 75
STANDARDS USING A CIRCUIT TESTER AND
OSCILLOSCOPE ................................................. 75
STANDARDS WITH CONSULT-II ........................ 78
Functions of CONSULT-II ....................................... 80
CONSULT-II MAINLY FUNCTION APPLICA-
TION TO ESP/TCS/ABS ...................................... 80
SELF-DIAGNOSIS ............................................... 81
DATA MONITOR .................................................. 83
ACTIVE TEST ...................................................... 87
For Correct and Quick Diagnosis ............................ 90
PRECAUTIONS FOR TROUBLE DIAGNOSIS ... 90
Basic Inspection ...................................................... 91
PRELIMINARY CHECK 1: (BRAKE FLUID
LEVEL AND LEAK INSPECTION) ....................... 91
PRELIMINARY CHECK 2: (INSPECTION FOR
LOOSE POWER SUPPLY TERMINAL) ............... 92
PRELIMINARY CHECK 3: (INSPECTION FOR
ABS WARNING LAMP, ESP OFF INDICATOR
LAMP, AND SLIP INDICATOR LAMP) ................. 92
Inspection 1 Wheel Sensor and Circuit ................... 92
Inspection 2 Engine System ................................... 94
Inspection 3 ESP/TCS/ABS Control Unit System ... 94
Inspection 4 Pressure Sensor and the Circuit
between Pressure Sensor and ESP/TCS/ABS Con-
trol Unit. ................................................................... 95
Inspection 5 Steering wheel Angle Sensor and the
Circuit between Steering Wheel Angle Sensor and
ESP/TCS/ABS Control Unit. ................................... 96
Inspection 6 Yaw Rate Sensor and Side G sensor
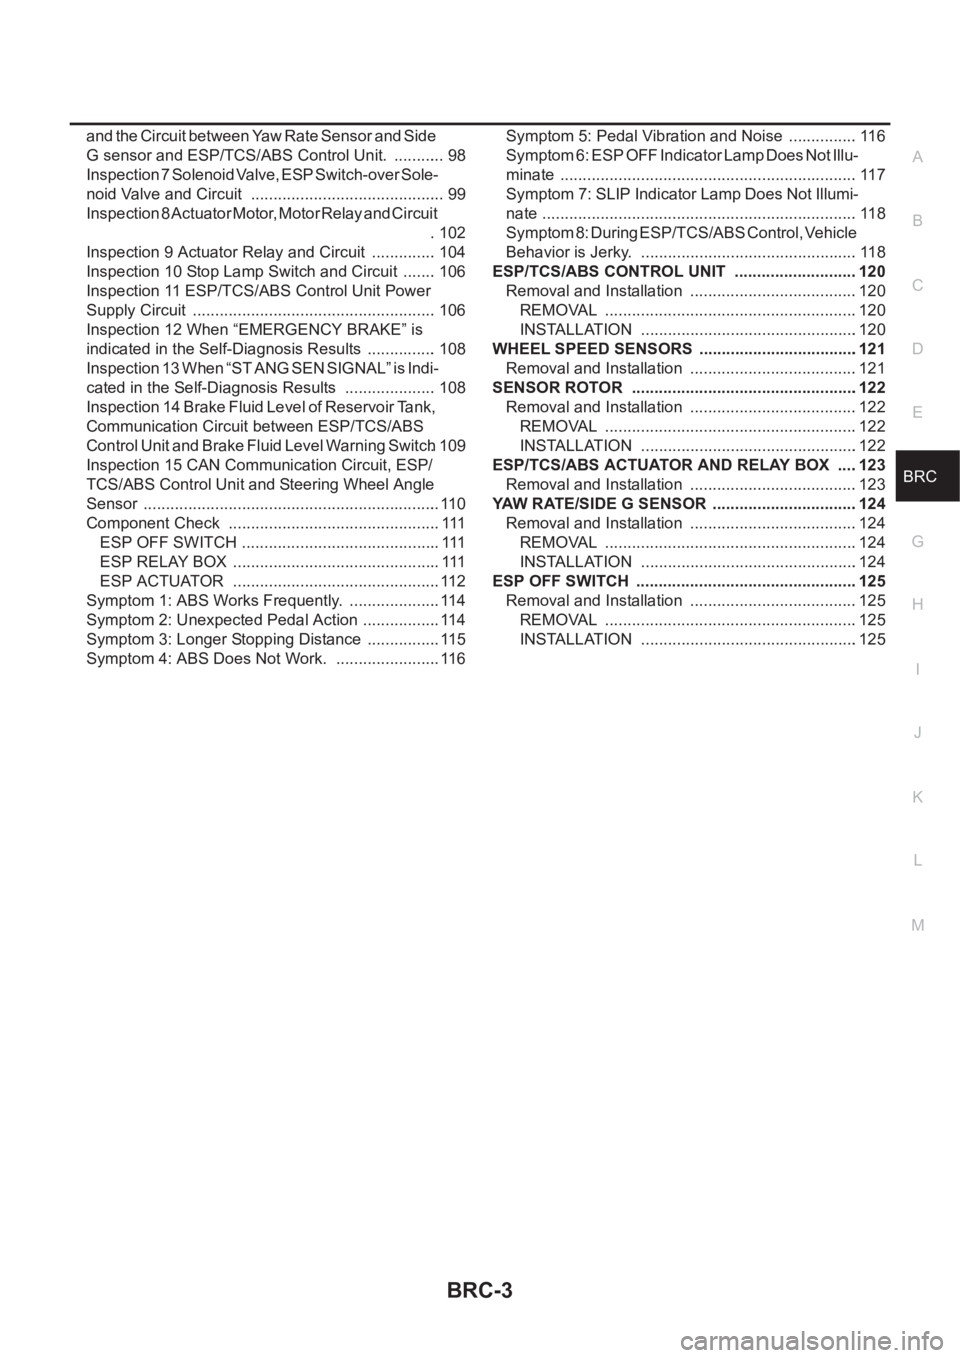
Page 2787 of 3833

BRC-3
C
D
E
G
H
I
J
K
L
MA
B
BRC and the Circuit between Yaw Rate Sensor and Side
G sensor and ESP/TCS/ABS Control Unit. ............ 98
Inspection 7 Solenoid Valve, ESP Switch-over Sole-
noid Valve and Circuit ......................................... ... 99
Inspection 8 Actuator Motor, Motor Relay and Circuit
. 102
Inspection 9 Actuator Relay and Circuit ............... 104
Inspection 10 Stop Lamp Switch and Circuit ........ 106
Inspection 11 ESP/TCS/ABS Control Unit Power
Supply Circuit ....................................................... 106
Inspection 12 When “EMERGENCY BRAKE” is
indicated in the Self-Diagnosis Results ................ 108
Inspection 13 When “ST ANG SEN SIGNAL” is Indi-
cated in the Self-Diagnosis Results .....................108
Inspection 14 Brake Fluid Level of Reservoir Tank,
Communication Circuit between ESP/TCS/ABS
Control Unit and Brake Fluid Level Warning Switch . 109
Inspection 15 CAN Communication Circuit, ESP/
TCS/ABS Control Unit and Steering Wheel Angle
Sensor ................................................................... 110
Component Check ............................................... . 111
ESP OFF SWITCH ............................................ . 111
ESP RELAY BOX .............................................. . 111
ESP ACTUATOR ............................................... 112
Symptom 1: ABS Works Frequently. ..................... 114
Symptom 2: Unexpected Pedal Action .................. 114
Symptom 3: Longer Stopping Distance ................. 115
Symptom 4: ABS Does Not Work. ........................ 116Symptom 5: Pedal Vibration and Noise ................116
Symptom 6: ESP OFF Indicator Lamp Does Not Illu-
minate ...................................................................117
Symptom 7: SLIP Indicator Lamp Does Not Illumi-
nate .......................................................................118
Symptom 8: During ESP/TCS/ABS Control, Vehicle
Behavior is Jerky. .................................................118
ESP/TCS/ABS CONTROL UNIT ............................120
Removal and Installation ......................................120
REMOVAL .........................................................120
INSTALLATION .................................................120
WHEEL SPEED SENSORS ....................................121
Removal and Installation ......................................121
SENSOR ROTOR ...................................................122
Removal and Installation ......................................122
REMOVAL .........................................................122
INSTALLATION .................................................122
ESP/TCS/ABS ACTUATOR AND RELAY BOX .....123
Removal and Installation ......................................123
YAW RATE/SIDE G SENSOR .................................124
Removal and Installation ......................................124
REMOVAL .........................................................124
INSTALLATION .................................................124
ESP OFF SWITCH ................................................. .125
Removal and Installation ......................................125
REMOVAL .........................................................125
INSTALLATION .................................................125
Page 2862 of 3833
![NISSAN X-TRAIL 2001 Service Repair Manual BRC-78
[ESP/TCS/ABS]
TROUBLE DIAGNOSIS
OFF: Approximately 0.5 seconds after the ignition switch is turned ON (when the system is in normal operation) or when ESP OFF
switch is OFF. NISSAN X-TRAIL 2001 Service Repair Manual BRC-78
[ESP/TCS/ABS]
TROUBLE DIAGNOSIS
OFF: Approximately 0.5 seconds after the ignition switch is turned ON (when the system is in normal operation) or when ESP OFF
switch is OFF.](/manual-img/5/57405/w960_57405-2861.png)
BRC-78
[ESP/TCS/ABS]
TROUBLE DIAGNOSIS
OFF: Approximately 0.5 seconds after the ignition switch is turned ON (when the system is in normal operation) or when ESP OFF
switch is OFF.
(Note 5): SLIP indicator lamp ON/OFF timing
ON: For approximately 0.5 seconds after the ignition switch is turned ON, or when a malfunction is detected.
OFF: Approximately 0.5 seconds after the ignition switch is turned ON (when the system is in normal operation) and ESP/TCS function
is not activated.
Flashing: ESP/TCS function is active during driving.
STANDARDS WITH CONSULT-II
CAUTION:
The displayed item is the data calculated by the control unit, so it may indicate a normal value even if
an output circuit (harness) is open or shorted.
Data monitor item ContentsData monitor
(Reference) Check items
for malfunction
ConditionReference value in
normal operation
FR RH SENSOR
FR LH SENSOR
RR RH SENSOR
RR LH SENSORWheel speed Vehicle stopped 0 [km/h (MPH)]
Wheel sensor circuit
During driving (Note 1)Almost in accor-
dance with the
speedometer dis-
play (within ±10%)
ACCEL POS SIGOpen/close condition
of throttle valve (linked
with accelerator pedal)Accelerator pedal not
depressed (ignition switch is
ON)0%Control unit communica-
tion circuit between the
ESP/TCS/ABS control
unit and ECM Accelerator pedal depressed
(ignition switch is ON)0 – 100%
ENG RPMWith the engine run-
ningWith the engine stopped 0rpm
Engine speed signal cir-
cuit
Engine runningAlmost in accor-
dance with
tachometer display
STR ANGLE SIGSteering wheel angle
detected by steering
wheel angle sensorStraight-ahead condition Approx. 0 deg
Steering wheel angle
sensor and circuit
Steering – 720 to 720deg
YAW RATE SENYaw rate detected by
yaw rate sensorVehicle stopped Approx. 0 d/s
Yaw rate sensor and cir-
cuit
During driving – 70 to 70d/s
SIDE G-SENSORTransverse accelera-
tion detected by side G
sensorVehicle stopped
Approx. 0 m/s
2
Side G sensor and circuit
During driving
– 24.3 to 24.1m/s2
PRESS SENSORBrake fluid pressure
detected by pressure
sensorWith the ignition switch
turned ON and brake pedal
released.Approx. 0 bar
Pressure sensor and cir-
cuit
With the ignition switch
turned ON and brake pedal
depressed.– 40 to 300bar
BATTERY VOLTBattery voltage sup-
plied to the ESP/TCS/
ABS control unitIgnition switch ON 10 – 16VESP/TCS/ABS control
unit power supply circuit
and ground circuit
MOTOR RELAYMotor relay
ON/OFF conditionABS not activated. OFF
Motor relay and circuit
ABS activated. ON
ACTUATOR RLYActuator relay
ON/OFF conditionIgnition ON and Vehicle
stopped.OFF
Actuator relay and circuit
Engine running and Vehicle
stopped.ON
STOP LAMP SWOperating status of
brake pedalDepress brake pedal. ON
Stop lamp switch circuit
Release the brake pedal. OFF