2001 NISSAN X-TRAIL belt
[x] Cancel search: beltPage 3006 of 3833
SRS-4
PREPARATION
PREPARATION
PFP:00002
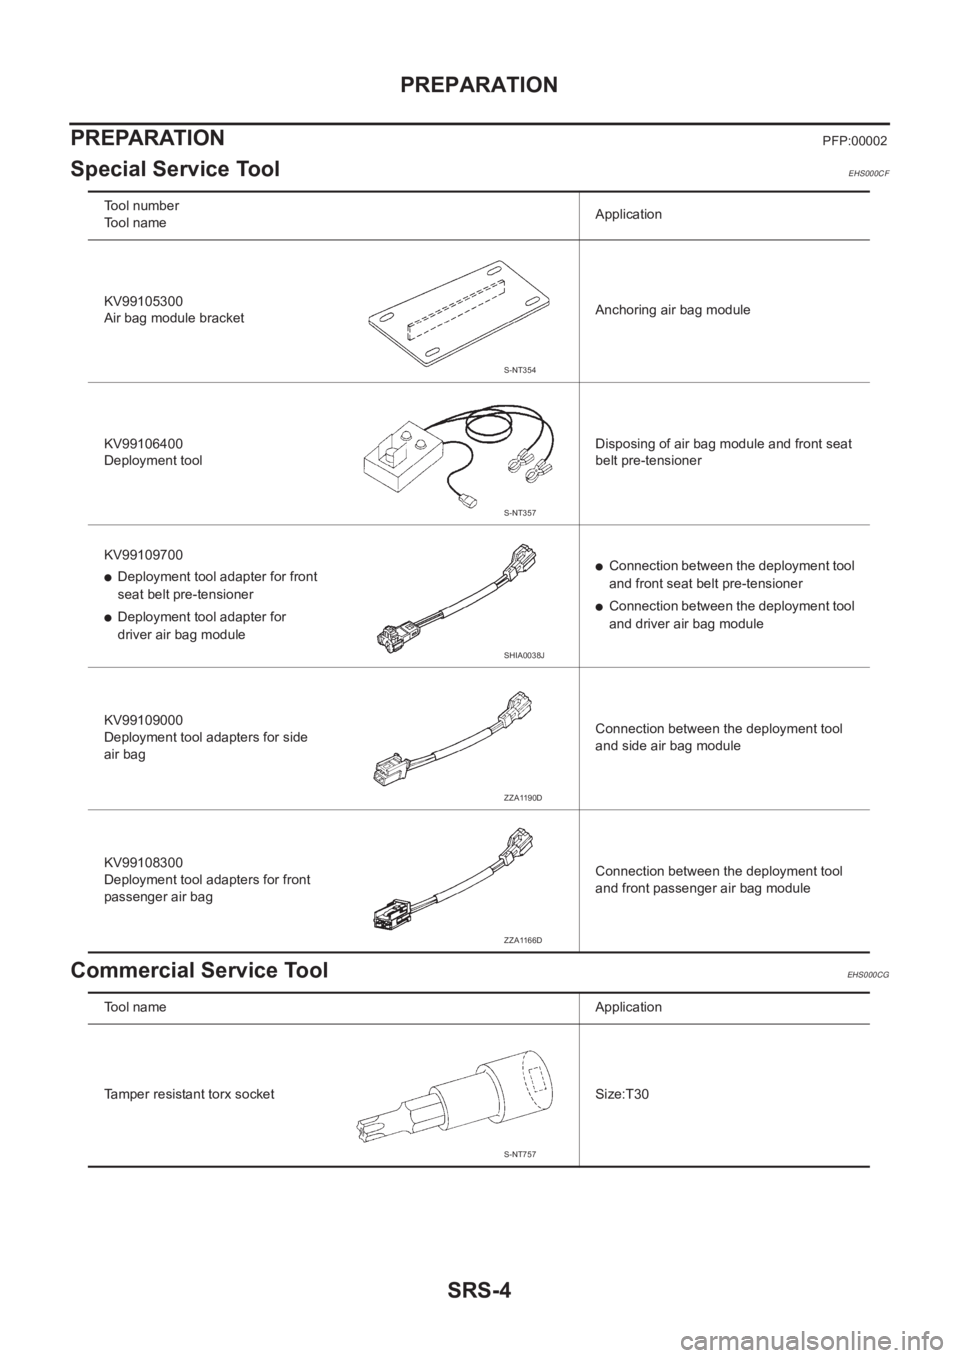
Special Service ToolEHS000CF
Commercial Service ToolEHS000CG
Tool number
Tool nameApplication
KV99105300
Air bag module bracketAnchoring air bag module
KV99106400
Deployment toolDisposing of air bag module and front seat
belt pre-tensioner
KV99109700
●Deployment tool adapter for front
seat belt pre-tensioner
●Deployment tool adapter for
driver air bag module
●Connection between the deployment tool
and front seat belt pre-tensioner
●Connection between the deployment tool
and driver air bag module
KV99109000
Deployment tool adapters for side
air bagConnection between the deployment tool
and side air bag module
KV99108300
Deployment tool adapters for front
passenger air bagConnection between the deployment tool
and front passenger air bag module
S-NT354
S-NT357
SHIA0038J
ZZA1190D
ZZA1166D
Tool name Application
Tamper resistant torx socket Size:T30
S-NT757
Page 3007 of 3833
SUPPLEMENTAL RESTRAINT SYSTEM (SRS)
SRS-5
C
D
E
F
G
I
J
K
L
MA
B
SRS
SUPPLEMENTAL RESTRAINT SYSTEM (SRS)PFP:28556
SRS ConfigurationEHS000CH
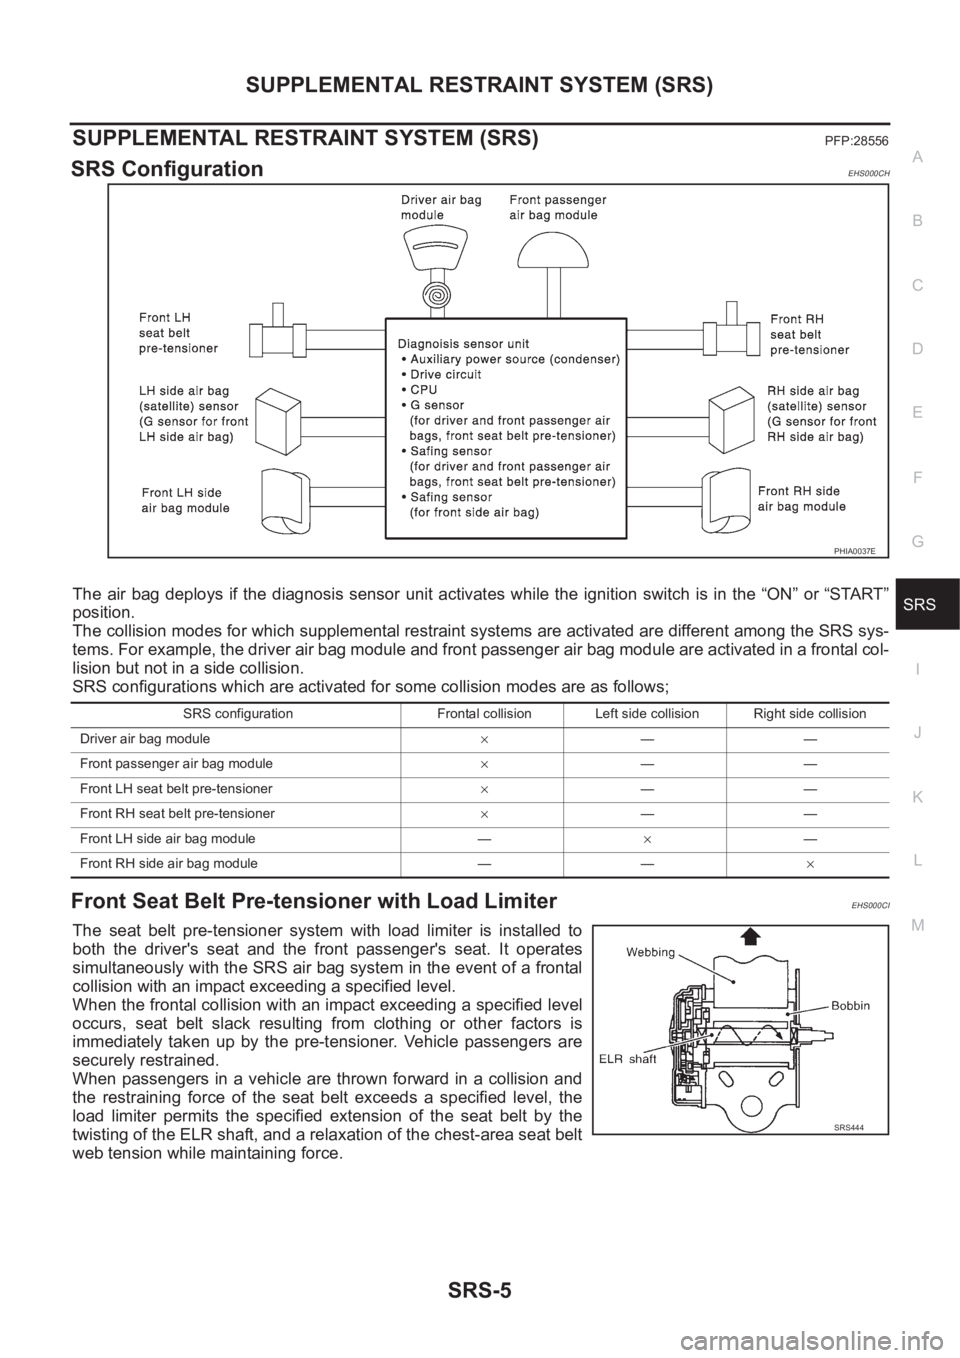
The air bag deploys if the diagnosis sensor unit activates while the ignition switch is in the “ON” or “START”
position.
The collision modes for which supplemental restraint systems are activated are different among the SRS sys-
tems. For example, the driver air bag module and front passenger air bag module are activated in a frontal col-
lision but not in a side collision.
SRS configurations which are activated for some collision modes are as follows;
Front Seat Belt Pre-tensioner with Load LimiterEHS000CI
The seat belt pre-tensioner system with load limiter is installed to
both the driver's seat and the front passenger's seat. It operates
simultaneously with the SRS air bag system in the event of a frontal
collision with an impact exceeding a specified level.
When the frontal collision with an impact exceeding a specified level
occurs, seat belt slack resulting from clothing or other factors is
immediately taken up by the pre-tensioner. Vehicle passengers are
securely restrained.
When passengers in a vehicle are thrown forward in a collision and
the restraining force of the seat belt exceeds a specified level, the
load limiter permits the specified extension of the seat belt by the
twisting of the ELR shaft, and a relaxation of the chest-area seat belt
web tension while maintaining force.
PHIA0037E
SRS configuration Frontal collision Left side collision Right side collision
Driver air bag module×——
Front passenger air bag module×——
Front LH seat belt pre-tensioner×——
Front RH seat belt pre-tensioner×——
Front LH side air bag module —×—
Front RH side air bag module — —×
SRS444
Page 3009 of 3833
TROUBLE DIAGNOSIS
SRS-7
C
D
E
F
G
I
J
K
L
MA
B
SRS
TROUBLE DIAGNOSISPFP:00004
Trouble Diagnosis IntroductionEHS000CL
CAUTION:
●Do not use electrical test equipment on any circuit related to the SRS unless instructed to in this
Service Manual. SRS wiring harness can be identified by yellow and/or orange harness connector.
●Do not attempt to repair, splice or modify the SRS wiring harness. If the harness is damaged,
replace it with a new one.
●Keep ground portion clean.
DIAGNOSIS FUNCTION
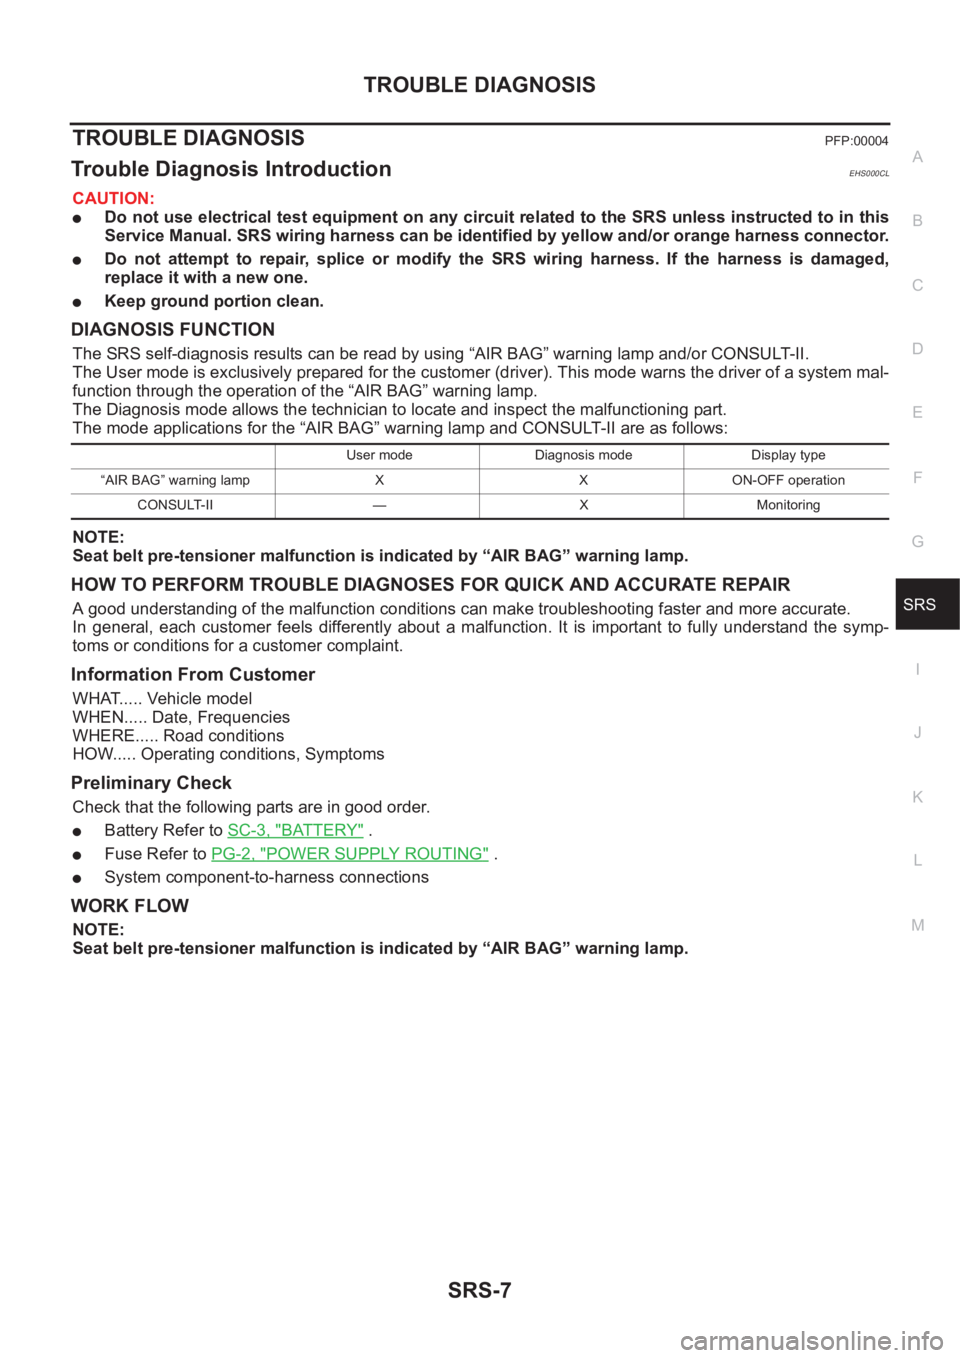
The SRS self-diagnosis results can be read by using “AIR BAG” warning lamp and/or CONSULT-II.
The User mode is exclusively prepared for the customer (driver). This mode warns the driver of a system mal-
function through the operation of the “AIR BAG” warning lamp.
The Diagnosis mode allows the technician to locate and inspect the malfunctioning part.
The mode applications for the “AIR BAG” warning lamp and CONSULT-II are as follows:
NOTE:
Seat belt pre-tensioner malfunction is indicated by “AIR BAG” warning lamp.
HOW TO PERFORM TROUBLE DIAGNOSES FOR QUICK AND ACCURATE REPAIR
A good understanding of the malfunction conditions can make troubleshooting faster and more accurate.
In general, each customer feels differently about a malfunction. It is important to fully understand the symp-
toms or conditions for a customer complaint.
Information From Customer
WHAT..... Vehicle model
WHEN..... Date, Frequencies
WHERE..... Road conditions
HOW..... Operating conditions, Symptoms
Preliminary Check
Check that the following parts are in good order.
●Battery Refer to SC-3, "BATTERY" .
●Fuse Refer to PG-2, "POWER SUPPLY ROUTING" .
●System component-to-harness connections
WORK FLOW
NOTE:
Seat belt pre-tensioner malfunction is indicated by “AIR BAG” warning lamp.
User mode Diagnosis mode Display type
“AIR BAG” warning lamp X X ON-OFF operation
CONSULT-II — X Monitoring
Page 3019 of 3833
TROUBLE DIAGNOSIS
SRS-17
C
D
E
F
G
I
J
K
L
MA
B
SRS
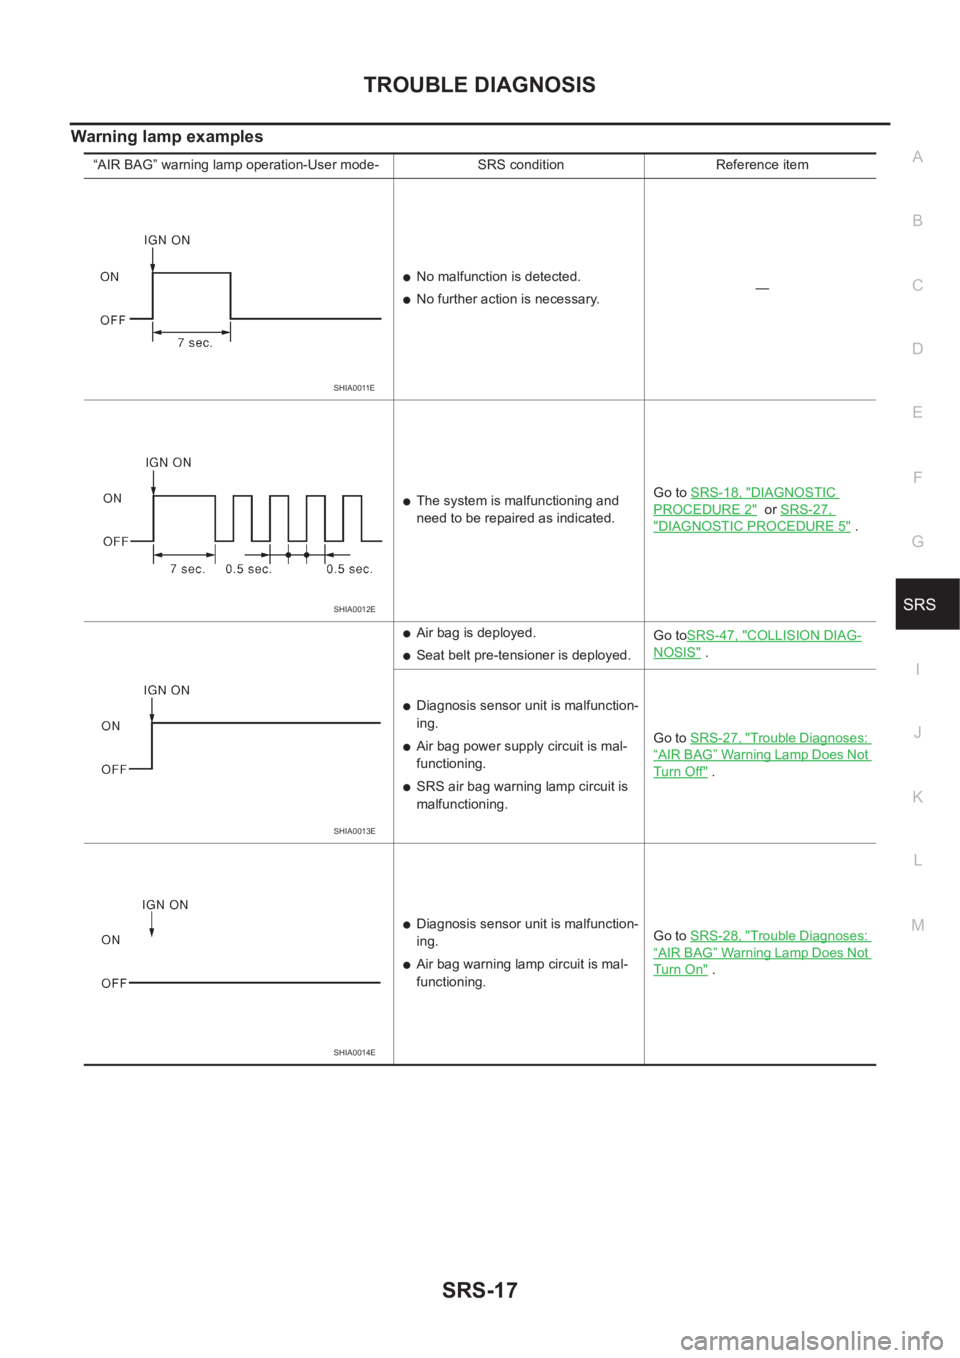
Warning lamp examples
“AIR BAG” warning lamp operation-User mode- SRS condition Reference item
●No malfunction is detected.
●No further action is necessary.—
●The system is malfunctioning and
need to be repaired as indicated.Go to SRS-18, "DIAGNOSTIC
PROCEDURE 2" or SRS-27,
"DIAGNOSTIC PROCEDURE 5" .
●Air bag is deployed.
●Seat belt pre-tensioner is deployed.Go toSRS-47, "
COLLISION DIAG-
NOSIS" .
●Diagnosis sensor unit is malfunction-
ing.
●Air bag power supply circuit is mal-
functioning.
●SRS air bag warning lamp circuit is
malfunctioning.Go to SRS-27, "
Trouble Diagnoses:
“AIR BAG” Warning Lamp Does Not
Turn Off" .
●Diagnosis sensor unit is malfunction-
ing.
●Air bag warning lamp circuit is mal-
functioning.Go to SRS-28, "
Trouble Diagnoses:
“AIR BAG” Warning Lamp Does Not
Turn On" .
SHIA0011E
SHIA0012E
SHIA0013E
SHIA0014E
Page 3024 of 3833
SRS-22
TROUBLE DIAGNOSIS
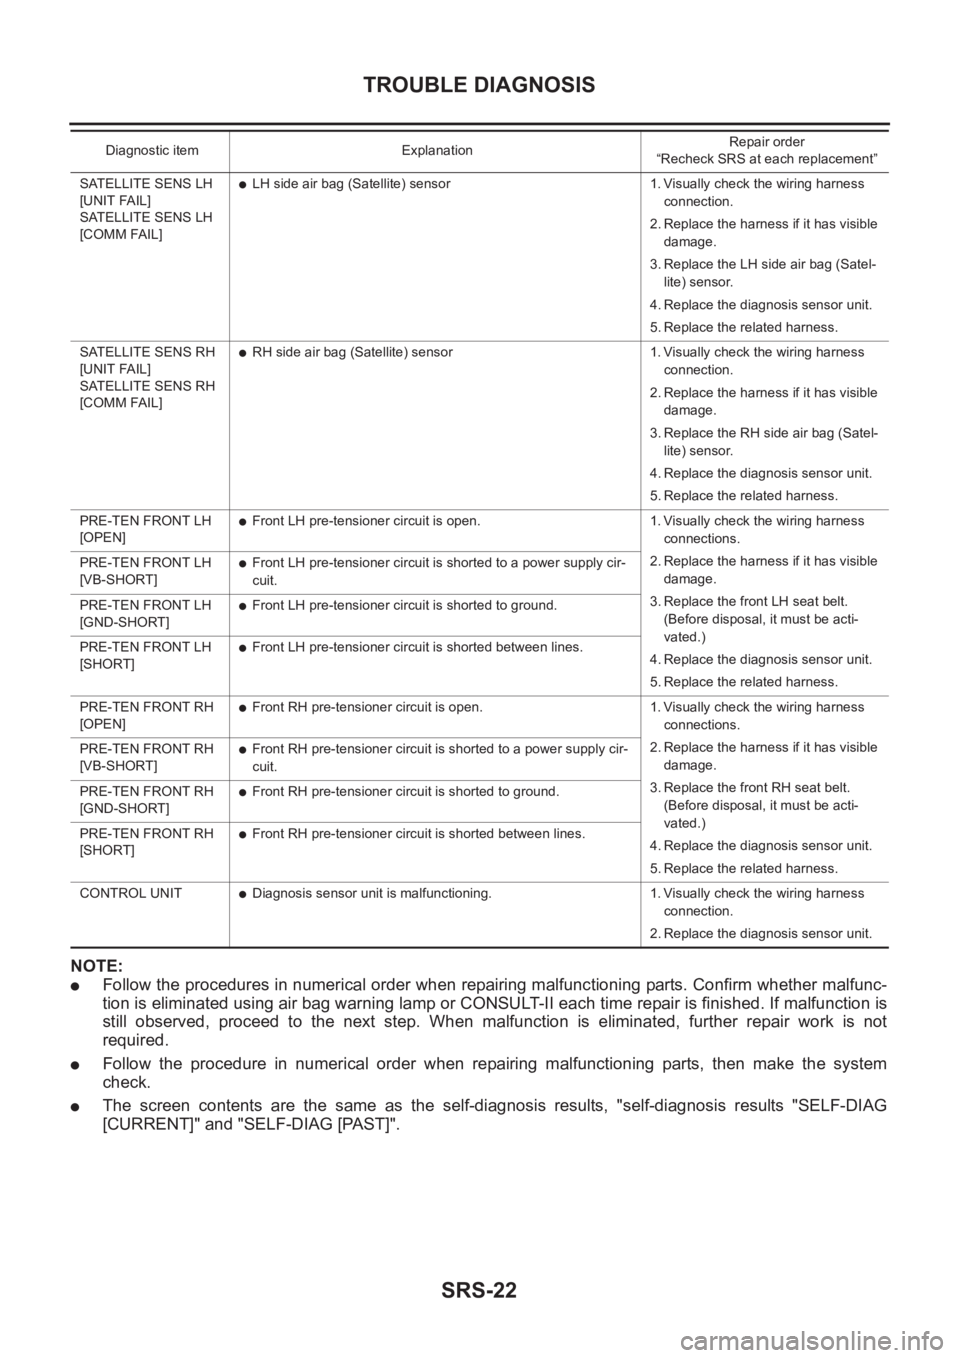
NOTE:
●Follow the procedures in numerical order when repairing malfunctioning parts. Confirm whether malfunc-
tion is eliminated using air bag warning lamp or CONSULT-II each time repair is finished. If malfunction is
still observed, proceed to the next step. When malfunction is eliminated, further repair work is not
required.
●Follow the procedure in numerical order when repairing malfunctioning parts, then make the system
check.
●The screen contents are the same as the self-diagnosis results, "self-diagnosis results "SELF-DIAG
[CURRENT]" and "SELF-DIAG [PAST]".
SATELLITE SENS LH
[UNIT FAIL]
SATELLITE SENS LH
[COMM FAIL]●LH side air bag (Satellite) sensor 1. Visually check the wiring harness
connection.
2. Replace the harness if it has visible
damage.
3. Replace the LH side air bag (Satel-
lite) sensor.
4. Replace the diagnosis sensor unit.
5. Replace the related harness.
SATELLITE SENS RH
[UNIT FAIL]
SATELLITE SENS RH
[COMM FAIL]
●RH side air bag (Satellite) sensor 1. Visually check the wiring harness
connection.
2. Replace the harness if it has visible
damage.
3. Replace the RH side air bag (Satel-
lite) sensor.
4. Replace the diagnosis sensor unit.
5. Replace the related harness.
PRE-TEN FRONT LH
[OPEN]
●Front LH pre-tensioner circuit is open. 1. Visually check the wiring harness
connections.
2. Replace the harness if it has visible
damage.
3. Replace the front LH seat belt.
(Before disposal, it must be acti-
vated.)
4. Replace the diagnosis sensor unit.
5. Replace the related harness. PRE-TEN FRONT LH
[VB-SHORT]
●Front LH pre-tensioner circuit is shorted to a power supply cir-
cuit.
PRE-TEN FRONT LH
[GND-SHORT]
●Front LH pre-tensioner circuit is shorted to ground.
PRE-TEN FRONT LH
[SHORT]
●Front LH pre-tensioner circuit is shorted between lines.
PRE-TEN FRONT RH
[OPEN]
●Front RH pre-tensioner circuit is open. 1. Visually check the wiring harness
connections.
2. Replace the harness if it has visible
damage.
3. Replace the front RH seat belt.
(Before disposal, it must be acti-
vated.)
4. Replace the diagnosis sensor unit.
5. Replace the related harness. PRE-TEN FRONT RH
[VB-SHORT]
●Front RH pre-tensioner circuit is shorted to a power supply cir-
cuit.
PRE-TEN FRONT RH
[GND-SHORT]
●Front RH pre-tensioner circuit is shorted to ground.
PRE-TEN FRONT RH
[SHORT]
●Front RH pre-tensioner circuit is shorted between lines.
CONTROL UNIT
●Diagnosis sensor unit is malfunctioning. 1. Visually check the wiring harness
connection.
2. Replace the diagnosis sensor unit. Diagnostic item ExplanationRepair order
“Recheck SRS at each replacement”
Page 3040 of 3833
SRS-38
SIDE AIR BAG (SATELLITE) SENSOR
SIDE AIR BAG (SATELLITE) SENSOR
PFP:98830
Removal and InstallationEHS000DB
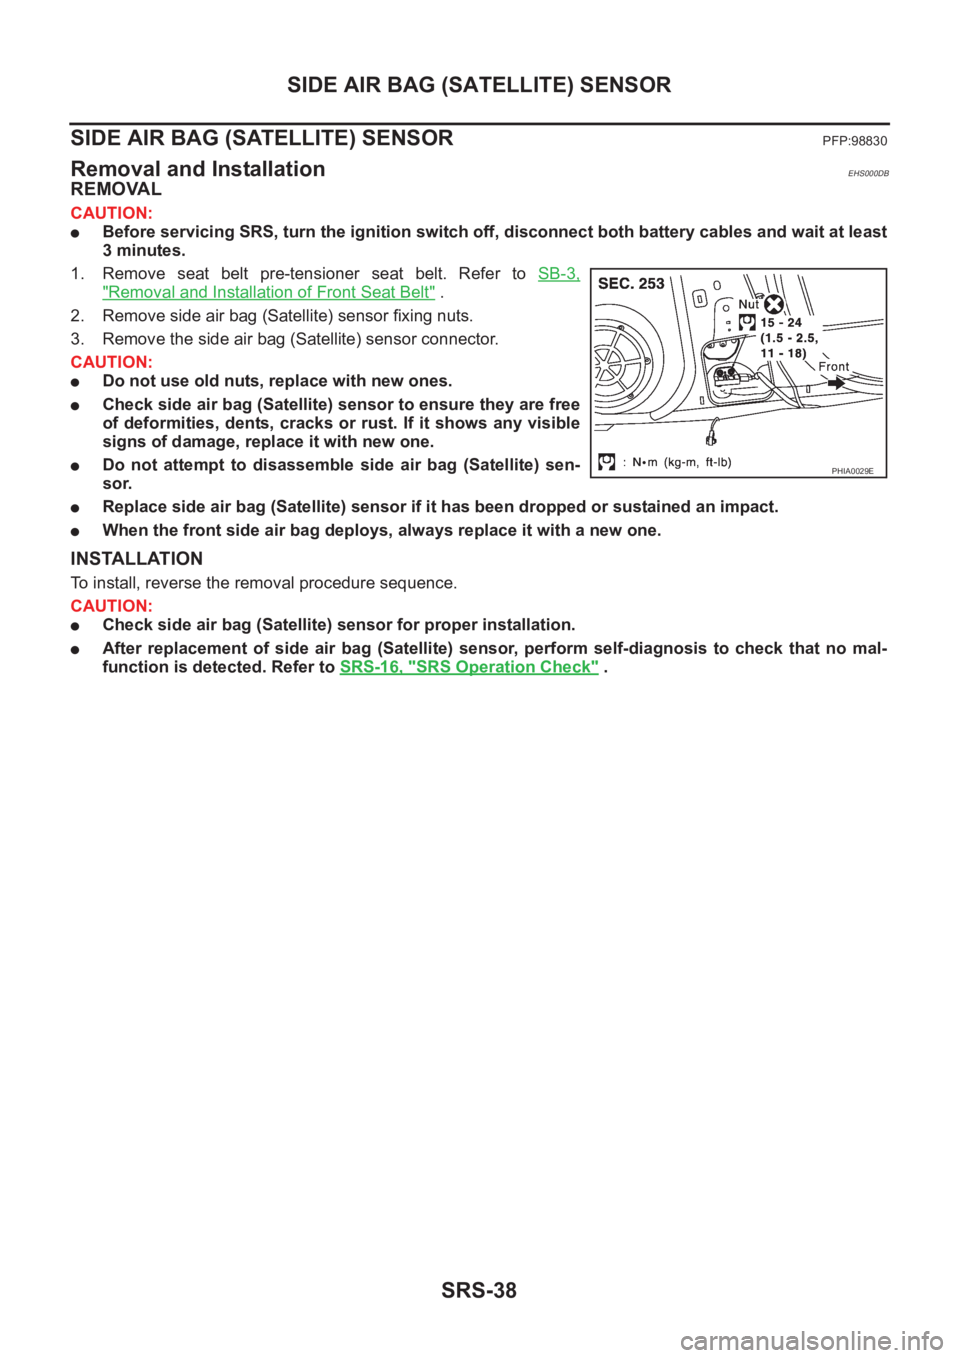
REMOVAL
CAUTION:
●Before servicing SRS, turn the ignition switch off, disconnect both battery cables and wait at least
3 minutes.
1. Remove seat belt pre-tensioner seat belt. Refer to SB-3,
"Removal and Installation of Front Seat Belt" .
2. Remove side air bag (Satellite) sensor fixing nuts.
3. Remove the side air bag (Satellite) sensor connector.
CAUTION:
●Do not use old nuts, replace with new ones.
●Check side air bag (Satellite) sensor to ensure they are free
of deformities, dents, cracks or rust. If it shows any visible
signs of damage, replace it with new one.
●Do not attempt to disassemble side air bag (Satellite) sen-
sor.
●Replace side air bag (Satellite) sensor if it has been dropped or sustained an impact.
●When the front side air bag deploys, always replace it with a new one.
INSTALLATION
To install, reverse the removal procedure sequence.
CAUTION:
●Check side air bag (Satellite) sensor for proper installation.
●After replacement of side air bag (Satellite) sensor, perform self-diagnosis to check that no mal-
function is detected. Refer to SRS-16, "
SRS Operation Check" .
PHIA0029E
Page 3041 of 3833
FRONT SEAT BELT PRE-TENSIONER
SRS-39
C
D
E
F
G
I
J
K
L
MA
B
SRS
FRONT SEAT BELT PRE-TENSIONERPFP:86884
Removal and Installation EHS000DC
To removal and installation procedures, refer to SB-3, "Removal and Installation of Front Seat Belt" .
Page 3043 of 3833
DISPOSAL OF AIR BAG MODULE AND SEAT BELT PRE-TENSIONER
SRS-41
C
D
E
F
G
I
J
K
L
MA
B
SRS
DISPOSAL OF AIR BAG MODULE AND SEAT BELT PRE-TENSIONERPFP:00014
Caution for Air Bag Module and Seat Belt Pre-tensioner EHS000DE
●Before disposing of air bag module and seat belt pre-tensioner, or vehicles equipped with such systems,
deploy the systems. If such systems have already been deployed due to an accident, dispose of them as
indicated in SRS-46, "
DISPOSING OF AIR BAG MODULE AND SEAT BELT PRE-TENSIONER"
●When deploying the air bag module and seat belt pre-tensioner, always use the Special Service Tool;
Deployment tool (KV99106400).
●When deploying the air bag module and seat belt pre-tensioner, stand at least 5 m (16 ft) away from the
deployment component.
●When deploying air bag module and seat belt pre-tensioner, a fairly loud noise is made, followed by
smoke being released. The smoke is not poisonous, however, be careful not to inhale smoke since it irri-
tates the throat and can cause choking.
●Always activate one air bag module at a time.
●Due to heat, leave air bag module unattended for more than 30 minutes after deployment. Also leave seat
belt pre-tensioner unattended for more than 10 minutes after deployment.
●Be sure to wear gloves when handling a deployed air bag module and seat belt pre-tensioner.
●Never apply water to the deployed air bag module and seat belt pre-tensioner.
●Wash your hands clean after finishing work.
●Place the vehicle outdoors with an open space of at least 6 m (20 ft) on all sides when deploying air bag
module and seat belt pre-tensioner while mounted in vehicle.
●Use a voltmeter to make sure the vehicle battery is fully charged.
●Do not dispose of the air bag module and seat belt pre-tensioner un-deployed.
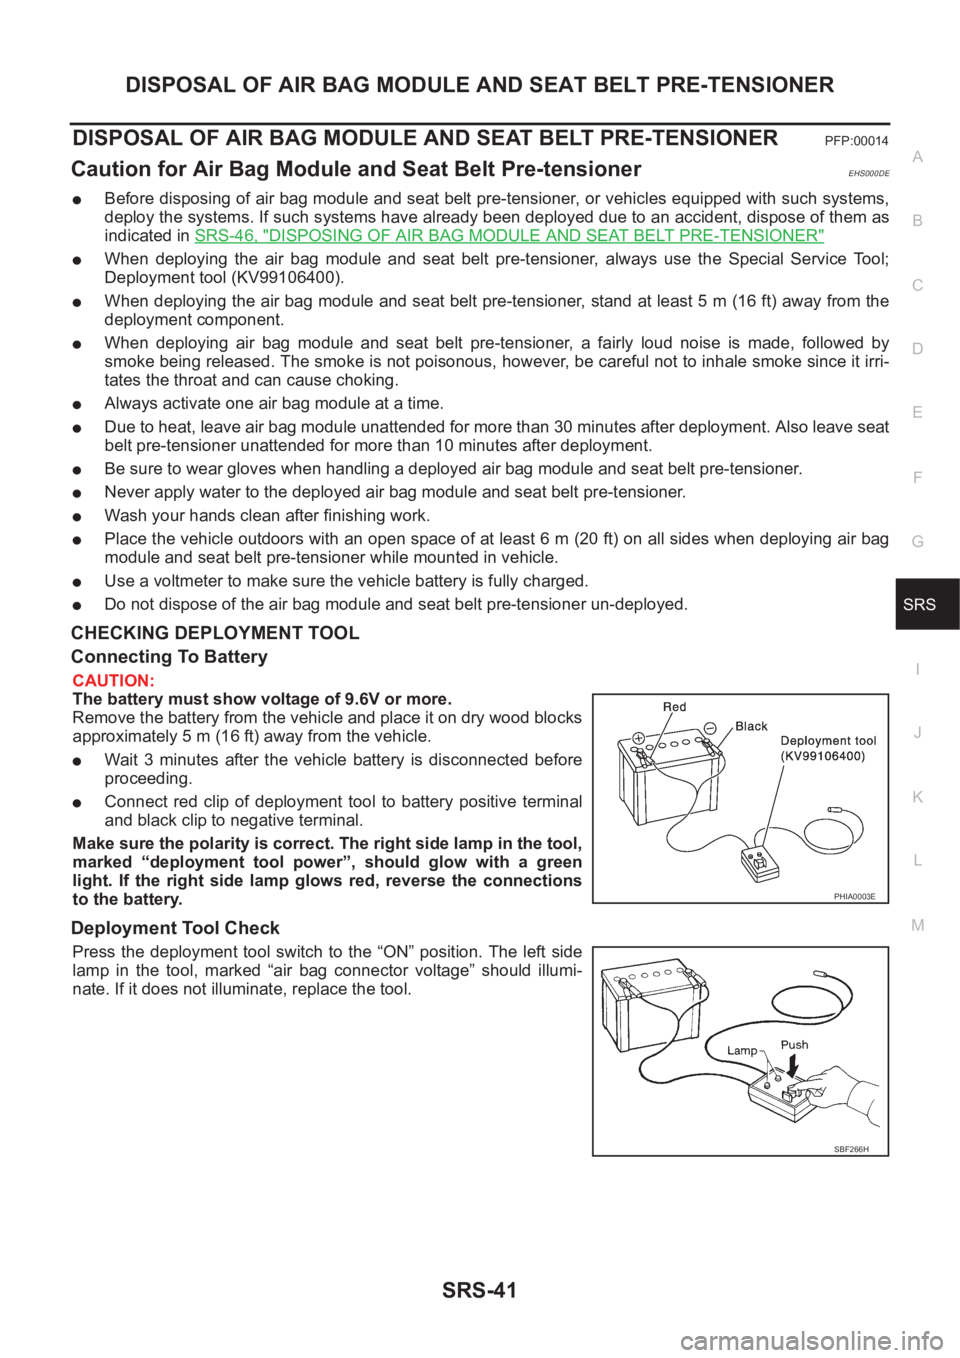
CHECKING DEPLOYMENT TOOL
Connecting To Battery
CAUTION:
The battery must show voltage of 9.6V or more.
Remove the battery from the vehicle and place it on dry wood blocks
approximately 5 m (16 ft) away from the vehicle.
●Wait 3 minutes after the vehicle battery is disconnected before
proceeding.
●Connect red clip of deployment tool to battery positive terminal
and black clip to negative terminal.
Make sure the polarity is correct. The right side lamp in the tool,
marked “deployment tool power”, should glow with a green
light. If the right side lamp glows red, reverse the connections
to the battery.
Deployment Tool Check
Press the deployment tool switch to the “ON” position. The left side
lamp in the tool, marked “air bag connector voltage” should illumi-
nate. If it does not illuminate, replace the tool.
PHIA0003E
SBF266H