2001 NISSAN X-TRAIL belt
[x] Cancel search: beltPage 2998 of 3833
SB-16
SEAT BELT WARNING SYSTEM
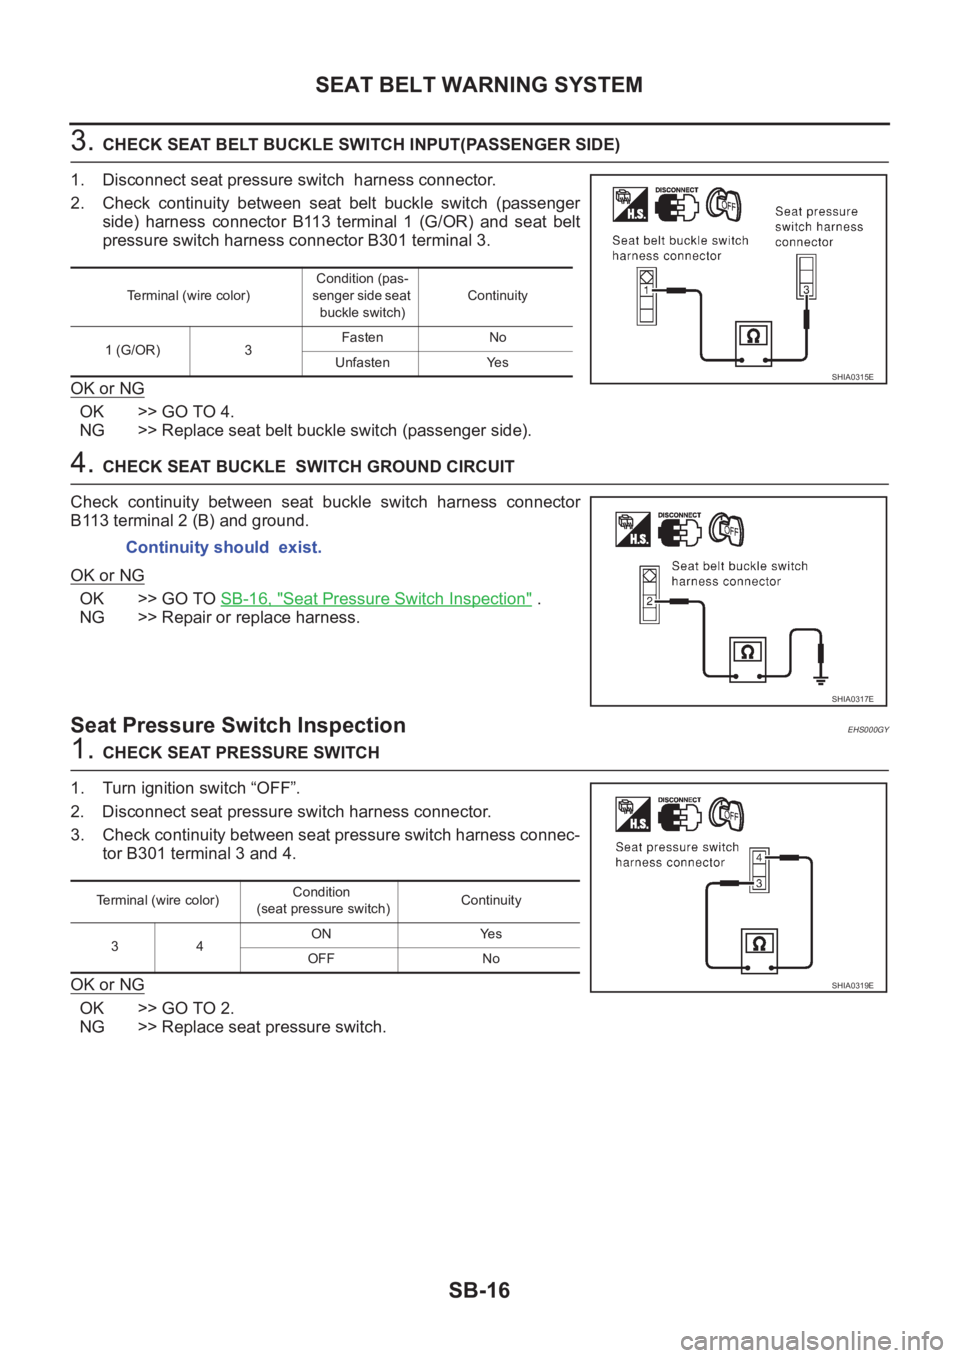
3. CHECK SEAT BELT BUCKLE SWITCH INPUT(PASSENGER SIDE)
1. Disconnect seat pressure switch harness connector.
2. Check continuity between seat belt buckle switch (passenger
side) harness connector B113 terminal 1 (G/OR) and seat belt
pressure switch harness connector B301 terminal 3.
OK or NG
OK >> GO TO 4.
NG >> Replace seat belt buckle switch (passenger side).
4. CHECK SEAT BUCKLE SWITCH GROUND CIRCUIT
Check continuity between seat buckle switch harness connector
B113 terminal 2 (B) and ground.
OK or NG
OK >> GO TO SB-16, "Seat Pressure Switch Inspection" .
NG >> Repair or replace harness.
Seat Pressure Switch InspectionEHS000GY
1. CHECK SEAT PRESSURE SWITCH
1. Turn ignition switch “OFF”.
2. Disconnect seat pressure switch harness connector.
3. Check continuity between seat pressure switch harness connec-
tor B301 terminal 3 and 4.
OK or NG
OK >> GO TO 2.
NG >> Replace seat pressure switch.
Terminal (wire color)Condition (pas-
senger side seat
buckle switch)Continuity
1 (G/OR) 3Fasten No
Unfasten Yes
SHIA0315E
Continuity should exist.
SHIA0317E
Terminal (wire color)Condition
(seat pressure switch)Continuity
34ON Yes
OFF No
SHIA0319E
Page 2999 of 3833
SEAT BELT WARNING SYSTEM
SB-17
C
D
E
F
G
I
J
K
L
MA
B
SB
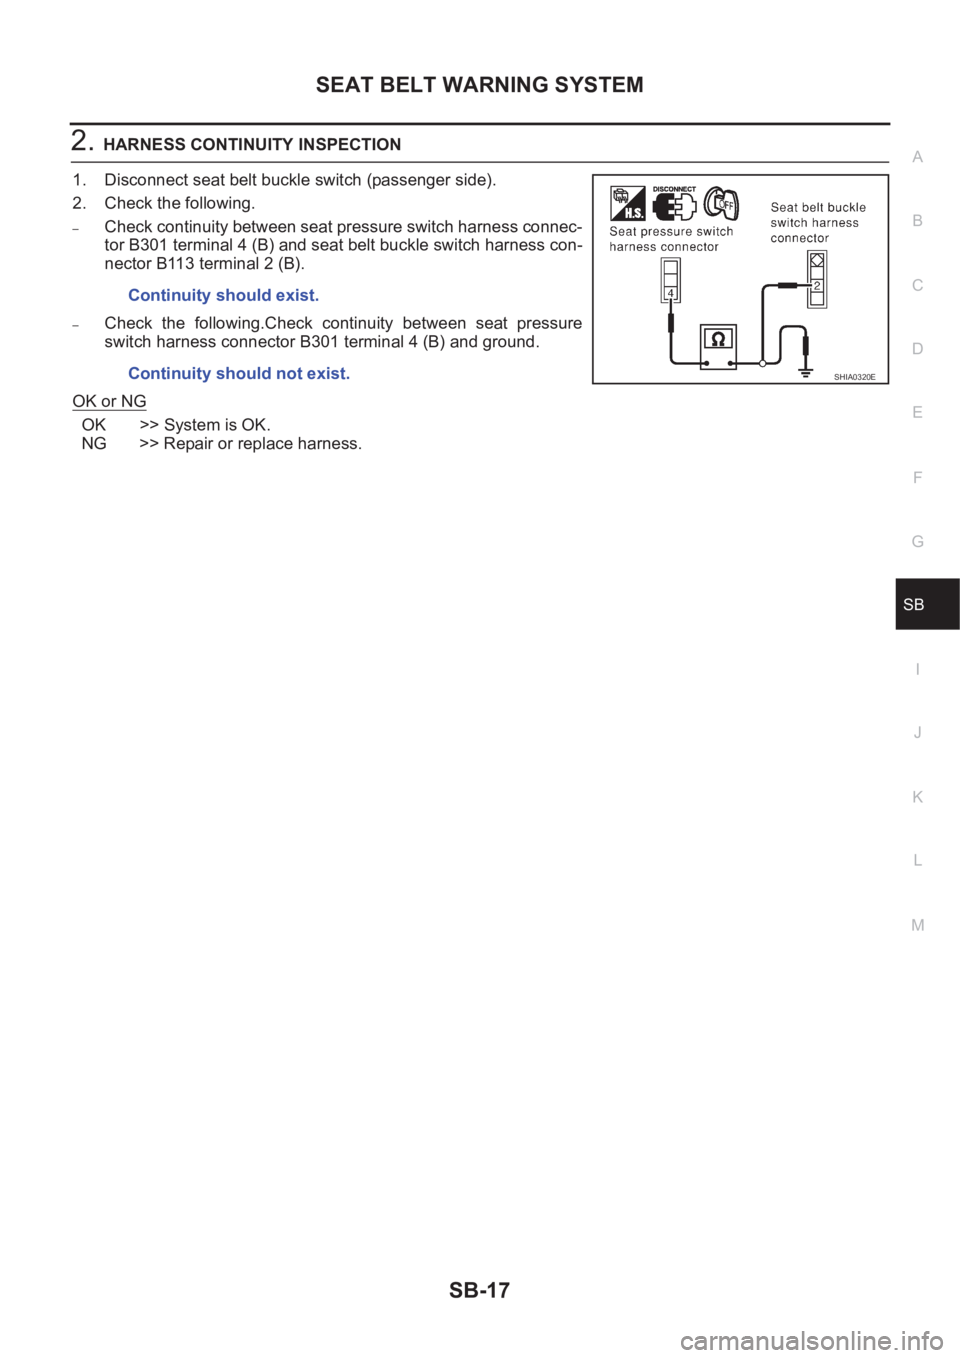
2.HARNESS CONTINUITY INSPECTION
1. Disconnect seat belt buckle switch (passenger side).
2. Check the following.
–Check continuity between seat pressure switch harness connec-
tor B301 terminal 4 (B) and seat belt buckle switch harness con-
nector B113 terminal 2 (B).
–Check the following.Check continuity between seat pressure
switch harness connector B301 terminal 4 (B) and ground.
OK or NG
OK >> System is OK.
NG >> Repair or replace harness.Continuity should exist.
Continuity should not exist.
SHIA0320E
Page 3000 of 3833
SB-18
SEAT BELT WARNING SYSTEM
Vehicle Speed Signal Inspection
EHS000GZ
1. COMBINATION METER CHECK
Check the speed meter in combination meter operates normally.
OK or NG
OK >> GO TO 2.
NG >> Check combination meter system. Refer to DI-12, "
SYMPTOM CHART" (LHD models) or DI-32,
"SYMPTOM CHART" (RHD models).
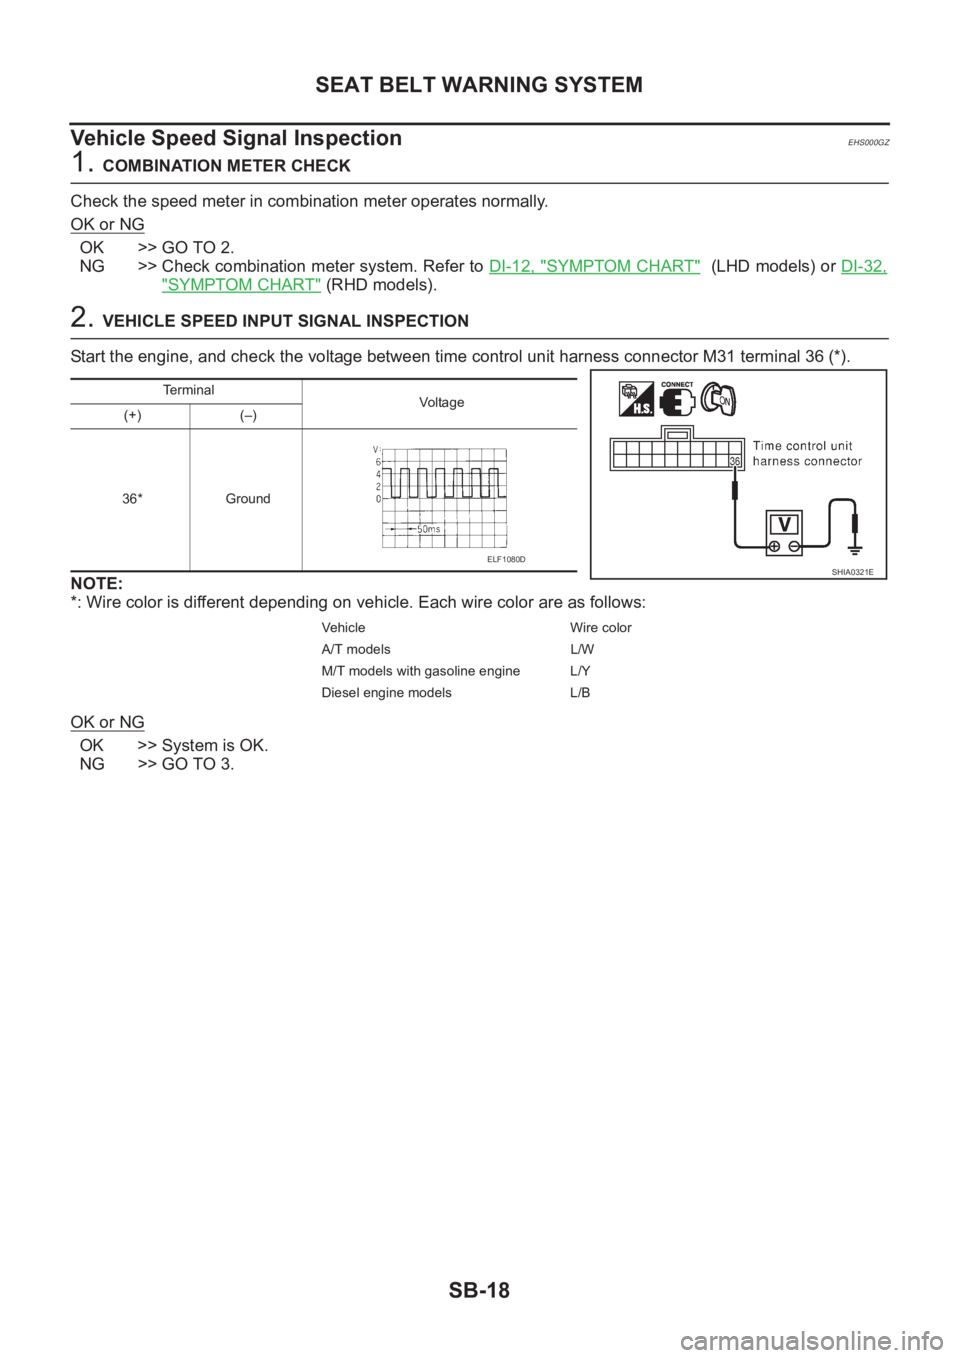
2. VEHICLE SPEED INPUT SIGNAL INSPECTION
Start the engine, and check the voltage between time control unit harness connector M31 terminal 36 (*).
NOTE:
*: Wire color is different depending on vehicle. Each wire color are as follows:
OK or NG
OK >> System is OK.
NG >> GO TO 3.
Terminal
Vo l ta g e
(+) (–)
36* Ground
Vehicle Wire color
A/T models L/W
M/T models with gasoline engine L/Y
Diesel engine models L/B
SHIA0321EELF1080D
Page 3001 of 3833
SEAT BELT WARNING SYSTEM
SB-19
C
D
E
F
G
I
J
K
L
MA
B
SB
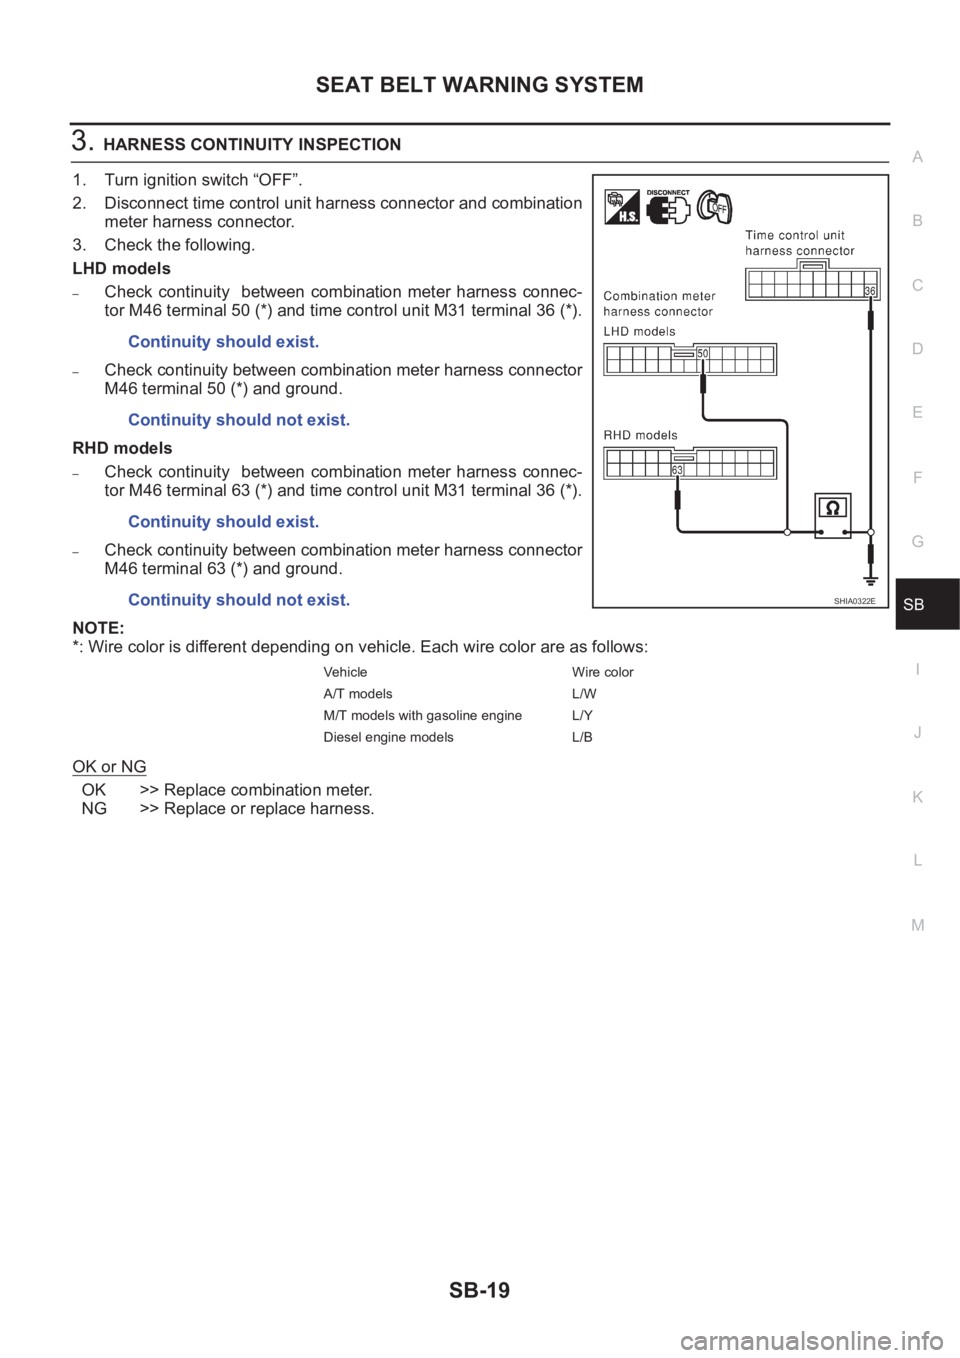
3.HARNESS CONTINUITY INSPECTION
1. Turn ignition switch “OFF”.
2. Disconnect time control unit harness connector and combination
meter harness connector.
3. Check the following.
LHD models
–Check continuity between combination meter harness connec-
tor M46 terminal 50 (*) and time control unit M31 terminal 36 (*).
–Check continuity between combination meter harness connector
M46 terminal 50 (*) and ground.
RHD models
–Check continuity between combination meter harness connec-
tor M46 terminal 63 (*) and time control unit M31 terminal 36 (*).
–Check continuity between combination meter harness connector
M46 terminal 63 (*) and ground.
NOTE:
*: Wire color is different depending on vehicle. Each wire color are as follows:
OK or NG
OK >> Replace combination meter.
NG >> Replace or replace harness.Continuity should exist.
Continuity should not exist.
Continuity should exist.
Continuity should not exist.
Vehicle Wire color
A/T models L/W
M/T models with gasoline engine L/Y
Diesel engine models L/B
SHIA0322E
Page 3002 of 3833

SB-20
SEAT BELT WARNING SYSTEM
Page 3003 of 3833
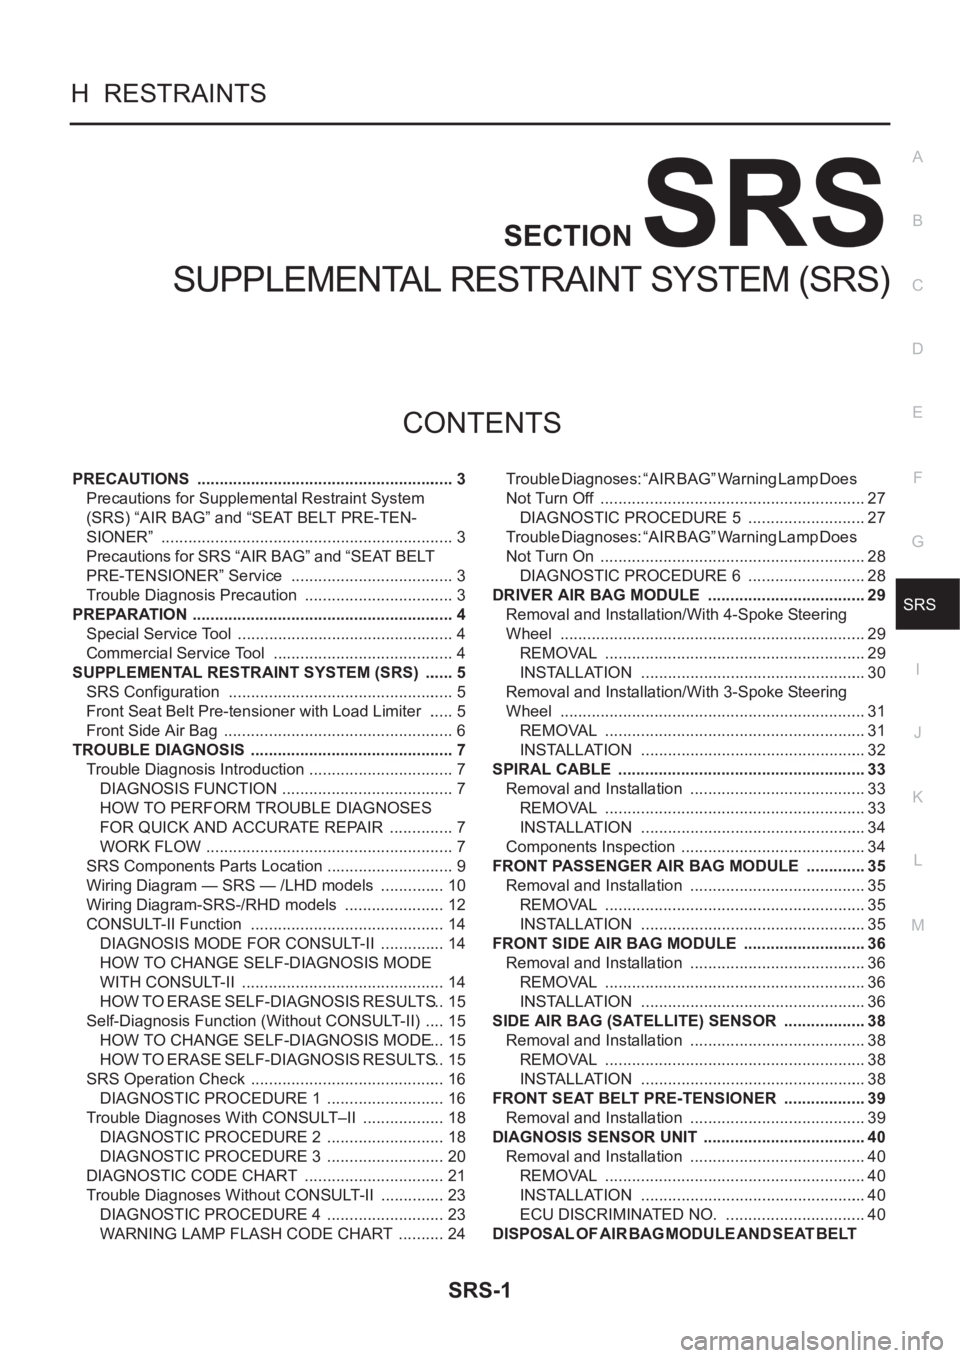
SRS-1
SUPPLEMENTAL RESTRAINT SYSTEM (SRS)
H RESTRAINTS
CONTENTS
C
D
E
F
G
I
J
K
L
M
SECTION
A
B
SRS
SUPPLEMENTAL RESTRAINT SYSTEM (SRS)
PRECAUTIONS .......................................................... 3
Precautions for Supplemental Restraint System
(SRS) “AIR BAG” and “SEAT BELT PRE-TEN-
SIONER” .................................................................. 3
Precautions for SRS “AIR BAG” and “SEAT BELT
PRE-TENSIONER” Service ..................................... 3
Trouble Diagnosis Precaution .................................. 3
PREPARATION ........................................................... 4
Special Service Tool ................................................. 4
Commercial Service Tool ......................................... 4
SUPPLEMENTAL RESTRAINT SYSTEM (SRS) ....... 5
SRS Configuration ................................................... 5
Front Seat Belt Pre-tensioner with Load Limiter ...... 5
Front Side Air Bag .................................................... 6
TROUBLE DIAGNOSIS .............................................. 7
Trouble Diagnosis Introduction ................................. 7
DIAGNOSIS FUNCTION ....................................... 7
HOW TO PERFORM TROUBLE DIAGNOSES
FOR QUICK AND ACCURATE REPAIR ............... 7
WORK FLOW ........................................................ 7
SRS Components Parts Location ............................. 9
Wiring Diagram — SRS — /LHD models ............... 10
Wiring Diagram-SRS-/RHD models ....................... 12
CONSULT-II Function ............................................ 14
DIAGNOSIS MODE FOR CONSULT-II ............... 14
HOW TO CHANGE SELF-DIAGNOSIS MODE
WITH CONSULT-II .............................................. 14
HOW TO ERASE SELF-DIAGNOSIS RESULTS ... 15
Self-Diagnosis Function (Without CONSULT-II) ..... 15
HOW TO CHANGE SELF-DIAGNOSIS MODE ... 15
HOW TO ERASE SELF-DIAGNOSIS RESULTS ... 15
SRS Operation Check ............................................ 16
DIAGNOSTIC PROCEDURE 1 ........................... 16
Trouble Diagnoses With CONSULT–II ................... 18
DIAGNOSTIC PROCEDURE 2 ........................... 18
DIAGNOSTIC PROCEDURE 3 ........................... 20
DIAGNOSTIC CODE CHART ................................ 21
Trouble Diagnoses Without CONSULT-II ............... 23
DIAGNOSTIC PROCEDURE 4 ........................... 23
WARNING LAMP FLASH CODE CHART ........... 24Trouble Diagnoses: “AIR BAG” Warning Lamp Does
Not Turn Off ............................................................ 27
DIAGNOSTIC PROCEDURE 5 ........................... 27
Trouble Diagnoses: “AIR BAG” Warning Lamp Does
Not Turn On ............................................................ 28
DIAGNOSTIC PROCEDURE 6 ........................... 28
DRIVER AIR BAG MODULE .................................... 29
Removal and Installation/With 4-Spoke Steering
Wheel ..................................................................... 29
REMOVAL ........................................................... 29
INSTALLATION ................................................... 30
Removal and Installation/With 3-Spoke Steering
Wheel ..................................................................
... 31
REMOVAL ........................................................... 31
INSTALLATION ................................................... 32
SPIRAL CABLE ........................................................ 33
Removal and Installation ........................................ 33
REMOVAL ........................................................... 33
INSTALLATION ................................................... 34
Components Inspection .......................................... 34
FRONT PASSENGER AIR BAG MODULE .............. 35
Removal and Installation ........................................ 35
REMOVAL ........................................................... 35
INSTALLATION ................................................... 35
FRONT SIDE AIR BAG MODULE ............................ 36
Removal and Installation ........................................ 36
REMOVAL ........................................................... 36
INSTALLATION ................................................... 36
SIDE AIR BAG (SATELLITE) SENSOR ................... 38
Removal and Installation ........................................ 38
REMOVAL ........................................................... 38
INSTALLATION ................................................... 38
FRONT SEAT BELT PRE-TENSIONER ................... 39
Removal and Installation ........................................ 39
DIAGNOSIS SENSOR UNIT ..................................... 40
Removal and Installation ........................................ 40
REMOVAL ........................................................... 40
INSTALLATION ................................................... 40
ECU DISCRIMINATED NO. ................................ 40
DISPOSAL OF AIR BAG MODULE AND SEAT BELT
Page 3004 of 3833

SRS-2
PRE-TENSIONER .................................................. ... 41
Caution for Air Bag Module and Seat Belt Pre-ten-
sioner ...................................................................... 41
CHECKING DEPLOYMENT TOOL ..................... 41
DEPLOYMENT PROCEDURES FOR AIR BAG
MODULE (OUTSIDE OF VEHICLE) ................... 42
DEPLOYMENT PROCEDURES FOR SEAT
BELT PRE-TENSIONER (OUTSIDE OF VEHI-
CLE) .................................................................... 45
DEPLOYMENT OF AIR BAG MODULE AND
SEAT BELT PRE-TENSIONER WHILE
MOUNTED IN VEHICLE ..................................... 45
DISPOSING OF AIR BAG MODULE AND SEAT
BELT PRE-TENSIONER ..................................... 46COLLISION DIAGNOSIS .......................................... 47
For Frontal Collision ................................................ 47
WHEN SRS (EXCEPT THE FRONT SIDE AIR
BAG) IS ACTIVATED IN A COLLISION: .............. 47
WHEN SRS IS NOT ACTIVATED IN A COLLI-
SION: ................................................................... 47
SRS INSPECTION (FOR FRONTAL COLLI-
SION) ................................................................... 47
For Side Collision .................................................... 48
WHEN THE SIDE AIR BAG IS ACTIVATED IN
THE SIDE COLLISION: ....................................... 48
WHEN SRS IS NOT ACTIVATED IN THE SIDE
COLLISION: ......................................................... 48
SRS INSPECTION (FOR SIDE COLLISION) ...... 49
Page 3005 of 3833
PRECAUTIONS
SRS-3
C
D
E
F
G
I
J
K
L
MA
B
SRS
PRECAUTIONSPFP:00001
Precautions for Supplemental Restraint System (SRS) “AIR BAG” and “SEAT
BELT PRE-TENSIONER”
EHS000QI
The Supplemental Restraint System such as “AIR BAG” and “SEAT BELT PRE-TENSIONER”, used along
with a front seat belt, helps to reduce the risk or severity of injury to the driver and front passenger for certain
types of collision. Information necessary to service the system safely is included in the SRS and SB section of
this Service Manual.
WARNING:
●To avoid rendering the SRS inoperative, which could increase the risk of personal injury or death
in the event of a collision which would result in air bag inflation, all maintenance must be per-
formed by an authorized NISSAN/INFINITI dealer.
●Improper maintenance, including incorrect removal and installation of the SRS, can lead to per-
sonal injury caused by unintentional activation of the system. For removal of Spiral Cable and Air
Bag Module, see the SRS section.
●Do not use electrical test equipment on any circuit related to the SRS unless instructed to in this
Service Manual. SRS wiring harnesses can be identified by yellow and/or orange harness connec-
tors.
Precautions for SRS “AIR BAG” and “SEAT BELT PRE-TENSIONER” ServiceEHS000BH
●Do not use electrical test equipment to check SRS circuits unless instructed to in this Service Manual.
●Before servicing the SRS, turn ignition switch “OFF”, disconnect both battery cables and wait at least 3
minutes.
For approximately 3 minutes after the cables is removed, it is still possible for the air bag and seat belt
pre-tensioner to deploy. Therefore, do not work on any SRS connectors or wires until at least 3 minutes
have passed.
●Diagnosis sensor unit must always be installed with their arrow marks “⇐” pointing towards the front of the
vehicle for proper operation. Also check diagnosis sensor unit for cracks, deformities or rust before instal-
lation and replace as required.
●The spiral cable must be aligned with the neutral position since its rotations are limited. Do not attempt to
turn steering wheel or column after removal of steering gear.
●Handle air bag module carefully. Always place driver and front passenger air bag modules with the pad
side facing upward and place front side air bag module standing with stud bolt side setting bottom.
●Conduct self-diagnosis to check entire SRS for proper function after replacing any components.
●After air bag inflates, the front instrument panel assembly should be replaced if damaged.
Trouble Diagnosis PrecautionEHS000BI
When you read wiring diagrams, refer to the followings:
●“HOW TO READ WIRING DIAGRAMS” in GI section
●PG-2, "POWER SUPPLY ROUTING" in PG section
When you perform trouble diagnosis, refer to the followings:
●“HOW TO FOLLOW TEST GROUP IN TROUBLE DIAGNOSIS” in GI section
●“HOW TO PERFORM EFFICIENT DIAGNOSIS FOR AN ELECTRICAL INCIDENT” in GI section
Check for any service bulletins before servicing the vehicle.